How to Configure Single Sign-On (SSO) on IGEL OS 12
With IGEL OS 12, you can use Single Sign-On (SSO) via a cloud-based identity provider (IdP) to access the local device and apps.
The following identity providers are supported:
Okta
Microsoft Entra ID (formerly known as Microsoft Azure AD)
Ping Identity | PingOne
VMware Workspace ONE Access
Generally, IGEL OS 12 supports OpenID Connect authentication. For IdPs that adhere closely to this standard, there is a good chance that they can be used with IGEL OS 12.
Generally, you can edit the IGEL OS 12 device configuration as follows:
via the IGEL UMS Web App:
Configuration > Create new profile

(You select one or several apps that will be configured by the profile. If the IGEL OS base system app is selected, all other apps are shown under the tab "Apps"; if not, each app is displayed as a separate tab)
Apps > [name of the app] > Create new profile (used to quickly configure a profile for the selected app. It is also possible to add other apps that will be configured by this profile)
Devices > [name of the device] > Edit Configuration (shows all installed apps. Apps are displayed under the tab "Apps")
via IGEL Setup locally on the device (shows all installed apps. Apps are displayed under the tab "Apps")
The best practice to configure your devices is via profiles. For details on how to create profiles, see Creating a Profile.
Apps and Utilities for IGEL OS 12 That Support SSO with Microsoft Entra ID
IGEL Azure Virtual Desktop Client (AVD)
Zoom client (SSO via Chromium)
Web apps, e. g. Office 365 (SSO via Chromium)
Device login
Screenlock
Apps and Utilities for IGEL OS 12 That Support SSO with Okta
Web apps, e. g. Okta portal (SSO via Chromium)
Device login
Screenlock
Apps and Utilities for IGEL OS 12 That Support SSO with Ping Identity / PingOne
Web apps (SSO via Chromium)
Device login
Screenlock
Apps and Utilities for IGEL OS 12 That Support SSO with VMware Workspace ONE Access
VMware Horizon (if Chromium is used for authentication)
Web apps (SSO via Chromium)
Device login
Screenlock
Apps and Utilities for IGEL OS 12 That Support SSO with Other IdPs
Web apps (SSO via Chromium)
Device login
Screenlock
Setting up SSO with Microsoft Entra ID
To enable SSO with Entra ID on IGEL OS 12 devices, an Entra application must be registered first. Then, you can configure IGEL OS 12 to use this application for authentication; the Entra application is referenced via its Public Client Identifier.
Registering an Entra Application
In your Entra AD Portal, go to App registrations > New registration.
Edit the data as follows and then click Register:
Add a proper name for the application. Note that this name will be visible to the user once during the consent process for granting permissions. In our example, "IGEL OS Single sign-on" is used as the name.
Select the option Accounts in this organizational directory only ([name of your organization's AD Portal] only - Single tenant).
Under Redirect URI (optional), select the option Public client/native (mobile & desktop) and enter "http://localhost/callback" as the URI.

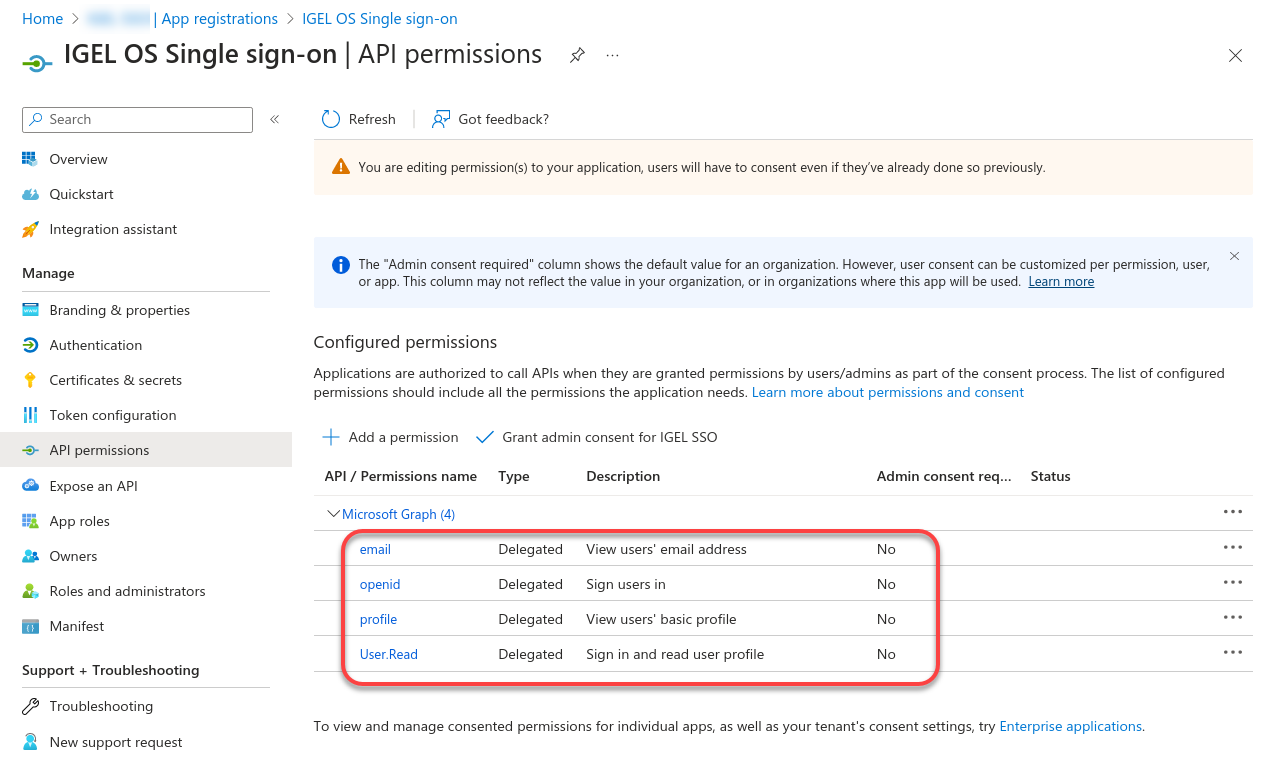
Check if the User.Read permission is granted.

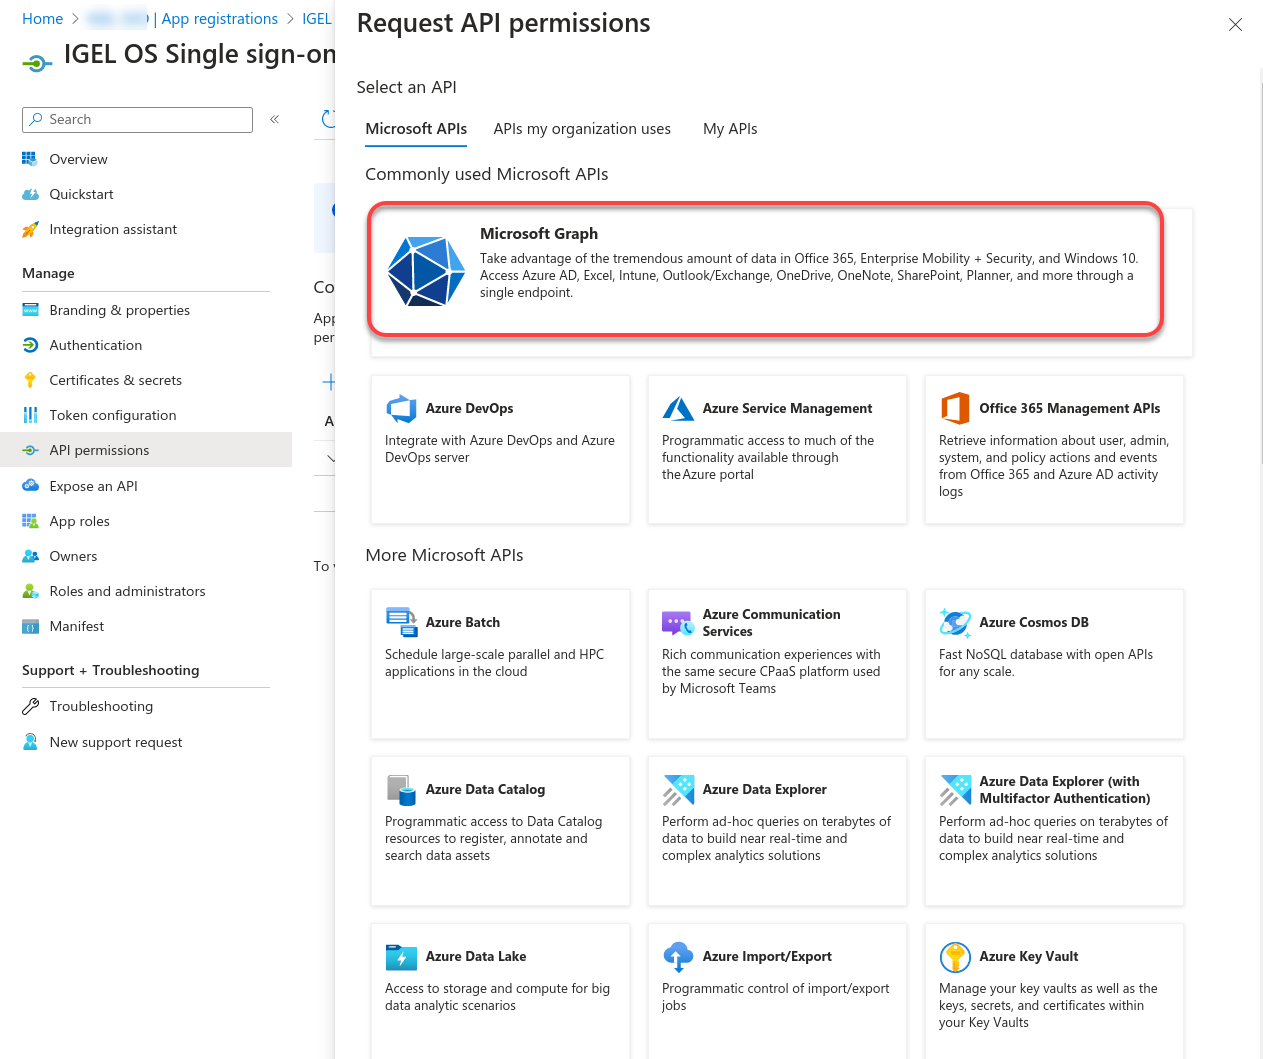
Click Add a permission.

Select Microsoft Graph.
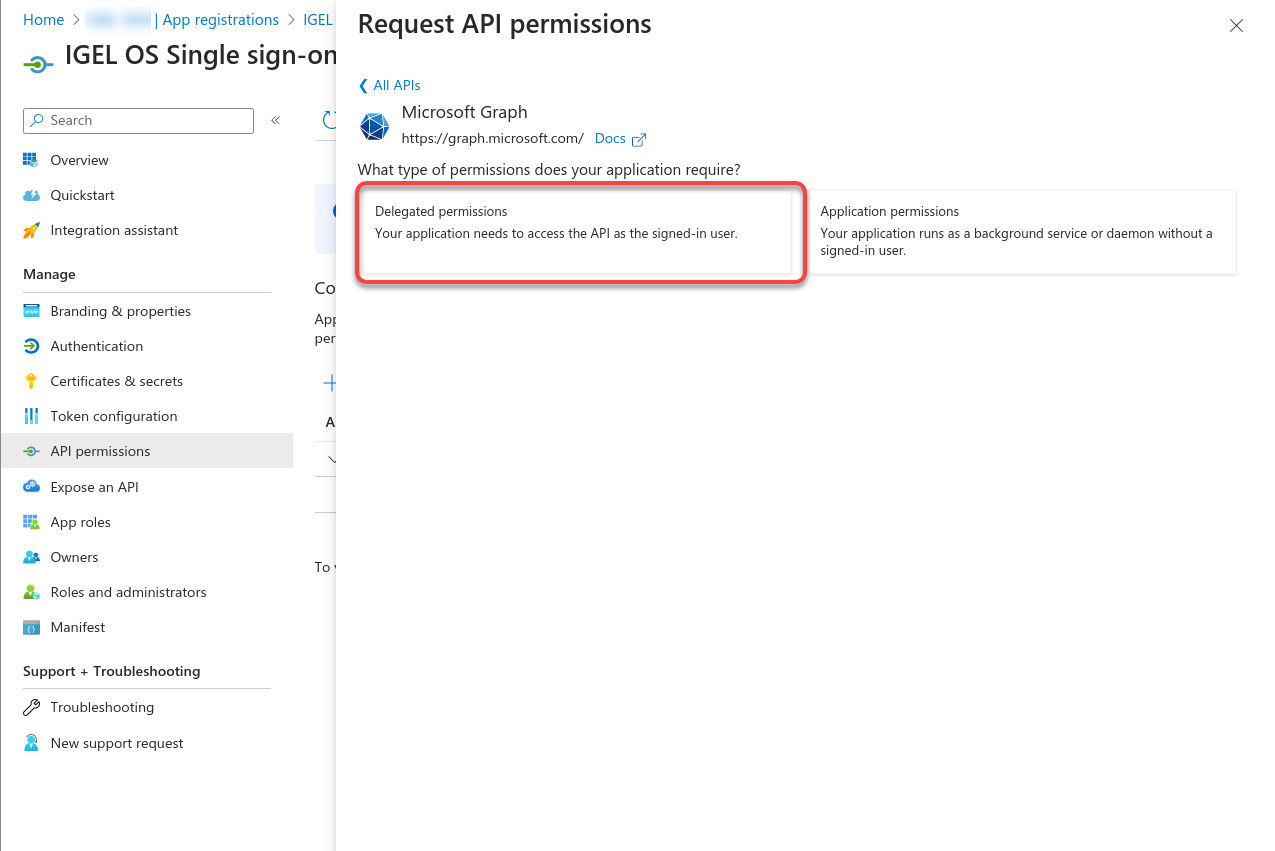
Select Delegated permissions.
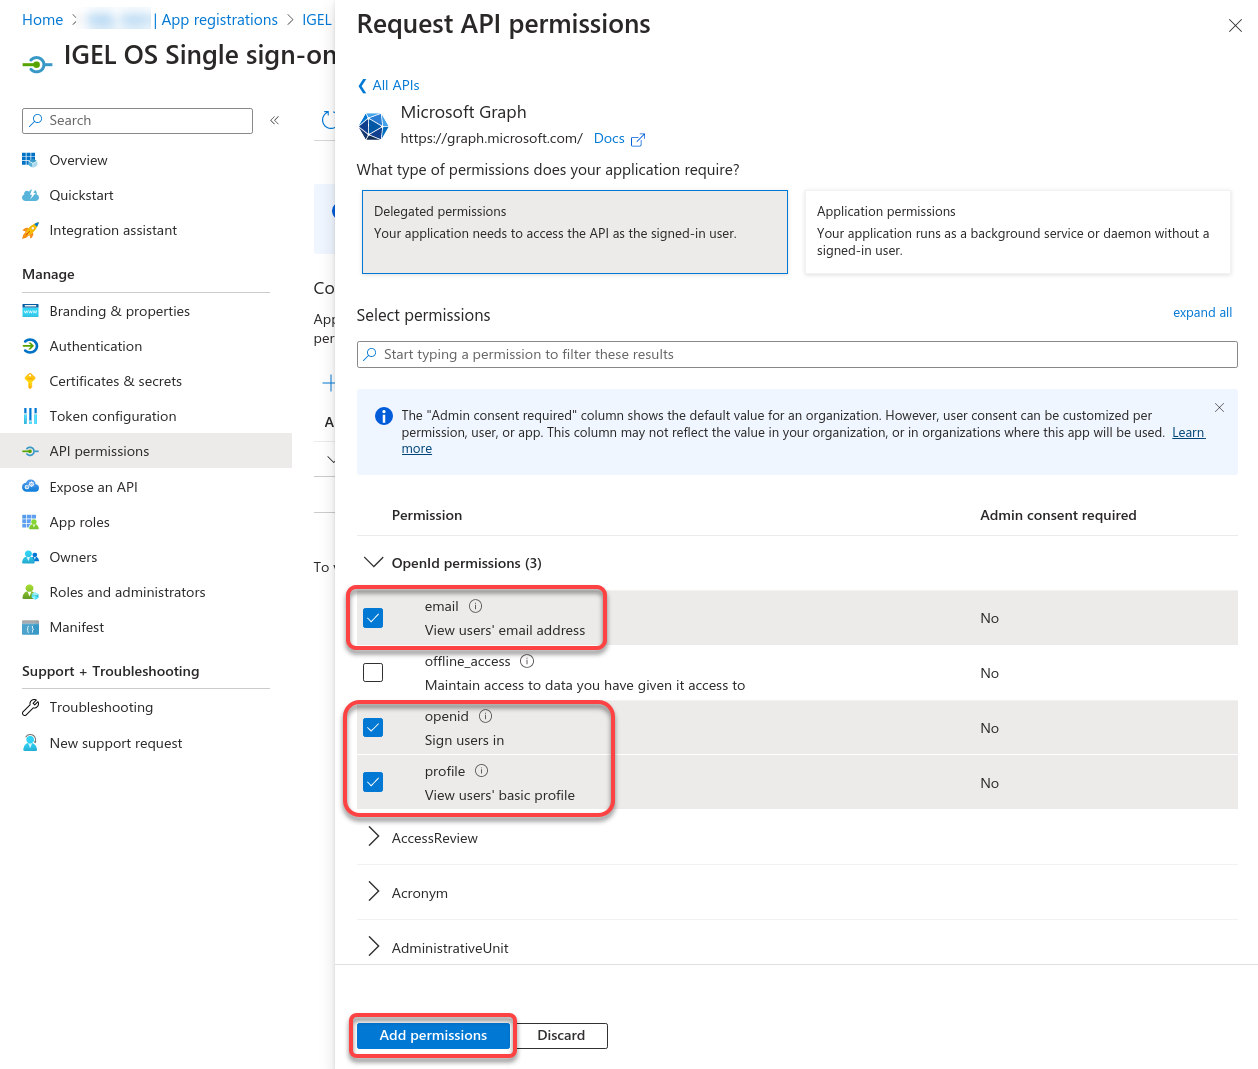
Enable the following permissions and then click Add permissions:
email
openid
profile
Check if the permissions are correct.
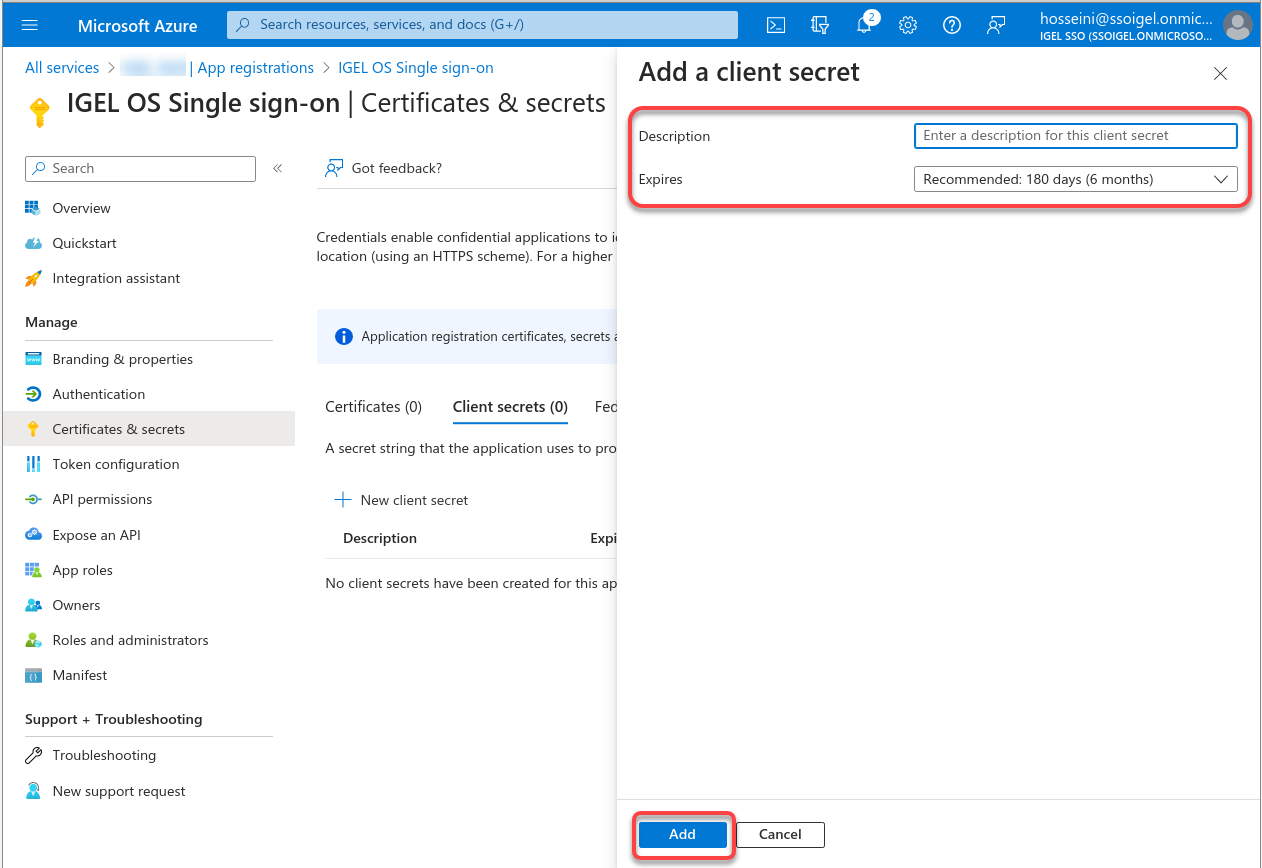
Go to Certificates & secrets and click New client secret.

Enter a Description, define when the secret Expires, and then click Add.
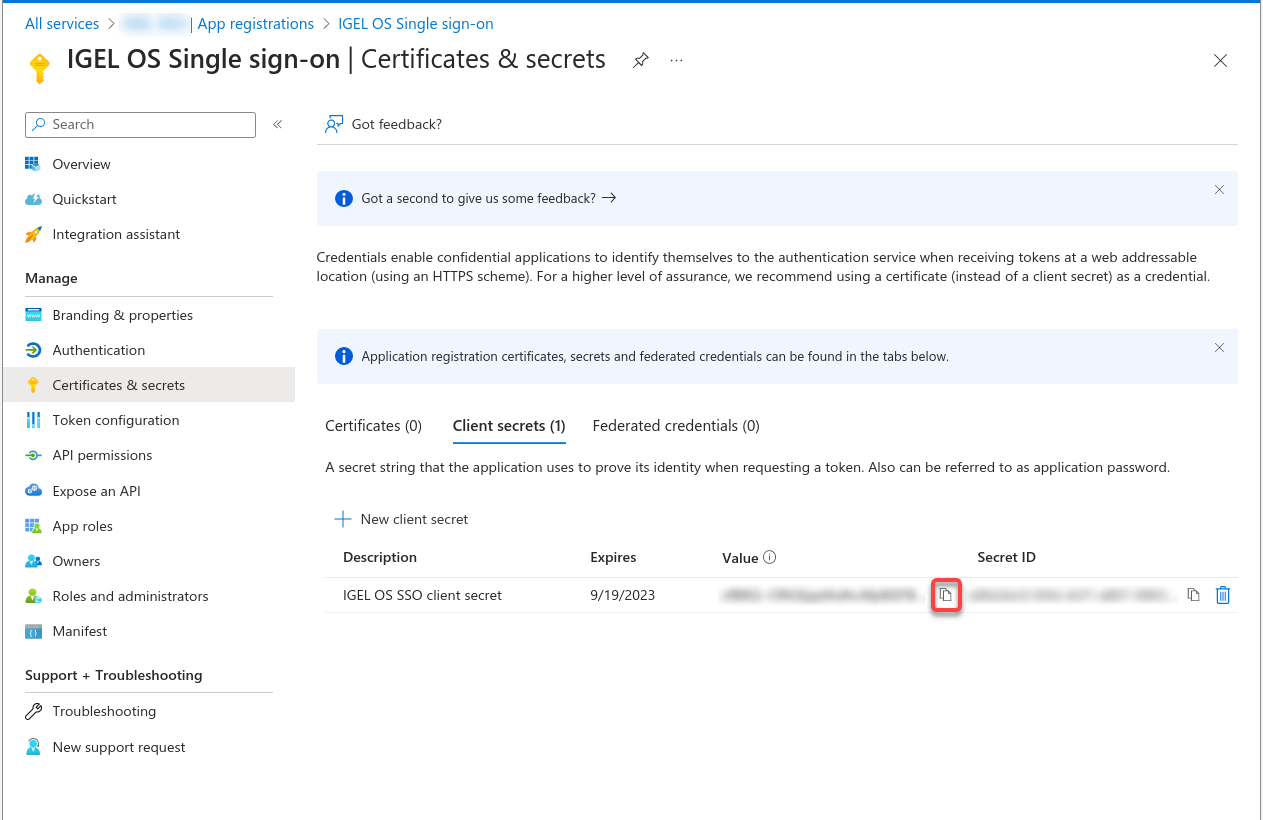
Copy the Value of the client secret.
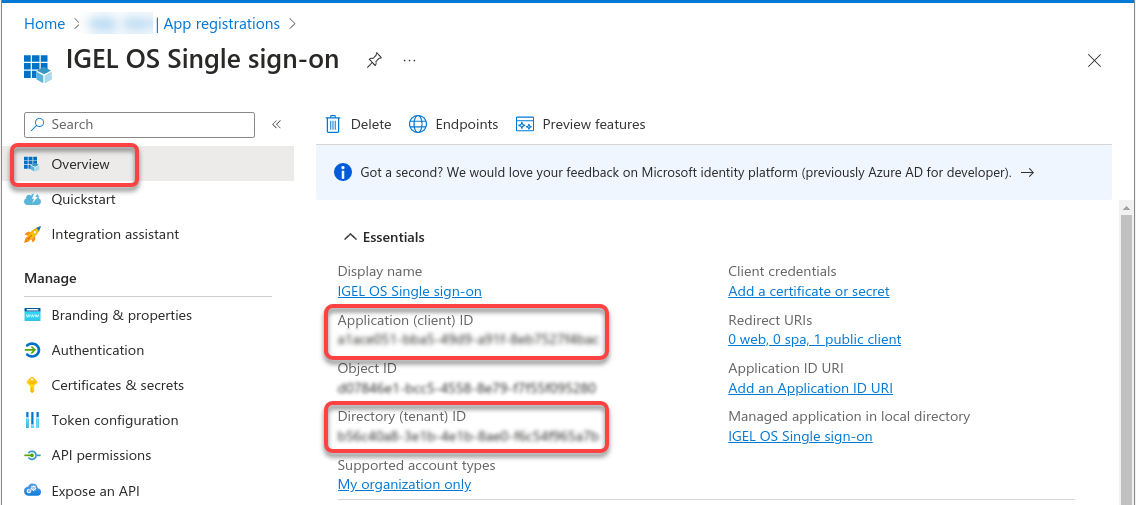
Go to Overview and copy the Application (client) ID and the Directory (tenant) ID. In the IGEL OS configuration, these values will be used as the Public client identifier (client/application ID) and the Azure ID Tenant Name/ID.
Configuring IGEL OS for SSO with Entra ID
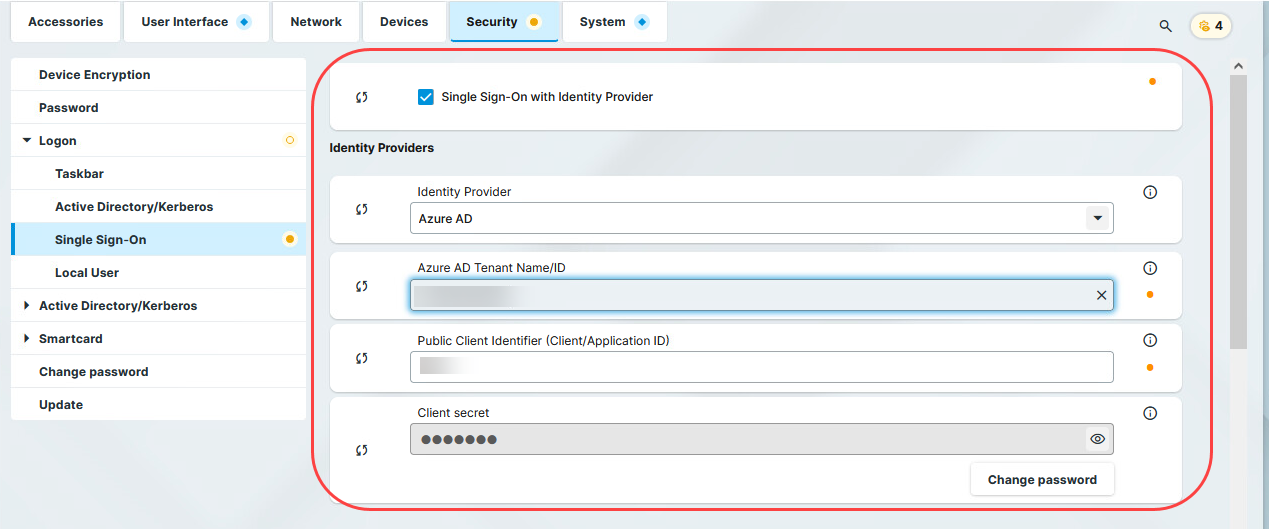
Go to Security > Logon > Single Sign-On and edit the settings as follows:
Enable Single Sign-On with Identity Provider.
Set Identity Provider to Azure ID.
Enter the Azure AD Tenant Name/ID. This is the value you have obtained as Directory (tenant) ID in Azure AD Portal.
Set the appropriate Application (client) ID. You have obtained this value as Application (client) ID in your Azure AD Portal.
Enter the Client secret.
If you want to use an automatic desktop login with predefined credentials that are stored securely on your endpoint device:
- Enable Automatically perform login.
- Under Username for autologin, enter a user's name known to your IdP.
- Under Password for autologin, enter the enter the corresponding password.
Click Save or Save and close.
The desktop of the device is terminated. The login screen is displayed.
You can now use the apps and utilities for IGEL OS 12 that support SSO with Entra AD.
For details on importing apps from the IGEL App Portal and installing them on IGEL OS devices, see IGEL UMS 12: Basic Configuration and Assignment of Apps and Profiles.
All methods of multi-factor authentication are available except the hardware token.
Configuring SSO with Okta
Registering an Application in Okta
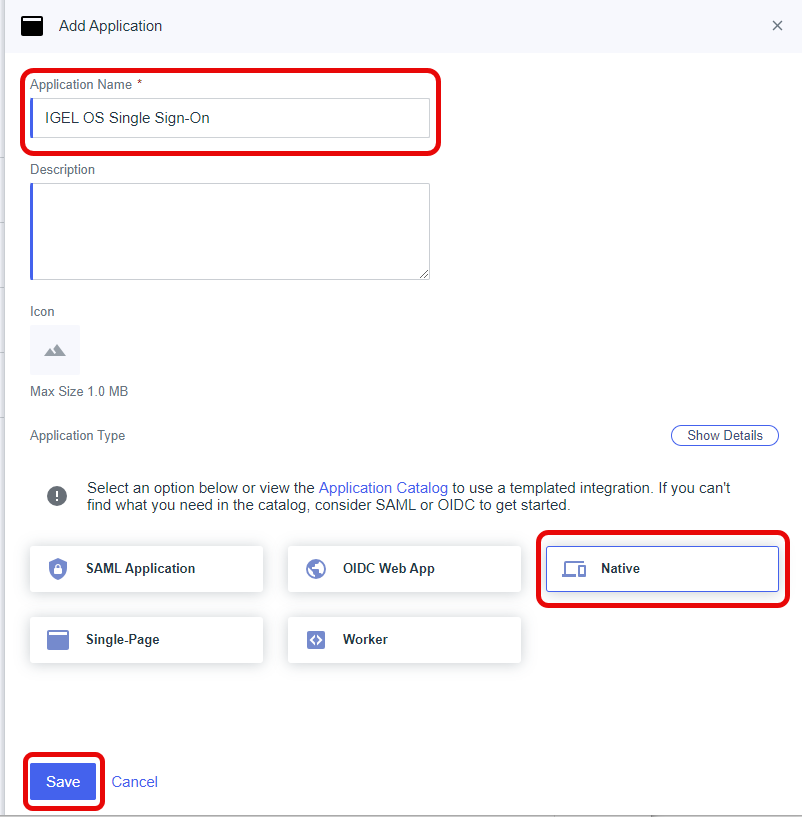
Log in to Okta with your admin account, and from the Applications menu, select Applications > Create App Integration.

Edit the settings as follows and then click Next.
Set Sign-in method to OIDC - OpenID Connect.
Set Application type to Native Application.

Edit the settings as follows and then click Save.
Under App integration name, enter a name for your application, e.g. "IGEL OS Single sign-on".
Make sure that as the Grant type, the option Authorization Code is selected.
Under Sign-in redirect URIs, enter "http://localhost/callback".

The app integration is created.
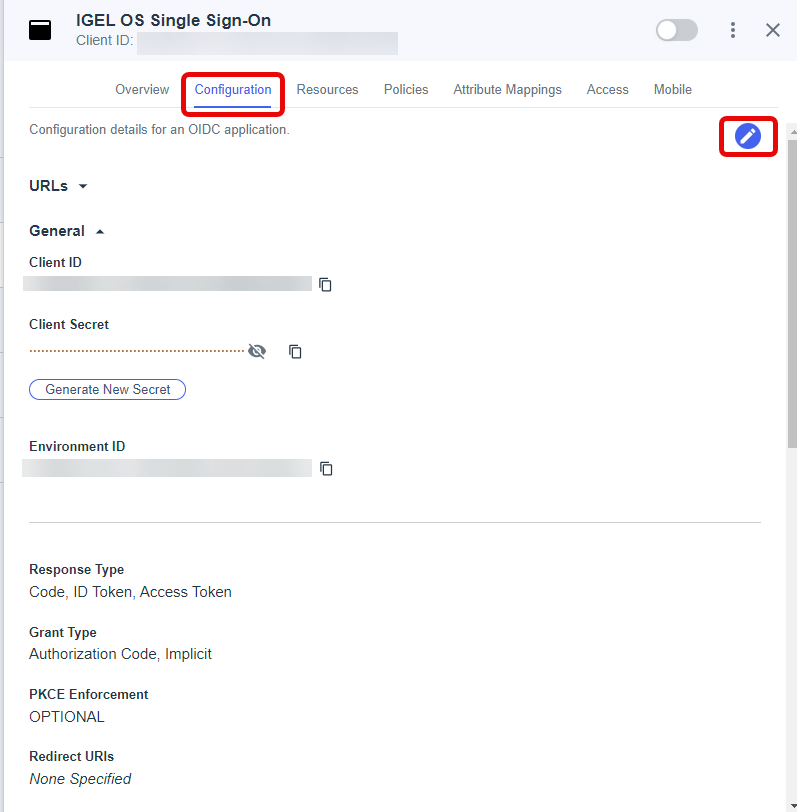
Select the General tab and then click Edit.

Under Client authentication, select Client secret and make sure that under Proof Key for Code Exchange (PKCE), Require PKCE as additional verification is enabled. Afterward, click Save.

The client secret will be created.Copy the Client ID and the Secret (client secret).

Configuring IGEL OS for SSO with Okta
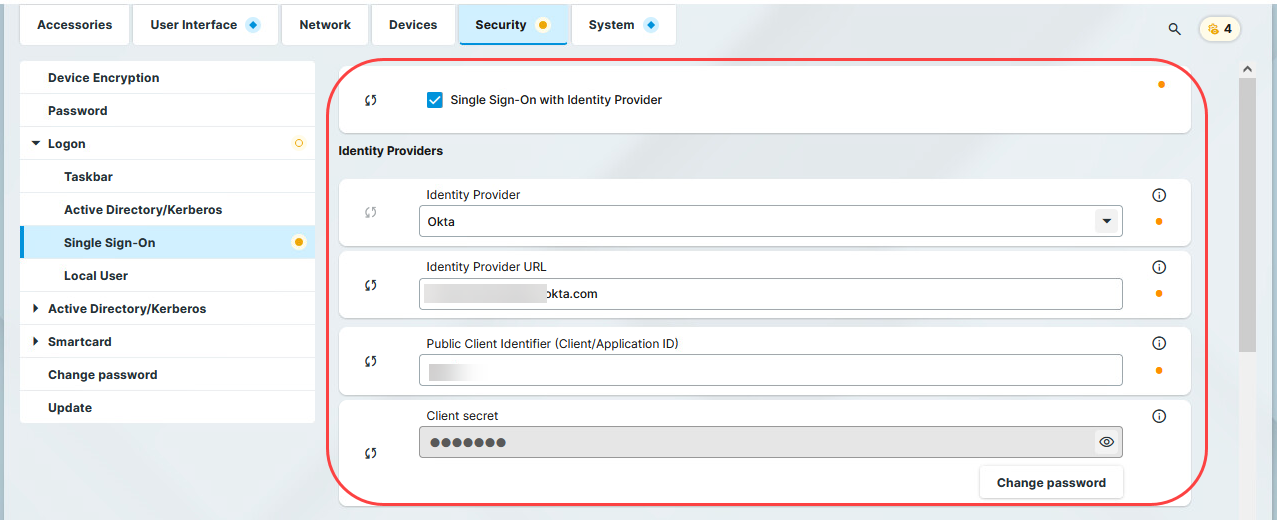
Go to Security > Logon > Single Sign-On and edit the settings as follows:
Enable Single Sign-On with Identity Provider.
Set Identity Provider to Okta.
Provide the Okta URL for your user. This is the Okta organization URL. Example: "https://mycompany.okta.com/"
Provide the Client ID. This is the client ID that was created in Okta.
Provide the Client secret.
If you want to use an automatic desktop login with predefined credentials that are stored securely on your endpoint device:
- Enable Automatically perform login.
- Under Username for autologin, enter a user's name known to your IdP.
- Under Password for autologin, enter the enter the corresponding password.
Click Save or Save and close.
The desktop of the device is terminated after the profile is applied. The login screen is displayed.
You can now use the apps and utilities for IGEL OS 12 that support SSO with Okta.
If you want to use multi-factor authentication, you can configure this in the Okta console. The available methods are Google Authenticator, E-Mail, and Okta Verify.
Setting up SSO with Ping Identity / PingOne
Setting up Your Application
Log in to your PingIdentity account, go to Applications, and click the add symbol to create a new application.

Provide an Application Name, select Native as the Application Type, and click Save.
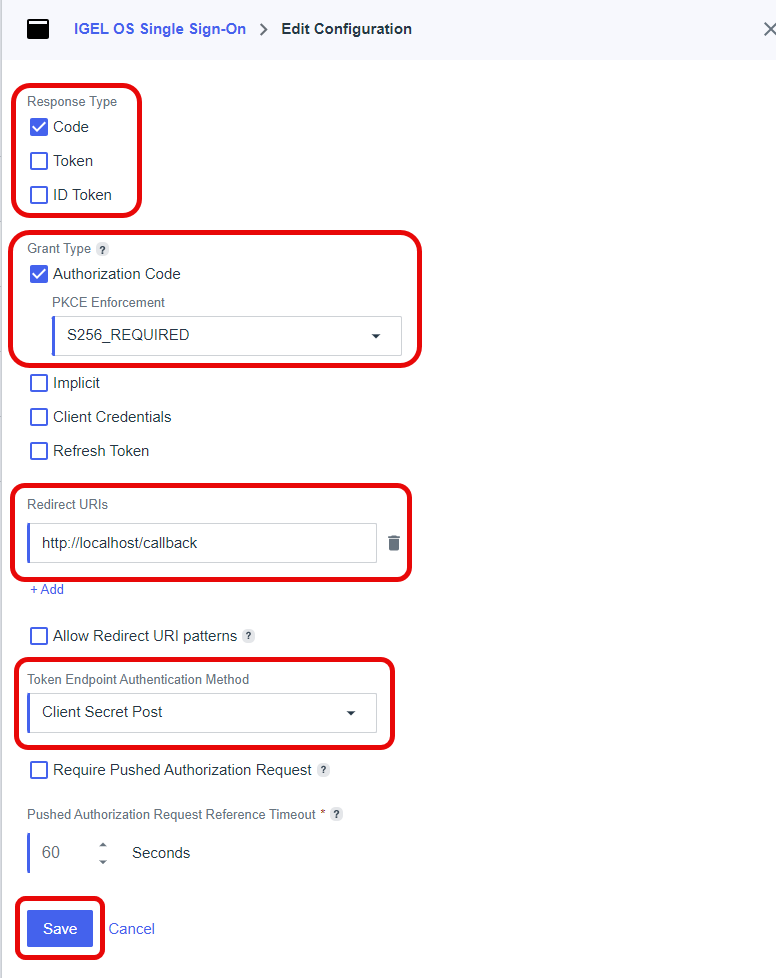
Select the Configuration tab and click the edit button.
Edit the configuration as described below and click Save.
Response Type: Select Code.
Grant Type: Select Authorization Code and set PKCE Enforcement to S256_REQUIRED.
Redirect URIs: Enter
http://localhost/callbackToken Endpoint Authentication Methods: Select Client Secret Post.
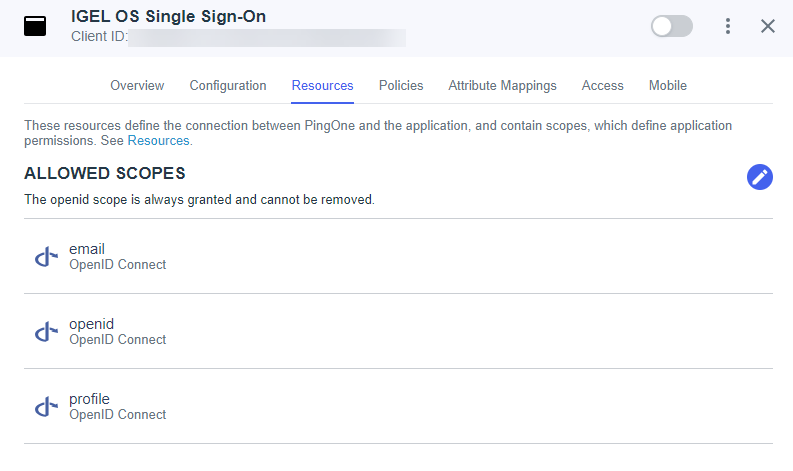
Select the Resources tab and click the edit button.
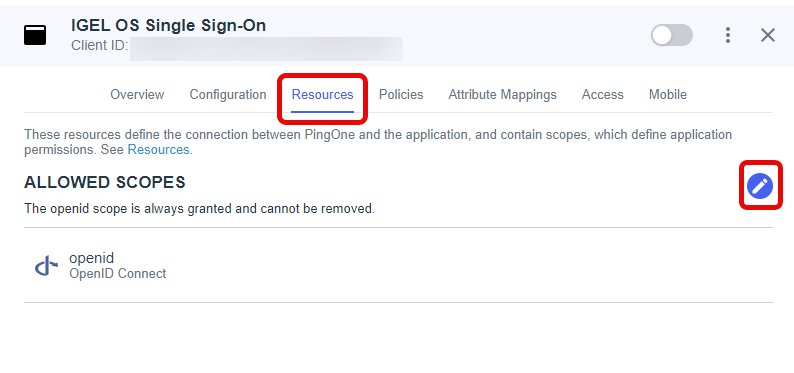
Ensure that the following resource scopes are activated and click Save.
email
openid
profile

Review the list of ALLOWED SCOPES.
Select the Configuration tab and copy the following data for later use:
Client ID
Client Secret
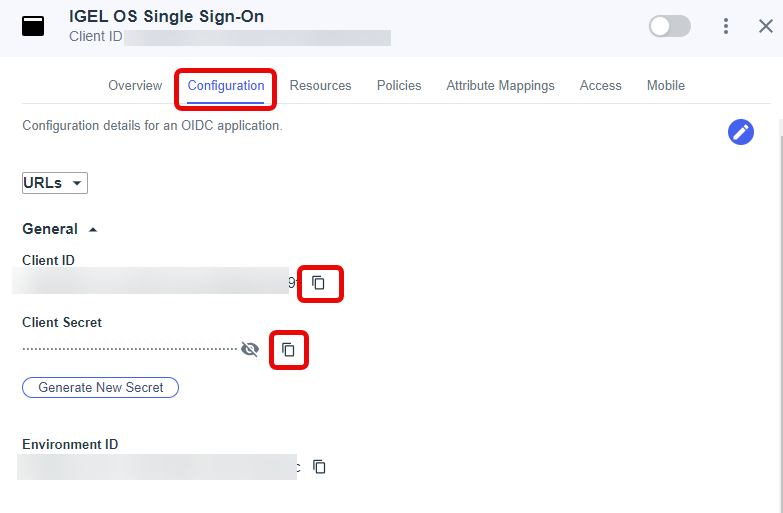
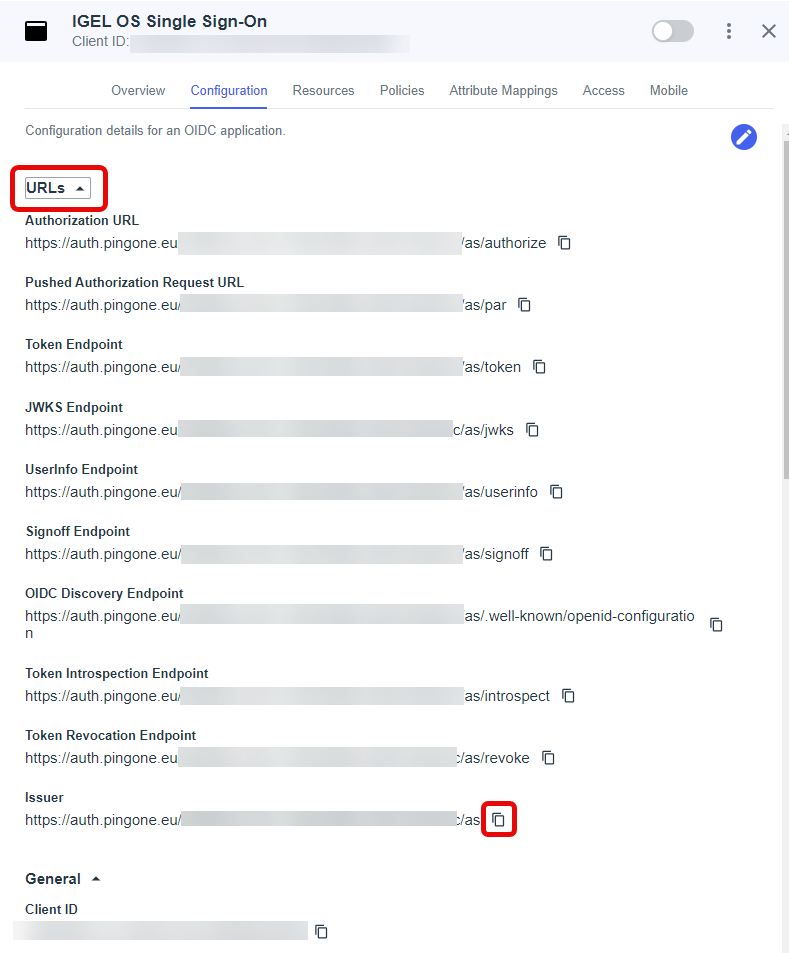
Expand the list of URLs and copy the Issuer URL for later use.
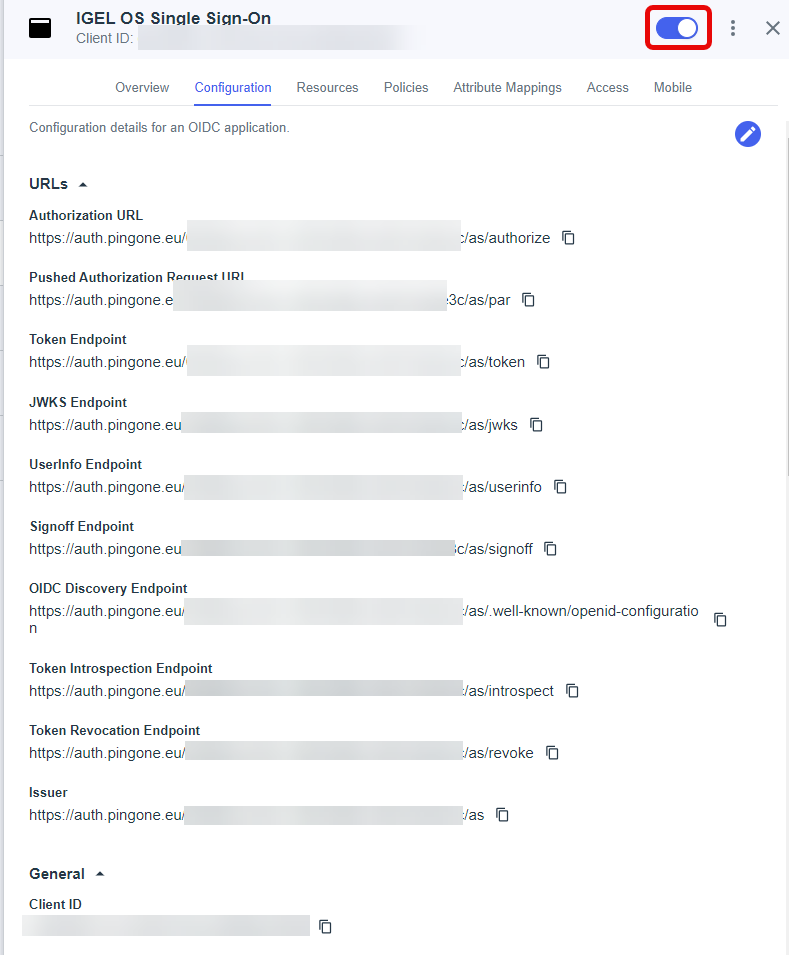
Activate your application.
Configuring IGEL OS for SSO with Ping Identity / PingOne
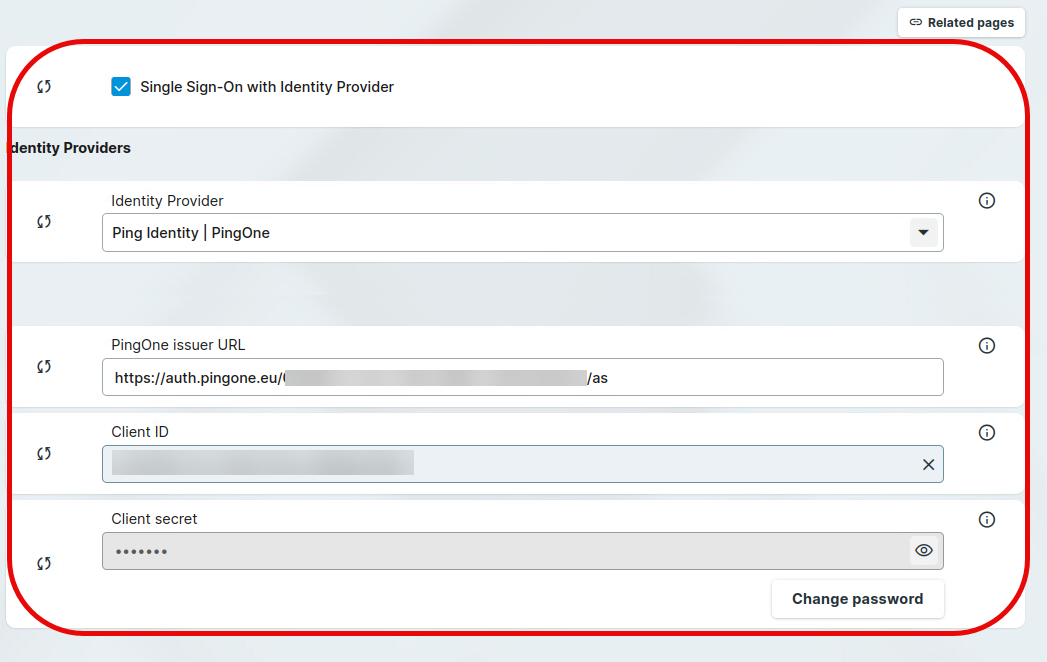
Go to Security > Logon > Single Sign-On and edit the settings as follows:
Enable Single Sign-On with Identity Provider.
Set Identity Provider to Ping Identity | PingOne.
Provide the PingOne issuer URL for your user. This is the Issuer URL provided in the Ping Identity configuration portal. Example:
https://auth.pingone.eu/0815abc-xyz123456/asProvide the Client ID. This is the client ID that was created in Ping Identity.
Provide the Client secret.
If you want to use an automatic desktop login with predefined credentials that are stored securely on your endpoint device:
- Enable Automatically perform login.
- Under Username for autologin, enter a user's name known to your IdP.
- Under Password for autologin, enter the enter the corresponding password.
Click Save or Save and close.
The desktop of the device is terminated after the profile is applied. The login screen is displayed.
You can now use the apps and utilities for IGEL OS 12 that support SSO with Ping Identity / PingOne.
If you want to use multi-factor authentication, you can configure this in the Ping Identity console.
Setting up SSO with VMware Workspace ONE Access
Registering an Application in VMware Workspace ONE Access
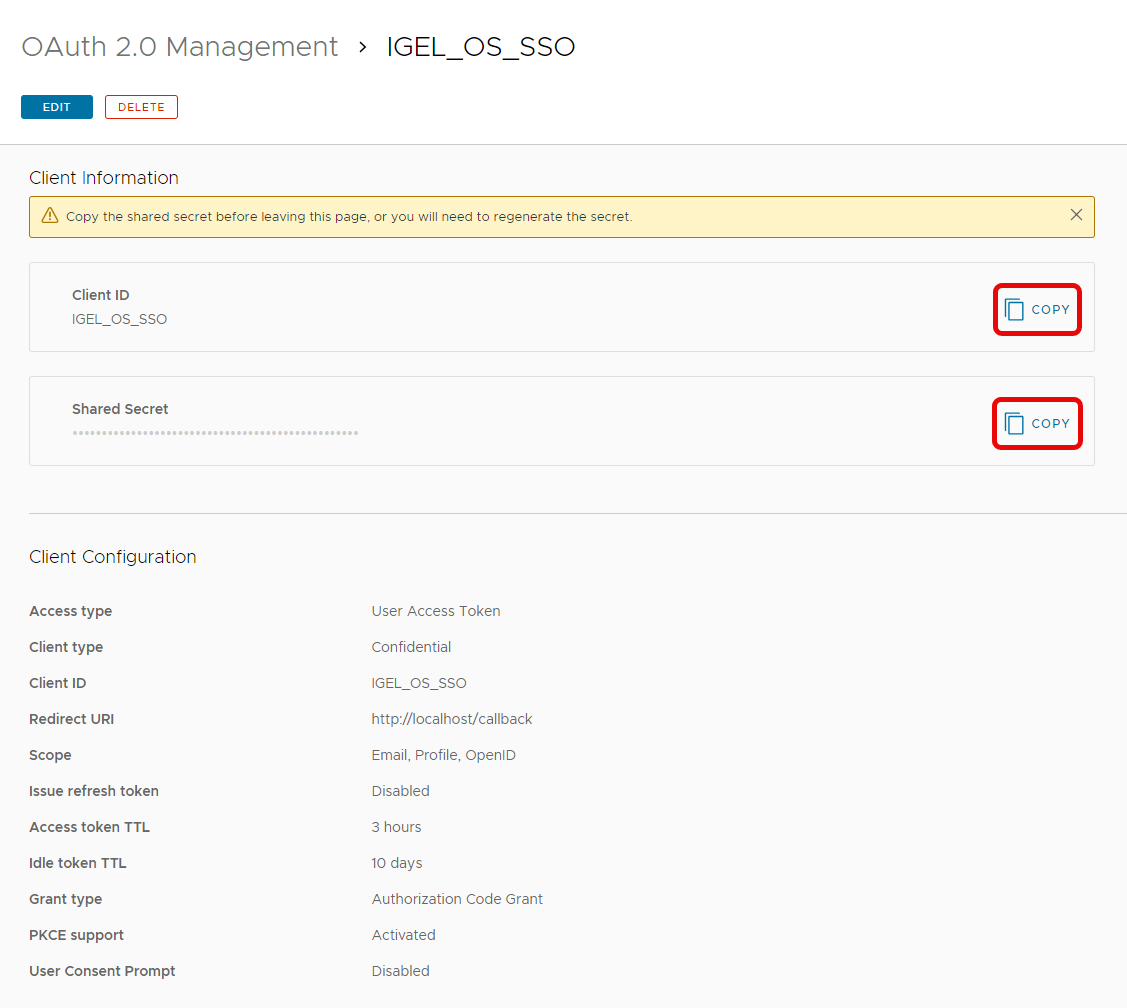
In the VMware Workspace ONE Access console, go to Settings > OAuth 2.0 Management and click Add client.

Set up the client as follows and finally click Save.
Access type: Select User Access Token.
Client type: Select Confidential.
Client ID: Enter a client ID that suits your needs; respect the allowed characters. Example:
IGEL_OS_SSOGrant type: Enable Authorization Code Grant.
Redirect URI: Enter
http://localhost/callbackUser grant: Disable Prompt users for scope acceptance.
Scope: Edit the settings as follows:
Email: Enabled
Profile: Enabled
User: Disabled
NAPPS: Disabled
OpenID: Enabled
Group: Disabled
Admin: Disabled
PKCE support: This option is enabled because Authorization Code Grant is selected as the Grant type.
Issue refresh token: Enable or disable this option according to your needs.
Access token TTL: Adjust the time to live for the authorization token according to your needs.
Idle token TTL: Adjust the time to live for the idle token according to your needs.

Review the settings and copy the following data for later use:
Client ID
Shared Secret
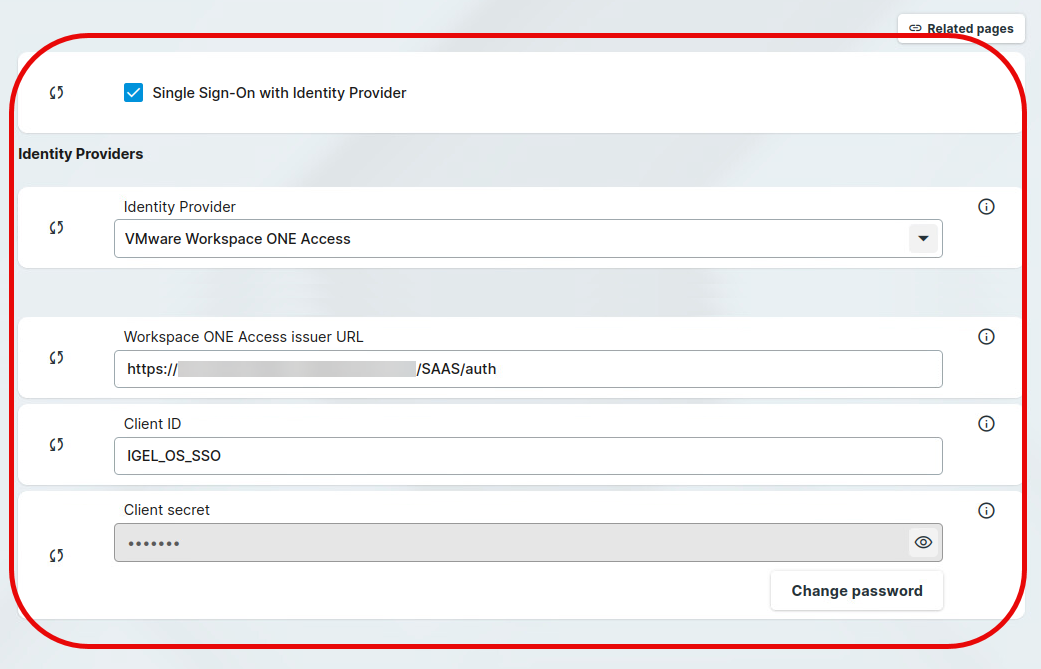
Configuring IGEL OS for SSO with VMware Workspace ONE Access
Go to Security > Logon > Single Sign-On and edit the settings as follows:
Enable Single Sign-On with Identity Provider.
Set Identity Provider to VMware Workspace ONE Access.
Provide the Workspace ONE Access issuer URL for your user. Pattern:
https://<YOUR WORKSPACE ONE ACCESS URL>/SAAS/authProvide the Client ID. This is the client ID that was created in VMware Workspace ONE Access.
Provide the Client secret.
If you want to use an automatic desktop login with predefined credentials that are stored securely on your endpoint device:
- Enable Automatically perform login.
- Under Username for autologin, enter a user's name known to your IdP.
- Under Password for autologin, enter the enter the corresponding password.
Click Save or Save and close.
The desktop of the device is terminated after the profile is applied. The login screen is displayed.
You can now use the apps and utilities for IGEL OS 12 that Support SSO with VMware Workspace ONE Access.
If you want to use multi-factor authentication, you can configure this in the VMware Workspace ONE Access portal.
Configuring SSO with Other IdPs That Use OpenID Connect
For setting up your application or client, the exact procedure depends on the exact OpenID Connect solution you are using. Therefore, the settings in the IdP console can only be described generically.
Setting up Your Application / Client
In your IdP console, edit the parameters as follows (the exact parameter names will probably deviate):
Parameter | Values |
|---|---|
Response type | code |
Scopes | openid, profile, email |
Redirect URI | http://localhost/callback |
Code challenge method | S256 |
Response mode | fragment |
Client authentication | client_secret_post |
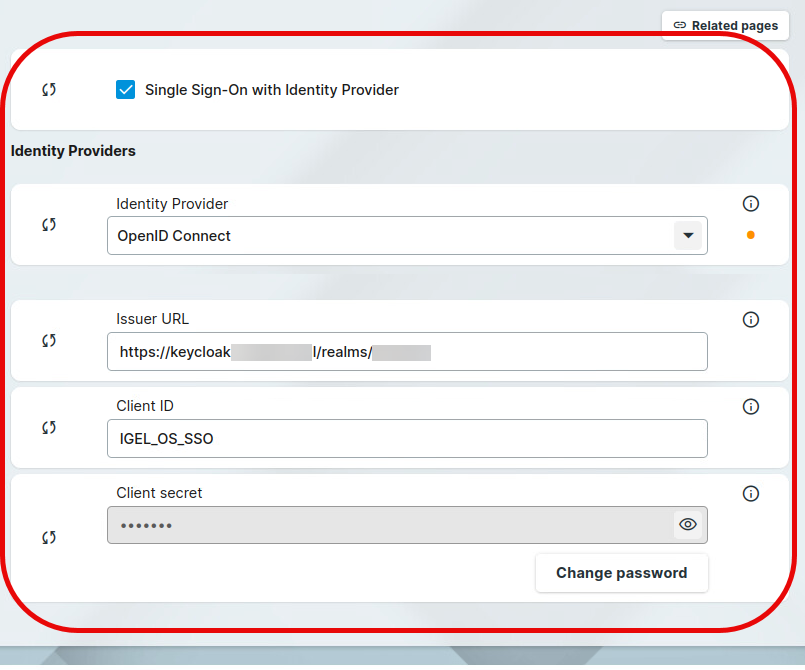
Configuring IGEL OS for SSO with Generic OpenID Connect
Go to Security > Logon > Single Sign-On and edit the settings as follows:
Enable Single Sign-On with Identity Provider.
Set Identity Provider to OpenID Connect.
Provide the Issuer URL for your user. This is the Issuer URL provided in the IdP console. Example for Keycloak: https://keycloak.yourcompany.com/realms/yourrealm
Provide the Client ID. This is the client ID that was created in the IdP console.
Provide the Client secret.
Click Save or Save and close.
The desktop of the device is terminated. The login screen is displayed.
You can now use the apps and utilities for IGEL OS 12 that support SSO with OpenID Connect (generic).
For details on importing apps from the IGEL App Portal and installing them on IGEL OS devices, see IGEL UMS 12: Basic Configuration and Assignment of Apps and Profiles.
For supported multi-factor authentication methods, check the documentation of your IdP.
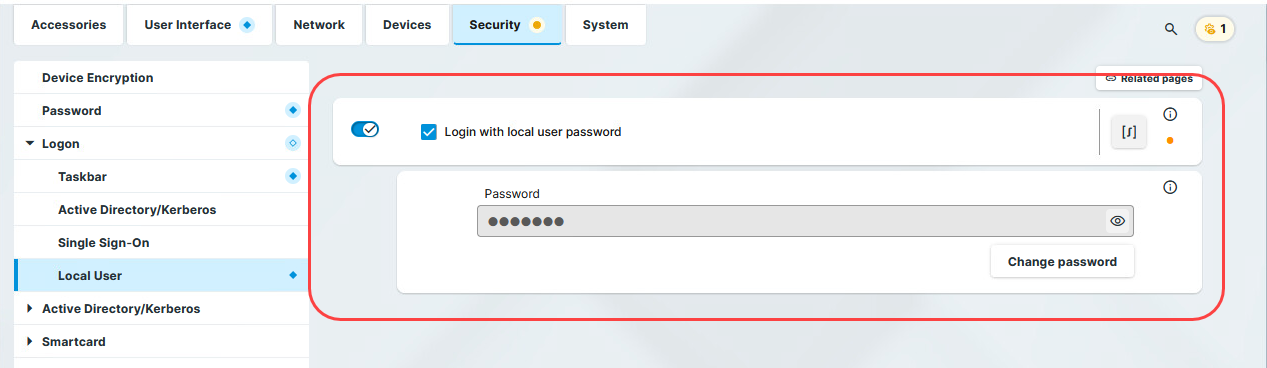
Enabling Local Login (Optional)
To have a fallback option if something goes wrong with SSO, e.g. a network failure, it is recommended to configure local login in addition.
Open the profile configurator and go to Security > Logon > Local user.
Activate Login with local user password and enter a password.