
This article describes how to configure the Citrix Workspace App global settings on IGEL OS using an IGEL UMS profile. The global settings can be found in the Profile Configurator under Apps > Citrix > Global Settings.
For information on creating and configuring a Citrix Workspace App session, see Getting Started with the Citrix Workspace App on IGEL OS.
This article is based on Citrix Workspace App version 2604 BUILD 1.0.
Configuring the Authentication Settings
-
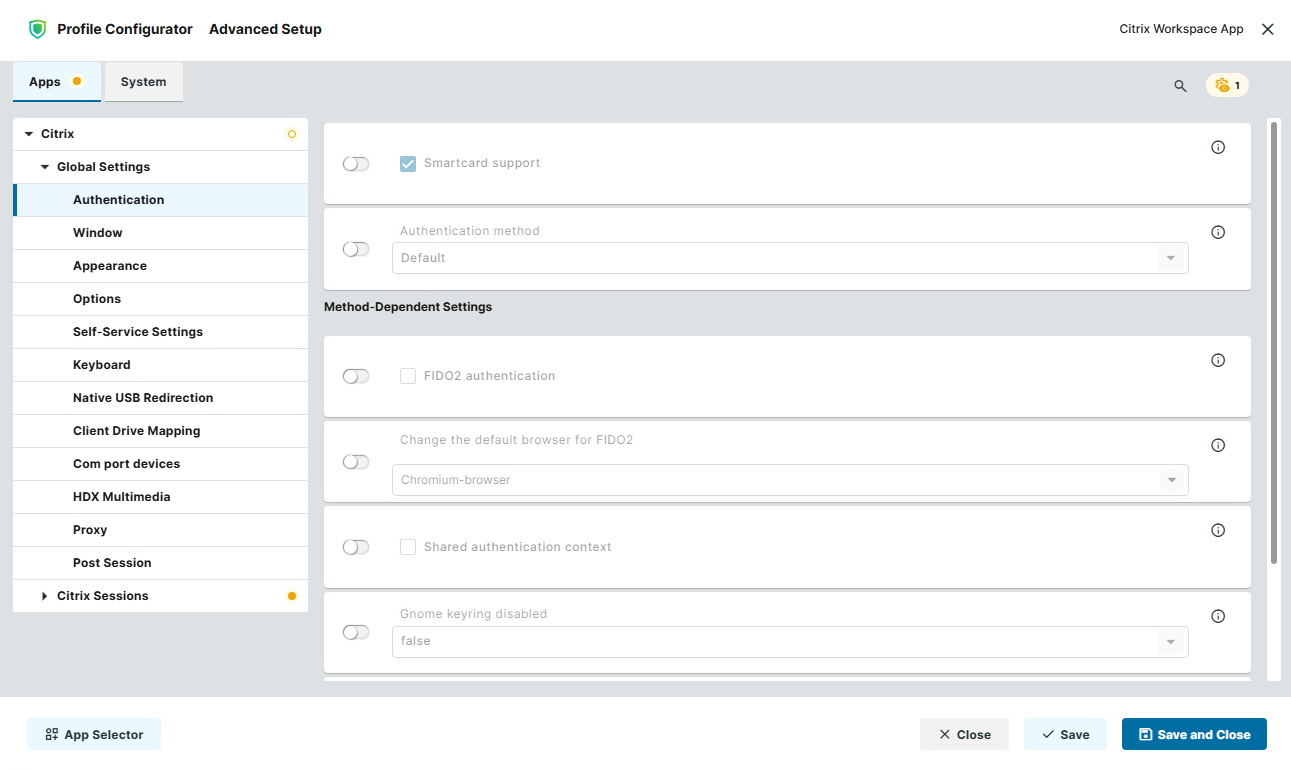
In the Profile Configurator, go to Apps > Citrix > Global Settings > Authentication.
-
Edit the settings according to your needs. The parameters are described in the following.
Smartcard support
- Smart card support for Citrix authentication is enabled. Enabling this option when no smart card is present can cause delays. (Default)
- Smart card support is disabled.
Authentication method
Select the authentication method to configure.
Possible values:
-
Default
-
Entra ID SSO
-
FIDO2
Selecting an Authentication method automatically presets several authentication parameters in the Profile Configurator as shown below. You can change the individual parameter values afterward.
|
Parameter |
Default |
Entra ID SSO |
FIDO2 |
|---|---|---|---|
|
FIDO2 authentication |
Disabled |
Enabled |
Enabled |
|
Change the default browser for FIDO2 |
Chromium-browser |
Chromium-browser |
Chromium-browser |
|
Shared authentication context |
Disabled |
Enabled |
Enabled |
|
Gnome keyring disabled |
Unchanged |
Unchanged |
Unchanged |
|
Long-lived token support |
Enabled |
Enabled |
Disabled |
FIDO2 authentication
- FIDO2 authentication is enabled when connecting to on-premises stores.
- FIDO2 authentication is disabled. (Default)
Change the default browser for FIDO2
Select the browser to use for FIDO2 authentication.
Possible values:
-
Chromium-browser (Default)
-
Chromium
-
Firefox
-
Edge
The Citrix Enterprise Browser is no longer available for this setting. Select one of the browsers installed on the IGEL OS base system.
Shared authentication context
- The cookie preset for Microsoft Entra ID single sign-on is enabled.
- The cookie preset for Microsoft Entra ID single sign-on is disabled. (Default)
Gnome keyring disabled
Specifies whether the GNOME Keyring is disabled so that IGEL Secret Bridge is used instead.
Possible values:
-
false (Default): GNOME Keyring is not disabled.
-
true: Disables GNOME Keyring and uses IGEL Secret Bridge instead.
Long-lived token support
- Persistent authentication tokens are enabled. (Default)
- Persistent authentication tokens are disabled.
Configuring the Session Window
-
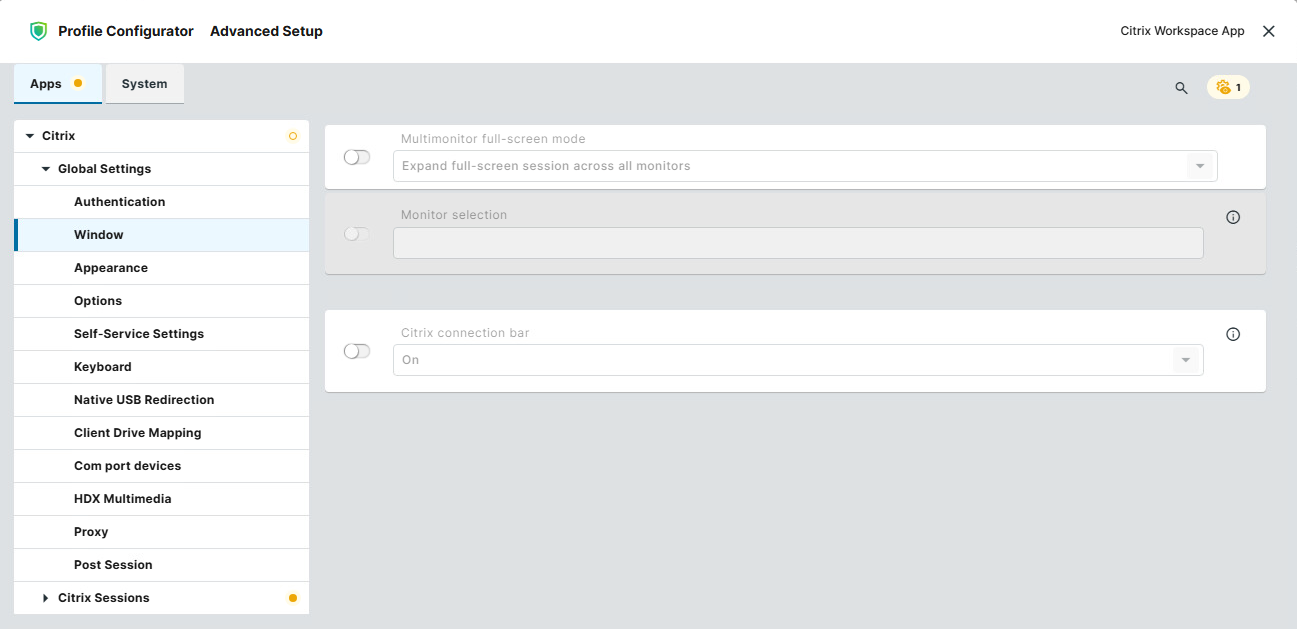
In the Profile Configurator, go to Apps > Citrix > Global Settings > Window.
-
Edit the settings according to your needs. The parameters are described in the following.
Multimonitor full-screen mode
-
Expand full-screen session across all monitors: A full-screen session is expanded across all monitors. (Default)
-
Expand the session over a self-selected number of monitors: Select this setting if you want to span the session across a certain number of monitors. Under Monitor selection, specify the relevant monitors, separated by numbers. You can use a short form to specify several subsequent monitors; for instance, "2,4" means that monitors 2, 3, and 4 are used.
-
1st monitor ... 8th monitor: The session is displayed on the specified monitor.
Monitor selection
This setting is available if you selected Expand the session over a self-selected number of monitors for Multimonitor full-screen mode.
Example
Sample configuration: If you have 4 monitors and want to expand your session across monitors 2, 3, and 4 you have to insert 2,3,4 or 2,4.
Citrix connection bar
-
On: The pulldown menu "Desktop Viewer" by Citrix will be displayed. This applies to non-seamless sessions. (Default)
-
Off: The pulldown menu is not displayed.
Configuring the Appearance
-
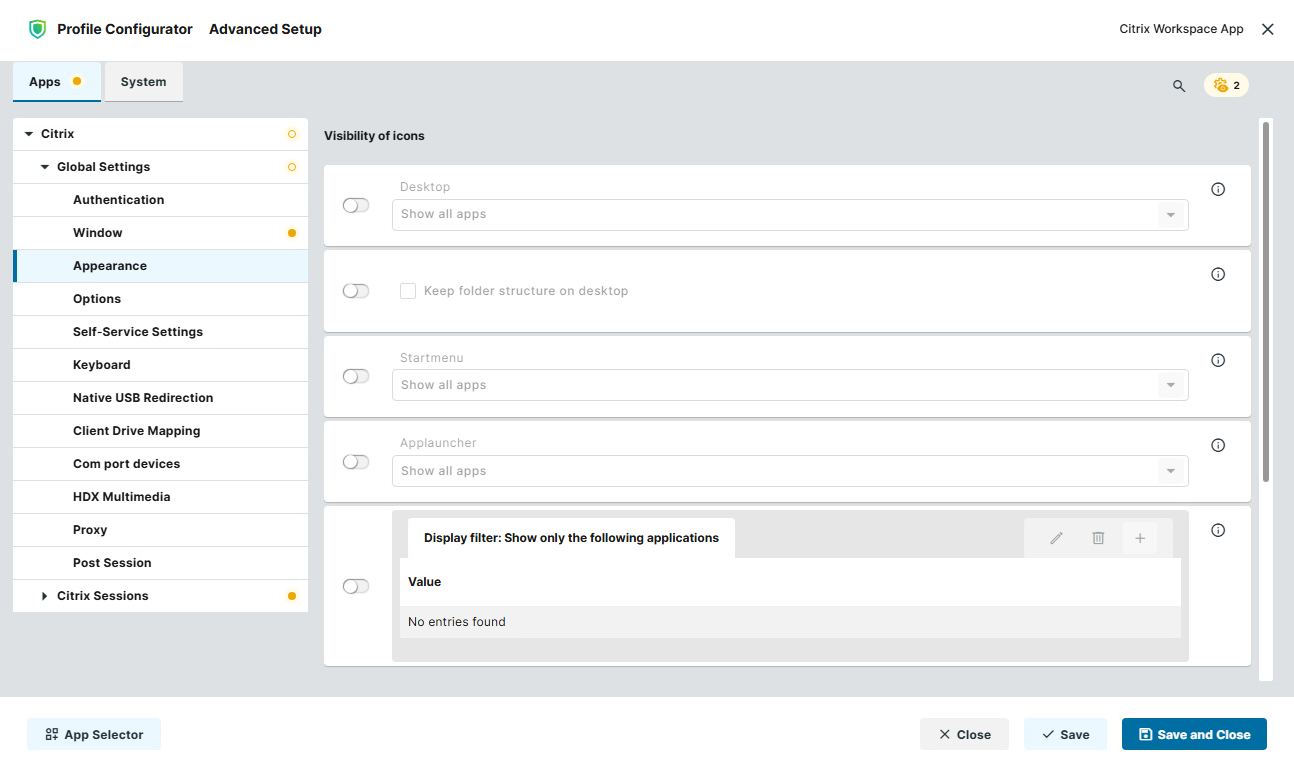
In the Profile Configurator, go to Apps > Citrix > Global Settings > Appearance.
-
Edit the settings according to your needs. The parameters are described in the following.
Desktop
Specifies which applications are displayed on the desktop.
Possible values:
-
Show all apps (Default): Displays all applications.
-
Show only apps from Display filter: Displays only applications that match the Display filter: Show only the following applications.
-
Do not show apps: Does not display applications.
Keep folder structure on desktop
- Desktop shortcuts retain the folder structure defined on the Citrix server.
- Desktop shortcuts are displayed without the folder structure. (Default)
Startmenu
Specifies which applications are displayed in the start menu.
Possible values:
-
Show all apps (Default): Displays all applications.
-
Show only apps from Display filter: Displays only applications that match the Display filter: Show only the following applications.
-
Do not show apps: Does not display applications.
Applauncher
Specifies which applications are displayed in the application launcher.
Possible values:
-
Show all apps (Default): Displays all applications.
-
Show only apps from Display filter: Displays only applications that match the Display filter: Show only the following applications.
-
Do not show apps: Does not display applications.
Display filter: Show only the following applications
Specify the applications to be displayed when Show only apps from Display filter is selected. Wildcards are supported, for example, Wordpad or Word*.
To manage the list of applications:
-
Click

-
Click

-
Click

Quickstart panel
Specifies which applications are displayed in the quick start panel.
Possible values:
-
Show only apps from Display filter (Default): Displays only applications that match the filter configured under Display filter: Show only the following applications in quick start panel.
-
Do not show apps: Does not display applications in the quick start panel.
Display filter: Show only the following applications in quick start panel
Specify the applications to be displayed in the quick start panel. Wildcards are supported, for example, Wordpad or Word*. Only applications matching the filter are displayed.
Configuring the Options
-
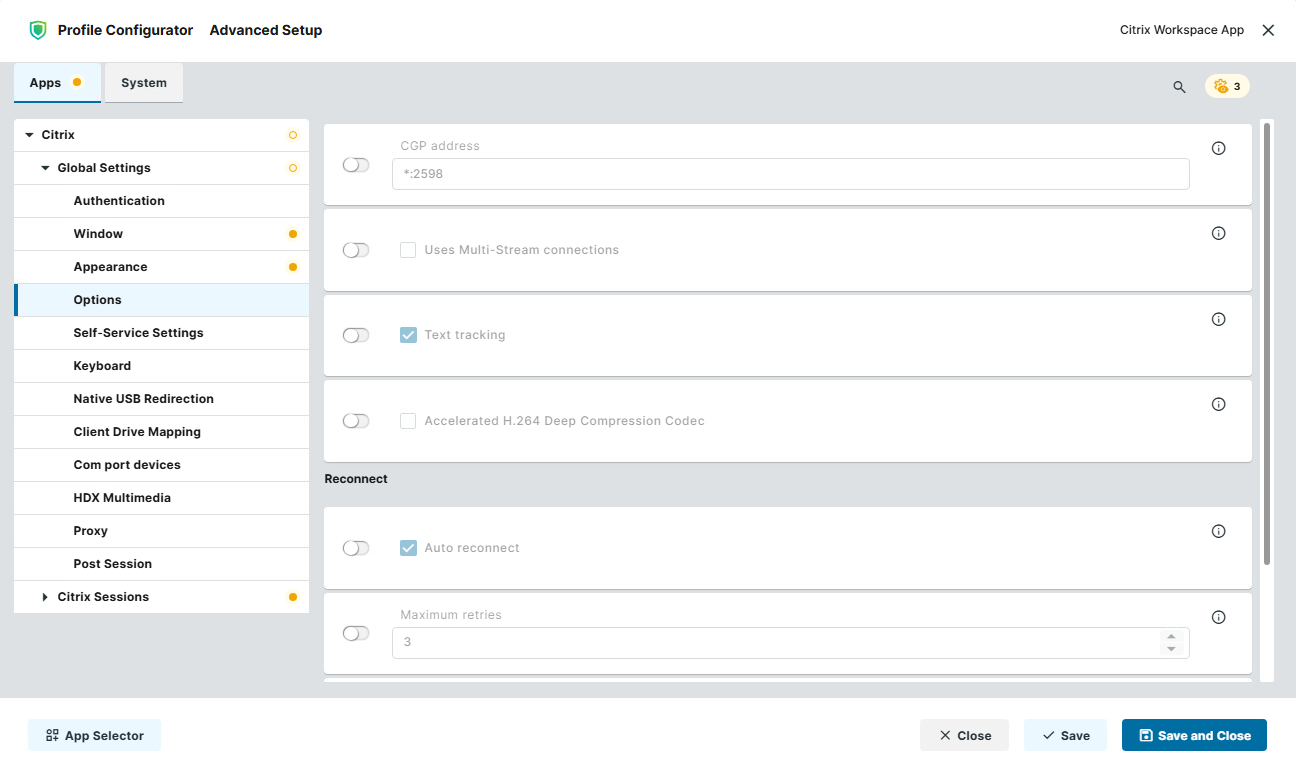
In the Profile Configurator, go to Apps > Citrix > Global Settings > Options.
-
Edit the settings according to your needs. The parameters are described in the following.
CGP address
This is relevant if a CGP connection is used. Address and port for the CGP connection in the format <address>.<port>. If the same address as that for non-CGP connections is to be used, enter *. (Default: *.2598)
Uses Multi-Stream connections
- The ICA virtual channels are divided into four separate ICA channels.
- The ICA virtual channels are not divided. (Default)
Text tracking
- Loss-free depiction of texts. Text is displayed sharper, especially if "Visual Quality" is set to Low/Medium. Recommended for office applications, but requires a higher bandwidth. (Default)
With a bad connection, this method can lead to missing text parts.
Auto reconnect
- Automatically attempt to reconnect if the connection to the Citrix server is lost. (Default)
Maximum retries
Relevant if Auto reconnect is activated. Specifies how often the client should retry to connect to the Citrix server. (Default: 3)
Delay in seconds before reconnecting
Relevant if Auto reconnect is activated. Time to wait for the network to recover before the client tries to reconnect. (Default: 30)
Editing the Self-Service Settings
-
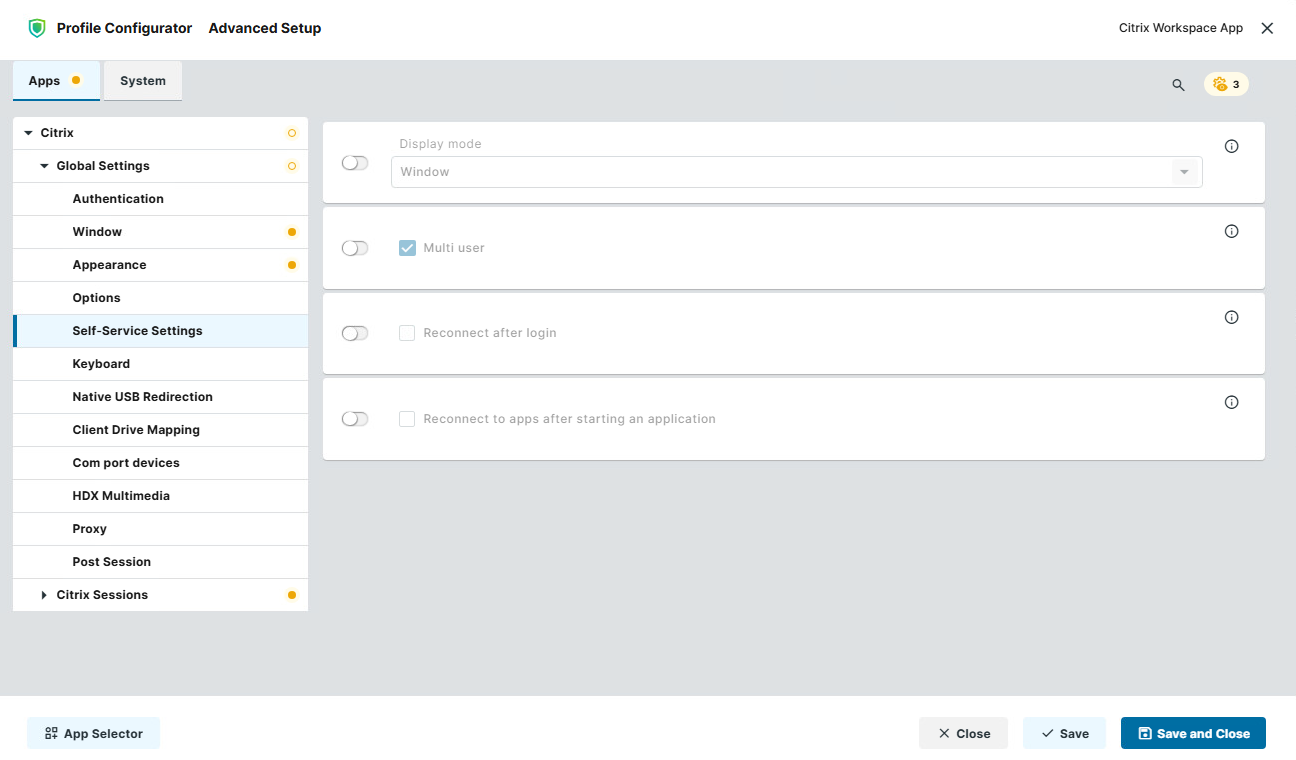
In the Profile Configurator, go to Apps > Citrix > Global Settings > Self-Service Settings.
-
Edit the settings according to your needs. The parameters are described in the following.
Display mode
Display type for the Self-Service user interface
Possible values:
-
Window (Default)
-
Full-screen
In full screen mode, the IGEL desktop will not be available.
Multi user
- The user data on the client will be deleted after logging off or terminating Self-Service. (Default)
Reconnect after login
- The Self-Service user interface reconnects automatically to applications and desktops after being launched.
- The Self-Service user interface does not reconnect automatically. (Default)
Reconnect to apps after starting an application
- The Self-Service user interface will attempt to reconnect to ongoing sessions if an application is launched or the store is reloaded.
- The Self-Service user interface will not attempt to reconnect. (Default)
Configuring the Keyboard
-
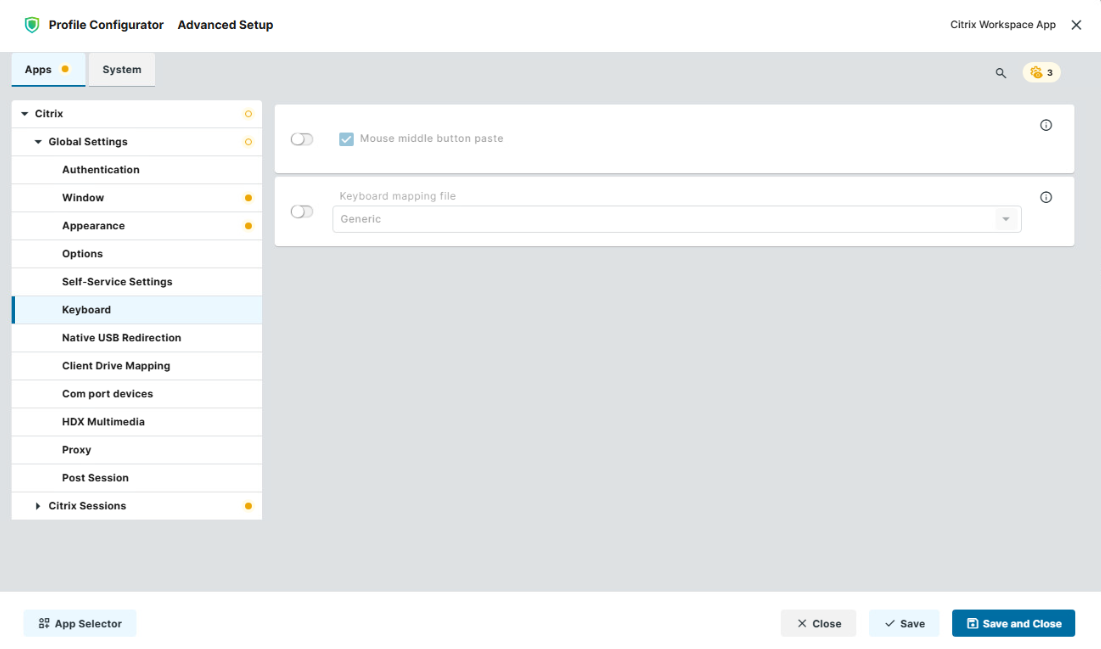
In the Profile Configurator, go to Apps > Citrix > Global Settings > Keyboard.
-
Edit the settings according to your needs. The parameters are described in the following.
Mouse middle button paste
- The middle button of the mouse can be used for pasting content in the Citrix session. (Default)
Keyboard mapping file
-
Generic: The client sends language-independent scancodes to the server. (Default)
-
Linux: The client sends language-specific scancodes to the server.
-
Automatic: The mapping file provided by Citrix is used.
Alt + F1 ... Alt + F12
The hotkey mappings are available if Keyboard mapping file is set to Linux or Automatic.
-
Hotkey character: The function key to be sent when the relevant key combination [Alt] + [F<n>] is pressed
-
Hotkey modifier: The modifier for the function key to be sent when the relevant key combination [Alt] + [F<n>] is pressed
Configuring Native USB Redirection
USB devices can be permitted or prohibited during a Citrix session on the basis of rules. Sub-rules for specific devices or device classes are also possible.
-
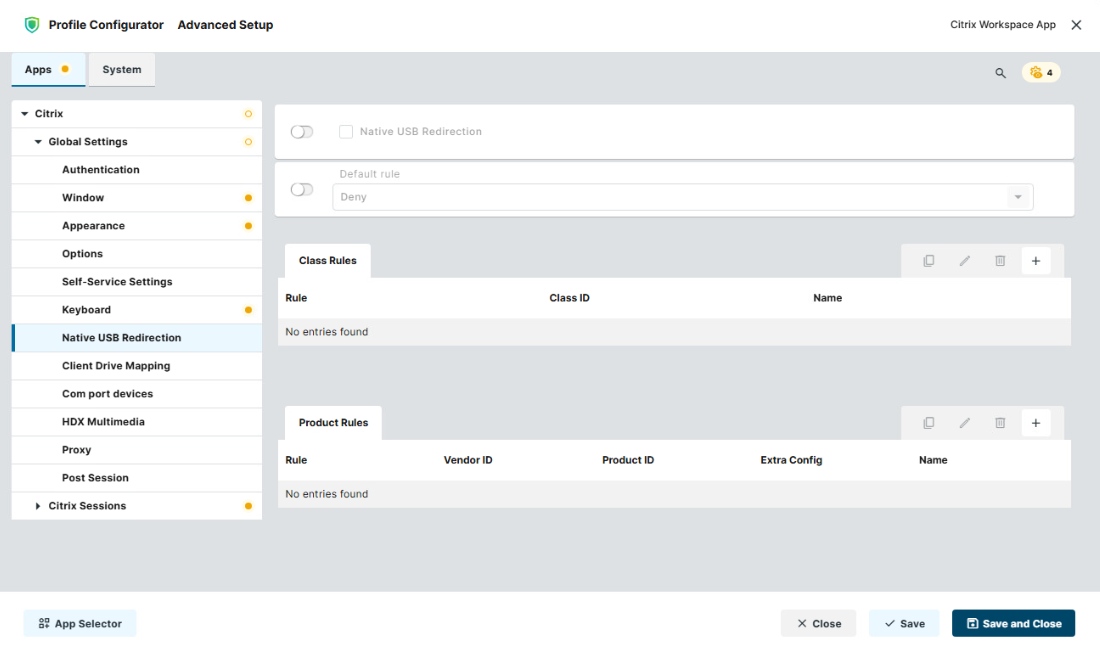
In the Profile Configurator, go to Apps > Citrix > Global Settings > Native USB Redirection.
-
Edit the settings according to your needs. The parameters are described in the following.
Native USB redirection
- Native USB redirection is enabled globally.
- Native USB redirection is disabled. (Default)
Default rule
This rule will apply if no specific rule was configured for a class or a device.
To secure your endpoint, it is generally recommended to set Default rule to Deny and to configure Allow rules only for the required USB devices and USB device classes.
-
Deny (Default)
-
Allow
Class Rules
Class rules apply to USB device classes and sub-classes.
To add a class rule:
In the Class Rules are, click 

-
Set the criteria according to your needs:
-
Rule:
-
Deny: Devices of this class/subclass will not be redirected automatically.
-
Allow: When a device of this class/subclass is plugged in after the start of the session, it will be redirected. If you want an already plugged-in device to be redirected, unplug it and plug it in again.
-
Connect: A device of this class/subclass is redirected, regardless of whether it has been plugged in before or after the start of the session.
-
-
Class ID: Select the class to which this rule should apply.
-
Subclass ID: Select the subclass to which this rule should apply.
-
Name: Enter a name for this rule.
-
Product Rules
Product rules apply to individual USB devices.
Composite USB Redirection
You can configure composite USB redirection which is needed for multifunctional devices that use different interfaces. Examples of such composite USB devices are dictation microphones or Bloomberg keyboards which comprise a keyboard, fingerprint reader, an audio device, USB hub, etc.
To redirect the entire composite device to the session, only Vendor ID (vid) and Product ID (pid) must be added.
If you need to split the composite device and redirect only the child interfaces that use a generic USB channel, you must also add filter parameters split and intf under Extra Config. For more information on composite USB redirection and sample device rules, see https://docs.citrix.com/en-us/citrix-workspace-app-for-linux/configure-xenapp.html#usb.
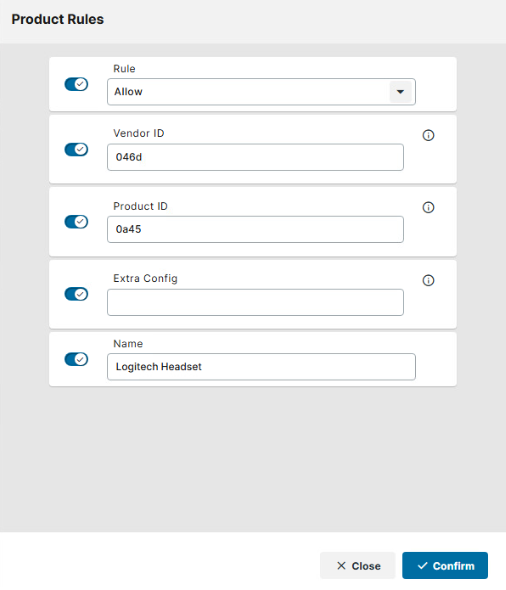
To add a product rule:
In the Class Rules area, click 

-
Set the criteria according to your needs:
-
Rule:
-
Deny: This device of this class/subclass will not be redirected automatically.
-
Allow: When this device is plugged in after the session start, it will be redirected. If you want an already plugged-in device to be redirected, unplug it and plug it in again.
-
Connect: This device is redirected, regardless of whether it has been plugged in before or after the session start.
-
-
Vendor ID: Enter the hexadecimal value of the vendor id for the device to which this rule should apply.
-
Product ID: Enter the hexadecimal value of the product id for the device to which this rule should apply.
-
Extra Config: If desired, enter configuration parameters for the device.
Example:
CONNECT: vid=047F pid=C039 split=1 intf=03(For composite USB devices: Allow HID device and connect automatically) -
Name: Enter a name for this rule.
-
Configuring the Client Drive Mapping
Through drive mapping, each directory mounted on the device (including CD-ROMs and disk drives) is made available to your Citrix session.
You can specify which drives and paths are mapped during the logon. This applies to all Citrix sessions.
-
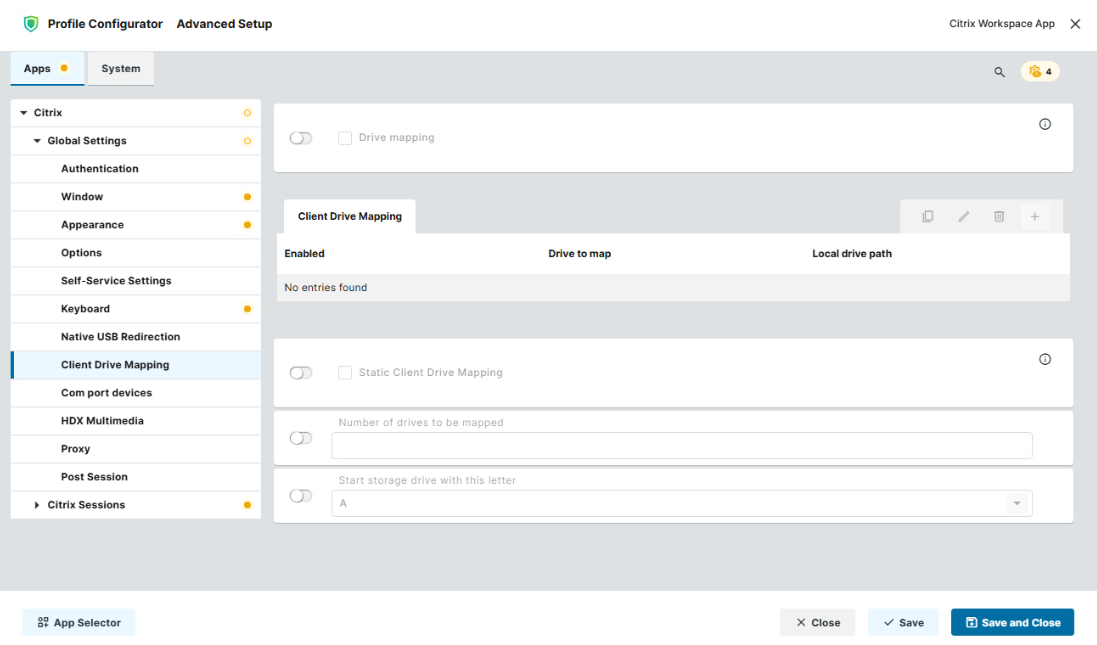
In the Profile Configurator, go to Apps > Citrix > Global Settings > Client Drive Mapping.
-
Edit the settings according to your needs. The parameters are described in the following.
Drive mapping
- Client drive mapping is enabled.
- Client drive mapping is disabled. (Default)
Client Drive Mapping
-
To add a client drive mapping, click

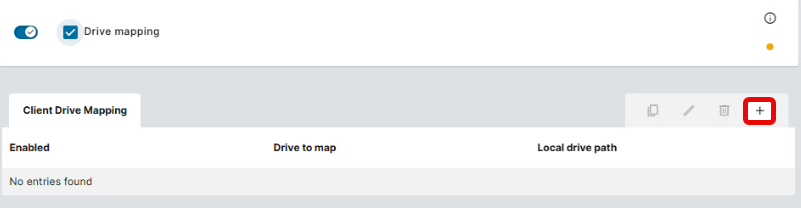
-
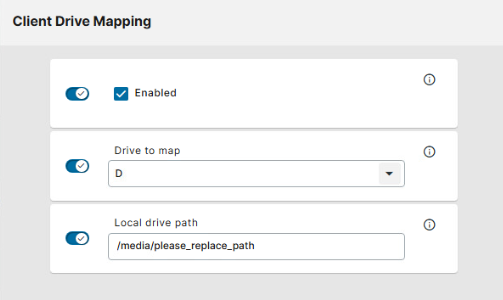
Edit the settings according to your needs and click Confirm:
-
Enabled: Activate to make this drive available in Citrix sessions.
-
Drive to map: Choose a DOS-style drive letter under which the drive will appear on the Citrix Server.
If the drive letter you have selected is no longer available on the Citrix server, the specified directory or local drive will be given the next free letter during the logon.
-
Local drive path: Enter a Unix path name of the local directory to which the mapping is to refer. If you map a locally connected device, use the pre-defined path names available in the drop-down field.
Local (USB) devices which are to be used for drive mapping purposes must first be set up as storage devices.
Before you unplug a hotplug storage device from the device, you must safely remove it. Otherwise, data on the hotplug storage device can be damaged. Depending on the configuration, there is one or several possibilities to safely remove a hotplug storage device:
-
Click on

-
Click on in the in-session control bar. Depending on the configuration, the in-session control bar may be available in a fullscreen session.
-
Function Devices > Storage Devices > Disk Removal with further starting possibilities; amongst other things, a hotkey can be defined here.
If the following warning is displayed: Volume(s) still in use. Don't remove the device., then the hotplug storage device must not be removed. First, exit the program concerned or close all files or directories that reside on the hotplug storage device.
Adding Further Drive Mappings by Copying
To add further drive mappings, you can use an existing drive mapping by duplicating it. Select an existing drive mapping, click 

Editing a Drive Mapping
To edit a drive mapping, select the relevant drive mapping and click 

Deleting a Drive Mapping
To delete a drive mapping, select the relevant drive mapping and click 

Static Client Drive Mapping
- Statically maps one or more local drives to the session using specified drive letters.
- Static client drive mapping is disabled. (Default)
Number of drives to be mapped
Specify the number of local drives to map to the session.
Start storage drive with this letter
Select the starting drive letter for static client drive mapping.
Possible values: A–Z
Configuring the Settings for COM Port Devices
-
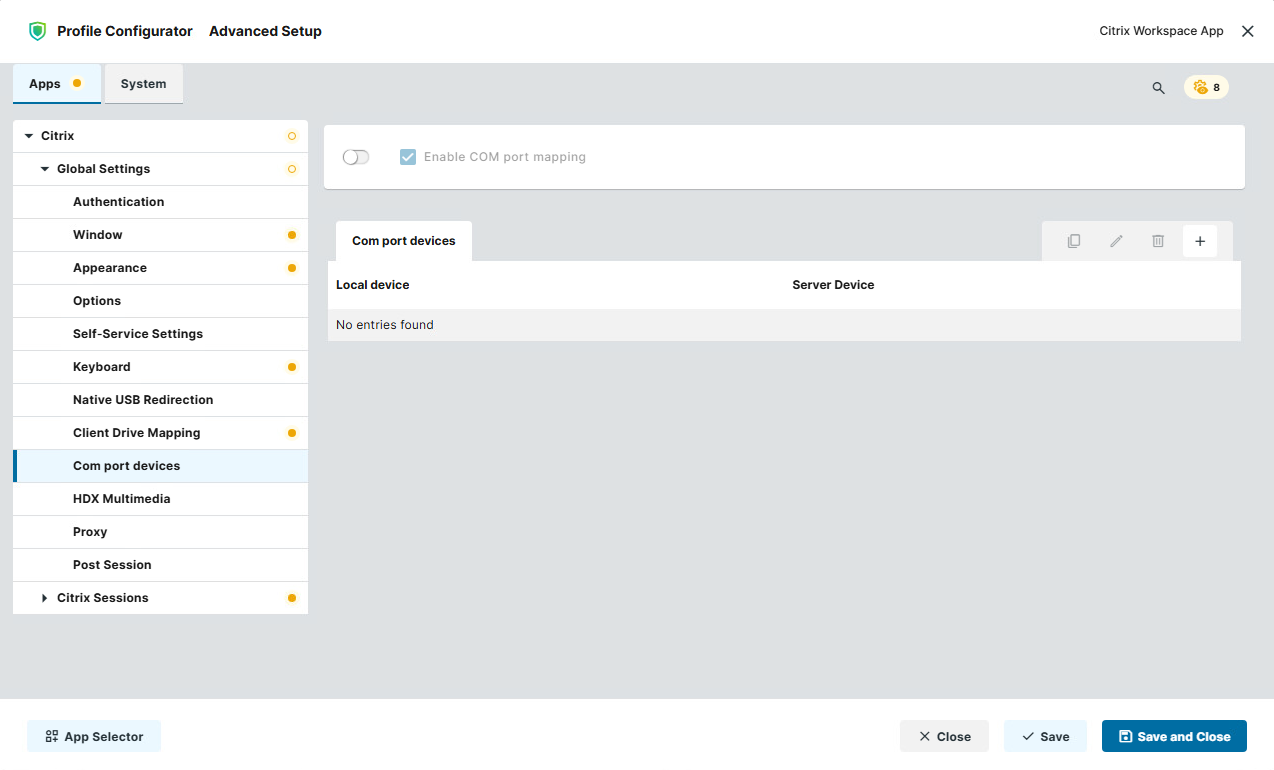
In the Profile Configurator, go to Apps > Citrix > Global Settings > Com port devices.
-
Edit the settings according to your needs. The parameters are described in the following.
Enable COM port mapping
- COM port mapping is enabled. (Default)
- COM port mapping is disabled.
Com port devices
Specify the mapping between a local COM port and a COM port available in the Citrix session.
-
Local device: Select the local COM port to be mapped.
Possible values:-
COM 1–4:
COM 1represents the first standard COM port. -
USB COM 1–4:
USB COM 1represents the first COM port of a USB-to-serial adapter.
-
-
Server Device: Select the COM port to which the local device is mapped in the Citrix session.
Possible values:\\Client\COM1–\\Client\COM8
Configuring the Settings for HDX Multimedia
-
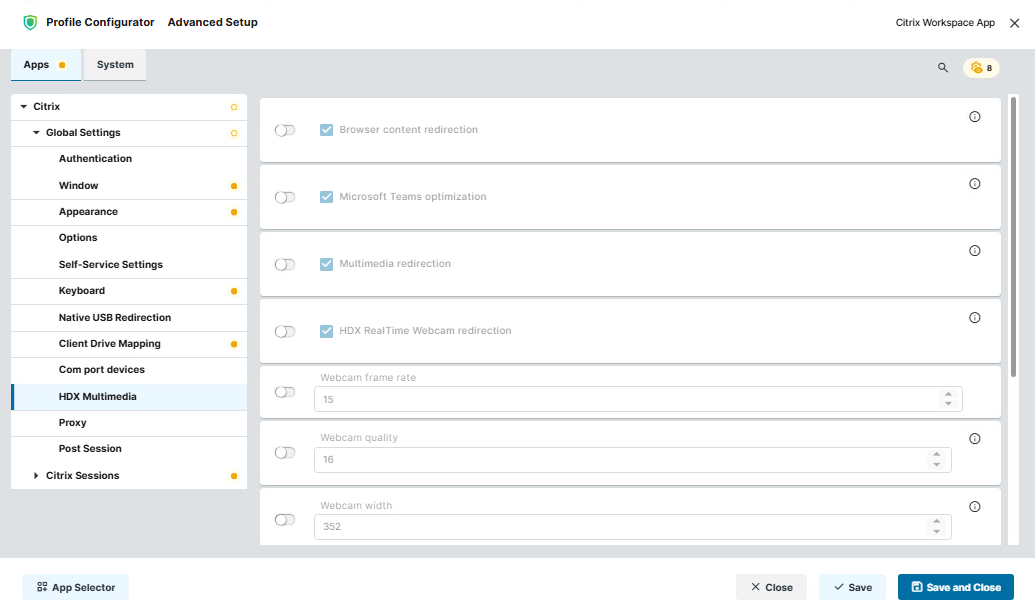
In the Profile Configurator, go to Apps > Citrix > Global Settings > HDX Multimedia.
-
Edit the settings according to your needs. The parameters are described in the following.
Browser content redirection
- The browser content is redirected from the server to the device, e.g., to reduce the load on the server.
- Browser content redirection is disabled. (Default)
Microsoft Teams optimization
- A virtual channel for Microsoft Teams optimization is enabled.
- Microsoft Teams optimization is disabled. (Default)
Multimedia redirection
- Multimedia data is decoded on the device.
- Multimedia data is decoded on the server. (Default)
HDX RealTime webcam redirection
This setting is only available if Multimedia redirection is enabled.
- Webcam redirection with HDX RealTime support is enabled. (Default)
Webcam frame rate
This setting is only available if Multimedia redirection is enabled.
The frame rate requested from the webcam. (Default: 15)
Webcam quality
This setting is only available if Multimedia redirection is enabled.
The image quality requested from the webcam. Range: 1-63. (Default: 16)
Webcam width
This setting is only available if Multimedia redirection is enabled.
The image width requested from the webcam. (Default: 352)
Webcam height
This setting is only available if Multimedia redirection is enabled.
The image height requested from the webcam. (Default: 288)
HDX webcam delay time
This setting is only available if Multimedia redirection is enabled.
Time to wait before the webcam is opened, in milliseconds. (Default: 2000)
HDX Webcam delay type
This setting is only available if Multimedia redirection is enabled.
Determines if and how the opening of the webcam should be delayed in a session.
-
0: No delay
-
1: If the time interval since the last closing of the webcam is less than the defined delay time (HDX Webcam delay time), the delay length is the remaining time. (Default)
-
2: The delay time is as defined by HDX Webcam delay time.
Configuring the Setting for Proxy
-
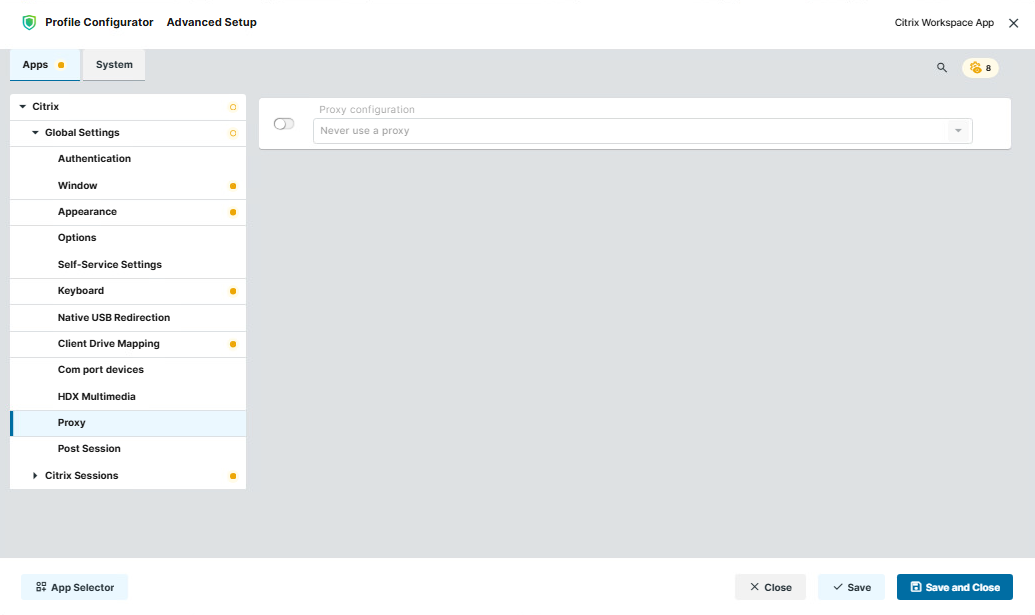
In the Profile Configurator, go to Apps > Citrix > Global Settings > Proxy.
-
Edit the setting according to your needs. The parameter is described in the following.
Proxy configuration
Specifies the proxy configuration used by the Citrix Workspace app.
Possible values:
-
Never use a proxy (Default): Does not use a proxy.
-
Use system proxy settings: Uses the proxy settings configured in the system.
-
Use fixed proxy settings: Uses manually specified proxy settings.
Configuring the Post Session
-
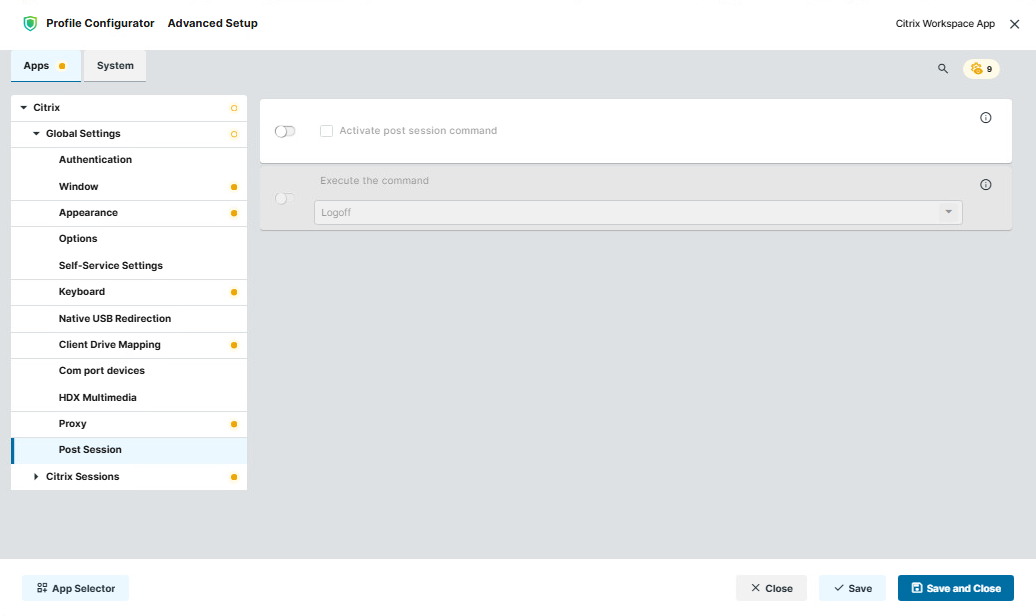
In the Profile Configurator, go to Apps > Citrix > Global Settings > Post Session.
-
Edit the settings according to your needs. The parameters are described in the following.
Activate post session command
Allows you to define an action that is performed when the last Citrix session is ended. For information on global post-session commands, see Post-session Custom Commands in IGEL OS 12.
- The post-session command specified under Execute the command will be executed.
- The post-session command specified under Execute the command will not be executed. (Default)
Execute the command
Action that is carried out after the end of the Citrix session(s). This setting is effective if Activate post session command is enabled.
Possible values:
-
Logoff (Default): Automatically logs off the user after all Citrix sessions have ended.
-
Shutdown: Shuts down the device.
-
Enter custom command here: Executes the specified custom command.