
The Linux Vendor Firmware Service (LVFS) BIOS Tools app offers BIOS tools to update the BIOS version. This app includes tools from the Linux Vendor Firmware Service - LF Projects LLC (https://lfprojects.org/policies/trademark-policy/ ). The Linux Vendor Firmware Service is a secure portal which allows hardware vendors to upload firmware updates.
This article serves as a guide for using the LVFS BIOS Tools app from configuration to debugging, including best practices.
BIOS Updates at Your Own Risk
IGEL is offering and supporting the LVFS BIOS Update mechanism - BIOS updates are performed at your own risk!
The LVFS BIOS update mechanism is functional even with Secure Boot enabled and when a BIOS password is set.
If the BIOS of your devices is distributed via the LVFS, you can update, downgrade, or reinstall it using the IGEL Universal Management Suite (UMS). As the procedures for reinstalling and downgrading the BIOS are analogous to the update procedure, we will use the term "update" in the following instructions.
Tip: Direct Download of Firmware from fwupd Repository
To download valid firmware updates on a given test device, run the following command on the test device:
fwupdmgr refresh --force
fwupdmgr get-updates --json > /tmp/updates.json
The updates.json file includes links to the .CAB files from fwupd. Use wget to download them.
Requirements
-
UMS 12.01 or higher
-
Device must support LVFS
-
IGEL OS Base System 12.7.0 or higher must be installed on supported devices
The IGEL OS Base System needs to be installed directly on the device. The LVFS BIOS Tools app is unsupported if the IGEL OS boots from a UD Pocket.
Step 1: Configuring the App in the UMS Web App
Importing the App
Import the LVFS BIOS Tools app into your UMS. For more information on how to do this, see (12.06.120-en) How to Import IGEL OS Apps from the IGEL App Portal or (12.06.120-en) How to Install OS 12 Apps in a UMS Environment with Limited or No Internet Access .
Creating a Profile
To distribute the app to the devices, create a profile:
-
In the UMS Web App, go to Apps and search for “BIOS” to find the LVFS BIOS Tools app.
-
Click Create New Profile.
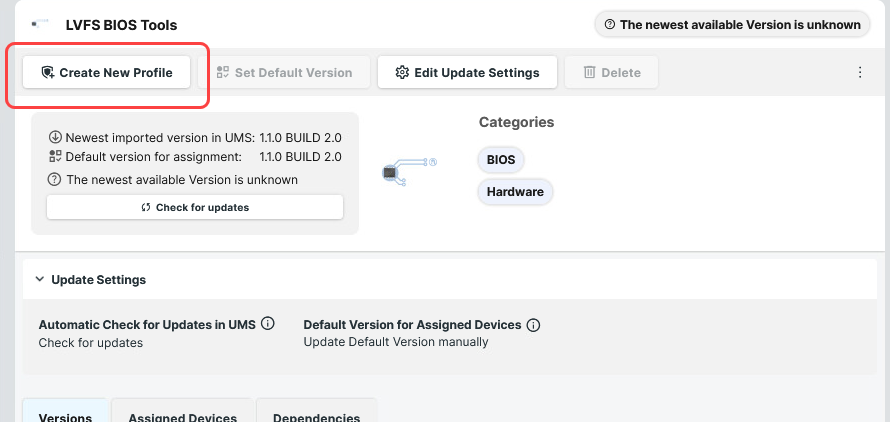
-
Define a name for your profile and save.
For more on profile creation, see (12.06.120-en) How to Create and Assign Profiles in the IGEL UMS Web App .
Assigning the Profile to Your Devices
-
In the field Assign device, enter the name of the device or device directory for which you want to use the LVFS BIOS Tools app.

-
Select Assign and apply changes now.
Step 2: Setting up the File Source
Look up the latest update file from https://fwupd.org/lvfs/devices/ and download it. If you want to use the UMS for file distribution, store it in a location that is reachable from the machine on which your UMS Server is running.
Using UMS File Transfer
The following example shows how to use the UMS file transfer facility for file deployment.
-
In the UMS Web App, go to Configuration Objects, select the icon for files, and then the icon for uploads.
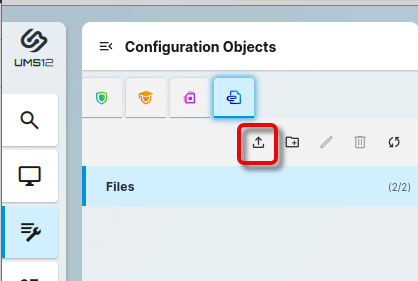
-
Choose the BIOS update file on your system via drag & drop or via Browse files….

-
In the field Device file location, define the local path in which the file will be stored on the device, e.g.
/wfs/. Afterward, click Finish upload.
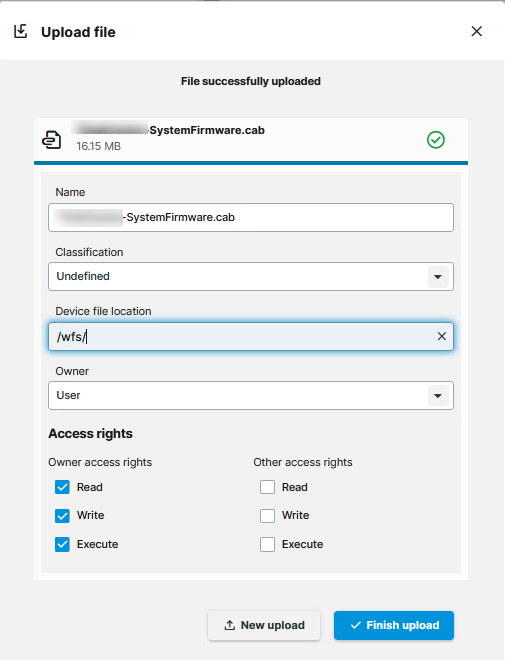
-
Assign the file to your devices by assigning it to the profile we have created beforehand.
Step 3: Updating the BIOS
Configuring the Devices for the BIOS Update
Once the file is made available for the endpoint devices:
-
Open the previously configured LVFS BIOS Tools profile.
-
Go to Apps > LVFS BIOS Tools > Update.
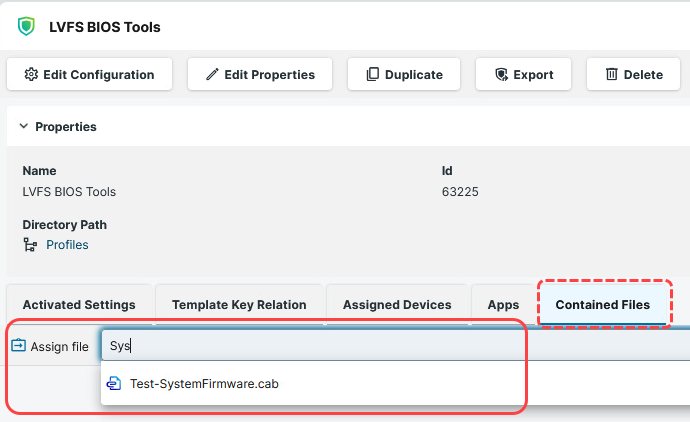
-
Under LVFS BIOS or Firmware Update file provide the local path of the BIOS update file with file extension. In our example:
/wfs/Test-SystemFirmware.cab
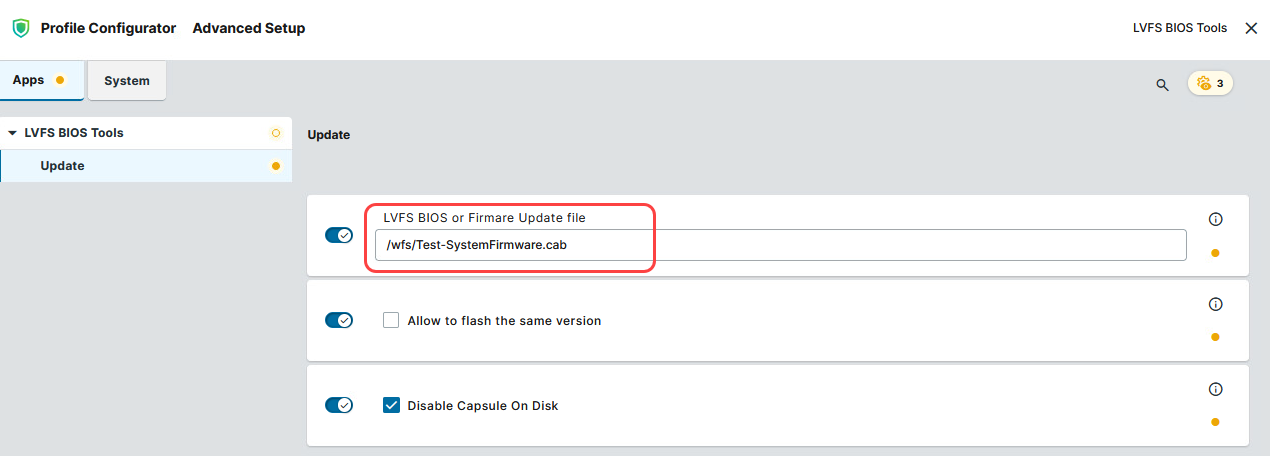
You can reinstall the same BIOS/Firmware version that had already been installed on the device if you enable Allow to flash the same version.
Triggering the BIOS Update
-
In the UMS, select the relevant devices (or directory). In the actions menu, click Update & Refresh > Specific Device Command.
-
Select BIOS - Trigger update and click Execute.
The target devices receive a reboot command; a corresponding message is displayed.
The timespan before the BIOS logo and the progress bar is shown might be significantly longer than usual. Please ensure that the device remains powered on until the update process is finished.
If you trigger the command again via the UMS Web App, the lines are shown in red, showing that an update is already pending (as an error message).
Step 4: Checking Update Success
If you want to check whether the command reached the IGEL device, you can open a terminal or Secure Terminal and run: journalctl -f . You can check the BIOS version on the device with the command dmidecode -t bios as root.
Debugging
For most cases, the normal logging to journalctl should be good enough to identify any problems. The default loglevel is “INFO”.
→ To enable loglevel “DEBUG”, enable the registry key app.lvfs_bios_tools.config.enable_debug
Using the Command Line Interface (CLI)
For testing the BIOS update on a single device, you can use the command line tool as an alternative to a scheduled job from the UMS.
As a prerequisite, the steps described under Setting up the File Source and the relevant settings in the profile must be completed.
When the command has been executed, a dialog informs you that a reboot is required. You can choose between two options:
-
Perform the reboot and update right away
-
Postpone the update to the next reboot
Usage
lvfs-bios-tools [OPTIONS] COMMAND [ARGS]...
Options
|
Option / Contrary Option |
Comment |
|---|---|
|
|
Provide extensive information (verbose mode) |
|
|
Show the help text and exit |
Commands
|
Command |
Argument (Short / Long Form) |
Comment |
|---|---|---|
|
|
|
Handle BIOS update |
|
|
|
Trigger BIOS update. Will be triggered after reboot. |
|
|
|
Disable BIOS update |
|
|
|
Show the help text and exit |
Example
The following command performs a BIOS update and displays extensive information:
update --debug -e