Installing the First Server in an HA Network
Prerequisites
A set of servers with the operating system supported by the UMS; see the "Supported Environment" section of the release notes.
A database system supported by the UMS; see the "Supported Environment" section of the release notes.
All installation requirements described under HA: Installation Requirements are fulfilled.
The current version of the UMS is downloaded from the IGEL Download Server.
For the first installation, it is advisable to use a server without an existing UMS installation.
Instructions
To install the UMS High Availability (HA) Extension on the first server, follow the instructions in the order given:
Preparing the Database
→ Create a database schema and a user for the UMS. Use the relevant DBMS program and its documentation. See also Connecting External Database Systems.
Preparing the Servers
Verify that each server can "see" the other servers via the network.
High Availability with IGEL UMS Load Balancers: All UMS Servers and UMS Load Balancers must reside on the same VLAN.
For High Availability (UMS HA) with IGEL UMS Load Balancers, network traffic must be allowed over UDP broadcast port 6155, and TCP traffic and UDP broadcast traffic over port 61616. For further port configuration, see IGEL UMS Communication Ports.
The network configuration on Windows Servers must have the TCP/IPv6 option enabled for UMS 12.
IGEL UMS HA installation with IGEL UMS Load Balancers is not supported in cloud environments like Azure / AWS as they do not allow broadcast traffic within their networks. The HA installation without IGEL UMS Load Balancers (as well as the Distributed UMS) is, however, supported in cloud environments as of UMS version 6.10.
Verify that the time on all servers is synchronized.
To avoid problems with your HA installation, make sure that the time on the servers of the HA network does not differ by more than one minute. After each manual time reset, the HA services on the relevant server must be restarted.
For Linux systems, make the directory
/rootwritable for the userroot.
Starting the Installation
Launch the UMS installer.
You need administration rights to install the IGEL UMS HA.
Read and confirm the License Agreement.
Read the Information regarding the installation process.
Select a path for the installation.
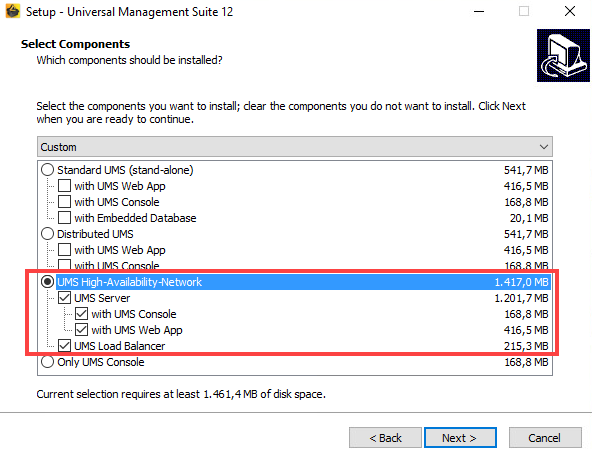
Depending on your desired HA network configuration, select the components to be installed: UMS Server + UMS Load Balancer or UMS Server.
Installing UMS Server and UMS Load Balancer on Separate Servers
If you install HA network components on separate servers, UMS Server must always be installed first. In this case, the IGEL network token, which is required for the integration of further servers into the HA network, will be created. Additionally, the UMS Administrator application, necessary for the further management of the installation, will be installed too. After configuring and enabling the database via the UMS Administrator, the UMS Server will be available in the HA network.
If you install an individual UMS Load Balancer, neither the IGEL network token nor UMS Console nor UMS Administrator will be installed. Only the option for uninstalling the UMS will then be set up in the Windows start menu.
For the management of the UMS installation, you require the UMS Console. In multi-instance installations, the UMS Console does not necessarily have to be installed on every UMS Server.
Note: For security, performance, or other reasons, the UMS Console is often additionally installed on a separate host.You cannot manage IGEL OS 12 devices without the UMS Web App. Thus, the UMS Web App must be selected during the installation of the UMS. In multi-instance installations, the UMS Web App does not necessarily have to be installed on every UMS Server, see Important Information for the IGEL UMS Web App.
The UMS Administrator application, which is necessary for the management of the UMS installation, will be automatically installed during the installation of the UMS Server.
For information on the UMS components, see Overview of the IGEL UMS.
Confirm the system requirements dialog if your system fulfills them.
Select the UMS data directory, in which Universal Firmware Updates and files are to be saved.
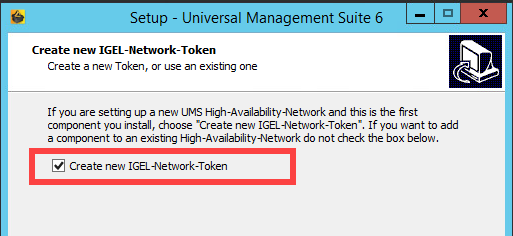
Enable the option for creating an IGEL network token.
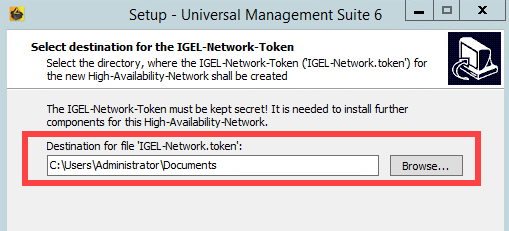
Specify a directory for saving the IGEL network token. The directory must be writeable for the administrator.
Keep the IGEL network token in a safe place! It will be needed for all subsequent server installations. If the IGEL network token is lost, the complete installation must be started again.
Optional: Under Import existing keystore, you can load the
tc.keystorefile from an existing UMS installation.
This function can destroy your UMS installation. Do not import this file unless you know exactly what you are doing.
If the internal Windows firewall is active on your host: Review the settings under Windows firewall settings and change them where necessary. Each port that is activated here will be set as rule in the Windows firewall.
UMS 12 Communication Ports
If you are going to make network changes, consider the following ports and paths:
For IGEL OS 12 devices, TCP 8443
/device-connector/*is required.
SSL can be terminated at the reverse proxy / external load balancer (see IGEL Universal Management Suite Network Configuration) or at the UMS Server.For importing IGEL OS 12 Apps to the UMS from the IGEL App Portal, the URL https://app.igel.com/ (TCP 443) is required.
For the UMS Web App, TCP 8443
/webapp/*and/wums-app/*are required.For the UMS Console, the root is required, i.e. TCP 8443
/*For IGEL OS 11 devices, TCP 30001 and TCP/UDP 30005 are required.
For more information on UMS ports, see IGEL UMS Communication Ports.
Under Select Start Menu Folder, specify a folder name for the shortcut.
Under Select Additional Tasks, specify whether you would like to create shortcuts for the UMS Console and UMS Administrator on the desktop.
Read the summary and start the installation process.
Close the UMS installer once the installation is complete.
The UMS installer creates entries in the Windows software directory and the start menu. If this was selected, shortcuts for the UMS Console and UMS Administrator will also be placed on the desktop.
If SQL Server AD Native is used, you must also set the correct startup type and logon settings for the "IGEL RMGUIServer" service and restart the service. This must be done on ALL UMS Server hosts. For more information, see Microsoft SQL Server/Cluster with Native Active Directory (AD) Authentication.
Defining the Database Connection
Open the UMS Administrator.
Default path to the UMS Administrator:
Linux: /opt/IGEL/RemoteManager/RMAdmin.sh
Windows: C:\Program Files\IGEL\RemoteManager\rmadmin\RMAdmin.exe
The IGEL UMS Administrator application can only be started on the UMS Server.
Select Datasource > Add.
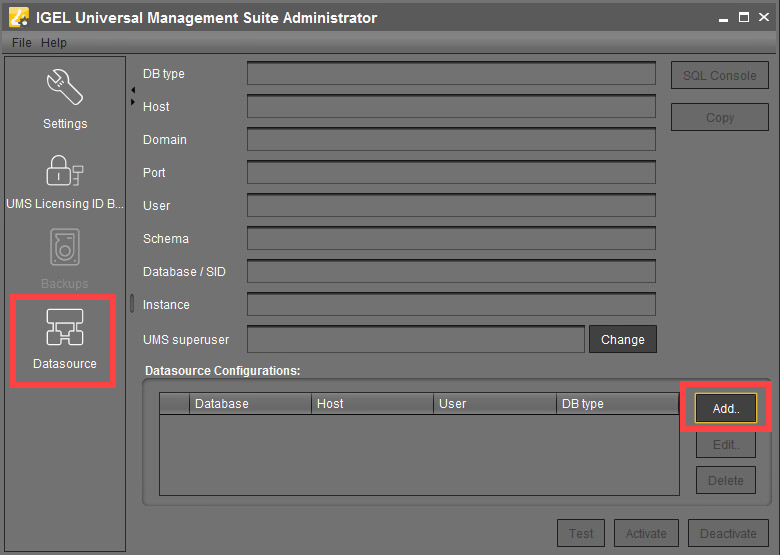
Enter the connection properties of the prepared database schema. See also How to Set Up a Data Source in the IGEL UMS Administrator.
Click Activate to enable the data source. See also Activating a Data Source.
Checking the Installation
Check if all processes are running. For the list of UMS HA processes, see IGEL UMS HA Services and Processes.
In the UMS Console, go to UMS Administration > UMS Network and check the items Server and Load Balancer if the complete UMS HA Extension has been chosen for the installation.

Saving the IGEL Network Token
→ Save the IGEL network token, i.e. the file IGEL-Network.token, on a storage medium which will be accessible when installing further HA servers (e.g. on the network or on a portable storage medium such as a USB stick). Always keep the IGEL network token well protected.
Next Step
>> Proceed with adding a further server to the HA installation, see Adding Further Servers to the HA Network.