IGEL UMS Installation under Windows
This article describes the complete procedure for installing the standard IGEL Universal Management Suite (UMS) with an embedded database under Windows. If your required installation differs, you can select individual components, e.g. for a standalone UMS Console installation. You can check the installation requirements under Installation Requirements for the IGEL UMS.
For the supported operating systems, see the "Supported Environment" section of the release notes.
The Server Core installation option of the Microsoft Windows Server is not supported.
Standard Installation of the UMS
To install the IGEL UMS under Windows, proceed as follows:
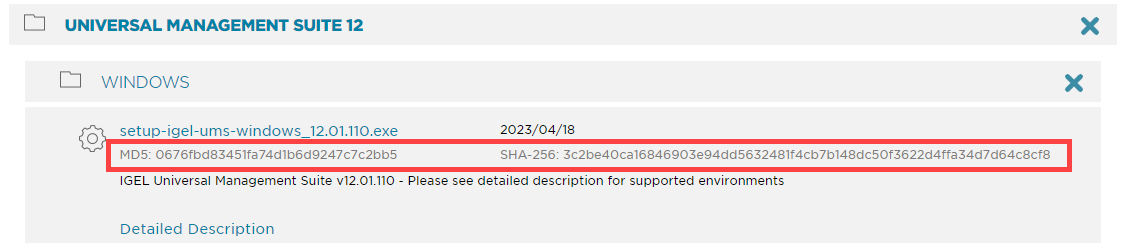
Download the current version of the IGEL Universal Management Suite from the IGEL Download Server.
For integrity and security purposes, it is recommended to verify the checksum of the downloaded software.
Launch the installer.
You will need administrator rights in order to install the UMS.
Read and confirm the License Agreement.
Read the Information regarding the installation process and click Next.
Only if this is an update installation: If you already have a UMS installation, select the file name for the backup of your embedded database. If you do not choose a file name and click on Next, no backup will be created. See also Updating the IGEL UMS under Windows.
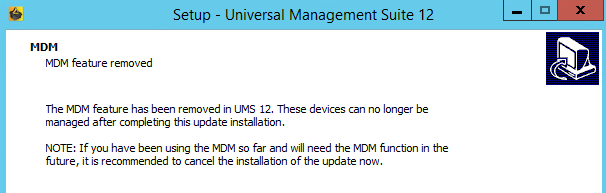
For Update Installations Only
As of UMS 12, the MDM feature is no longer available. Cancel the upgrade to UMS 12 if you still need the MDM feature:
Only if you have a Distributed UMS installation: During the update installation, it will be checked whether only one UMS Server is running and the others are stopped. If not, stop all UMS Servers except one and proceed with the update; otherwise, you risk losing data. After the update on this server is complete, you can update the remaining UMS Servers, either simultaneously or one after another.
Only if this is a new installation: Select the folder for the installation under Select Destination Location. (Default:
C:\Program Files\IGEL\RemoteManager)Choose the components to be installed under Select Components.

Standard UMS
with UMS Web App
with UMS Console
with Embedded Database
Distributed UMS
with UMS Web App
with UMS Console
UMS High Availability Network
UMS Server
with UMS Console
with UMS Web App
UMS Load Balancer
Only UMS Console
For information on the UMS installation types, see IGEL UMS Installation.
For information on the UMS components, see Overview of the IGEL UMS.The embedded database is suitable for most purposes. If not disabled, the embedded database will automatically be installed if you select Standard UMS.
The use of an external database system is recommended in the following cases:
- You manage a large network of devices.
- A dedicated database system is already in use in your company.
- You integrate the High Availability or the Distributed UMS solution.
For more information regarding the use of the IGEL UMS with external databases, see Connecting External Database Systems.
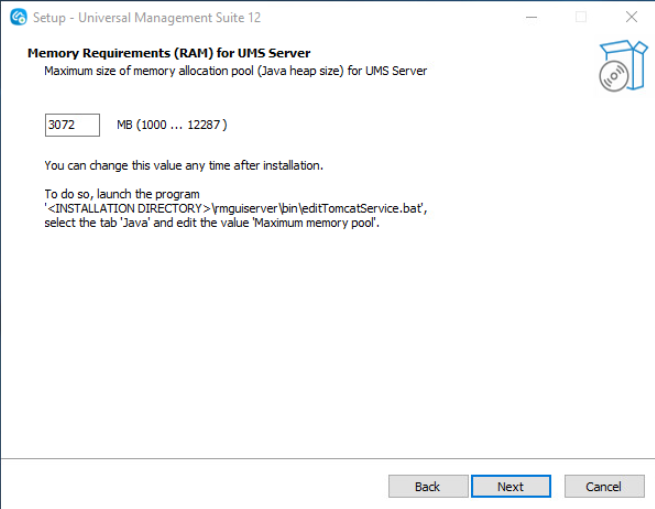
Set the maximum memory consumption (Java heap size) for the UMS Server depending on your environment. For the first installation, you can leave the default value (3072 MB), and change it later based on How to Configure Java Heap Size for the UMS Server. If you are updating the UMS, the installer will carry over and display the previously configured value.
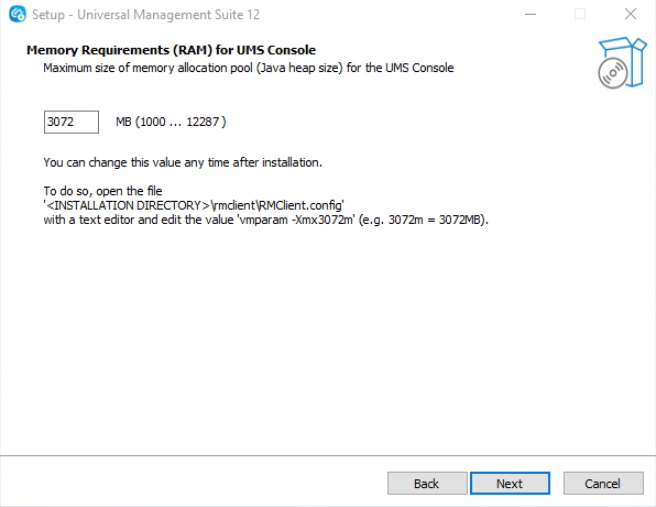
Set the maximum memory consumption (Java heap size) for the UMS Console depending on your environment. For the first installation, you can leave the default value (3072 MB), and change it later based on How to Configure Java Heap Size for the UMS Console. If you are updating the UMS, the installer will carry over and display the previously configured value.
Read the Memory (RAM) requirements and click Next if your system fulfills them.
Select the UMS data directory. (Default:
C:\Program Files\IGEL\RemoteManager)Under User Credentials for DB-connect, enter the user name and password for the database connection – unless you are planning to connect the UMS to an MS SQL Server via Active Directory. For more information on connecting via AD, see Microsoft SQL Server/Cluster with Native Active Directory (AD) Authentication .
The credentials for the database connection are created.
The user name and password are case-sensitive.
Initially, the credentials entered here are also the credentials of the UMS superuser. After the installation, the credentials for the database user and those for the UMS superuser can be changed independently from each other. For more information about the UMS superuser, see Changing the UMS Superuser .
If the internal Windows firewall is active on your host: Review the settings under Windows firewall settings and change them where necessary. Each port that is activated here will be set as rule in the Windows firewall.
UMS 12 Communication Ports
If you are going to make network changes, consider the following ports and paths:
For IGEL OS 12 devices, TCP 8443
/device-connector/*is required.
SSL can be terminated at the reverse proxy / external load balancer (see IGEL Universal Management Suite Network Configuration ) or at the UMS Server.For importing IGEL OS 12 Apps to the UMS from the IGEL App Portal, the URL https://app.igel.com/ (TCP 443) is required.
For the UMS Web App, TCP 8443
/webapp/*and/wums-app/*are required.For the UMS Console, the root is required, i.e. TCP 8443
/*For IGEL OS 11 devices, TCP 30001 and TCP/UDP 30005 are required.
For more information on UMS ports, see IGEL UMS Communication Ports .
Choose a folder name under Select Start Menu Folder.
Under Select Additional Tasks, specify whether you would like to create shortcuts for the UMS Console and UMS Administrator on the desktop.
Read the summary and start the installation process.
The installer will install the UMS, create entries in the Windows software directory and in the start menu, and, if selected, will place shortcuts for the UMS Console and UMS Administrator on the desktop.
Close the program after completing the installation by clicking on Finish.
If you have chosen the standard installation, the UMS Server will run with the embedded database.Start the UMS Console.
Connect the UMS Console to the UMS Server using the access data for the database that you entered during the installation. For more information, see Connecting the UMS Console to the IGEL UMS Server.
Start the UMS Web App. See How to Log In to the IGEL UMS Web App.
It is recommended to check your antivirus software and, if installed, other management software like HP Device Manager for possible conflicts if
the installation of the IGEL UMS fails
the UMS Server service does not start when the installation is complete, and the manual start of the service fails. For details on how to start services, see IGEL UMS HA Services and Processes.
there are problems when connecting the UMS Console to the UMS Server
If You Use an External Load Balancer / Reverse Proxy
The FQDN and port of your external load balancer / reverse proxy must be specified in the UMS Console under UMS Administration > Global Configuration > Server Network Settings > Cluster Address. Information on the Cluster Address can be found under Server Network Settings in the IGEL UMS.
For the management of IGEL OS 12 devices, it is necessary to register your UMS after the installation, see Registering the IGEL UMS.
TechChannel
Silent Installation of the UMS Console
You can carry out the installation silently by first creating an .inf file and then launching the installation using a command line. For further information, see Unattended / Silent Installation of the UMS Console.
Silent installation is only possible for the UMS Console. It is not possible for the UMS Server, the UMS Administrator, or the UMS Web App.