How to Update a UMS HA Installation: With Downtime of the Servers
For a short overview of the High Availability (HA) update procedure, see Updating the Installation of an HA Network.
To update the HA installation, follow these instructions in the order given.
Preparing the Update
Perform the following steps before updating a server:
Download the current version of IGEL Universal Management Suite from the IGEL Download Server and distribute the installer file to all systems with UMS components (UMS Server, UMS Load Balancer, UMS Consoles).
In the UMS Console, call up the list of UMS Servers and Load Balancers in the HA network under UMS Administration > UMS Network and check whether the listed components really exist in the network. Delete orphaned entries before starting the process for updating the components.

Create a backup of your database before starting the update installation. Use the backup procedures recommended by the DBMS manufacturer. See also Creating a Backup of the IGEL UMS.
Warning
It is not possible to install a UMS version which is older than the current one. If you want to change to an older version (e.g. from 6.10 to 6.09), you will need to install a separate HA network and restore a database backup of the corresponding schema. This is also one of the reasons why you should back up the running system before updating the UMS HA network.
Since the version of the database schema always corresponds to the current major.minor version of the UMS (i.e. 6.10 for all 6.10.x releases, 6.08 for all 6.08.x. releases), the downgrades are only possible within a major.minor version. Example: you can downgrade from 6.10.140 to 6.10.120, but not from 6.10.140 to 6.09.120.
Verify that the time on all servers is synchronized.
To avoid problems with your HA installation, make sure that the time on the servers of the HA network does not differ by more than one minute. After each manual time reset, the HA services on the relevant server must be restarted.
Updating UMS Servers
The main feature of this update method is that it checks at the beginning how many UMS Servers are "online". If the server where the update has been started is the only one active, no temporary database with a copy of the productive database is created and the productive database is updated immediately, i.e. as soon as the UMS Server starts after the update is complete. Therefore, it is necessary to leave ONLY ONE UMS Server running, i.e. the one you start the update procedure with. This can be any UMS Server within your HA network.
Stop all UMS Servers except the one, on which you are going to start the update. You can stop UMS Servers in the UMS Console under UMS Administration > UMS Network > Server > [Server name] > Stop service or in Windows Services, see IGEL UMS HA Services and Processes.
Verify that only one UMS Server is running and the others are stopped:
by checking the list of servers in the UMS Console under UMS Administration > UMS Network > Server
ORwith the following SQL statement:
selectep.epr_process_id,ep.epr_process_host,ep.epr_process_mode,ep.epr_service_statusfromepr_processes epwhereep.epr_process_type = 'UMS_RMGUISERVER'SERVICE_RUNNINGmust be shown only for the server you are about to update.SERVICE_STOPPEDmust be shown for all the other servers.
Launch the UMS installer.
You need administration rights to update the IGEL UMS HA.
When installing the UMS Server as a part of the HA network on Linux, the directory /root must be writable for the user root.
Read and confirm the License Agreement.
Read the Information regarding the installation process.
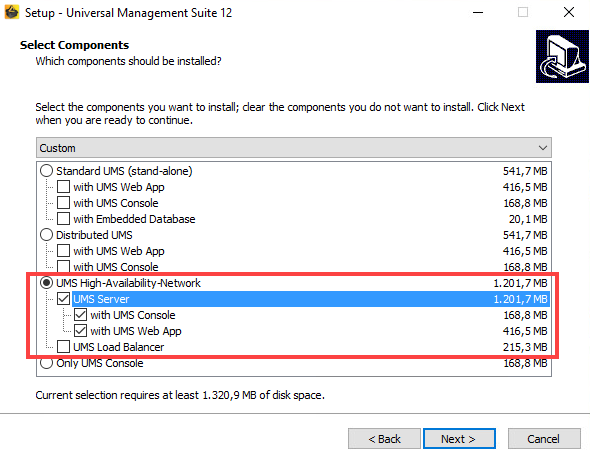
Verify the components to be installed. (In this example: HA network with UMS Server and UMS Load Balancer installed individually)
Confirm the system requirements dialog if your system fulfills them.
Under Select Additional Tasks, specify whether you would like to create shortcuts for the UMS Console and UMS Administrator on the desktop.
If the internal Windows firewall is active on your host: Review the settings under Windows firewall settings and change them where necessary. Each port that is activated here will be set as rule in the Windows firewall.
UMS 12 Communication Ports
If you are going to make network changes, consider the following ports and paths:
For IGEL OS 12 devices, TCP 8443
/device-connector/*is required.
SSL can be terminated at the reverse proxy / external load balancer (see IGEL Universal Management Suite Network Configuration ) or at the UMS Server.For importing IGEL OS 12 Apps to the UMS from the IGEL App Portal, the URL https://app.igel.com/ (TCP 443) is required.
For the UMS Web App, TCP 8443
/webapp/*and/wums-app/*are required.For the UMS Console, the root is required, i.e. TCP 8443
/*For IGEL OS 11 devices, TCP 30001 and TCP/UDP 30005 are required.
For more information on UMS ports, see IGEL UMS Communication Ports .
Read the summary and start the installation process.
Close the UMS installer once the installation is complete.
The UMS Server will start and update the database.
If SQL Server AD Native is used, you must also set the correct startup type and logon settings for the "IGEL RMGUIServer" service and restart the service. This must be done on ALL UMS Server hosts. For more information, see Microsoft SQL Server/Cluster with Native Active Directory (AD) Authentication.
Open the UMS Console and go to UMS Administration > UMS Network > Server to verify that the server is
successfully updated
running
in normal mode

Update the remaining UMS Servers, either simultaneously or one after another, by repeating steps 3-11.
After the update, the servers will automatically start and connect to the productive database.
Updating Further Components
After updating the UMS Servers within the HA network, you have to update all other current UMS components, e.g. separate UMS Load Balancers and UMS Consoles.
In order to do this, run the UMS installer on the systems.
Verify the components to be installed.
You cannot connect to the UMS Server with a console version that is older than the version of the UMS Server.
Load balancers are able to interoperate with UMS Servers of newer versions, but they should have the same version as the UMS Servers for optimal performance.
See also Troubleshooting: Load Balancer Is Not Stopping during the Update of the HA Installation.
Checking the Installation
Check if all processes are running. For the list of UMS HA processes, see IGEL UMS HA Services and Processes.
In the UMS Console, go to UMS Administration > UMS Network and check the items Server and Load Balancer.
All servers and load balancers must be:updated
running
in normal mode