Download PDF
Download page Installing the First HA Server and Transferring the Data from the Existing UMS Server.
Installing the First HA Server and Transferring the Data from the Existing UMS Server
When all preparation steps have been made, you can start the migration.
Installing the First HA Server
![]() Start the UMS High Availability (HA) installation. For the instructions, see the "Starting the Installation" section under "Installing the First Server in an HA Network".
Start the UMS High Availability (HA) installation. For the instructions, see the "Starting the Installation" section under "Installing the First Server in an HA Network".
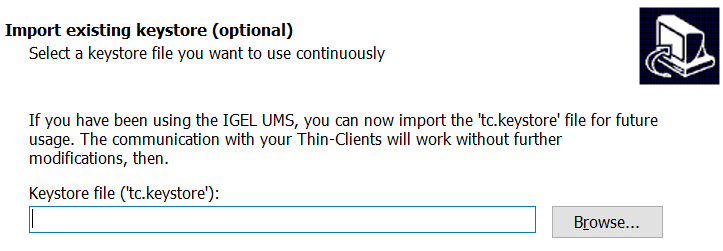
When asked for the keystore, use the file [IGEL installation directory]/rmtcserver/tc.keystore of the existing UMS installation:
Transferring the Data from the Old UMS Server
![]() Copy the files from the following folders to the new server – without the
Copy the files from the following folders to the new server – without the WEB-INF folder:
[IGEL installation directory]/rmguiserver/webapps/ums_filetransfer
Universal Firmware Updates
If you have used the UMS's integrated webserver to distribute the firmware updates, the updates that are still required should be manually transferred to the new server or the FTP server (if you configure it as the destination for the update files, see Universal Firmware Update). See also Which Files Are Automatically Synchronized between the IGEL UMS Servers?.
Or you can simply download the required firmware updates anew.-
[IGEL installation directory]/rmguiserver/webapps/e08ce61-d6df-4d2b-b44a-14c1ec722c44(only required if the old server has UMS version 6.07 or older)
Defining the Database Connection
- Stop the Windows service
IGEL RMGUIServeron the old UMS Server. - Open the UMS Administrator on the HA server.
Default path to the UMS Administrator:
Linux:
/opt/IGEL/RemoteManager/RMAdmin.shWindows:C:\Program Files\IGEL\RemoteManager\rmadmin\RMAdmin.exeThe IGEL UMS Administrator application can only be started on the UMS Server.
- Select Datasource > Add.
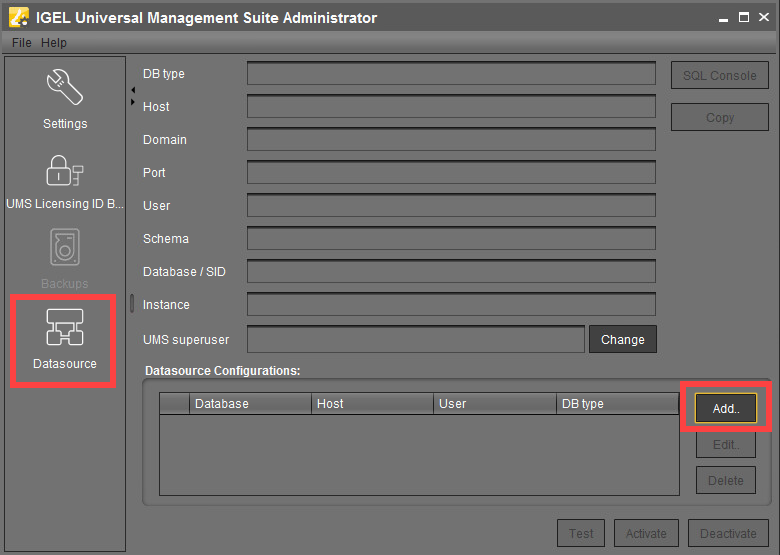
- Enter the connection properties of the prepared database. See also How to Set Up a Data Source in the IGEL UMS Administrator.
- Click Activate to enable the data source. See also Activating a Data Source.
The UMS Server will start automatically after that.
Checking the Installation
- Check if all processes are running. For the list of UMS HA processes, see IGEL UMS HA Services and Processes
In the UMS Console, go to UMS Administration > UMS Network and check the items Server and Load Balancer if the complete UMS HA Extension has been selected for installation. Check if there is an entry for the previous UMS Server among the listed components. If so, delete it.

Transferring or Registering Your UMS Licensing ID
![]() Transfer the UMS Licensing ID of the previous UMS installation to the new server. Alternatively, you can register the new UMS Licensing ID, which was created during the installation of the HA server. For detailed instructions, see Transferring or Registering the UMS Licensing ID.
Transfer the UMS Licensing ID of the previous UMS installation to the new server. Alternatively, you can register the new UMS Licensing ID, which was created during the installation of the HA server. For detailed instructions, see Transferring or Registering the UMS Licensing ID.
Adjusting DHCP Tag and DNS Alias
![]() Adapt, if necessary, the DHCP Tag and the DNS Alias
Adapt, if necessary, the DHCP Tag and the DNS Alias igelrmserver with the IP or FQDN of the new UMS Server. See Registering Devices Automatically on the IGEL UMS.
The configuration of the DHCP tag and the DNS alias is not a setting that can be made within the IGEL software. You must configure these within your individual network environment on the corresponding DHCP and DNS servers.
Next Step
>> Proceed with installing the other components, i.e. further UMS Servers, UMS Load Balancers, or UMS Console: Installing Further HA Components.