IGEL UMS 12 uses a web-based user interface to administer IGEL OS devices, see IGEL UMS Web App.
To log in to the UMS Web App, you can use the credentials of the UMS superuser (if not changed under UMS Administrator > Datasource > UMS superuser, the same as the User Credentials for DB-connect you set when installing the UMS with the embedded database); see How to Log In to the IGEL UMS Web App.
First Steps in the IGEL UMS
It is recommended to consider the following settings before onboarding / registering your devices. These settings are made in the IGEL UMS Console.
You can log in to the UMS Console using the credentials you set under User Credentials for DB-connect when installing the UMS with the embedded database; for more information, see Connecting the UMS Console to the IGEL UMS Server.
System Configuration
-
Activate logging under UMS Administration > Global Configuration > Logging.
-
Under UMS Administration > Administrative tasks, create the following administrative tasks:
-
Create backup (for the embedded database only. If you use an external database, see Creating a Backup of the IGEL UMS.
-
Delete logging data
-
Other tasks to automatically clean up logs (job execution data, execution data of administrative tasks, process events, asset information history)
-
-
If you want to activate the naming convention for your devices, go to UMS Administration > Global Configuration > Device Network Settings. For more information, see How to Rename IGEL OS Devices.
Administrator Accounts
In the IGEL UMS, you can import administrative accounts from your existing Active Directory (AD). If you want to do this, you have to link the UMS Server to the existing AD, see Active Directory / LDAP in the IGEL UMS.
After that, you can import users or user groups from your AD under UMS Console > System > Administrator Accounts > Import.
If you do not want to adopt the Active Directory structure, you can create local administrators and groups manually: UMS Console > System > Administrator Accounts > New.
Permission settings are performed in the same way for both groups and individual administrators.
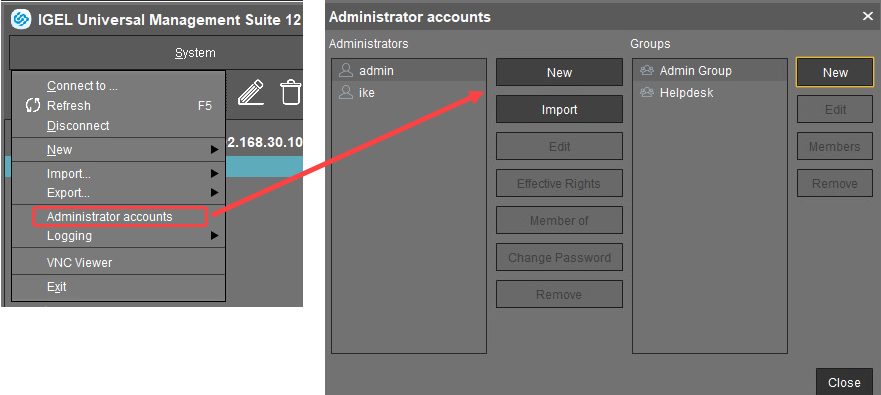
Each administrator / group can be granted specific permissions with regard to objects in the structure tree:
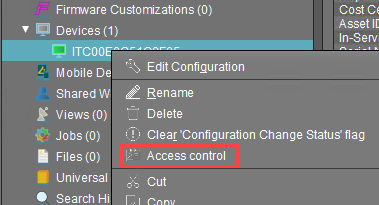
→ Right-click an object in the structure tree and select Access control in the context menu to set object permissions.
For more information on UMS administrator accounts and access rights, refer to Administrator Accounts in the IGEL UMS and User Management and IdP Management in the IGEL UMS Web App.
For permissions required for the UMS Web App, incl. for managing apps, see Important Information for the IGEL UMS Web App.
Optional: Preconfiguring Your Devices Before Onboarding
-
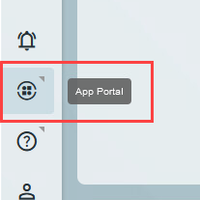
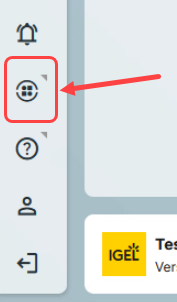
In the UMS Web App, click App Portal to import IGEL OS Apps.
-
Select an app and the required version and click Import.
After accepting the End User License Agreement (EULA), the selected app version will be imported into the UMS.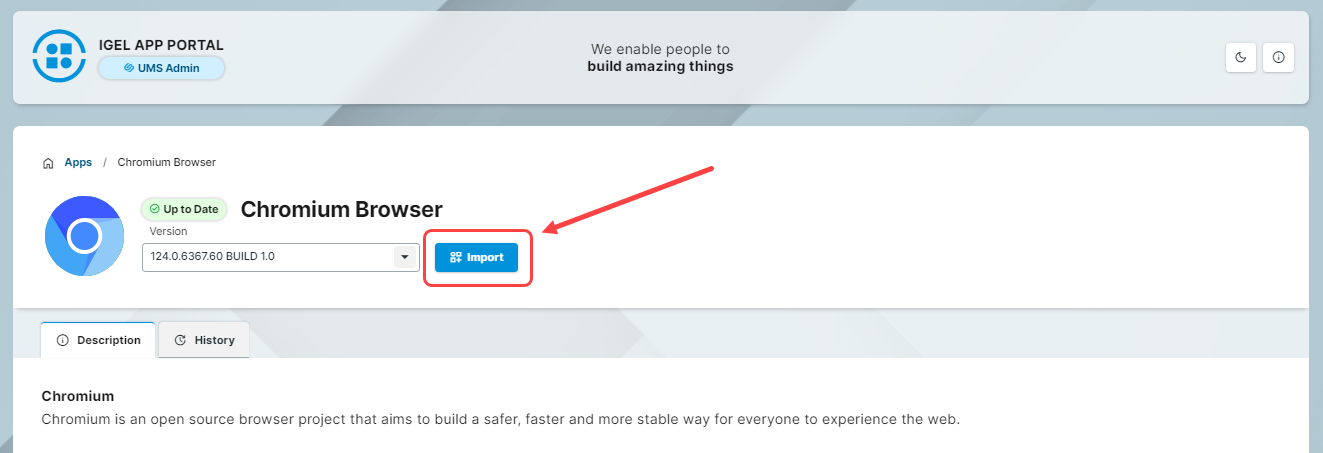
If you want to create profiles configuring IGEL OS Base System settings (e.g. SSO, accesories, etc.) before any of your IGEL OS 12 devices is registered with the UMS, import the IGEL OS Base System app. The latest app version is recommended. Alone for the purpose of profile creation, the subsequent assignment of the IGEL OS Base System app to a device / device directory is NOT necessary.
-
In the UMS Web App, go to Apps to view the imported app. To quickly configure the desired settings for this app, select the app and click Create new profile. Save the changes.
-
In order for your devices to be placed automatically in the specific directory according to certain rules during the onboarding:
1) In UMS Web App > Devices, create a device directory. For more information, see Creating a Directory Structure in the IGEL UMS Web App.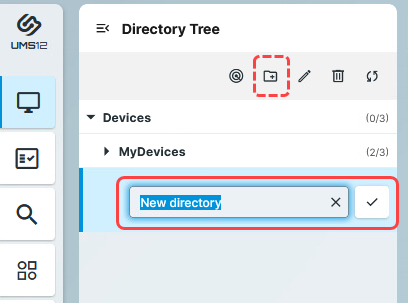
2) In the UMS Console, go to UMS Administration > Global Configuration > Default Directory Rules and create the desired rule. For details, see Default Directory Rules.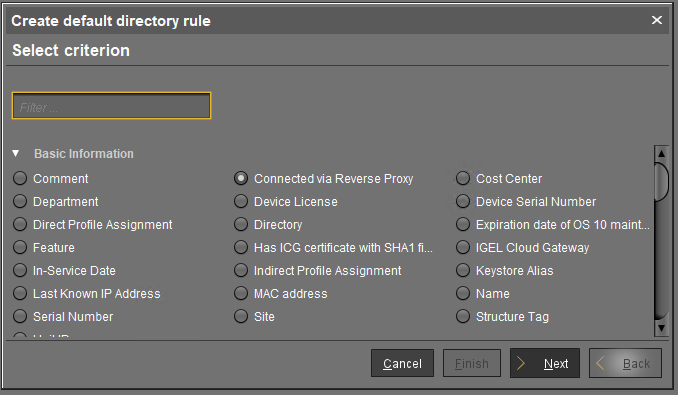
-
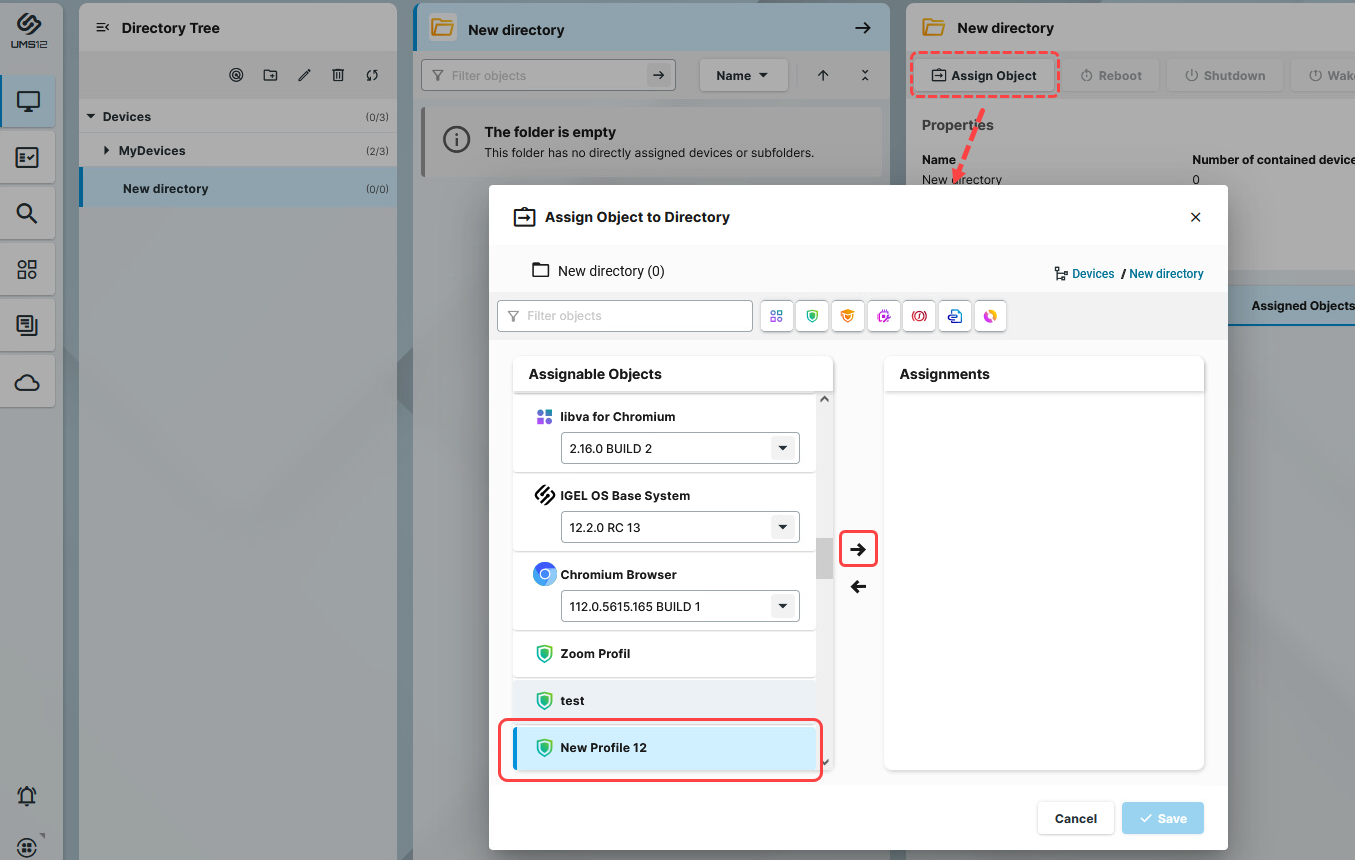
In the UMS Web App > Devices, assign the created profile to the device directory. Apply the changes.
The app will be assigned to the devices via this profile (so-called "implicit app assignment") and will be installed on the devices. Exception: IGEL OS Base System app
By default, apps / app versions assigned to the device will be automatically activated at the next reboot. If the background app update has been activated, an Update command must be sent, instead. For details, see How to Configure the Background App Update in the IGEL UMS Web App.
An implicit app assignment is overwritten if you assign an app explicitly, i.e. if you select an app as an object in the Assign object dialog.
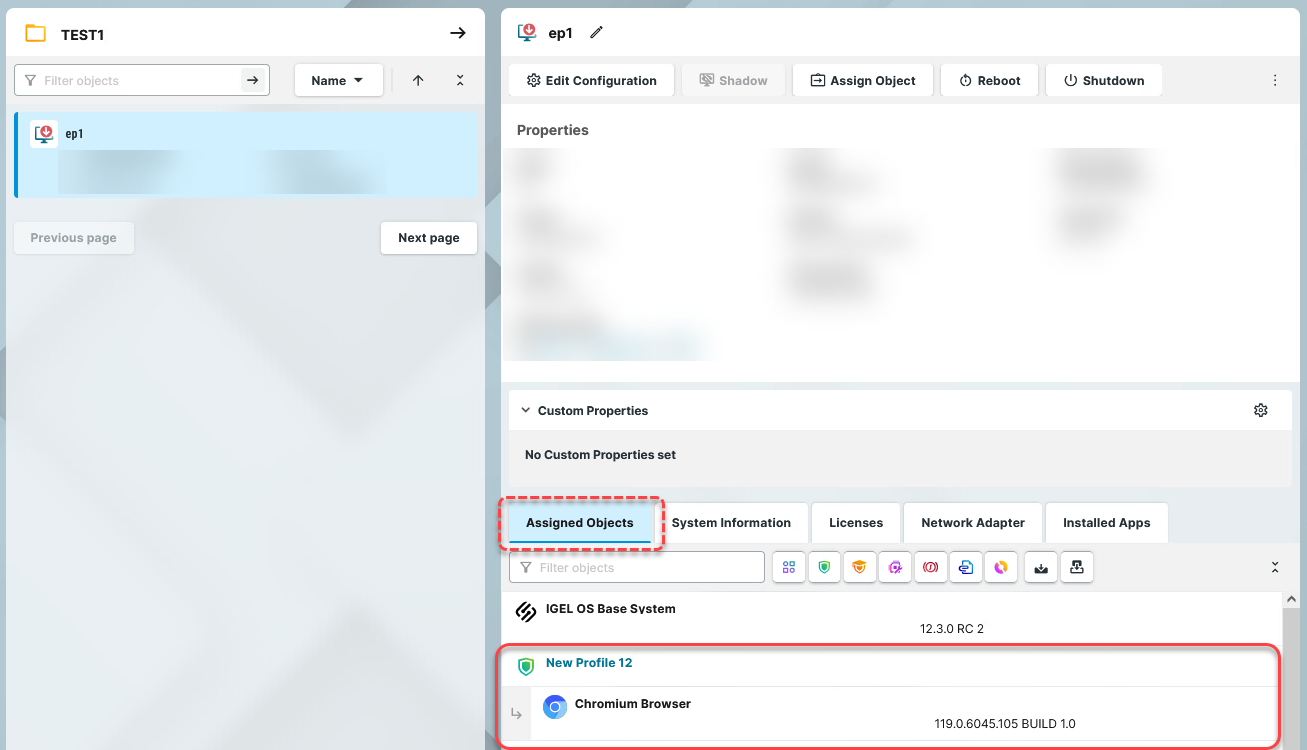
All implicitly assigned apps, i.e. apps assigned to devices via a profile, are displayed directly under the profile that contains them under Assigned Objects.
For more information, see How to Assign Apps to IGEL OS Devices via the UMS Web App.
Configuring corporate design settings is easier not via profiles, but via Corporate Identity Customizations (CICs). See How to Use Corporate Identity Customizations in IGEL UMS Web App.
For an overview of all methods for changing device settings, see Configuration of IGEL OS 12 Device Settings.
Importing IGEL OS Apps from the IGEL App Portal
To manage IGEL OS 12 devices, you need to import IGEL OS Apps of your choice from the IGEL App Portal:
-
In the UMS Web App, click App Portal.
-
Select the app and the required version and click Import.
-
Accept the End User License Agreement (EULA) and wait for the import to be finished.
-
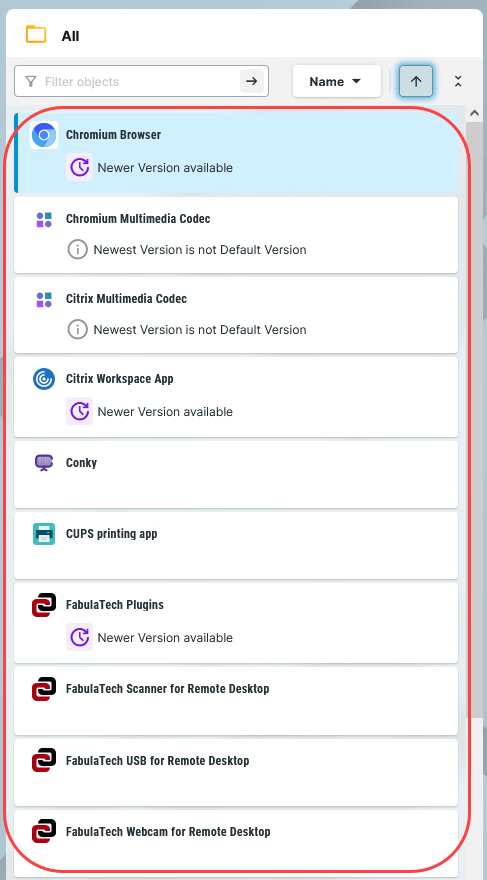
In the UMS Web App, go to Apps to view the imported app.
App Management permission is required to access the Apps area. You can set the permission under UMS Web App > User Management (see User Management and IdP Management in the IGEL UMS Web App) or under UMS Console > System > Administrator accounts.
The results of the app import are also displayed under Messages ![]()
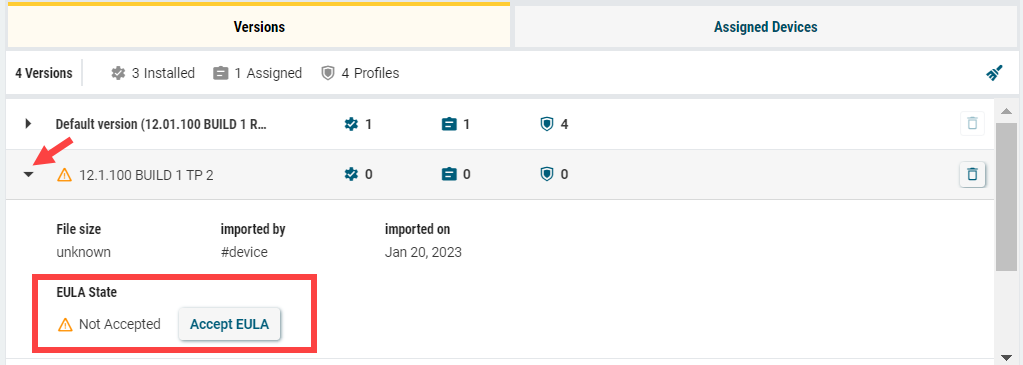
Accepting EULA in the UMS
In the Apps section, you may sometimes see app versions marked with an exclamation mark, i.e. with End User License Agreement (EULA) not accepted.
Accepting EULA can be necessary, for example, for automatically registered apps (IGEL OS Base System, all locally installed apps) or if the EULA is changed. If not accepted in the UMS, the EULA can still be accepted by your users locally on the device via the corresponding notification dialog.
If you need to delete an app / app version, see How to Delete Apps in the IGEL UMS Web App.
Creating an OS 12 Profile
As soon as you have imported an app, you can create a profile to configure settings for your IGEL OS 12 device.
Implicit App Assignment via Profiles
An app is automatically assigned to a device via a profile which configures this app. Exception: IGEL OS Base System app
An app version selected in the profile will be assigned to a device. The best practice is to use the Default Version, see How to Set a Default Version of an App in the IGEL UMS Web App.
An implicit app assignment is overwritten if you assign an app explicitly, i.e. if you select an app as an object in the Assign object dialog.
For more information on the app assignment, see Assignment of Apps and Profiles.
There are two methods to create a profile:
-
Via Configuration > Profiles > Create new profile (used to configure several apps. A profile configures ALL versions of an app, unless the version is specified.) For details, see How to Create and Assign Profiles in the IGEL UMS Web App.
-
Via Apps > Create new profile (used to quickly configure a profile for the selected app.) See the instructions below.
For apps that have no configurable parameters (e.g. codecs), it is not possible to create a profile.
If you need to delete a profile, see How to Use the Recycle Bin in the IGEL UMS Web App.
Creating a Profile in the “Apps” Tab
To quickly create a profile for an imported app, proceed as follows:
-
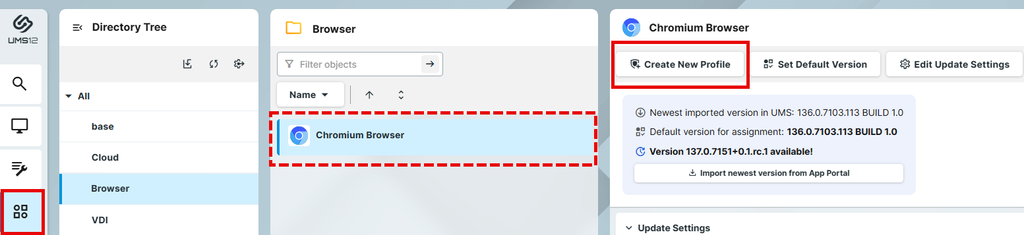
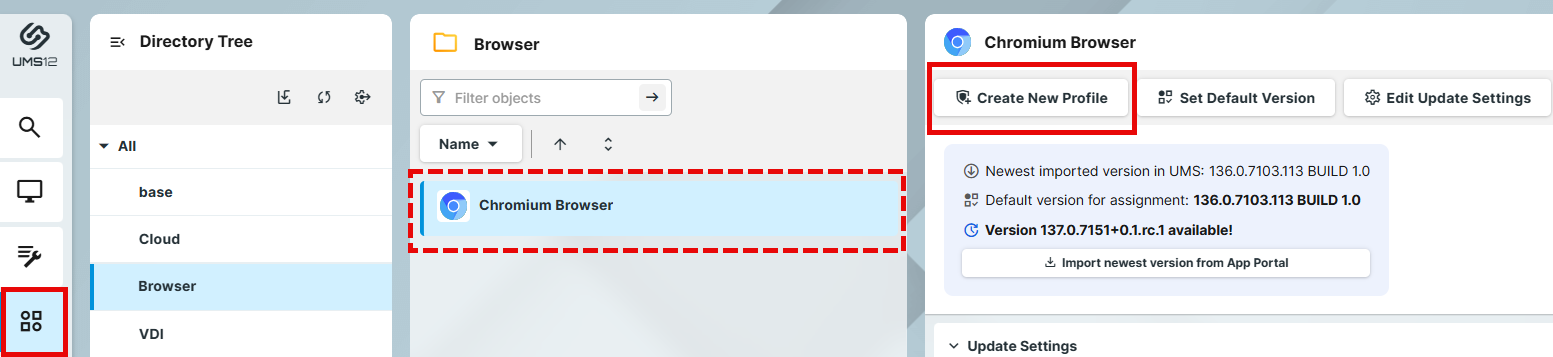
Under UMS Web App > Apps, select the required app and click Create New Profile.
-
Enter the name of the profile and specify the desired directory for storing the profile under Location. If desired, add the description for the profile.
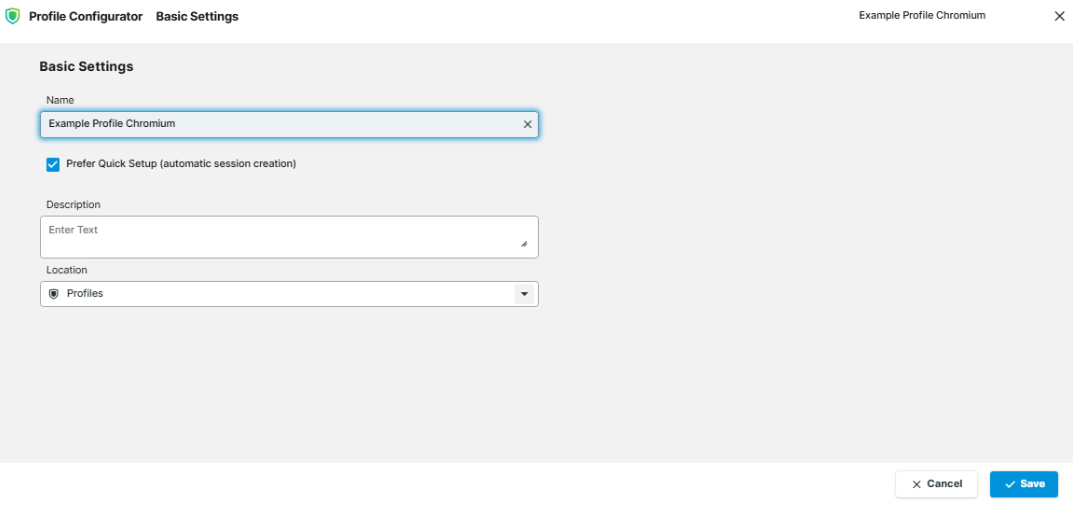
-
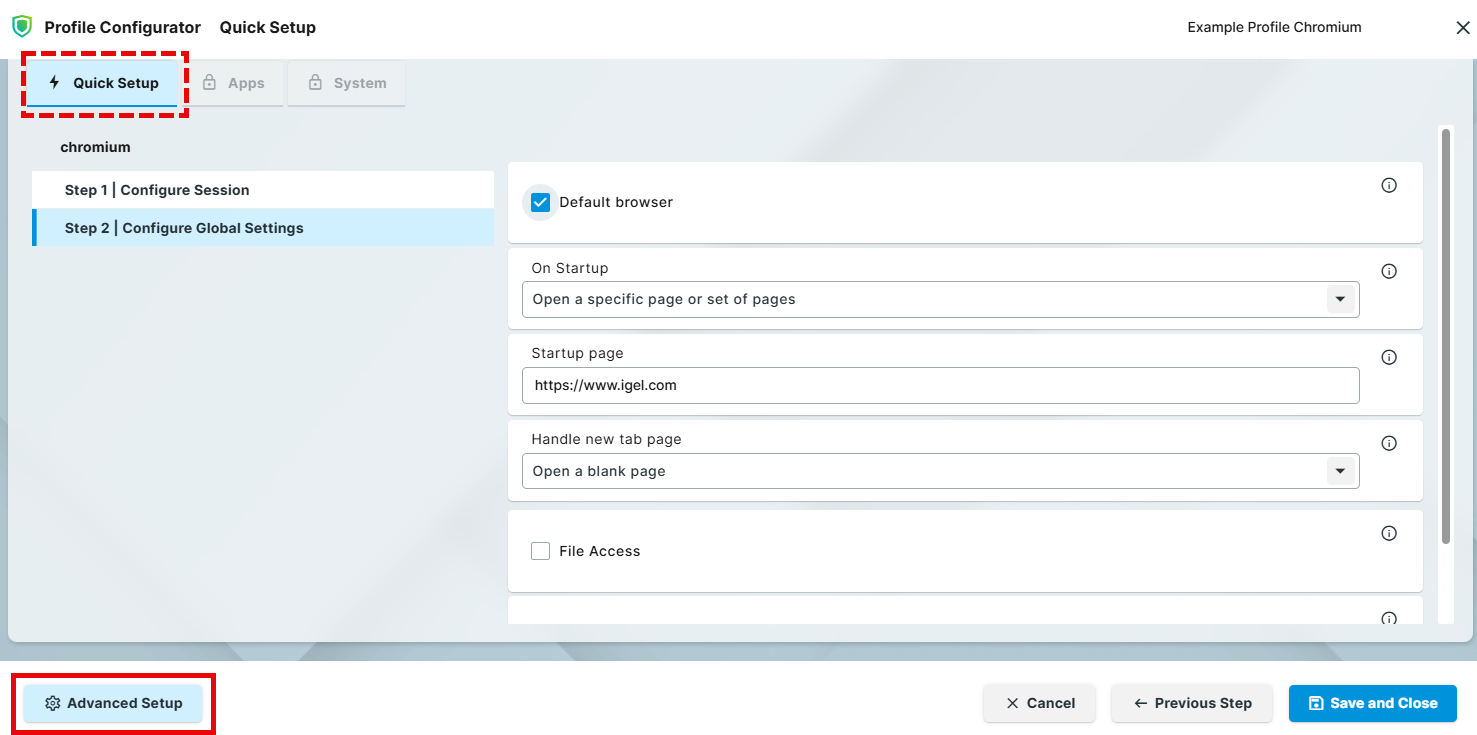
Optional (for a quicker profile creation): If you do not want to see all app settings available for configuration, but only those relevant for the quick start with the app, leave
Prefer Quick Setup (automatic session creation) enabled.Quick Setup mode for the configuration dialog will be opened if available.
Note the following:
-
Quick Setup mode is currently available for specific apps only.
-
Quick Setup mode is available only when creating a new profile, not while editing the existing profile.
-
Quick Setup mode is available for OS 12 profiles only.
-
Quick Setup mode is displayed only if one app supporting it is selected in the App Selector.
In case multiple apps or an app not supporting the Quick Setup mode are selected, Advanced Setup with all available app settings will be displayed even if Prefer Quick Setup (automatic session creation) is enabled.
-
-
Click Save.
The profile will be listed under Configuration > Profiles. -
Configure the desired settings.
The configuration dialog shows only those settings that can be configured for the selected app(s).
If you want to change the scope of the profile (i.e. redefine which apps should be configured by the profile), click App Selector.
|
|
The parameter is active and the set value will be configured by the profile. |
|
|
The parameter is inactive and will not be configured by the profile. IMPORTANT: When you deactivate the parameter, the value will be automatically set back to the default value. |
|
For information on the colored icons for tracking the changes, see Configuration of IGEL OS 12 Device Settings. |
|
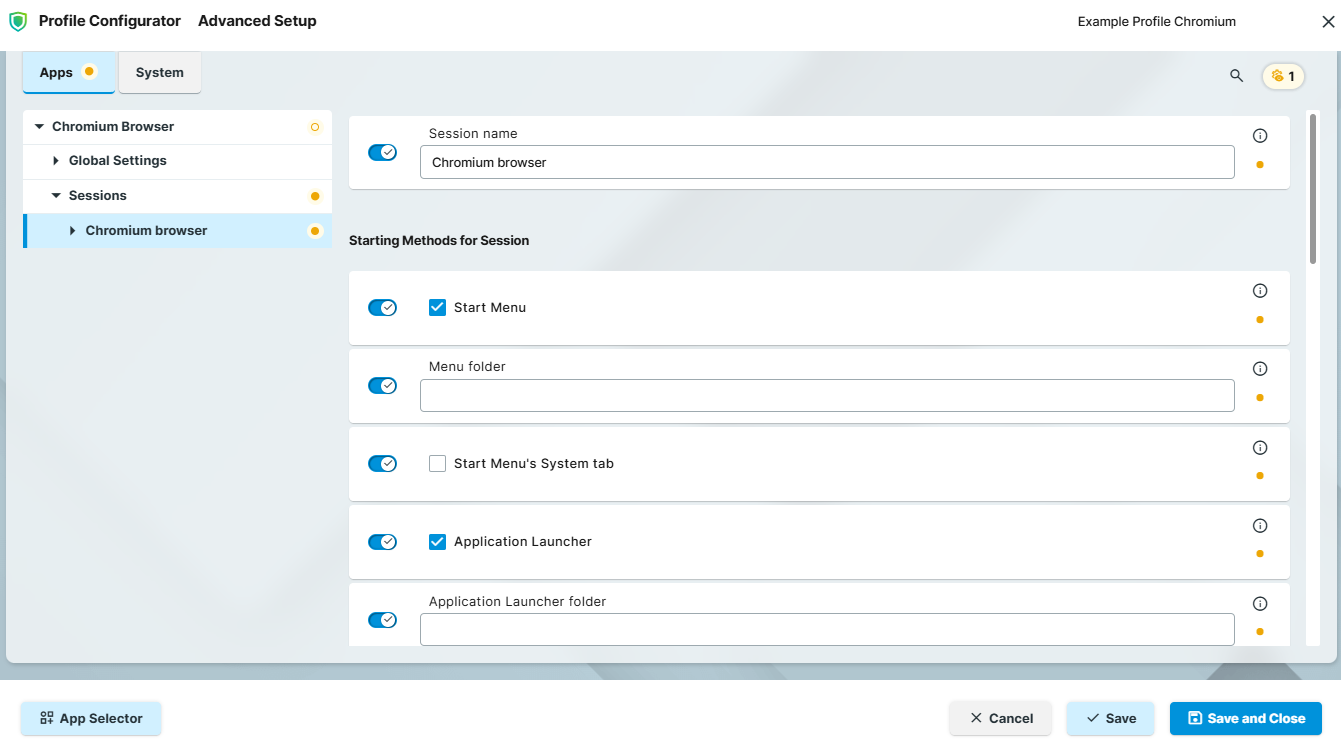
If the Quick Setup mode is displayed, click Advanced Setup to show all settings available for configuration or to open App Selector for changing the scope of the profile.
Note the following:
-
If you navigate from Quick Setup to Advanced Setup, all changes are saved and, if relevant for the selected app, one app session is automatically created.
-
If you click Cancel while in Quick Setup mode, the profile is permanently deleted straight away.
-
Save the changes.
-
Assign the profile to the required device / device directory. See Assignment of Apps and Profiles.
Setting a Default Version of an App
If you have imported several versions of an app, you can define which version will be a Default Version.
Default Version is a version that will be assigned to a device / device directory if no version is specified during the assignment of an app or during the creation of a profile configuring this app.
A Default Version is set globally: If changed, all assignments where no version was explicitly specified will change with it.
The best practice is to use the Default Version during the app assignment and profile creation.
The use of a specific version during the app assignment and profile creation is recommended for test purposes, e.g. to test app updates. After successful testing, you can change your Default Version.
To set a Default Version:
-
Under Apps, select the required app and click Set Default Version.
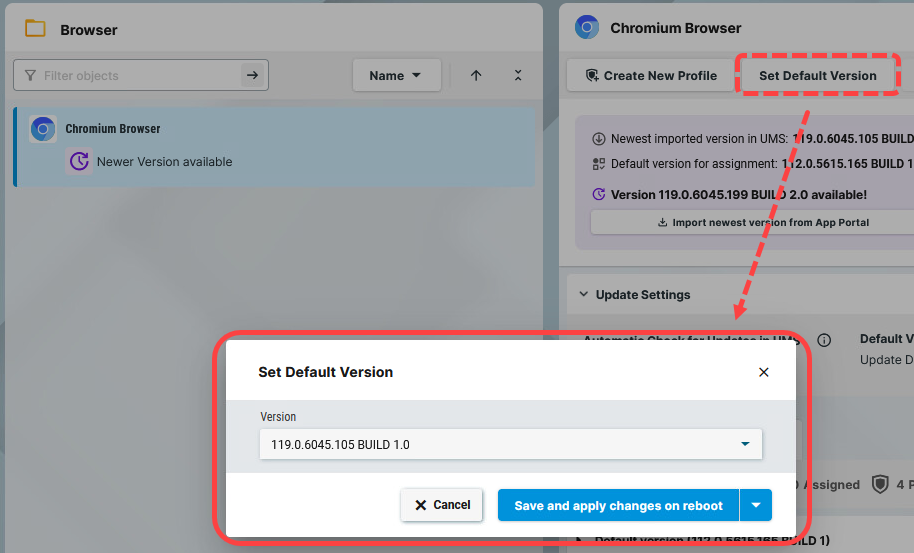
-
Select the desired default version and save the changes.
Assignment of Apps and Profiles
In the UMS, there are two methods to assign an app to your devices:
-
Implicit app assignment via profiles: An app is automatically assigned to a device via a profile that configures this app. Exception: IGEL OS Base System app
The app version that will be installed on the device via the implicit assignment if several profiles configure this app (but in different versions) is defined by the priority rules for profiles, see Summary - Prioritization of IGEL UMS Profiles. -
Explicit app assignment via the Assign object dialog
An explicitly assigned app ALWAYS overwrites an implicitly assigned app.
If you need to detach an app from the device, see Detaching Apps from the IGEL OS Device in IGEL UMS Web App.
Implicit App Assignment via Profiles
To assign profiles to a device / device directory, proceed as follows:
-
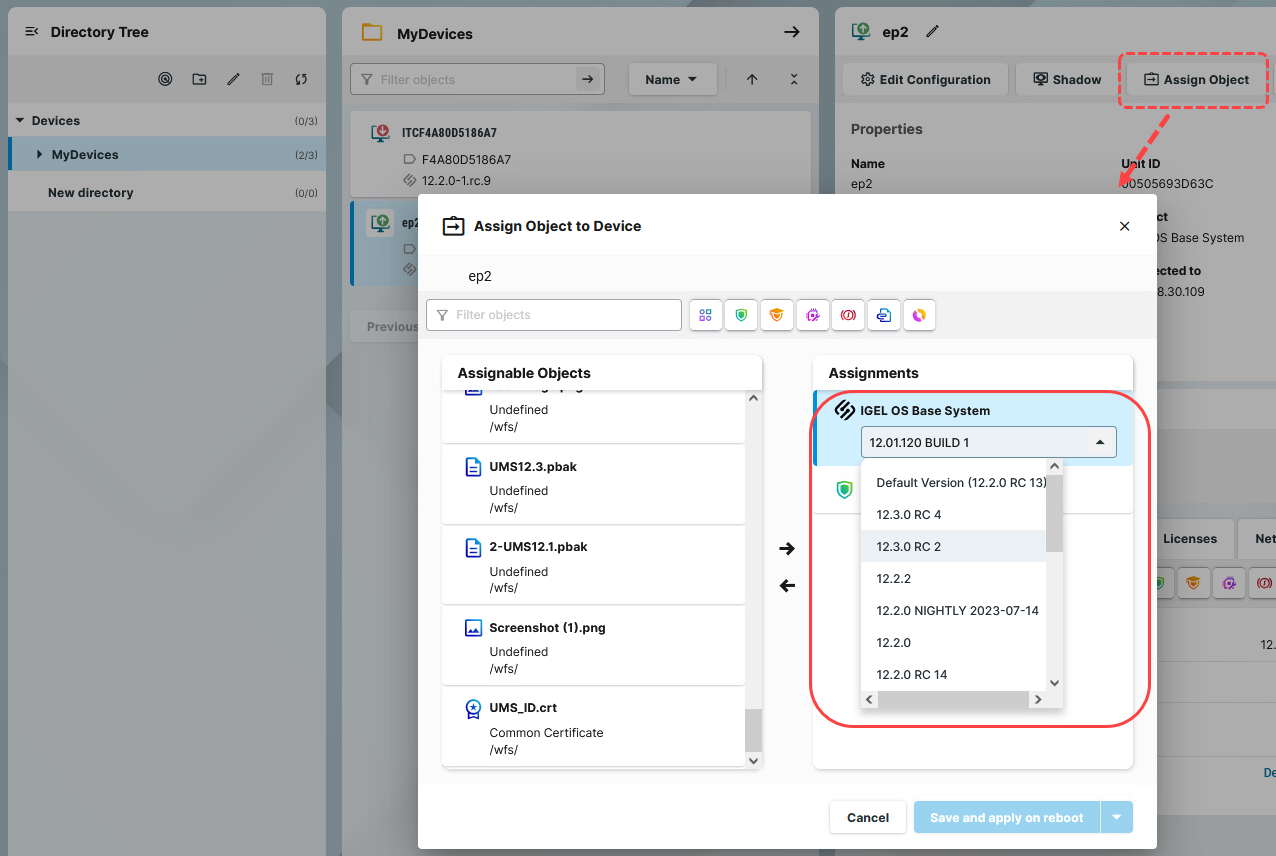
Under UMS Web App > Devices, select a device or device directory and click Assign object.
-
Select the profile you want to assign to the device / device directory and use the arrow button or drag & drop.
-
Save the changes.
-
Decide when the changes should become effective.
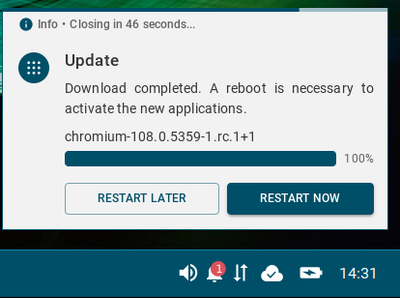
An app assigned via the profile will be downloaded by the device.
By default, apps / app versions assigned to the device will be automatically activated at the next reboot. The user will receive a corresponding notification. If the background app update has been activated, an Update command must be sent, instead; see How to Configure the Background App Update in the IGEL UMS Web App.
The assigned profile and the app assigned to the device via this profile are displayed under Devices > Assigned Objects.
To check the installed apps, go to Devices > [name of the device] > Installed Apps; see Checking Installed Apps via the IGEL UMS Web App.
Explicit App Assignment
For the assignment of the IGEL OS Base System app, the permission Assign Base System / Firmware Update is required. You can set the permission in the UMS Console via [context menu of a device / device directory] > Access control.
If various app versions have been assigned to a device (e.g. via direct and indirect assignment), the version that is closer to the device in the directory tree will have the priority and will be installed on the device.
https://kb.igel.com/en/universal-management-suite/12.07.100/detaching-apps-from-the-igel-os-device-in-igel-ums
To assign apps to a device / device directory, proceed as follows:
-
Under UMS Web App > Devices, select a device or device directory and click Assign object.
-
Select the required app (and its specific version, if necessary).
If no version is specified for an app during the assignment, the default version will be used. It is possible to select the version for an app in the Assign Object dialog either under Assignable Objects or under Assignments.
-
Save the changes.
-
Decide when the changes should become effective.
The app will be downloaded by the device.
By default, apps / app versions assigned to the device will be automatically activated at the next reboot. The user will receive a corresponding notification. If the background app update has been activated, an Update command must be sent, instead; see How to Configure the Background App Update in the IGEL UMS Web App.
The assigned app is displayed in the UMS Web App under Devices > Assigned Objects.
To check the installed apps, go to Devices > [name of the device] > Installed Apps; see Checking Installed Apps via the IGEL UMS Web App.
You can also observe the desktop of a device via shadowing with VNC, see Remote Access to Devices via Shadowing in the IGEL UMS Web App.