Creating Your Own Wallpaper via a Profile
You have already uploaded your wallpaper picture; see Uploading a Picture.
Create a profile and name it, for example, Wallpaper; see Create a Profile.
The Profile Configuration window opens.Set the wallpaper server location; see below "Setting the Wallpaper Server Location".
Configure the background of the client desktop; see below "Configuring the Background".
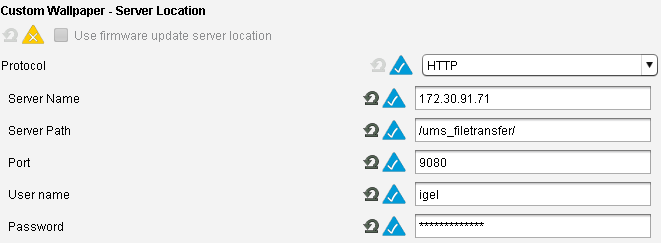
Setting the Wallpaper Server Location
Click System > Firmware Customization > Corporate Design > Background > Custom Wallpaper Server.

Choose HTTP as Protocol.
Enter the Server name of your UMS Server.
Enter the path of your wallpaper directory as Server path.
The standard Port should be 9080.
Set your UMS administrator User name and Password.
Click Save to save the settings.
Configuring the Background
Open the profile.
Click System > Firmware Customization > Corporate Design > Background (1st Monitor).
Activate Custom wallpaper download.
Enter under Custom wallpaper file the name of the picture you want to define as your background image.
If you use more than one monitor, you have to assign the background image to each one of them manually.Assign the profile to your devices by dragging and dropping them or by adding them under Assigned objects.
Checking the Results
Choose the device in the UMS structure tree under Devices.
Go to User Interface > Desktop > Background.
You will see that the wallpaper has already been assigned by the profile; you cannot set it manually any more.
Alternatively, you can shadow your thin client and you will see the new wallpaper.
This way, you can automatically assign background images to your devices. It is very easy to maintain them because the only thing you have to do if you want to choose another image is to change it in the profile.
