Installing UDC3 on Secunet SINA Workstation
To install IGEL Universal Desktop Converter 3 on a SINA workstation, proceed as follows:
Download the UDC3 zip file under IGEL Software Download and unzip the file.
Copy the ISO image to an USB stick.
Start the SINA workstation
Click Administration > Volumes in the navigation bar.
Click + Add item at the bottom of the screen to add a new item.
Enter a distinct name for the volume in the Name field top right.
The target drive is already specified.Click New CFS under Select volume type.
The form expands.Choose the preconfigured Security domain, Cipher algorithm and Hash algorithm.
Click Define Guest system under CFS content.
The form expands.Enter a distinct name for the system under Guest system name.
Choose 2 GiB as minimum for the Guest system size.
Select Disabled under Quarantine.
Click Create.
The system will now create the volume. This may take a while - depending on the size of the guest system.
Go to Administration > Volumes and click the new volume.
Next to it a little form opens.Open Guest systems.
You will see the volume you've created.Click Local under Add guest system from... to add the ISO image to this volume.
The form expands.Plug the USB Stick with the ISO image into the workstation.
Choose the stick as Device and the ISO image as Guest system image.
Click Add at the bottom of the form.
The system now adds the ISO image to your new volume. This will take a while.
Switch to the Workplaces menu.
Click + Add item at the bottom of the screen.
Enter a distinct name for the workplace in the Name field top right.
Choose the Guest system you've created. It has a small hard disk icon.
Choose the ISO image under Secondary guest system. It should have a small CD icon.
Select Secured networking under Network mode.
Choose your prefered settings under Display layout, Workplace hotkey and Audio mode.
Select CD/DVD under Boot order.
Select Automatic reservation under IP to claim and MAC to claim.
Select Ubuntu as OS type.
It is not necessary to activate the Detailed settings.
Click Create.
The system now creates the workplace.
Klick on the new workplace.
Next to it a little form opens.Click Launch to start the workplace.
The IGEL Universal Desktop Converter starts.After a few second you will see this screen:
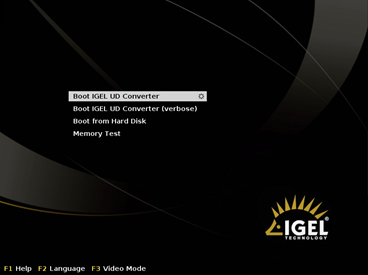
Keep the first selected item Boot IGEL UD Converter.
The conversion process starts.
Next you will see the blue IGEL Linux background.
A little popup appears.Choose your desired language.
Agree the license agreement.
Install the IGEL Linux OS to the workspace.
Be aware, that all data of the volume will be deleted. That’s why you should always create a new volume for the IGEL Linux OS.