In the following article, you will learn how to configure the IGEL Secure Kiosk App. The app allows organizations to deliver web-based applications safely, using a hardened configuration with minimal user interaction and strong control for administrators.
With the IGEL Secure Kiosk App, any web page whitelisted by the administrator is opened in a fully locked-down, kiosk-like mode. There are no standard browser menus, no shortcuts, and no right-clicking possibilities. The browser is controlled by a fully customizable toolbar with buttons for navigation, printing, or custom commands. Strong control over the allowed websites and browser options makes the app ideal for public kiosks and secure enterprise terminals.
The IGEL Secure Kiosk app is always displayed in full-screen mode, even if multiple monitors are used.
To authenticate the app, you can provide a client certificate.
Requirements
-
IGEL OS Base System 12.7.4 or higher
-
The IGEL Secure Kiosk app is imported to your IGEL UMS. For details on app import, see How to Import IGEL OS Apps from the IGEL App Portal.
-
Highly recommended: Virtual console access should be disabled. Follow the instructions under Disabling Virtual Console Access and reboot the device afterward.
How to Configure IGEL Secure Kiosk App
-
In the IGEL UMS, create a profile that configures the IGEL Secure Kiosk app. For details on profile creation, see How to Create and Assign Profiles in the IGEL UMS Web App.
-
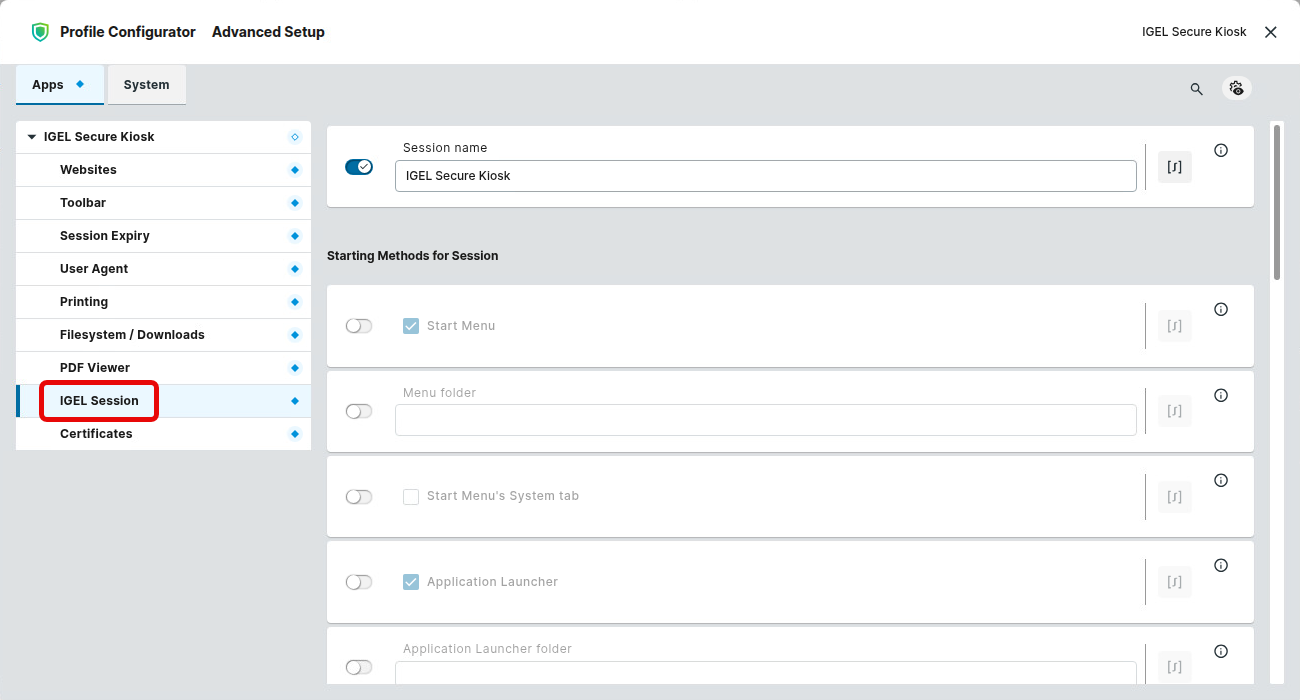
In the profile configurator, go to Apps > IGEL Secure Kiosk > IGEL Sessions and define the required Session name and starting methods for the app (e. g. Autostart as a typical use case). The starting methods are described under Starting Methods for Apps.
-
Configure the settings described below.
-
Save the profile and assign it to the required devices. For details on profile assignment, see How to Create and Assign Profiles in the IGEL UMS Web App.
The app will be downloaded and installed on the IGEL OS device.
-
Reboot the device.
Configuring the Allowed Websites
-
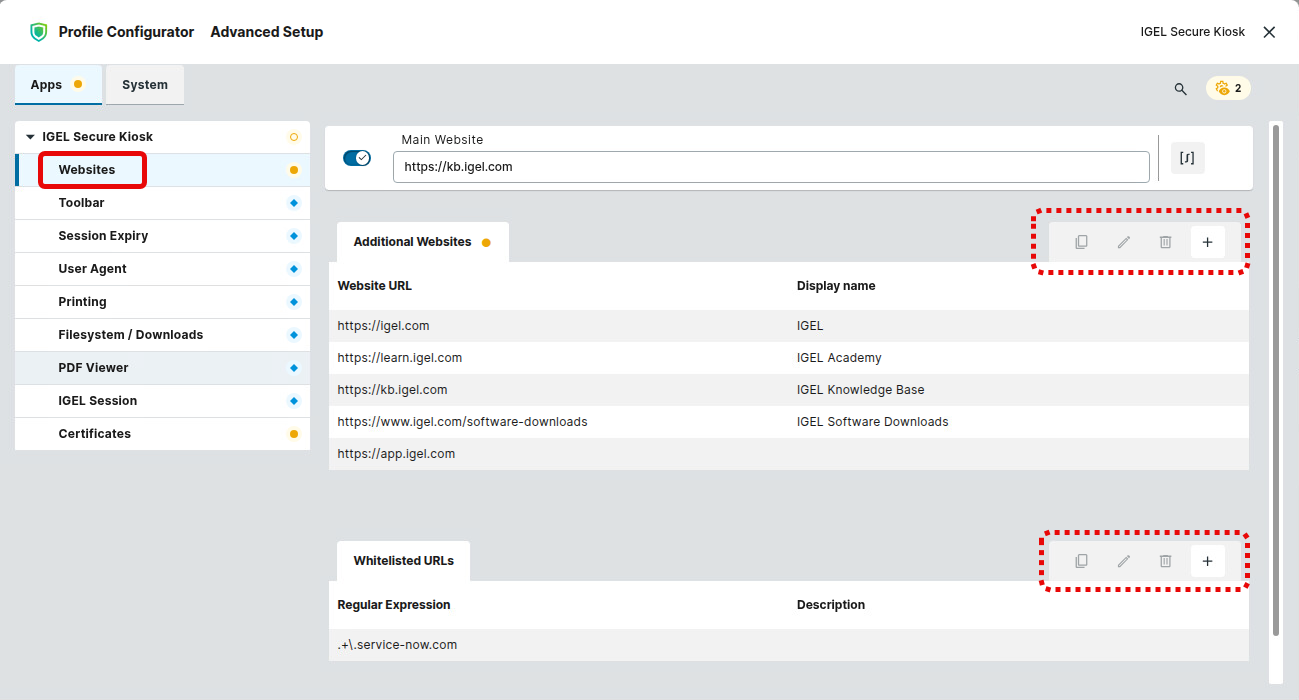
In the profile configurator, go to Apps > IGEL Secure Kiosk > Websites.
-
Configure the settings according to your requirements.
Main Website
URL of the website that should be opened initially.
Additional Websites
URLs of other websites that the end user is allowed to open. These websites will be opened when Page Selector is added as a toolbar element under Apps > IGEL Secure Kiosk > Toolbar > Toolbar Items > Toolbar item type.
To add a new entry:
-
Click

The entry mask will be opened.
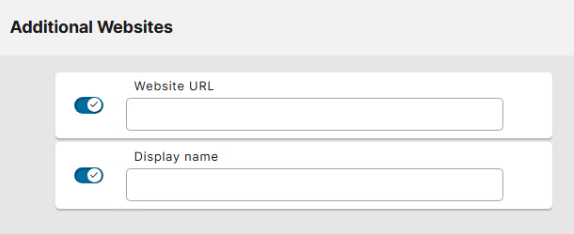
-
Specify Website URL.
-
Specify Display name. If left empty, the Website URL will be displayed in the Page Selector (configured under Apps > IGEL Secure Kiosk > Toolbar > Toolbar Items > Toolbar item type > Page Selector).
-
Click Confirm to save the settings.
To manage the list of additional allowed websites, proceed as follows:
-
Click
-
Click

-
Click

-
Click

Example of additionally allowed websites:
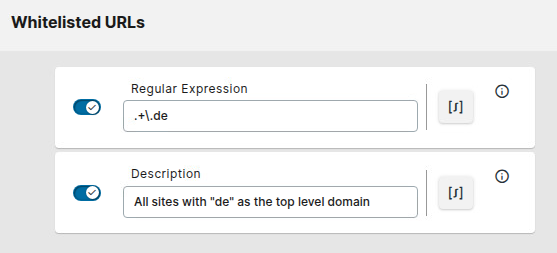
Whitelisted URLs
A list of domains, patterns, or concrete web addresses that are explicitly permitted to be accessed or processed by the system.
To add a new entry:
-
Click
-
Regular Expression: A pattern that represents the URLs you want to allow. The usual regular expressions can be used.
-
Description: A short text that describes the allowed URLs.
-
-
Click Confirm to save the settings.
To manage the list, proceed as follows:
-
Click
-
Click
-
Click
-
Click
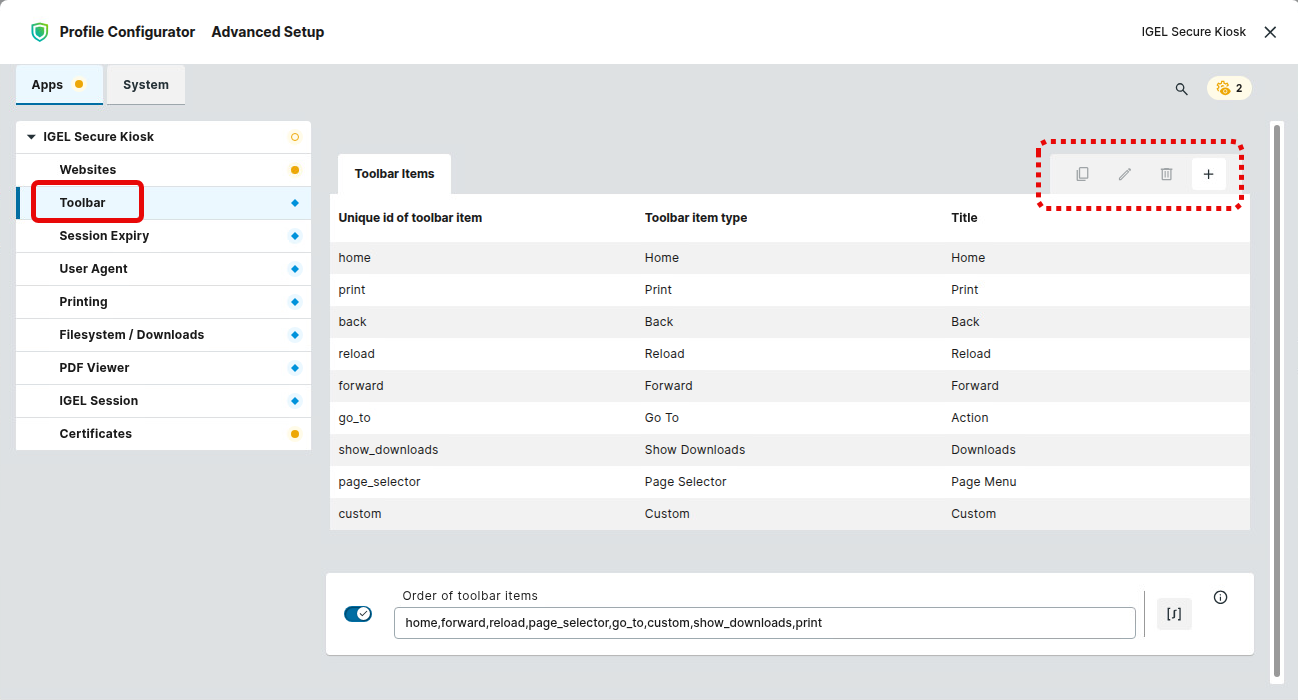
Configuring the Toolbar
You can populate the toolbar with GUI elements.
To configure the toolbar:
-
In the profile configurator, go to Apps > IGEL Secure Kiosk > Toolbar.
-
Configure the toolbar items and their order as described below.
To manage the toolbar items, proceed as follows:
-
Click
-
Click
-
Click
-
Click
Home Button
This button loads the page defined under Main Website.
→ Edit the parameters according to your needs:
-
Unique id of toolbar item: Provide a unique identifier for this toolbar item. Allowed characters:
-
letters
-
numbers
-
“-”
-
“_”
-
-
Toolbar item type: Select Home.
-
Title: Provide a title that contains at least one non-whitespace character.
-
Tooltip (optional): A hint for the user that explains the function of this toolbar item.
-
Icon path (optional): The file path to an icon for this toolbar item.
Reload Button
This button reloads the current page.
→ Edit the parameters according to your needs:
-
Unique id of toolbar item: Provide a unique identifier for this toolbar item. Allowed characters:
-
letters
-
numbers
-
“-”
-
“_”
-
-
Toolbar item type: Select Reload.
-
Title: Provide a title that contains at least one non-whitespace character.
-
Tooltip (optional): A hint for the user that explains the function of this toolbar item.
-
Icon path (optional): The file path to an icon for this toolbar item.
Back Button
This button loads the previous page in the page history, if applicable.
→ Edit the parameters according to your needs:
-
Unique id of toolbar item: Provide a unique identifier for this toolbar item. Allowed characters:
-
letters
-
numbers
-
“-”
-
“_”
-
-
Toolbar item type: Select Back.
-
Title: Provide a title that contains at least one non-whitespace character.
-
Tooltip (optional): A hint for the user that explains the function of this toolbar item.
-
Icon path (optional): The file path to an icon for this toolbar item.
Forward Button
This button loads the next page in the page history, if applicable.
→ Edit the parameters according to your needs:
-
Unique id of toolbar item: Provide a unique identifier for this toolbar item. Allowed characters:
-
letters
-
numbers
-
“-”
-
“_”
-
-
Toolbar item type: Select Forward.
-
Title: Provide a title that contains at least one non-whitespace character.
-
Tooltip (optional): A hint for the user that explains the function of this toolbar item.
-
Icon path (optional): The file path to an icon for this toolbar item.
Print Button
This button prints the current page.
For details on printer configuration, see Configuring Printing.
→ Edit the parameters according to your needs:
-
Unique id of toolbar item: Provide a unique identifier for this toolbar item. Allowed characters:
-
letters
-
numbers
-
“-”
-
“_”
-
-
Toolbar item type: Select Forward.
-
Title: Provide a title that contains at least one non-whitespace character.
-
Tooltip (optional): A hint for the user that explains the function of this toolbar item.
-
Icon path (optional): The file path to an icon for this toolbar item.
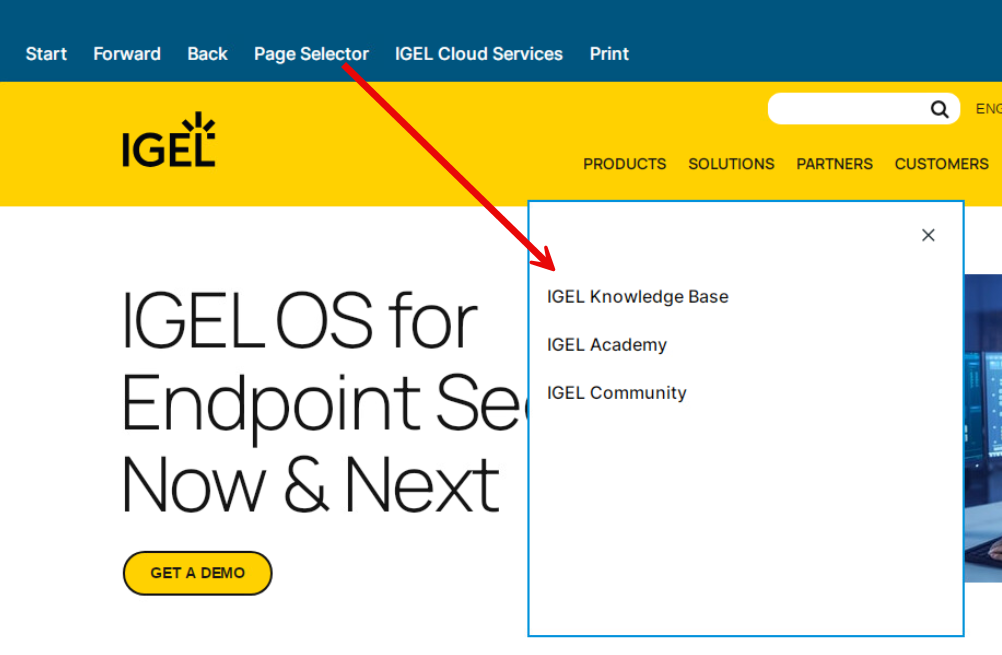
Page Selector
This button adds a menu with the pages configured in Websites > Additional Websites.
→ Edit the parameters according to your needs:
-
Unique id of toolbar item: Provide an identifier for this toolbar item. Allowed characters:
-
letters
-
numbers
-
“-”
-
“_”
-
-
Toolbar item type: Select Page Selector.
-
Title: Provide a title that contains at least one non-whitespace character.
-
Tooltip (optional): A hint for the user that explains the function of this toolbar item.
-
Icon path (optional): The file path to an icon for this toolbar item.
Go To Button
This button can load a specific target URL, clear the browser cache, or execute a configurable command or script. Please note that a target URL must be defined for this type of toolbar item; if you need a button to clear the browser cache, or execute a configurable command or script without loading a target URL, check out the Custom Button.
→ Edit the parameters according to your needs:
-
Unique id of toolbar item: Provide a unique identifier for this toolbar item. Allowed characters:
-
letters
-
numbers
-
“-”
-
“_”
-
-
Toolbar item type: Select Page Selector.
-
Title: Provide a title that contains at least one non-whitespace character.
-
Tooltip (optional): A hint for the user that explains the function of this toolbar item.
-
Icon path (optional): The file path to an icon for this toolbar item.
-
Target URL: The URL that will be loaded when the user clicks the button.
-
Clear browser data: If enabled, the browser cache will be cleared when the user clicks the button.
-
Command to execute: The command that will be executed when the user clicks the button. The full absolute path must be provided. Example for test purposes:
/usr/bin/notify-send ‘Message’ 'You are in the kiosk'
Show Downloads Button
This button opens a list of files downloaded to the device.
For configuration details on downloads, see Configuring Downloads and Filesystem Access.
→ Edit the parameters according to your needs:
-
Unique id of toolbar item: Provide a unique identifier for this toolbar item. Allowed characters:
-
letters
-
numbers
-
“-”
-
“_”
-
-
Toolbar item type: Select Show Downloads.
-
Title: Provide a title that contains at least one non-whitespace character.
-
Tooltip (optional): A hint for the user that explains the function of this toolbar item.
-
Icon path (optional): The file path to an icon for this toolbar item.
Custom Button
This button executes a configurable command or script.
→ Edit the parameters according to your needs:
-
Unique id of toolbar item: Provide a unique identifier for this toolbar item. Allowed characters:
-
letters
-
numbers
-
“-”
-
“_”
-
-
Toolbar item type: Select Custom.
-
Title: Provide a title that contains at least one non-whitespace character.
-
Tooltip (optional): A hint for the user that explains the function of this toolbar item.
-
Icon path (optional): The file path to an icon for this toolbar item.
-
Clear browser data: If enabled, the browser cache will be cleared when the user clicks the button.
-
Command to execute: This command is executed when the user clicks the button. The full absolute path must be provided. Example for test purposes:
/usr/bin/notify-send ‘Message’ 'You are in the kiosk'
Order of Toolbar Items
You can define the order of the toolbar items by creating a comma-separated list of their unique identifiers.
Example: home,forward,reload,page_selector,go_to,custom,show_downloads,print
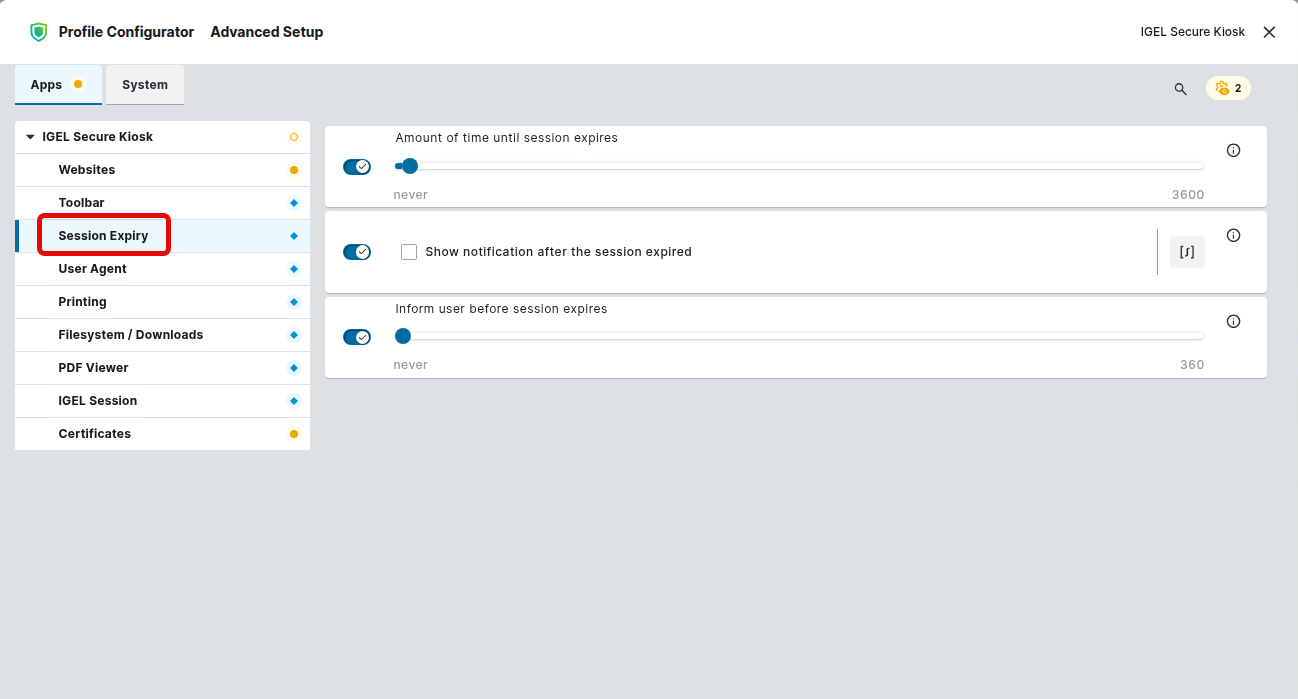
Configuring the Session Expiry
You can define if and when an IGEL Secure Kiosk App session expires, and if the user is notified.
When a session expires, the following happens:
-
The browser returns to the start page (Main Website).
-
The browser data is cleared.
-
The download folder is cleared.
To configure the session expiry:
-
In the profile configurator, go to Apps > IGEL Secure Kiosk > Session Expiry.
-
Configure the details as described below.
Amount of time until session expires
Sets an idle timeout in seconds. When there has been no user interaction during the specified time, the IGEL Secure Kiosk session expires.
Value range: never (0) … 3600
Show notification after the session expired
- A notification is shown when the session has expired.
Inform user before session expires
Defines how many seconds before session expiry a notification is shown.
Value range: never … 360
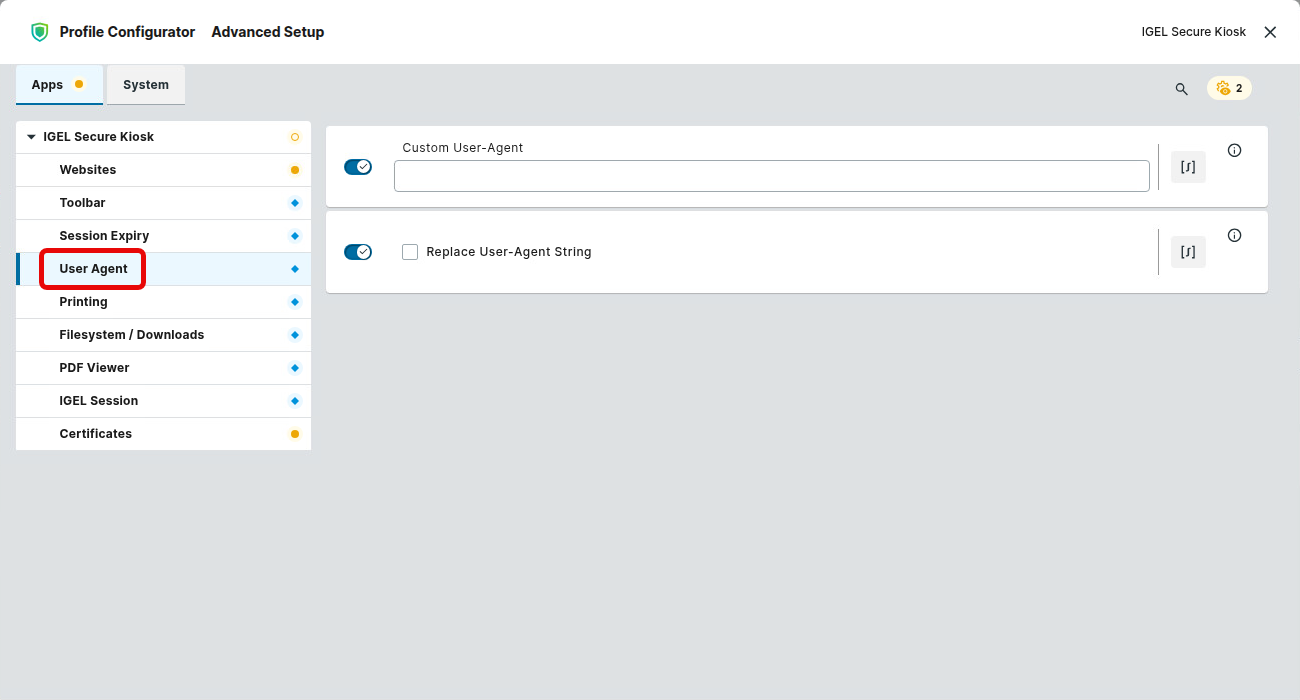
Configuring the User Agent
You can edit the user-agent string that the app will send with its HTTP requests. You can choose between adding a custom user-agent string to the predefined user-agent string and replacing the predefined user-agent string with the custom user-agent string.
To configure the session expiry:
-
In the profile configurator, go to Apps > IGEL Secure Kiosk > User Agent.
-
Configure the details as described below.
User Agent
You can edit the user-agent string that the app will send with its HTTP requests. Please note the requirements below.
-
The user-agent string must have at least one PRODUCT.
-
Each PRODUCT consists of a NAME, an optional VERSION, and zero or more optional COMMENTs.
-
For the Name, the following characters are allowed:
!/#/$/%/&/'/*/+/-/./^/_/`/|/~/ DIGIT / ALPHA -
For the COMMENT, the following characters are allowed:
!/#/$/%/&/'/*/+/-/./^/_/`/|/~/=/“/ DIGIT / ALPHA -
Examples of valid user-agent strings:
-
One product:
Mozilla -
One product with version:
Mozilla/5.0 -
One product with version and comment:
Mozilla/5.0 (info=1) -
Several products:
Mozilla Gecko/1.0 MyBrowser/1234 (additional info)
-
Replace User-Agent String
- The custom user-agent string is added to the predefined user-agent string. (Default)
- The custom user-agent string replaces the predefined user-agent string.
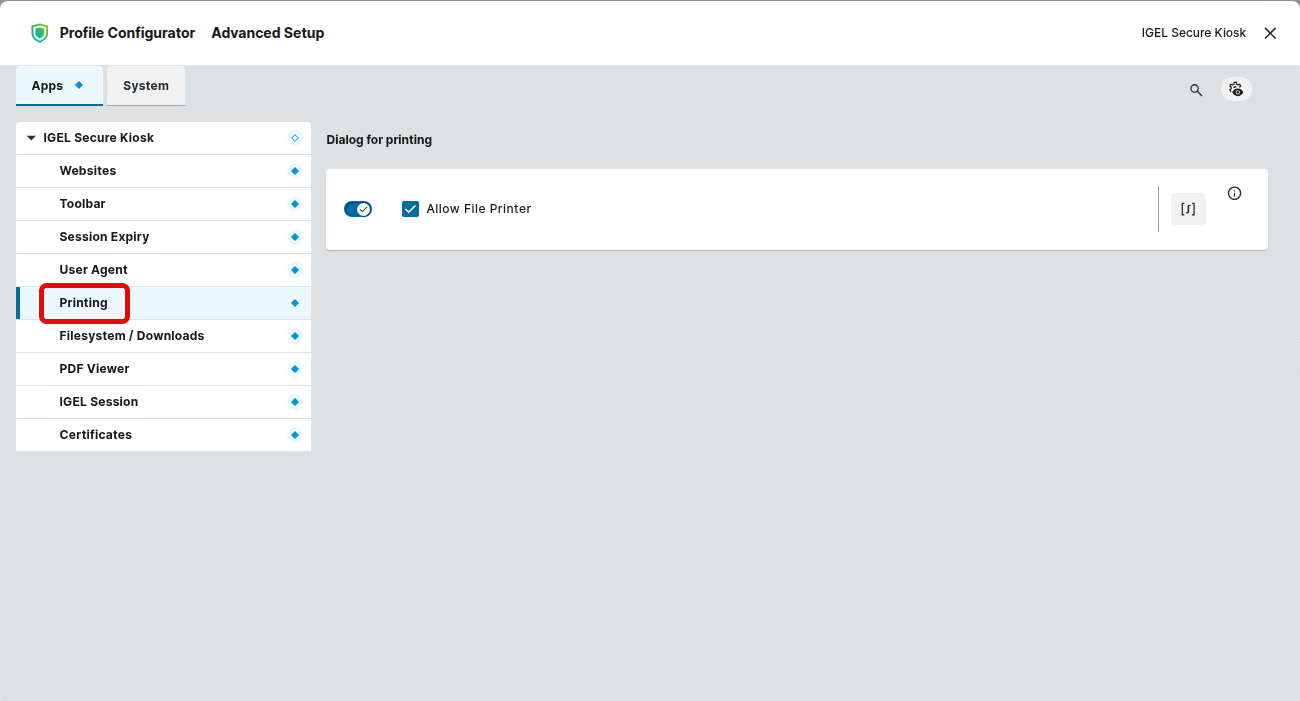
Configuring Printing
For all printing functions except printing to a file, the CUPS printing app must be installed, and a printer must be set up. For details, see CUPS printing app.
You can select the printer to be used, enable or disable the printing dialog, and set printing parameters.
To configure printing:
-
In the profile configurator, go to Apps > IGEL Secure Kiosk > Printing.
-
Configure the details as described below.
Allow File Printer
- The user can print to a PDF file. The user can view the file via the Show Downloads button.
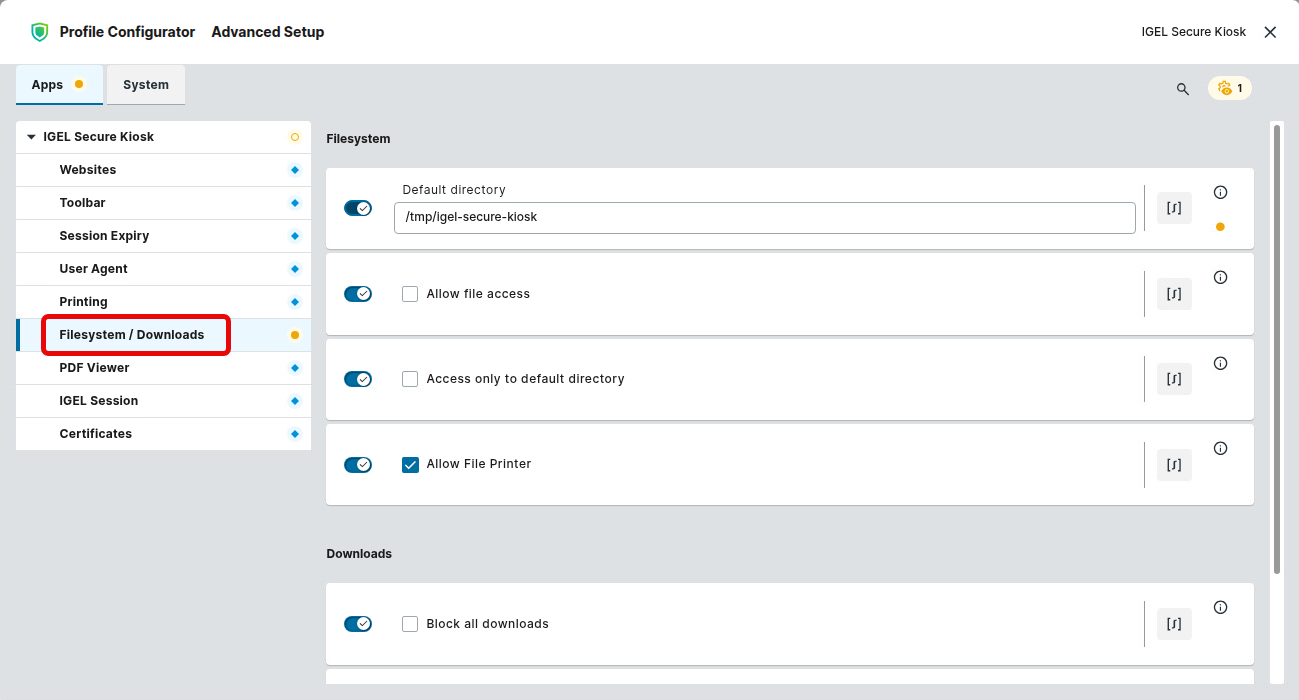
Configuring Downloads and Filesystem Access
You can configure whether downloads and PDFs from a file print are allowed and where they are stored. Also, you can allow, restrict, or disallow user access to stored files.
To configure downloads:
-
In the profile configurator, go to Apps > IGEL Secure Kiosk > Filesystem / Downloads.
-
Configure the details as described below.
Default directory
The directory on the device’s file system to which files are downloaded and PDF files are printed. This field must be filled in. Please note that only absolute paths are allowed. Default: /tmp/igel-secure-kiosk
Allow file access
To enable the user to upload files to a web page or to view local files with the PDF viewer, this option must be activated.
- The user can see files on the device’s file system.
- Files on the device’s file system cannot be viewed. (Default)
Access only to default directory
When the user opens a web page with an upload button or a PDF document, the contents of the default directory are available in a file chooser. This parameter determines whether the file chooser allows the user to access other directories.
- The user can only access files located in the default directory. (Default)
- The user can change to other directories.
Allow File Printer
- The user can print to a PDF file. The user can view the file via the Show Downloads button.
Block all downloads
- No files can be downloaded.
- All files that are specified under Allowed file extensions for download can be downloaded. (Default)
Allowed file extensions for download
Enter a comma-separated list of allowed file extensions. Example: .txt,.pdf,.zip
Configuring the PDF Viewer
You can configure the appearance of the built-in PDF viewer.
To configure the PDF viewer:
-
In the profile configurator, go to Apps > IGEL Secure Kiosk > PDF Viewer.
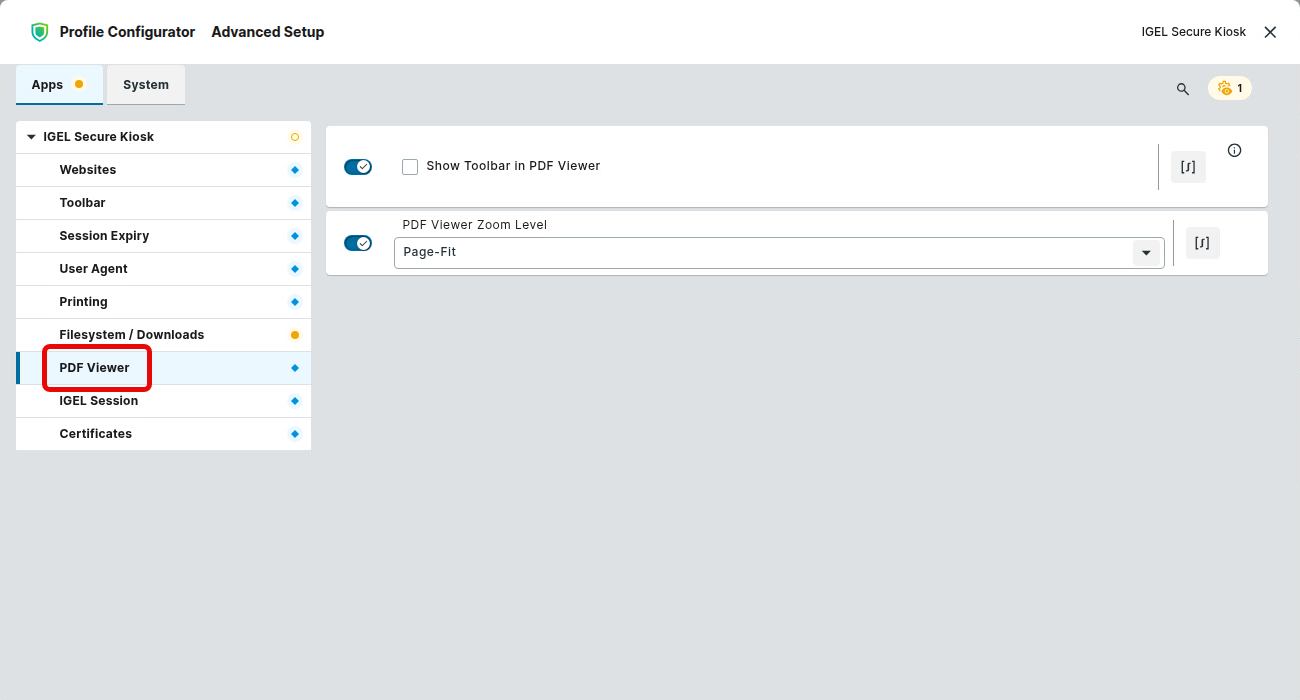
-
Configure the details as described below.
Show Toolbar in PDF Viewer
With the toolbar, the user can adjust the display of pages, like zooming in and out.
- The toolbar of the PDF viewer is shown.
- The toolbar is hidden. (Default)
PDF Viewer Zoom Level
Defines the size in which a document is displayed.
Possible values:
-
Page-Fit: The size is adjusted so that a complete page fits on the available space.
-
Page-Height: The size is adjusted so that the page height matches the height of the available space.
-
Page-Width: The size is adjusted so that the page width matches the width of the available space.
-
50% … 200%
Installing a Client Certificate
To authenticate the IGEL Secure Kiosk app with a server, you can install a client certificate on your device. Certificate files in the PKCS#12 format are supported.
Ensure that the certificate file meets the following requirements:
-
File extension:
.p12or.pfx -
Compatible with SSL 3.0 or higher
To install a certificate:
-
Transfer the file to the devices using UMS file transfer. For this purpose, follow the instructions in Files - Registering Files on the IGEL UMS Server and Transferring Them to Devices, using the following settings:
-
Set Classification to Undefined. This allows you to define the file path yourself.
-
Ensure the Owner has Read, Write, and Execute permissions.
-
Ensure the Owner is set to User.
-
-
In the profile configurator, go to Apps > IGEL Secure Kiosk > Certificate.
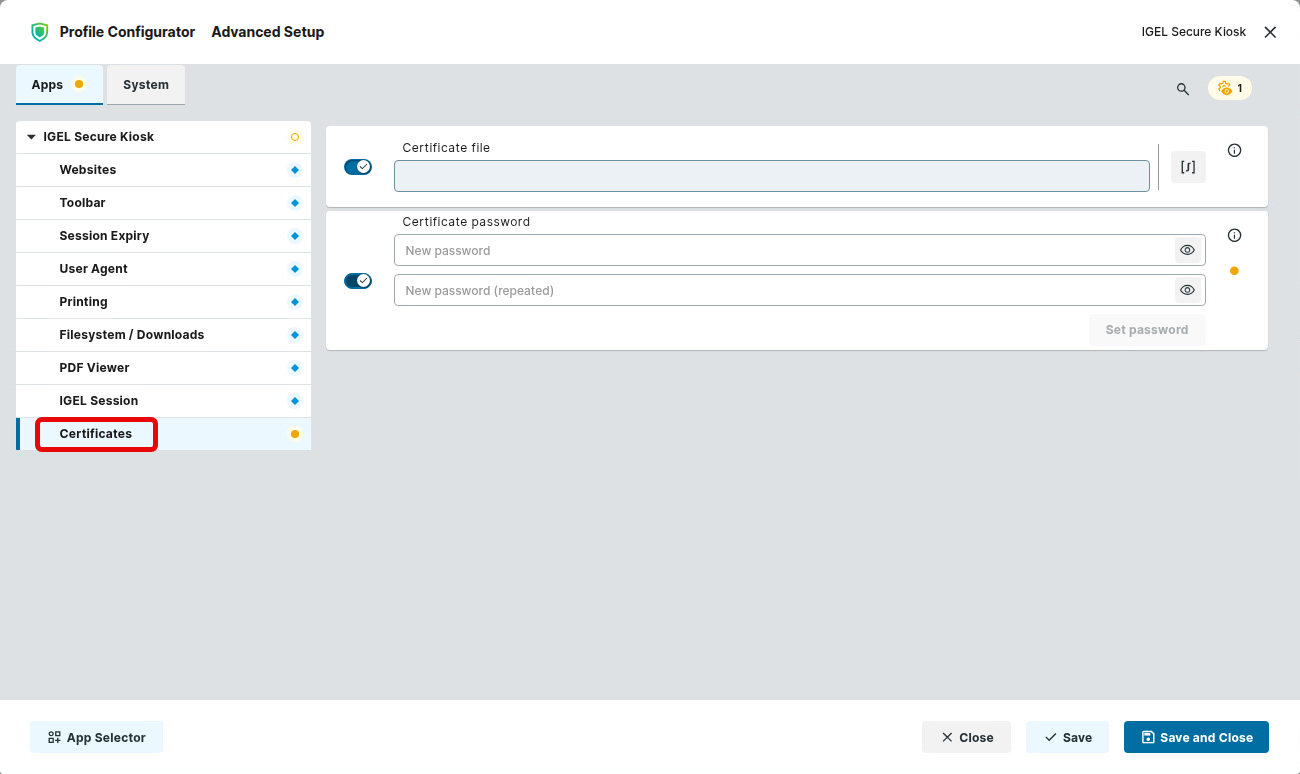
-
Configure the details as described below.
Certificate file
Enter the file path you have specified for the file transfer in step 1.
Certificate password
The password for the certificate file.