
The Lenovo BIOS Tools app offers BIOS tools to update the BIOS version, BIOS settings, and BIOS password on supported Lenovo devices. This app includes tools from Lenovo Inc., and the Linux Vendor Firmware Service - LF Projects LLC (https://lfprojects.org/policies/trademark-policy/ ). The Linux Vendor Firmware Service is a secure portal which allows hardware vendors to upload firmware updates.
This article serves as a guide for using the Lenovo BIOS Tools app from configuration to debugging, including best practices.
BIOS Updates at Your Own Risk
IGEL is offering and supporting the LVFS BIOS Update mechanism - BIOS updates are performed at your own risk!
The LVFS BIOS update mechanism is functional even with Secure Boot enabled and when a BIOS password is set.
If the BIOS of your devices is distributed via the Linux Vendor Firmware Service (LVFS), you can update, downgrade, or reinstall it using the IGEL Universal Management Suite (UMS). As the procedures for reinstalling and downgrading the BIOS are analogous to the update procedure, we will use the term "update" in the following instructions.
Tip: Direct Download of Firmware from fwupd Repository
To download valid firmware updates on a given test device, run the following command on the test device:
fwupdmgr refresh --force
fwupdmgr get-updates --json > /tmp/updates.json
The updates.json file includes links to the .CAB files from fwupd, use wget to download.
Supported Devices
Currently supported Lenovo devices:
-
ThinkCentre M70q Gen3
-
ThinkCentre M70q Gen5
-
ThinkCentre M75q Gen2
-
ThinkCentre M75q Gen5
-
ThinkCentre Neo50q Gen4
-
ThinkPad L13 Gen4
-
ThinkPad L13 Gen5
-
ThinkPad L14 Gen4
-
ThinkPad L14 Gen5
-
ThinkPad L15 Gen4
-
ThinkPad L16 Gen1
Requirements
-
UMS 12.01 or higher
-
Device supports LVFS
-
Supported devices with IGEL OS Base System 12.7.0 or higher
The IGEL OS Base System needs to be installed directly on the device. The Lenovo BIOS Tools app is unsupported if the IGEL OS boots from a UD Pocket.
Configuring the App in the UMS Web App
Importing the App
Import the Lenovo BIOS Tools app into your UMS. For more information on how to do this, see (12.06.120-en) How to Import IGEL OS Apps from the IGEL App Portal or (12.06.120-en) How to Install OS 12 Apps in a UMS Environment with Limited or No Internet Access .
Creating a Profile
To distribute the app to the devices, create a profile:
-
In the UMS Web App, go to Apps and search for “BIOS” to find the Lenovo BIOS Tools app.
-
Click Create New Profile.

-
Define a name for your profile and save.
For more on profile creation, see (12.06.120-en) How to Create and Assign Profiles in the IGEL UMS Web App .
Assigning the Profile to Your Devices
-
In the field Assign device, enter the name of the device or device directory for which you want to use the Lenovo BIOS Tools app.
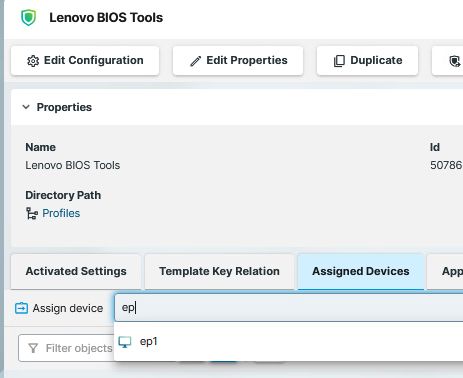
-
Select Assign and apply changes now.
Setting up the File Source
Since not only updating the BIOS but also its configuration is done using files, we need to set up a file source that is reachable by all devices.
The creation of the files is described in the relevant sections. The procedures described here are the same for all files in question, that is:
-
BIOS update file
-
BIOS settings file
Additional information
-
Instead of a single
.CABfile, it is possible to use a.ZIPfile containing multiple.CABfiles-
There is no danger of flashing wrong firmware, the content of the
.CABfile will be checked and has to match the system
-
-
The
.CABfile is not limited to BIOS updates: Any available firmware for a Lenovo device is supported:-
EC (Embedded Controller) firmware update
-
Intel ME (Management Engine) firmware update
-
Docking station firmware update
-
NVMe drive firmware update
-
Secure Boot DBX update
-
Getting the BIOS Update File from LVFS
→ Look up the latest update file from https://fwupd.org/ and download it. If you want to use the UMS for file distribution, store it in a location that is reachable from the machine on which your UMS Server is running.
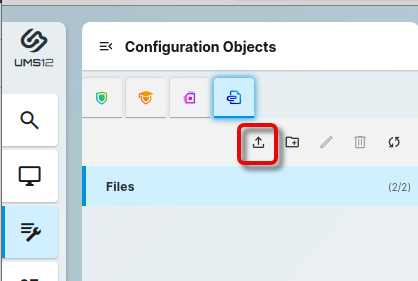
Using UMS File Transfer
The following example shows how to use the UMS file transfer facility for file deployment.
-
In the UMS Web App, go to Configuration Objects, select the icon for files, and then the icon for uploads.
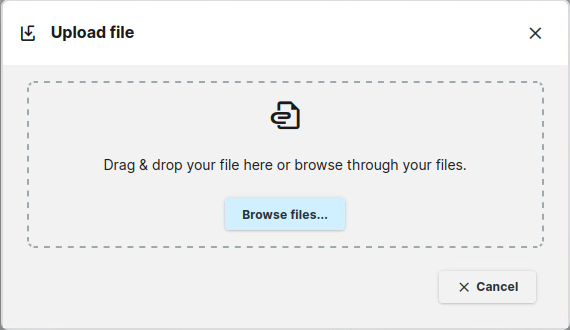
-
Choose the BIOS update file on your system via drag & drop or via Browse files….
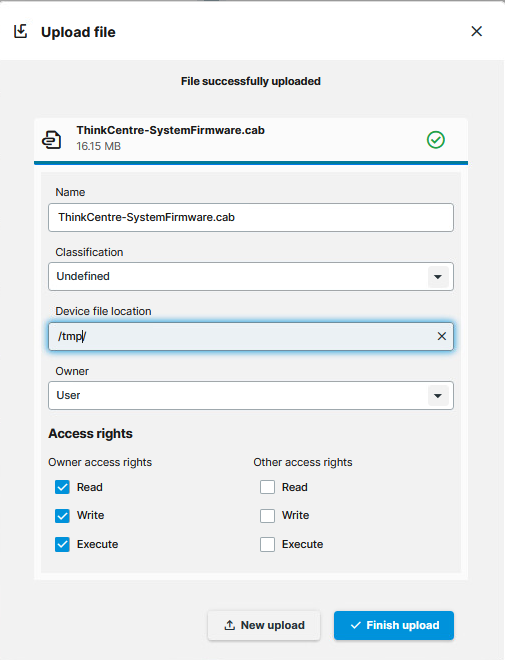
-
In the field Device file location, define the local path in which the file will be stored on the device, e.g.
/tmp/. Afterward, click Finish upload.
-
Assign the file to your devices by assigning it to the profile we have created beforehand.

Updating the BIOS
Making the BIOS Update File Available
→ Make the BIOS update file available to your devices; see Setting up the File Source.
Configuring the Devices for the BIOS Update
-
Open the previously configured Lenovo BIOS Tools profile.
-
Go to Apps > Lenovo BIOS Tools > Update.
-
Under LVFS BIOS or Firmware Update file provide the local path of the BIOS update file.
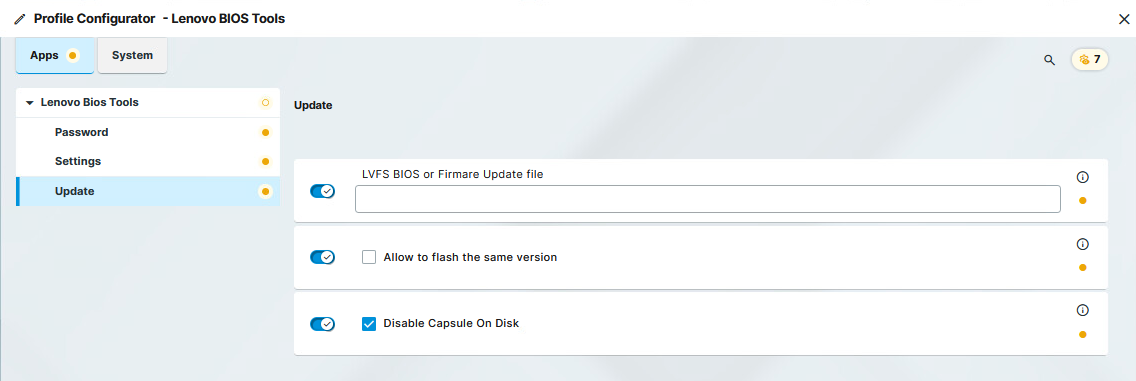
You can reinstall the same BIOS/Firmware version that had already been installed on the device if you enable Allow to flash the same version.
Triggering the BIOS Update
-
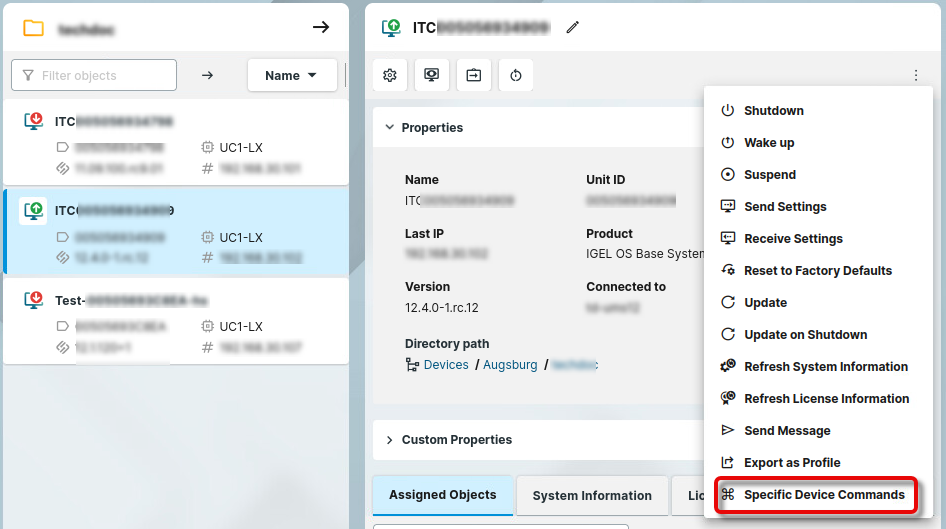
In the UMS, select the relevant devices (or directory), open the context menu, and select Specific Device Command

-
Select BIOS - Trigger update and click Execute.

The target devices receive a reboot command; a corresponding message is displayed.
The timespan before the BIOS logo and the progress bar is shown might be significantly longer than usual. Please ensure that the device remains powered on until the update process is finished.
Changing the BIOS Settings
To change the BIOS settings a set_settings.json file needs to be transferred to the device with the setting updates in the correct syntax.
In the section below, we describe in detail the easiest way to do this, that is:
-
Getting the
get_settings.jsonfile from the device through scp. This way you get the correct syntax example. -
Editing the transferred file with an editor of choice.
-
Transferring it back as
set_settings.jsonto the device or device directory. This way you can distribute the update in batches.
This is the recommended way to change BIOS settings, but not the only way. For example, you can also write the set_settings.json from scratch and transfer it using a USB pen drive.
Defining the Paths for Exchanging the BIOS Settings Files
First, we will define a local directory path in which the Lenovo BIOS Tools app will store the current BIOS settings as a file and a local directory path in which the edited settings file will be stored so the app can apply them to the device's BIOS.
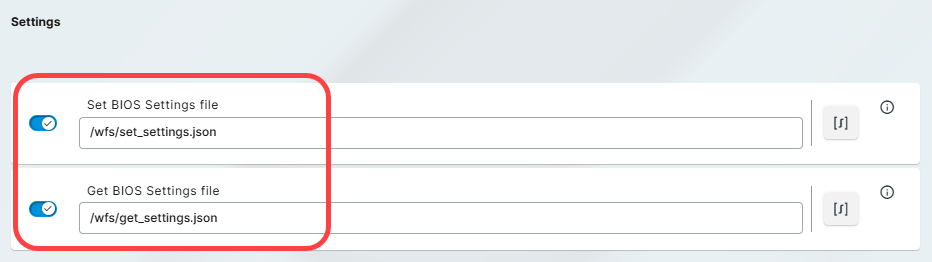
→ In the BIOS Tools profile, go to Apps > Lenovo BIOS Tools > Settings, make the following edits, and save your settings.
-
Set BIOS settings file: Path where the file with the changed settings will be stored.
-
Get BIOS settings file: Path to the file with the current settings. The path has to include the filename, for example:
/wfs/get_settings.json
Generating the Current BIOS Settings File
-
In the UMS, select the relevant devices (or directory), open the context menu, and select Specific Device Commands.
-
Select BIOS - Get settings and click Execute.
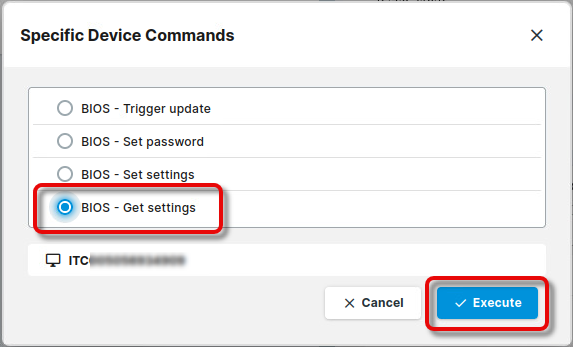
All BIOS settings will be listed in the saved .json file, including a list of possible values.
Transferring and Editing the BIOS Settings File
-
Enable SSH as described in SSH Access in IGEL OS 12 .
-
Use scp from a linux or windows terminal:
scp username@remote:/path /localpath
-
Depending on the SSH access configuration,
usernamecould beroot,ruser, oruser. -
remoteis the IP address of the OS 12 device. -
/pathit the path to theget_settings.jsonon the OS 12 device -
/localpathis the path to where the file will be saved locally
-
Edit the configuration file as desired.
Limitations
-
Some settings require that a BIOS supervisor password has been set.
-
Some settings can only be changed from the BIOS menu (F1).
-
For more details, check the Lenovo documentation: https://support.lenovo.com/manuals/um927324-thinklmi-lenovo-bios-setup-using-linux-wmi-deployment-guide-thinkpad
It is sufficient to specify only those BIOS setting you want to change so that your edited file contains snippets instead of all possible settings.
-
Save the settings file and make the edited file available as described under Setting up the File Source.
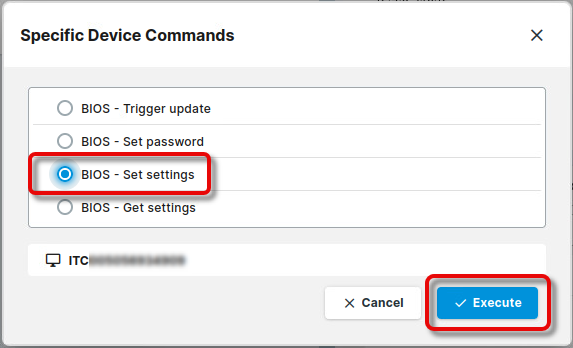
Deploying the Changed Settings on the Device
-
In the UMS, select the relevant devices (or device directory), open the context menu, and select Specific Device Command.

-
Select BIOS - Set settings and click Execute.
Setting a BIOS Password
Limitation
Lenovo does not support setting a new BIOS supervisor password if there is no old/current BIOS supervisor password.
Changing the BIOS password is possible, see below.
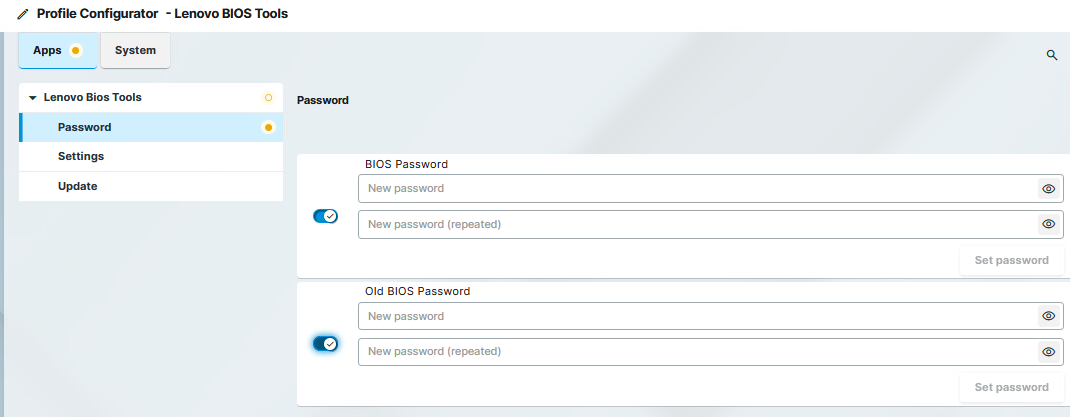
Changing the BIOS Password
-
In the BIOS Tools profile, go to Apps > Lenovo Bios Tools > Password.
-
Enter the current BIOS supervisor password under Old BIOS Password.
-
Enter the new BIOS supervisor password under BIOS Password.
-
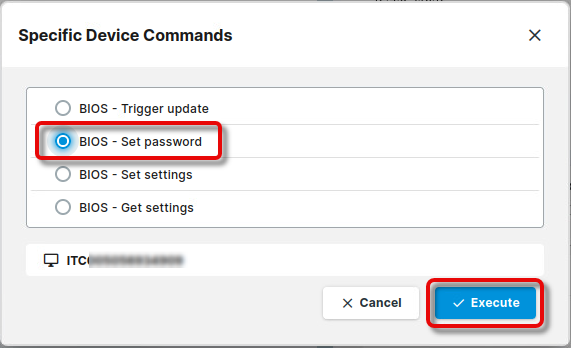
In the UMS, select the relevant devices (or directory), open the context menu, and select Specific Device Command.
-
Select BIOS - Set password and click Execute.
-
If the command is performed successfully, reboot the device.
Using the Command Line Interface (CLI)
For testing the BIOS update on a single device, you can use the command line tool as an alternative to a scheduled job from the UMS.
As a prerequisite, the steps described under Setting up the File Source and the relevant settings in the profile must be completed.
When the command has been executed, a dialog informs you that a reboot is required. You can choose between two options:
-
Perform the reboot and update right away
-
Postpone the update to the next reboot
Usage
lenovo-bios-tools [OPTIONS] COMMAND [ARGS]...
Options
|
Option / Contrary Option |
Comment |
|---|---|
|
|
Provide extensive information (verbose mode) |
|
|
Show the help text and exit |
Commands
|
Command |
Argument (Short / Long Form) |
Comment |
|---|---|---|
|
|
|
Handle BIOS update |
|
|
|
Trigger BIOS update. Will be triggered after reboot. |
|
|
|
Disable BIOS update |
|
|
|
Show the help text and exit |
|
|
|
Set BIOS password |
|
|
|
|
|
|
|
Get current BIOS settings |
|
|
|
Configure BIOS settings |
Example
The following command performs a BIOS update and displays extensive information:
update --debug -e
Debugging
For most cases, the normal logging to journalctl should be good enough to identify any problems. The default loglevel is “INFO”.
→ To enable loglevel “DEBUG”, enable the registry key app.lenovo_bios_tools.config.enable_debug