This section describes the Secure VNC procedure, parts of which your custom VNC proxy has to implement.
-
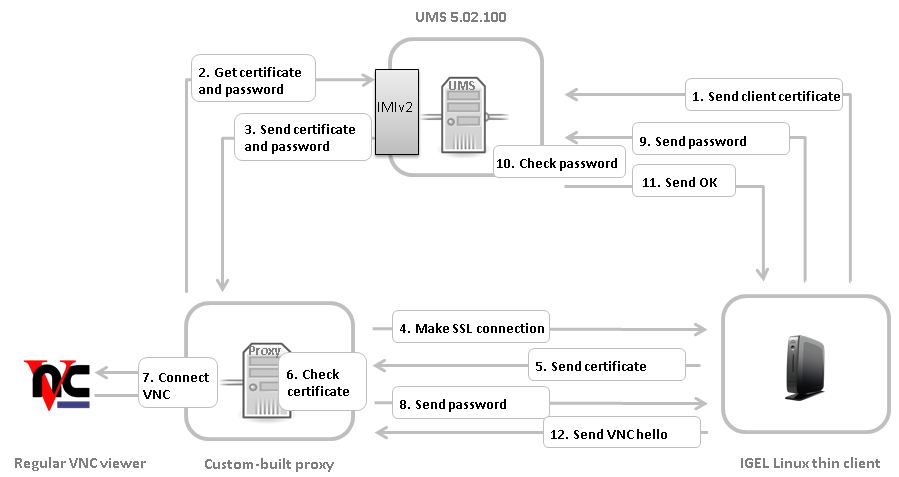
The thin client sends its certificate to UMS on boot.
For a thin client newly registered to the UMS, either
-
reboot the thin client once or
-
use UMS Console to send Settings UMS > TC and send Settings TC > UMS once
-
-
Via the IMIv2 REST API, the custom proxy asks UMS for the credentials necessary for shadowing the thin client:
GET /umsapi/v2/thinclients/[thin client ID]?facets=shadow -
The custom proxy receives the credentials:
-
the thin client certificate in Base64 encoding, or an empty string if UMS has not received a certificate
-
a one-time-password in the form of a Java UUID for logging in within the next 5 min.
-
-
The custom proxy initiates a SSL connection to the thin client's TCP port 5900.
-
The thin client sends its certificate.
-
The custom proxy checks the certificate against the one received from UMS and decides whether to accept it and proceed with the connection.
-
The custom proxy opens a TCP server socket for an external VNC viewer to connect to. The custom proxy must connect the network streams involved as follows:
-
write to the VNC viewer what it reads from the SSL connection with the thin client
-
write to the SSL connection with the thin client what it reads from the VNC viewer
Make the external VNC viewer connect to the custom proxy's server socket. -
-
On accepting the connection from the external VNC viewer, the custom proxy writes the String
PROCYCMD PW_[one-time password]
to the SSL connection with the thin client. -
The thin client sends the password to UMS.
-
UMS checks the password.
-
If the password is correct, UMS tells the thin client to proceed. Otherwise the connection will be closed.
-
The thin client sends a string like
RFB 003.008\nas a VNC hello which initiates the VNC session with the external VNC viewer.