How to Deploy IGEL OS 12 with IGEL OS Creator (OSC)
With the IGEL OS Creator (OSC), you can install IGEL OS 12 on any supporting device. Moreover, you can use the IGEL OS Creator to recover a broken installation of IGEL OS that cannot boot anymore.
Installing the IGEL OS operating system via OSC destroys all data on the target device’s mass storage device (hard disk, flash memory, SSD).
Devices Supported by IGEL OS 12
For a detailed list, see Devices Supported by IGEL OS 12.
Licensing
For information on licensing, see Essential IGEL Licensing FAQ .
Create USB Installation Medium
Windows
Download the ZIP archive for OS Creator from the IGEL Download Server
Unzip the contents into a local directory.
Connect a USB memory stick with at least 4 GB capacity to the computer.
All existing data on the USB memory stick will be destroyed.
Double-click the
preparestick.exefile from the unzipped directory.
If you are in the "administrators" group, the program will start after you have confirmed a dialog. If you are not in the "administrators" group, you must enter the administrator password to start the program.
The dropdown menu Isofile shows the ISO file contained in the unzipped directory, e.g.osc12.01.110.iso.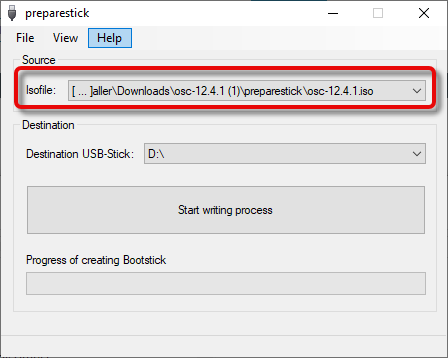
Under Destination USB stick, select the USB storage medium on which you would like to save the installation data.
It is recommended that you only have one USB storage medium connected during this procedure. If you accidentally select the wrong medium, all data on it will be lost.
Generally speaking, the list of available USB storage media is refreshed automatically. If, however, you would like to refresh it manually, click on View > Refresh USB Device List.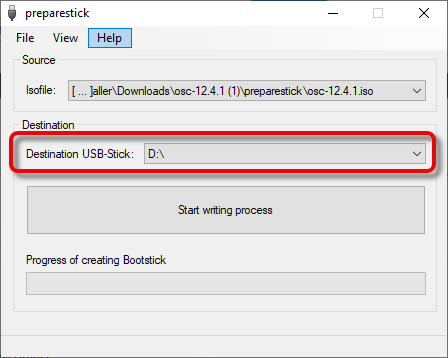
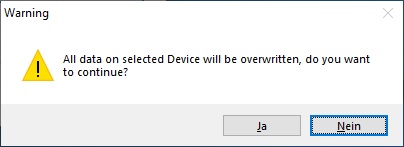
Click Start writing process.
Confirm the following dialog:
In the program window, the progress of the process is shown.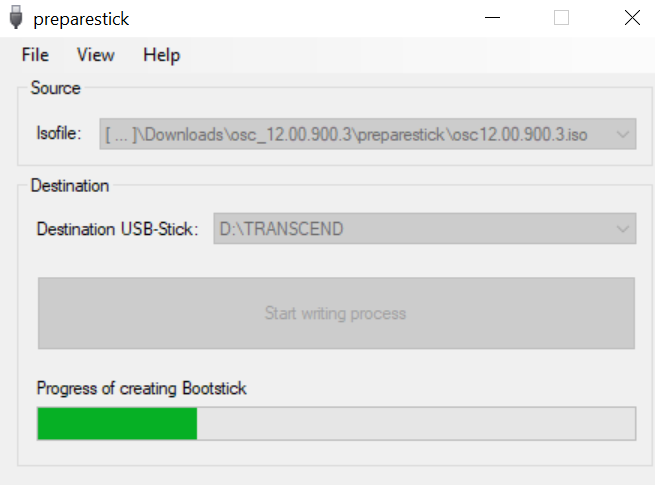
When the process is finished, a message window is displayed.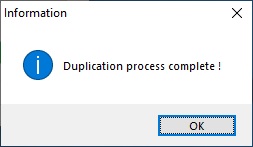
Close the message window and the program.
After about 3 seconds, remove the USB memory stick.
If you remove the USB memory stick too early, the writing process may still need to be completed. In this case, the data on the memory stick gets corrupted.
The USB memory stick for OSC installation is ready for use.
Linux
Download the ZIP archive for OS Creator from https://www.igel.com/software-downloads/
Unzip the contents into a local directory.
You will need the ISO file (e.g., osc12.4.1.iso) from this directory to create a bootable medium.
Connect a USB memory stick with at least 4 GB capacity to the computer.
All existing data on the USB memory stick will be destroyed.
Open a terminal emulator and enter the command
dmesgto determine the device name of the USB memory stick.
Example output:[...][19514.742229] scsi 3:0:0:0: Direct-Access JetFlash Transcend 8GB 1100 PQ: 0 ANSI: 6[19514.742805] sd 3:0:0:0: Attached scsi generic sg1 type 0[19514.744688] sd 3:0:0:0: [sdb] 15425536 512-byte logical blocks: (7.89 GB/7.35 GiB)[19514.745370] sd 3:0:0:0: [sdb] Write Protect is off[19514.745376] sd 3:0:0:0: [sdb] Mode Sense: 43 (0) 00 00 00[19514.746040] sd 3:0:0:0: [sdb] Write cache: enabled, read cache: enabled, doesn't support DPO or FUA[19514.752438] sdb: sdb1
In this example, the device name searched for is/dev/sdb.
Ensure that you have determined the correct device name. If you use the wrong device name, the dd command in the next step can destroy your operating system.
The following command writes the installation data to the USB memory stick (example):
dd if=osc12.4.1.iso of=/dev/sdX bs=1M oflag=direct
ReplacesdXwith the device name of the USB memory stick that you have determined.
When theddcommand has terminated, you can see the terminal emulator input prompt again.
Wait for about 3 seconds after the
ddcommand has terminated, and remove the USB memory stick.
If you remove the USB memory stick too early, the writing process may still need to be completed. In this case, the data on the memory stick gets corrupted.
The USB memory stick for OSC installation is ready for use.
Create DVD Installation Medium
The ISO file in the installation directory for OSC is a so-called hybrid image. It can not only be copied onto USB storage devices but can also be used to create a bootable DVD.
Burn ISO Image (Windows)
In Explorer, open the directory that contains the ISO file.
Right-click on the ISO file.
Select Burn disc image.
Burn ISO Image (Linux)
Under Linux, various burning programs with a graphical user interface or for the command line are available.
The Ubuntu Wiki explains how to burn an ISO image onto a DVD using several programs.
Boot Settings
OSC works on systems with BIOS and UEFI.
Your system must support booting from USB storage media or from a DVD. This may already be enabled, or you may have to enable it yourself.
IGEL OS 12 supports UEFI Secure Boot. Refer to the manual of your device's manufacturer to learn whether your device supports Secure Boot and how to enable it. Enabling Secure Boot often consists of two steps. First, the boot mode has to be changed to UEFI Boot in the BIOS; after that, Secure Boot can be activated, also in the BIOS. For instructions on how to check whether Secure Boot has been properly enabled, seeVerifying that Secure Boot is Enabled .
For UEFI Secure Boot on devices manufactured by IGEL, see UEFI Secure Boot Enabling Guides.
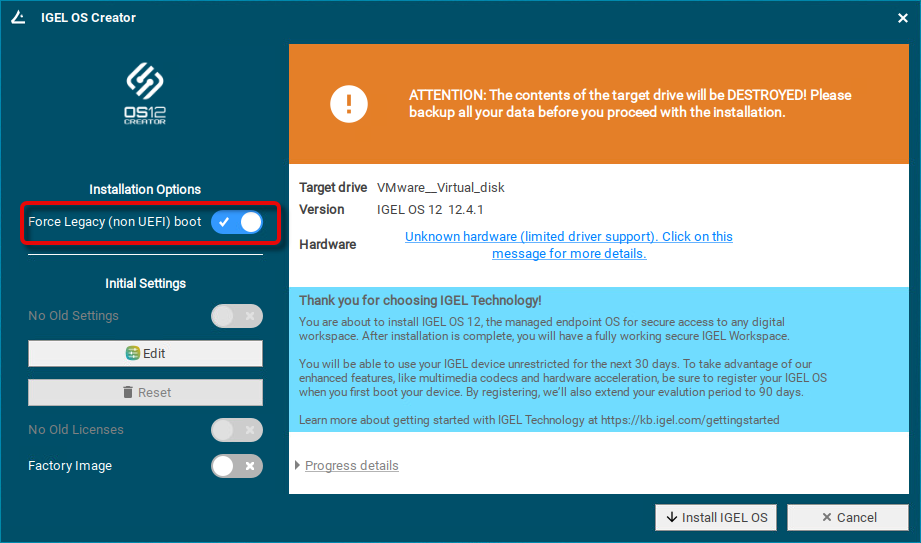
If IGEL OS fails to boot in UEFI mode, try switching to Force Legacy (non UEFI) boot. IGEL OS will then be installed in legacy/BIOS mode.
General Hints on Changing the Boot Settings
The required key presses for this may vary from vendor to vendor. However, here are some hints:
→ While the device is booting, try pressing [F12] (in general), [F10] (Intel devices), or [F9] (Hewlett-Packard devices) to access a list of boot devices and select your USB installation medium.
→ If the above does not work, access the BIOS settings via pressing [Del], [F1], or [F2] during boot, activate booting from USB storage media and/or change the boot order.
→ See the BIOS/UEFI documentation for your system for details of how to boot from USB storage media.
Changing the Boot Settings of Devices Manufactured by IGEL
If the USB installation medium is not found, though the USB boot is enabled, try the following:
Reconnect the USB installation medium and reboot the endpoint device.
Use another USB port.
UD7 (H860C)
Power up the device while pressing the [Del] button repeatedly in rapid succession.
If a password prompt is shown, enter the BIOS password.
Select Setup Utility.
Select the Boot tab.
Set USB Boot to <ENABLED>.
Save the settings and exit.
Connect the USB stick to the device.
Reboot the device while pressing the [Del] button repeatedly in rapid succession.
Select Boot Manager.
Select the USB stick as the boot medium and press Enter.
You can continue with the installation procedure.
UD3 (M350C)
Power up the device while pressing the [Del] button repeatedly in rapid succession.
If a password prompt is shown, enter the BIOS password.
Select Setup Utility.
Select the Boot tab.
Set USB Boot to <ENABLED>.
Save the settings and exit.
Connect the USB stick to the device.
Reboot the device while pressing the [Del] button repeatedly in rapid succession.
Select Boot Manager.
Select the USB stick as the boot medium and press Enter.
You can continue with the installation procedure.
Installation Procedure
The installation will overwrite all existing data on the target drive.
Connect the prepared USB memory stick to the target device and switch the target device on.
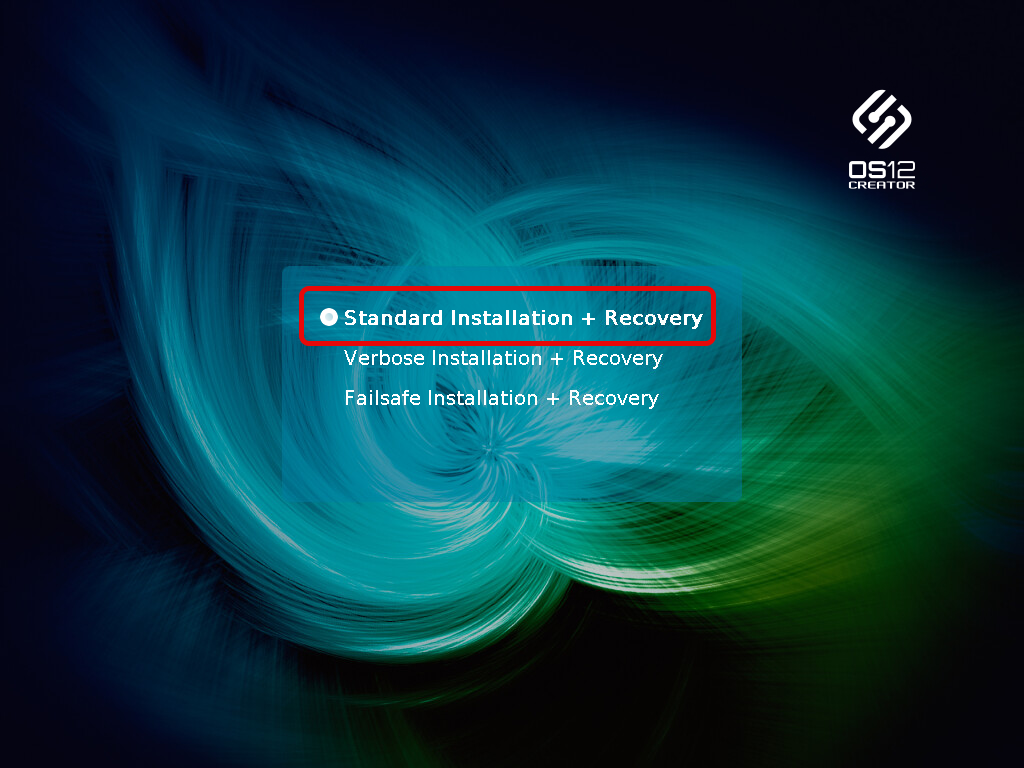
Select one of the following options from the boot menu:

Standard Installation + Recovery: Boots the system with just a few messages from the USB memory stick and launches the installation program. (Default)
Verbose Installation + Recovery: Boots the system from the USB memory stick and shows the Linux boot messages in the process.
Failsafe Installation + Recovery: Fallback mode; to be used if the graphical boot screen cannot be displayed.
Memory Test: Memory test, only available in legacy/BIOS mode. This option does not carry out an installation.
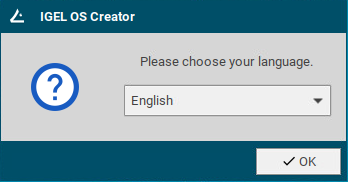
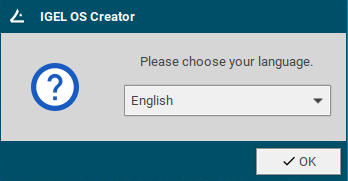
Select the language for the installation process.
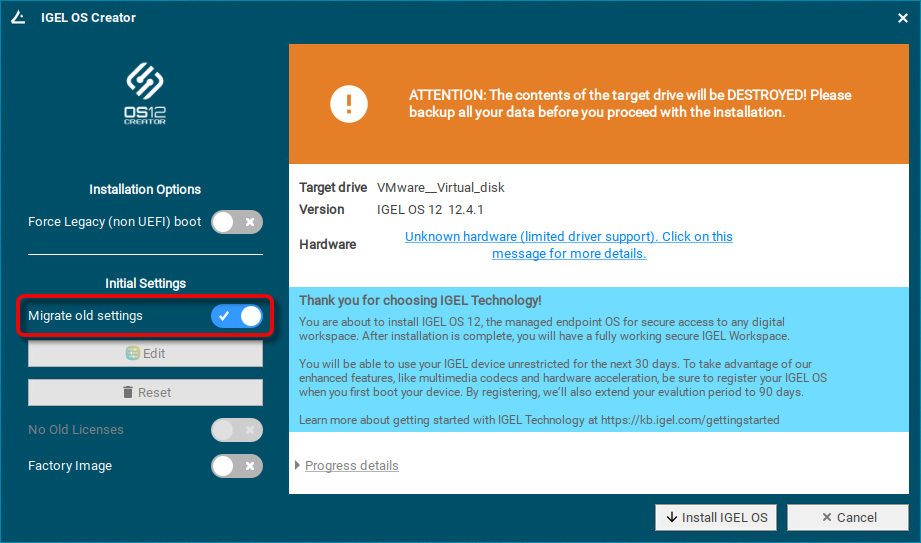
If IGEL OS 12 has been running on the device before and you want to preserve the device's settings, ensure that Migrate old settings is enabled.
If one of the following is the case, make sure that Migrate licenses is enabled:
- Your device has been operating with IGEL OS 11 before and you want to preserve the device's IGEL OS 11 licenses because you want to test IGEL OS 12 and downgrade to IGEL OS 11 afterward
- Your device has been operating with IGEL OS 12 before and you want to keep the licenses on the device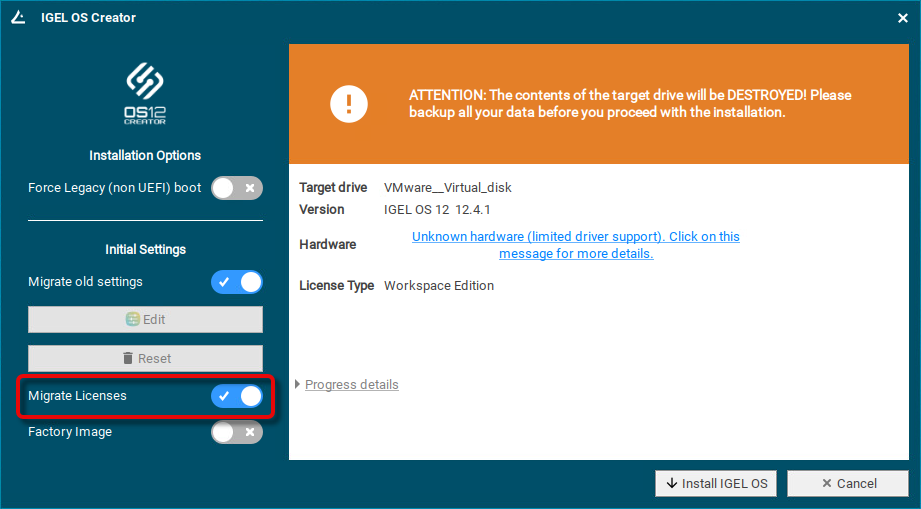
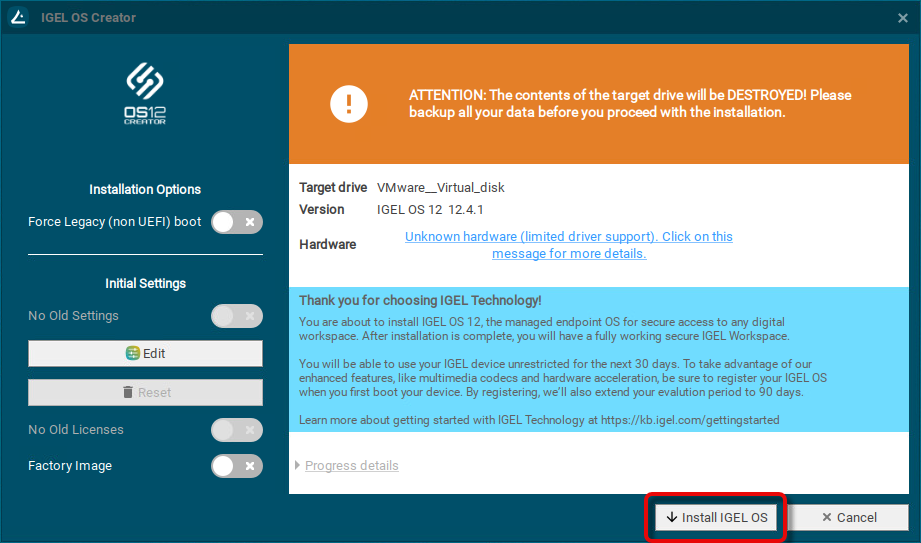
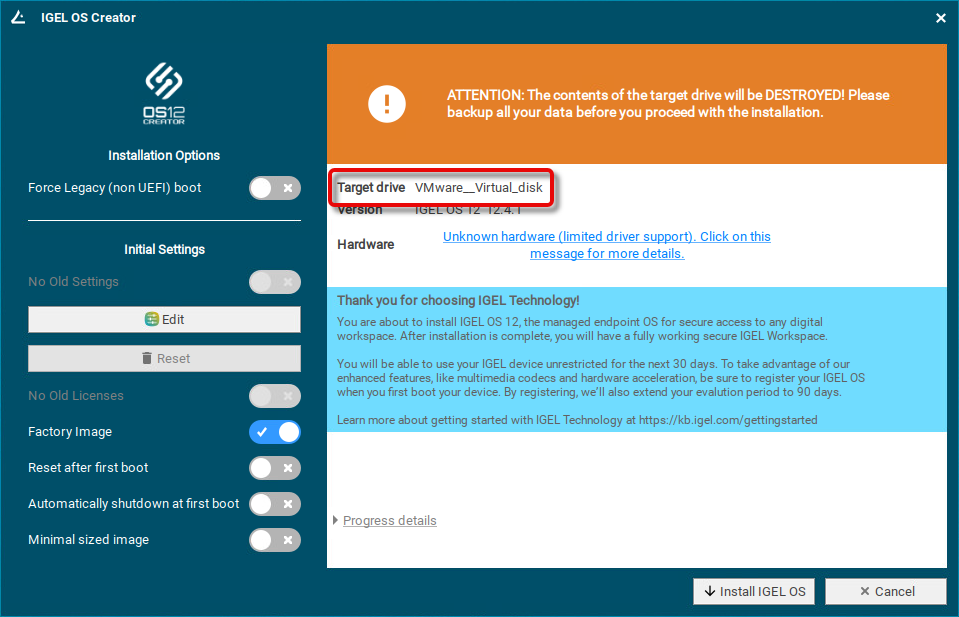
Check the Target drive to ensure that the system is installed on the desired drive.
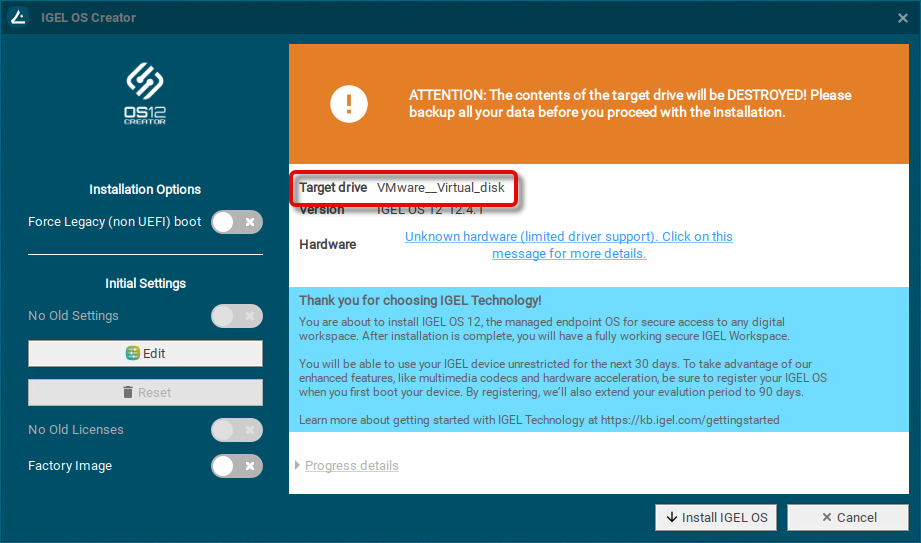
Click Install IGEL OS.
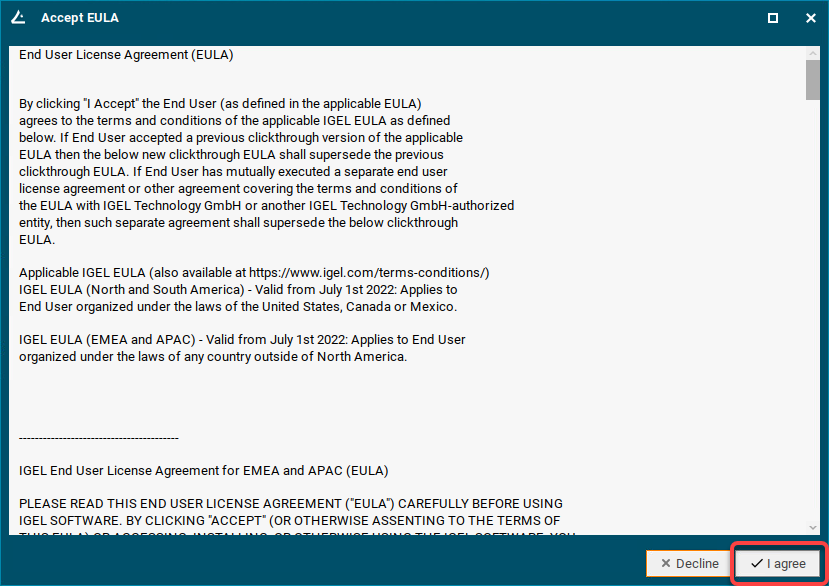
Accept the EULA by clicking I agree.
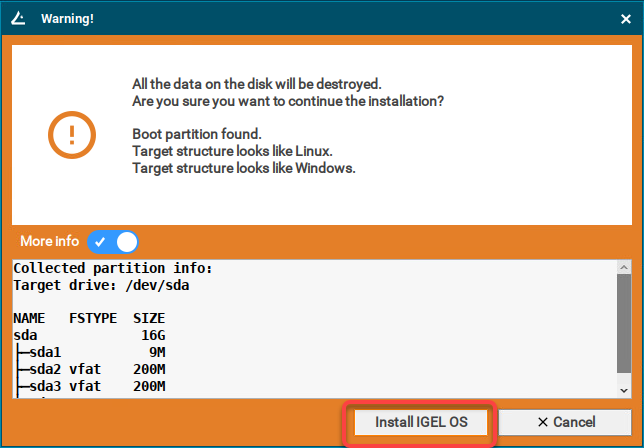
To view the details for the target drive, click More Info.
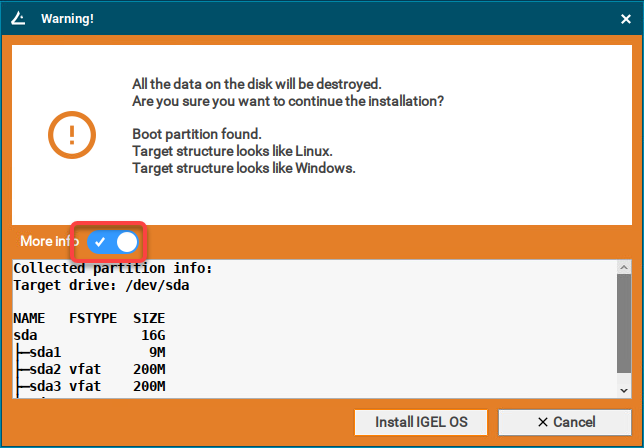
Click Install IGEL OS.
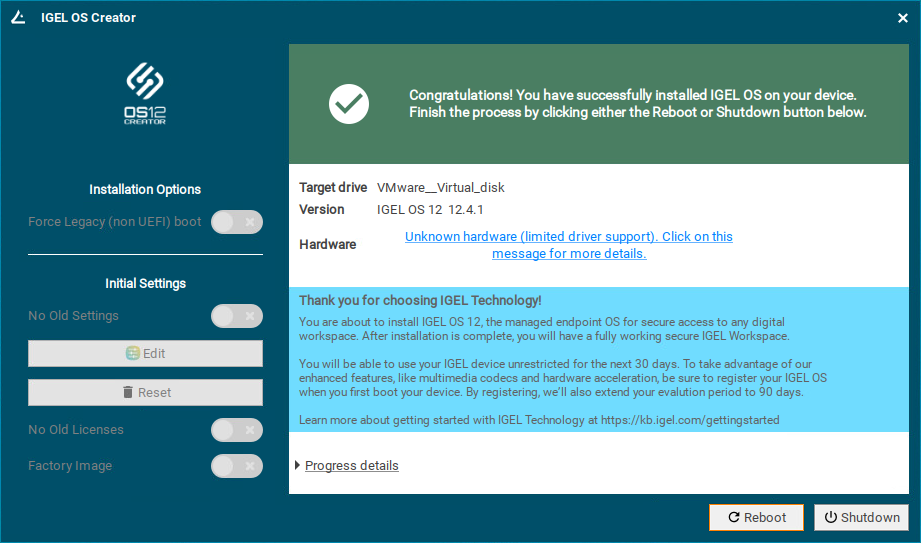
The installation program will install IGEL OS 12 on the target drive. If you see the success message, the installation is complete.

Click Reboot.
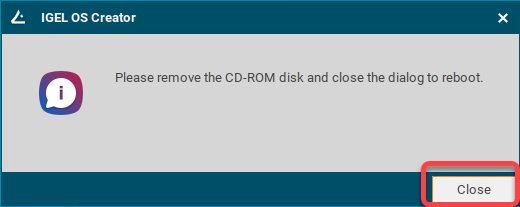
Remove the USB memory stick.
Close the message window.
The system will shut down and then boot IGEL OS 12.
The device is ready for onboarding; for details, see Onboarding IGEL OS 12 Devices.
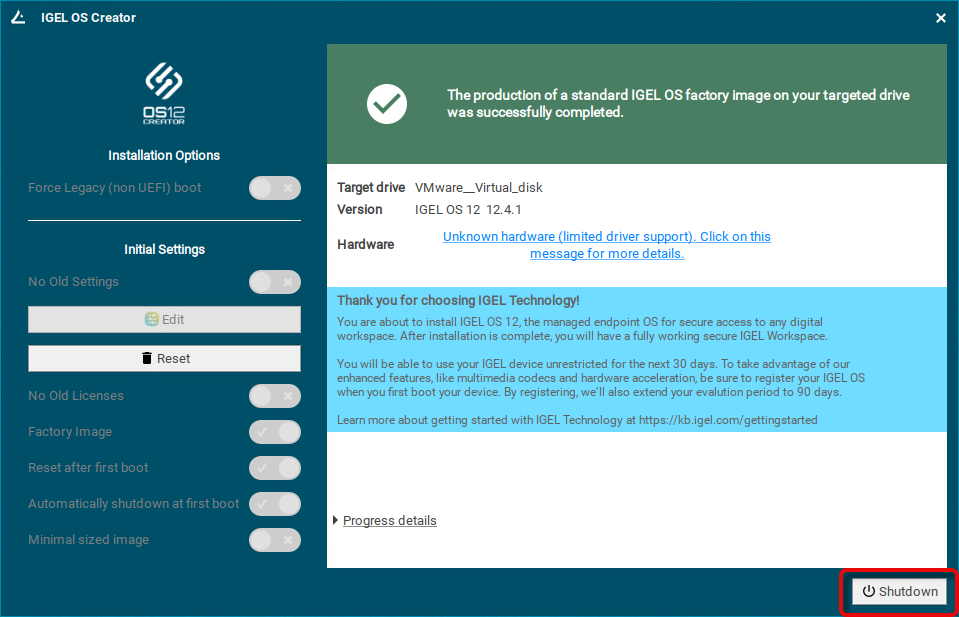
Installation Procedure for Factory Images
The installation will overwrite all existing data on the target drive.
Preparing the Image
Connect the prepared USB memory stick to the target device and switch on the target device.
Select Standard Installation + Recovery or Verbose Installation + Recovery.
Select the language for the installation process.
The installation program IGEL OS Creator opens. Here, you can configure settings for the installation process and start it.
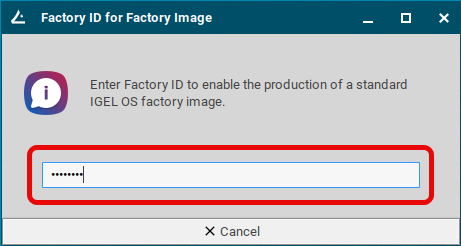
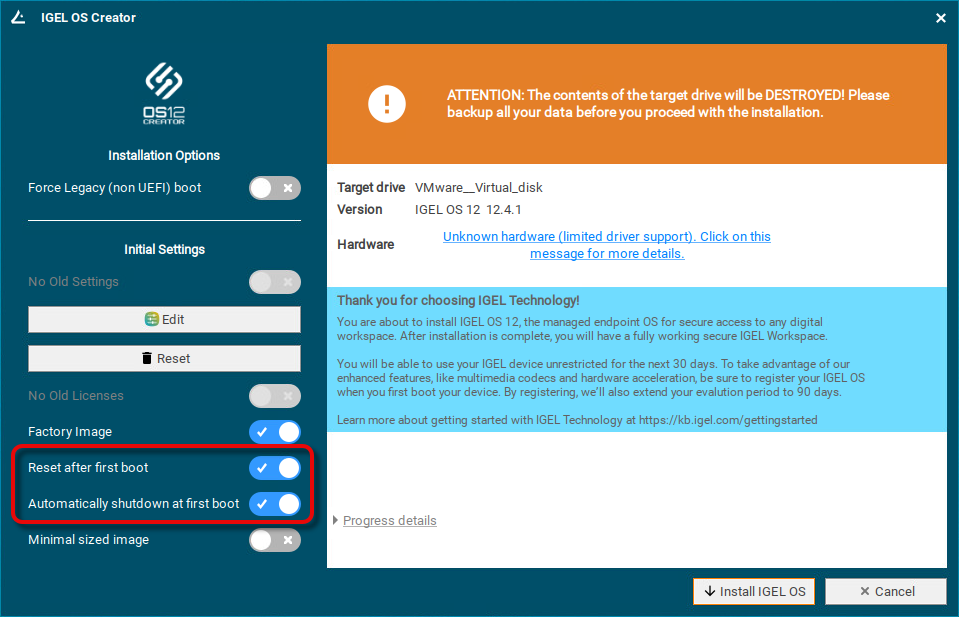
Activate Factory Image and enter your factory ID.
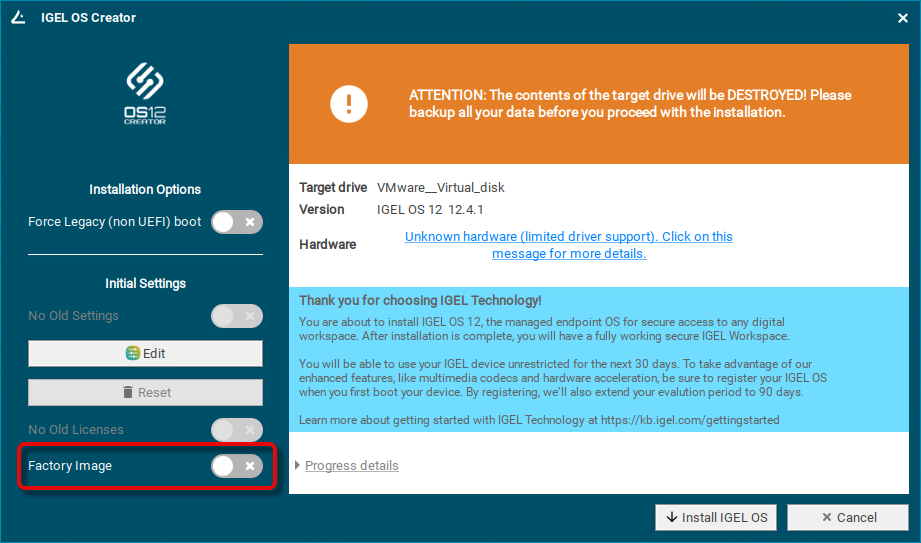
Check the Target drive to ensure that the system is installed on the desired drive.
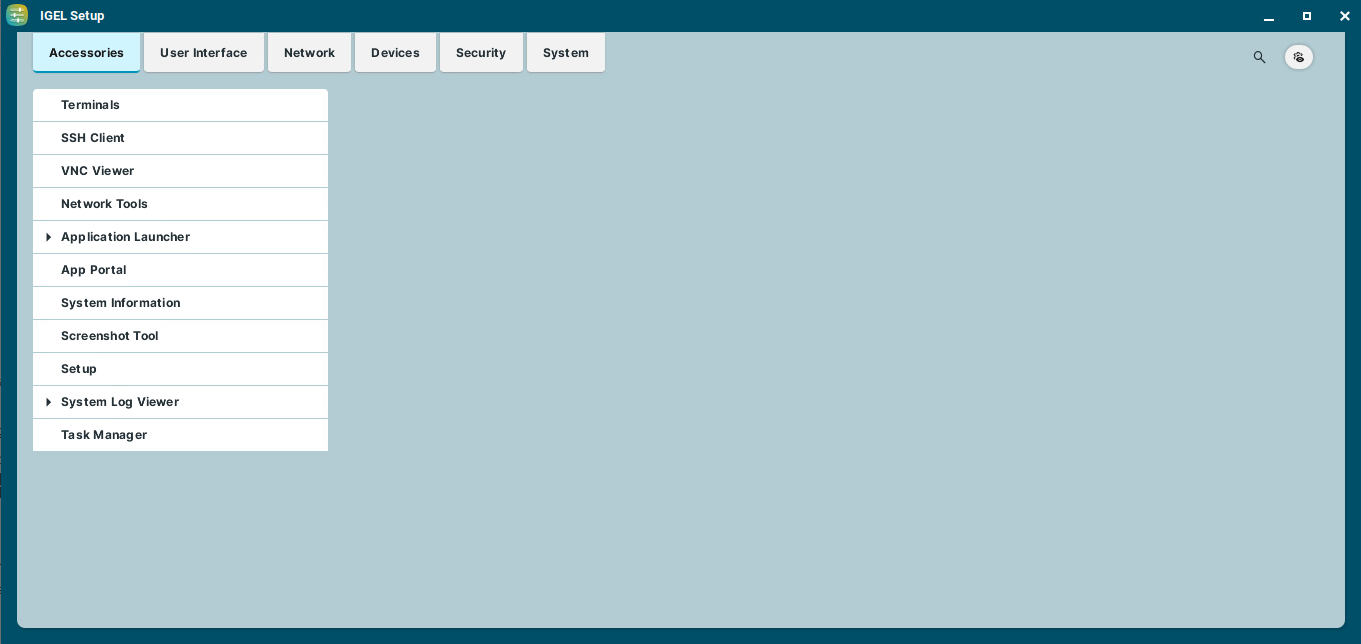
If you want to change the initial settings for the devices you are about to deploy, click Edit.
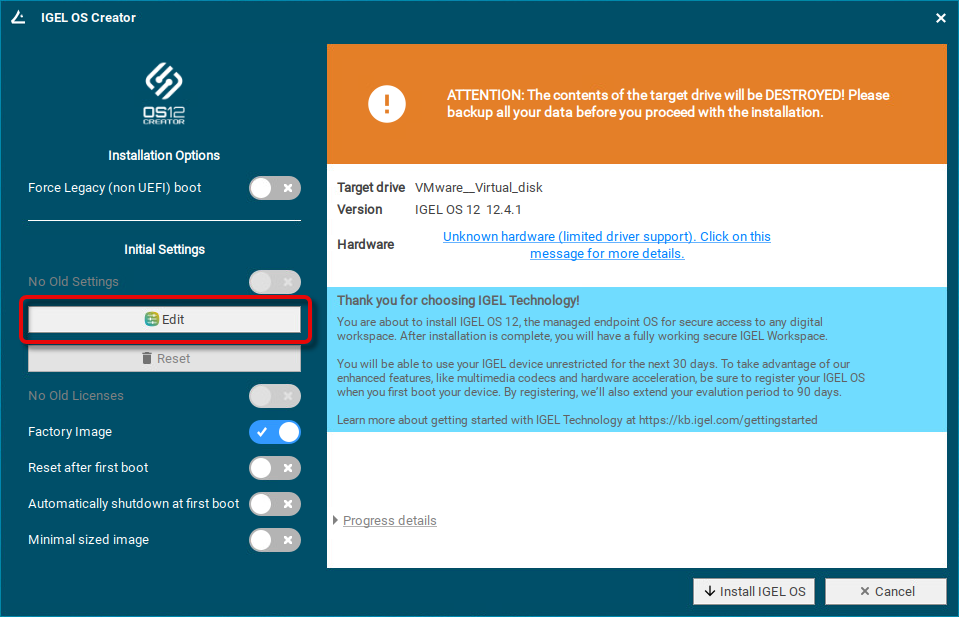
The IGEL Setup opens, enabling you to change the settings in the same way as with a regular IGEL OS installation. The changes are stored on the USB memory stick from which the IGEL OS Creator (OSC) is executed. For details about the settings, see Configuration of IGEL OS 12 Device Settings.
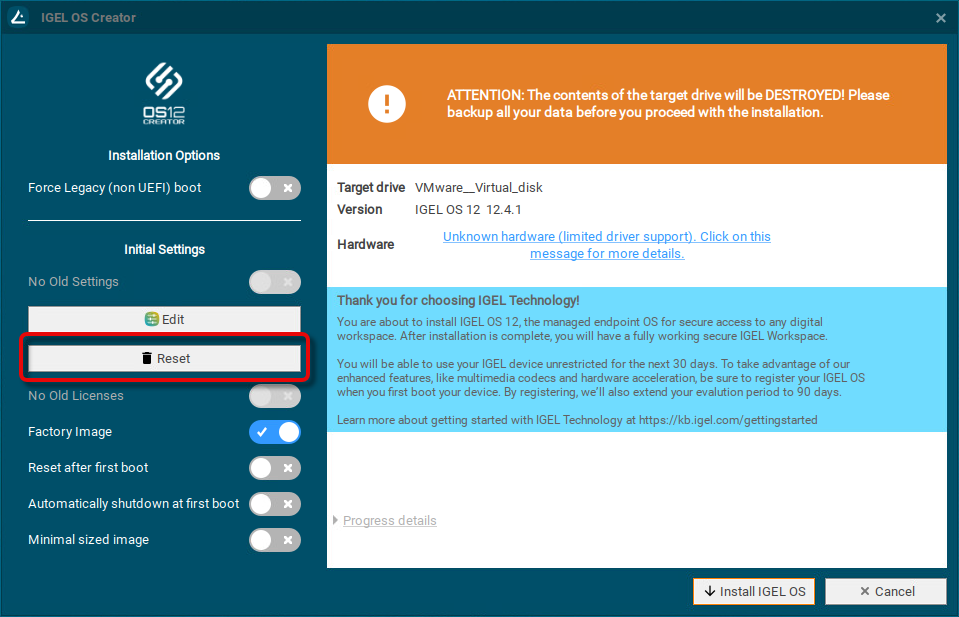
If you want to undo your changes and restore the original settings, click Reset.
If you want to perform manual tests with visual feedback on each device, enable Enable Reset after first boot. The test procedure is described under Unit Testing.
If Reset after first boot is activated, the first boot of your devices MUST take place BEFORE shipment to end customers!

If you want to perform automatic tests (unattended), enable both Reset after first boot and Enable Reset after first boot. The test procedure is described under Automatic Unit Testing.
If Reset after first boot is activated, the first boot of your devices MUST take place BEFORE shipment to end customers!
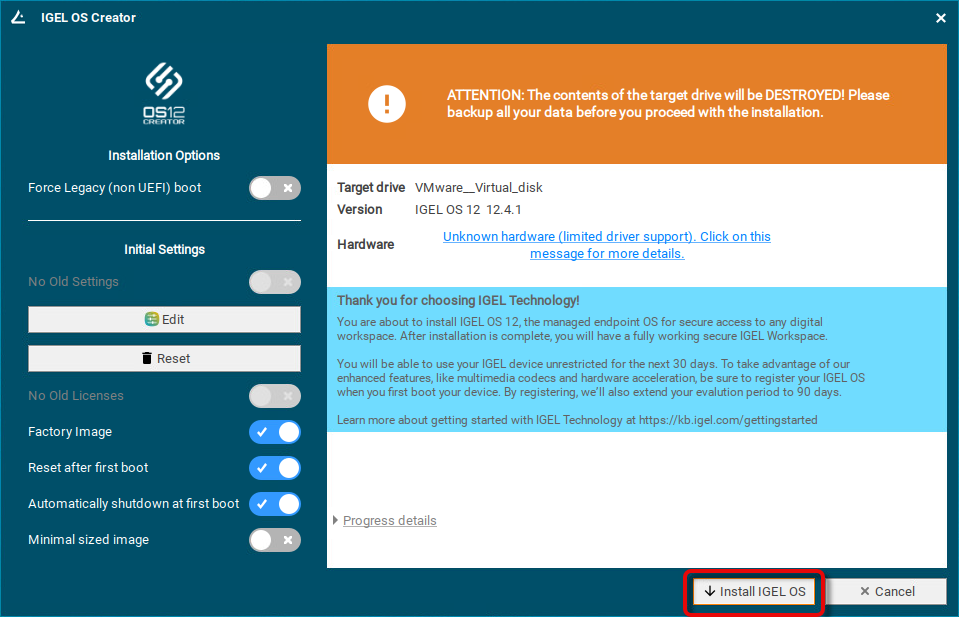
To start the installation, click Install IGEL OS.
Confirm the warning dialog.
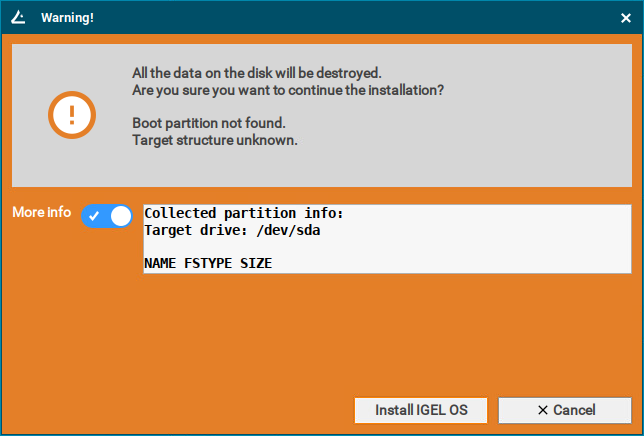
The installation of IGEL OS 12 starts.
The installation program will set up IGEL OS 11 on the target drive. If you see the success message, the installation is complete.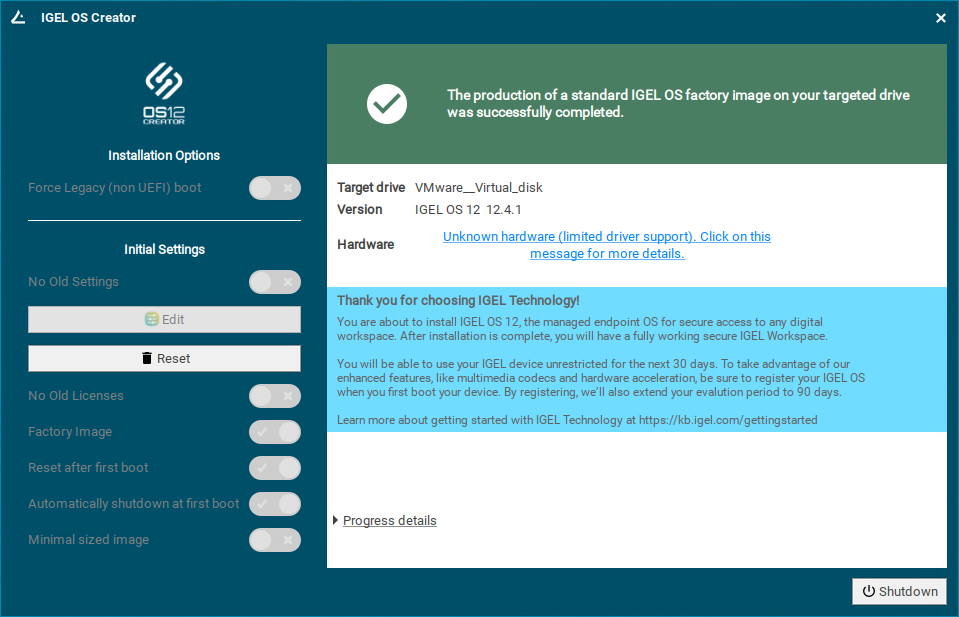
Click Shutdown.
Read out the image from your device to deploy it on the units.
O NOT BOOT THE EXACT FACTORY IMAGE THAT IS INTENDED FOR DEPLOYMENT ON YOUR DEVICES! ALL DEVICES TO WHICH THIS IMAGE HAS BEEN DEPLOYED WOULD SHARE ONE AND THE SAME UNIT ID. AS A RESULT, YOUR DEVICES WOULD BE PRACTICALLY UNUSABLE.
If you want to test the factory image before its deployment, transfer it to your target medium first and then boot the image on the machine on which you created it, or any other test machine. The important thing is that the factory image that will be mass-deployed to your units has not been booted before.
The maximum size of the image created by the IGEL OS Creator (OSC) is 64 GiB. Therefore, only the first 64 GiB of your storage medium is needed. If your devices have larger storage, this will allow for faster deployment.
To ensure the integrity of the image, you should create checksums of the original image and the deployed images and then compare them. For details, see IGEL Endpoint Partners: Ensuring Image Integrity with a Checksum.
Proceed as appropriate:
If Reset after first boot is inactive, you can deploy the images on the units and roll them out straight away. The deployment should include a comparison of the checksums.
If Reset after first boot has been activated, deploy the images on the units and continue with Unit Testing.
If Automatically shutdown at first boot has been activated, deploy the images on the units and continue with Automatic Unit Testing.
Unit Testing
Perform the following procedure on the original device and every unit on which the image has been deployed.
The first boot test MUST take place with each unit BEFORE it is rolled out. (Otherwise, the device would present the green test screen on the first boot instead of the IGEL Setup Assistant.)
Start the device and review the green test screen.
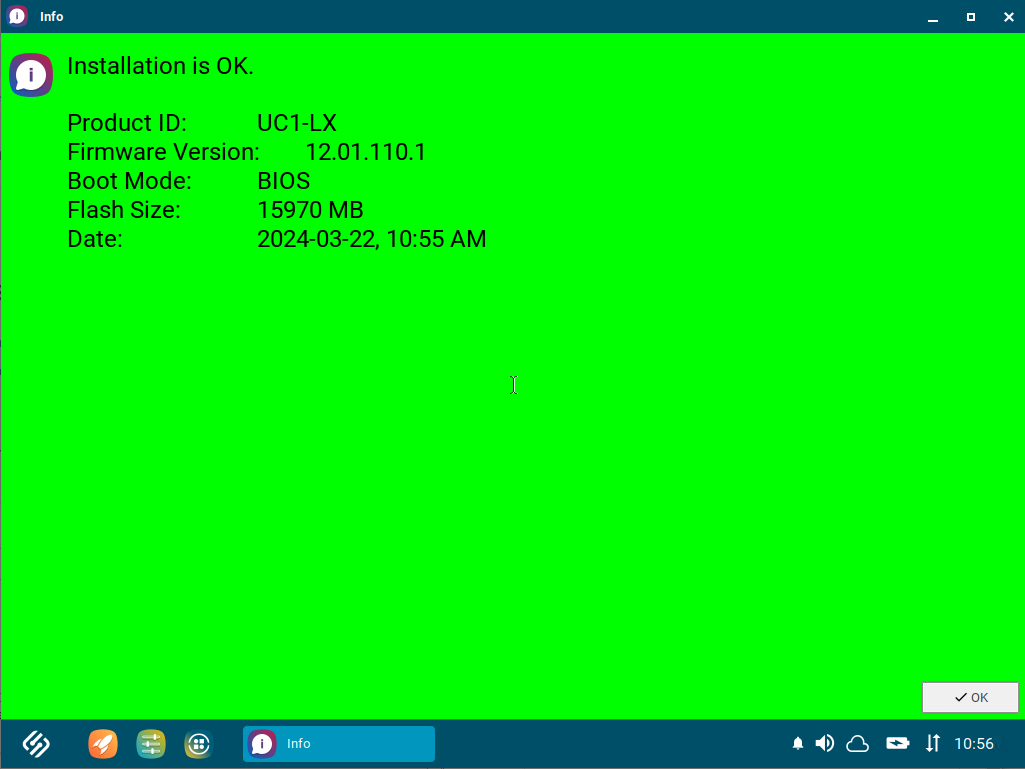
Click OK.
You can access IGEL OS in a regular way and perform your tests.Shut the device down.
The device is ready for roll-out.
Automatic Unit Testing
When Reset after first boot and Automatically shutdown at first boot has been enabled, the device writes a log file on its first boot and then shuts down automatically.
Your test routine must perform the following procedure:
Start the device.
The device will perform a check and write the results to a file on the first VFAT partition of the device's storage medium. The file format is JSON, and the file name ischeck.log. After a few seconds, the machine shuts down automatically. During the uptime, the green test screen is shown.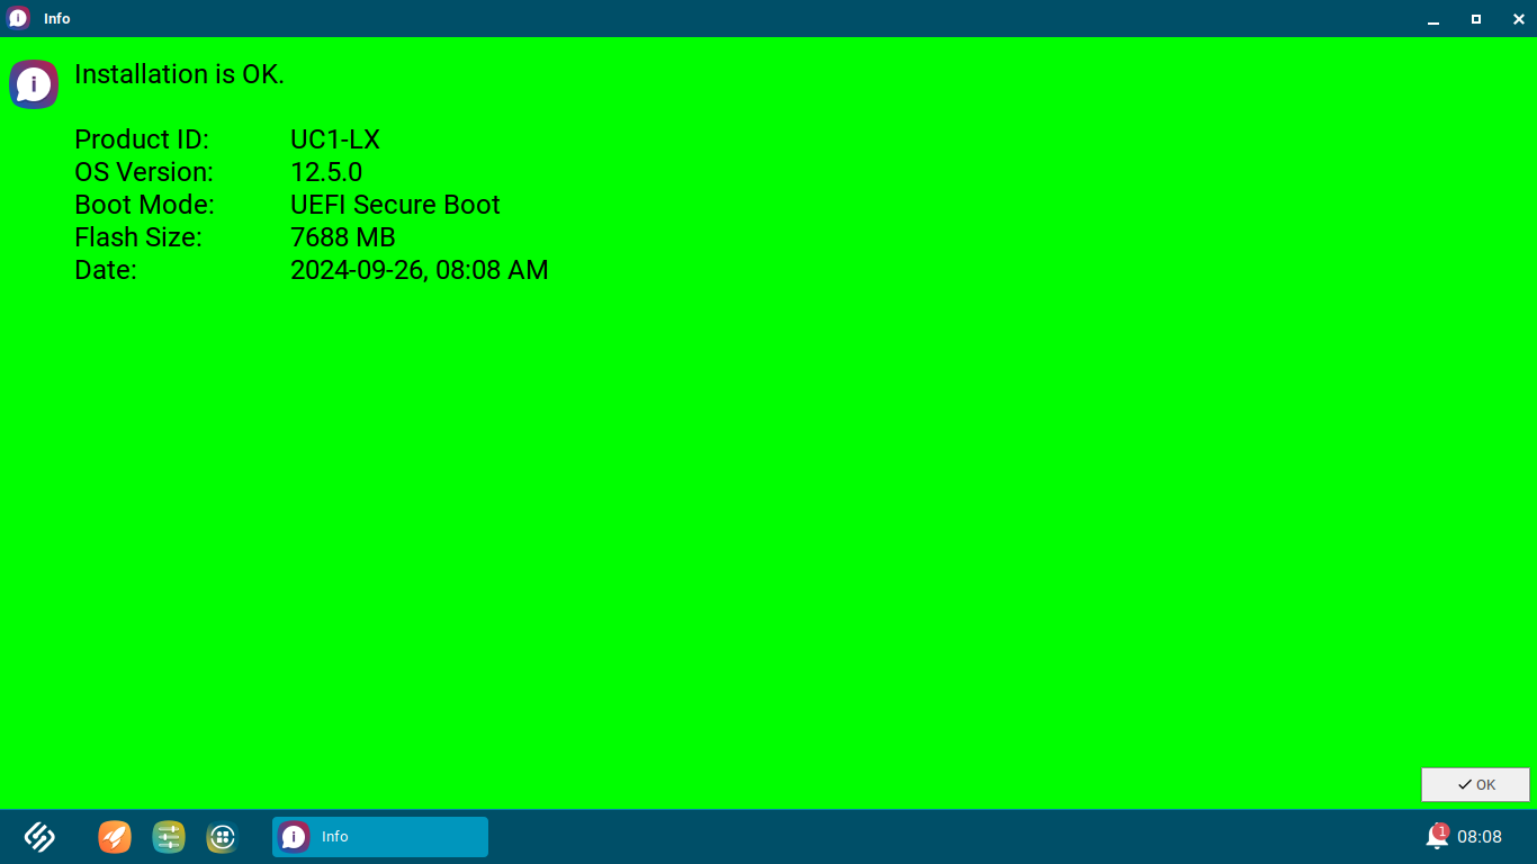
Get the file
check.logfrom the first VFAT partition of the storage medium and analyze it. The contents of the file are described below.
Example Content of check.log
{
  "product": "Standard PC",
  "serial": "12345678",
  "product_id": "UC1-LX",
  "version": "12.4.1",
  "bootmode": "UEFI Secure Boot",
  "flashsize": "7688 MB",
  "date": "2024-09-26, 08:08 AM",
  "status": "SUCCESS",
  "log": ""
}
Explanation of the JSON Fields
Field | Explanation |
|---|---|
| Product id from DMI |
| Serial number from DMI |
| The IGEL product ID. This value is also shown in the About window: 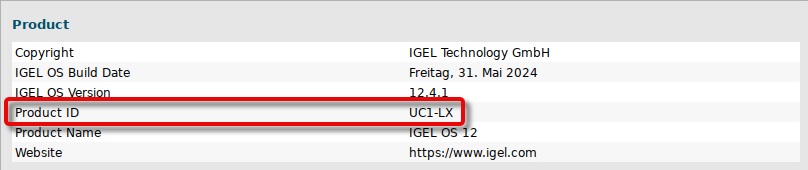 |
| The version of the IGEL OS Base System. This value is also shown in the About window: 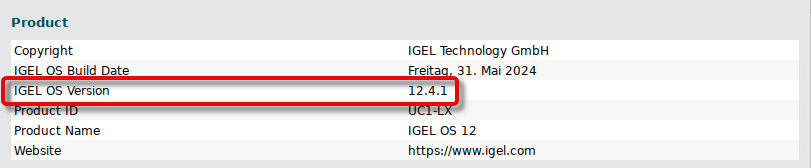 |
| The boot mode: 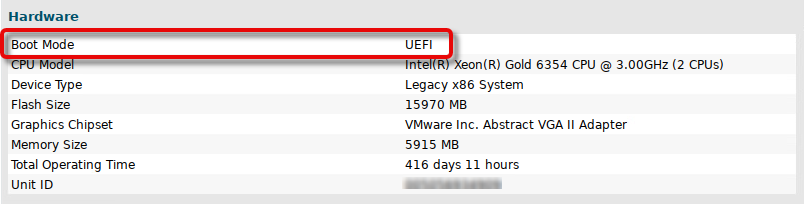 |
| The size of the IGEL partition (not the complete available disk space). This value is also shown in the About window: 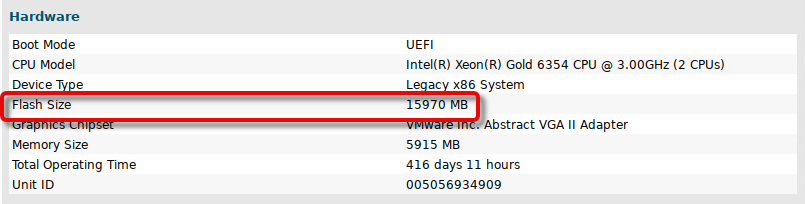 |
| Time and date of the check |
|
|
| Empty if no error has occurred; otherwise, an error description is provided |