Deploying the License on the Device
You can find instructions for manual license deployment options to license your IGEL OS devices.
Deploying the License via the UMS
Go to UMS Administration > Global Configuration > Licenses > Device's Licenses.
Click
 to open the Select License Files window.
Click
 to open a file chooser and select a license file.
Click Open in the file chooser.
Click OK in the Select License Files window.
The new license will show up in the licenses list. After a few minutes, the UMS will deploy the license on the device with the appropriate unit ID. When the device has received the license, it will restart. After the restart, the device is fully functional.
Deploying the License without UMS in IGEL OS 12
Using USB Memory Stick and the Rescue Shell (Physical Access Required)
You can deploy the license file locally from a USB memory stick.
Boot your device and press [Esc] during the boot sequence.
The IGEL boot menu is displayed.Select Verbose boot and press the return key.
At the end of the boot process, you are prompted to press a key combination to enter the rescue shell.Insert your USB storage device and press [Ctrl-Alt-F11].
Press the return key.
Enter the command
dmesgto determine the device name of the USB memory stick. The relevant information should be in the last few lines.
Example output:[...][391.214049] sd 6:0:0:0: [sdc] Write Protect is off[391.214052] sd 6:0:0:0: [sdc] Mode Sense: 43 00 00 00[391.216412] sd 6:0:0:0: [sdc] Write cache: disabled, read cache: enabled, doesn't support DPO or FUA[391.243732] sd 6:0:0:0: [sdc]: sdc1[391.247429] sd 6:0:0:0: [sdc]: Attached SCSI removable disk
In this example, the device name issdc1, and the device path is/dev/sdc1Create a directory to which the USB memory stick will be mounted:
mkdir /tmp/disklicMount your USB memory stick to the directory:
mount /dev/sdc1 /tmp/disklicIf your device has old license files, you can remove these with the following command::
delete_igel_licenses ALLInstall the new license file with the following command:
install_igel_license /tmp/disklic/[LICENSE FILE NAME].licReboot the device:
reboot
After the reboot, the license is in effect.
Deploying the License without UMS in IGEL OS 11
Using USB Memory Stick and the Rescue Shell (Physical Access Required)
You can deploy the license file locally from a USB memory stick. Choose this method when you cannot use the licensing tool (see Using the Licensing Tool).
Boot your device and press [Esc] during the boot sequence.
The IGEL boot menu is displayed.Select Verbose boot and press the return key.
At the end of the boot process, you are prompted to press a key combination to enter the rescue shell.Insert your USB storage device and press [Ctrl-Alt-F11].
Press the return key.
Enter the command
dmesgto determine the device name of the USB memory stick. The relevant information should be in the last few lines.
Example output:[...][391.214049] sd 6:0:0:0: [sdc] Write Protect is off[391.214052] sd 6:0:0:0: [sdc] Mode Sense: 43 00 00 00[391.216412] sd 6:0:0:0: [sdc] Write cache: disabled, read cache: enabled, doesn't support DPO or FUA[391.243732] sd 6:0:0:0: [sdc]: sdc1[391.247429] sd 6:0:0:0: [sdc]: Attached SCSI removable disk
In this example, the device name issdc1, and the device path is/dev/sdc1Create a directory to which the USB memory stick will be mounted:
mkdir /tmp/disklicMount your USB memory stick to the directory:
mount /dev/sdc1 /tmp/disklicRemount the directory that contains the license files as follows to make it writeable:
mount –o remount,rw /licenseIf your device has a license request file and old license files, you can remove these with the following commands:
rm /license/fetch*rm /license/dsa/licenses/*.licCopy the new license file to the license directory:
cp /tmp/disklic/[LICENSE FILE NAME].lic /license/dsa/licenses/Set the access rights of the license directory to its read-only default:
mount –o remount,ro /licenseReboot the device:
reboot
After the reboot, the license is in effect.
Using the Licensing Tool (Access via GUI Required)
With the licensing tool, you can fetch the licensing file via HTTPS download from a specific URL, via FTP, or from a USB memory stick.
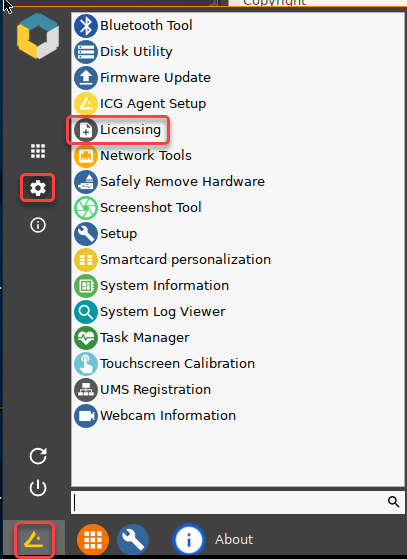
Open the Licensing tool.

Follow the instructions in the section Activate Your IGEL OS > Alternative License Deployment under Setup Assistant for IGEL OS.
