Download PDF
Download page BIOS Tools for Selected HP Devices.
BIOS Tools for Selected HP Devices
BIOS Updates at Your Own Risk
IGEL is offering and supporting the BIOS Update mechanism - BIOS updates are performed at your own risk!
The BIOS update mechanism is functional even with Secure Boot enabled and when a BIOS password is set.
With the BIOS tools, you can manage and update the BIOS of your devices using the IGEL Universal Management Suite (UMS). This is possible with specific models by Hewlett-Packard (HP).
We will use profiles and specific device commands to handle any number of devices simultaneously.
Supported Devices
- HP T540
- HP T640
Requirements
- UMS 6.10 or higher
Supported devices with IGEL OS 11.08.330 or higher

The IGEL OS needs to be installed directly on the device. BIOS tools are not supported if the IGEL OS boots from a UD Pocket.
- A Windows machine for creating the password file
Setting up the File Source
Since not only updating the BIOS but also its configuration is done using files, we need to set up a file source that is reachable by all devices.
The creation of the files is described in the relevant sections. The procedures described here are the same for all files in question, that is:
- BIOS update file
- BIOS settings file
- BIOS password file
Security Note
If you use password files, make sure that the password file is not accessible longer than necessary.
Using an External Source (HTTP/HTTPS)
If you want to deploy the BIOS update file, the BIOS settings file, and the password file from an external source, you can set up an HTTP/HTTPS server.
You can secure the file access using a username and password. The devices can be configured to provide a username and password; see If the External File Source Has Password Protection.
Using a Local Storage Device (USB)
For more information on how to use a storage device with IGEL OS, see Storage Hotplug.
Using UMS File Transfer
The following example shows how to use the UMS file transfer facility for file deployment. In this example, a BIOS update file is provided; the procedure is the same for settings and password files.
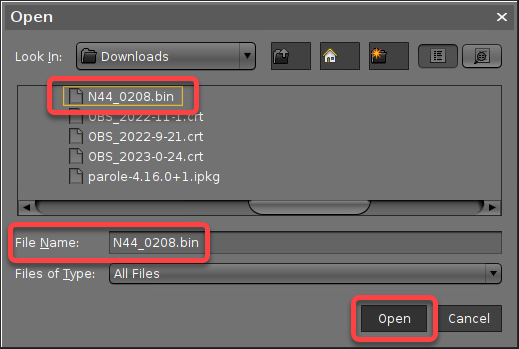
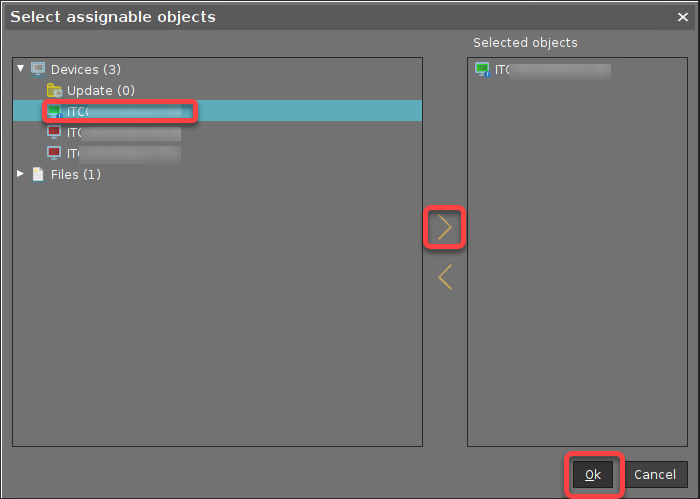
- In the UMS Console, go to Files, open the context menu, and select New file.

- Click the file chooser button.
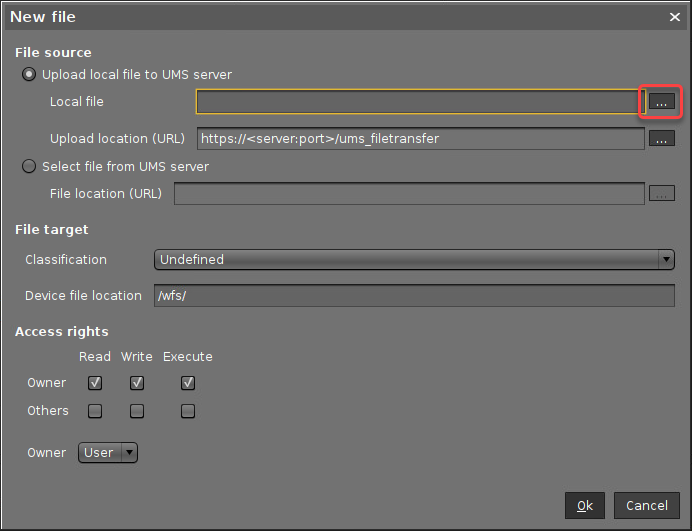
- Find the BIOS update file in your file system, select it, and click Open.
- In the field Device file location, define the local path in which the file will be stored on the device, e.g.
/tmp/. Afterward, click Ok.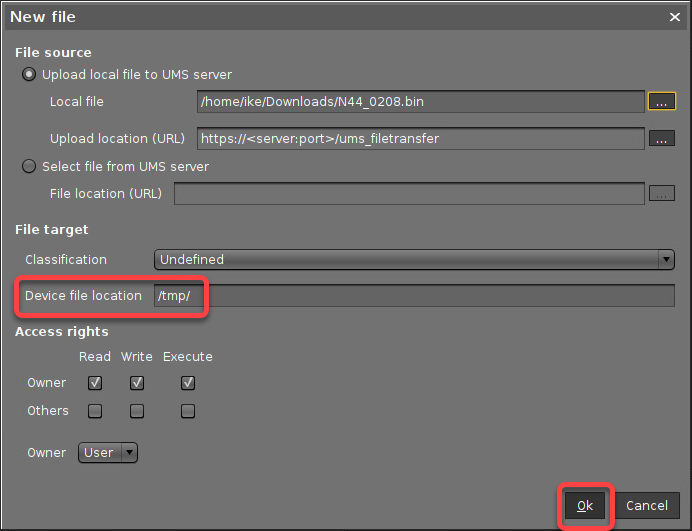
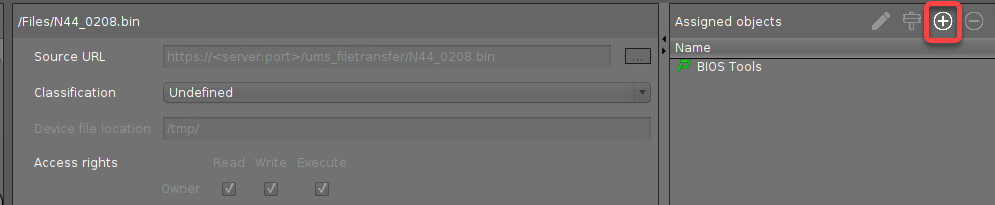
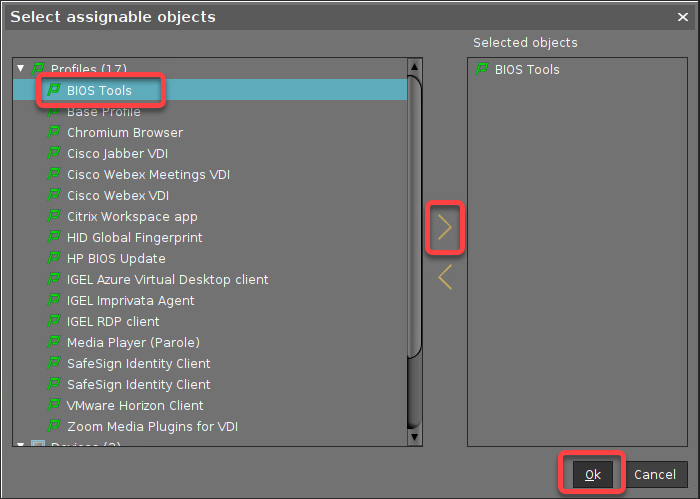
- Assign the file to your devices by assigning it to the profile we have created beforehand.
Configuring the Devices
This section describes the necessary preparations for each use case.
First of all, the BIOS Tool feature must be enabled and installed.
Then, depending on the use case, specific parameters must be set and files must be created.
The following registry parameters are currently not relevant to the procedures described here:
fwtools.bios_tools.allow_downgradefwtools.bios_tools.allow_only_trustedfwtools.bios_tools.allow_reinstall
Enabling the BIOS Tool
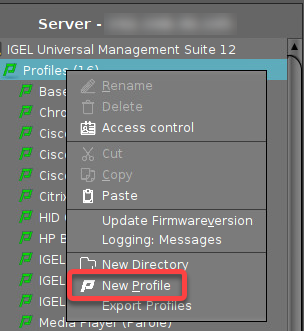
- In the UMS Console, go to Profiles, open the context menu, and select New Profile.
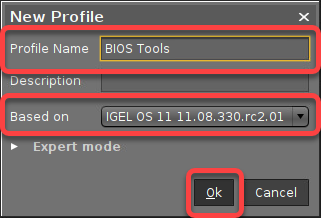
- Provide the following data and then click Ok.
- Profile Name: Display name of the profile
- Based on: Select the IGEL OS version of the devices; must be IGEL OS 11.08.330 or higher.
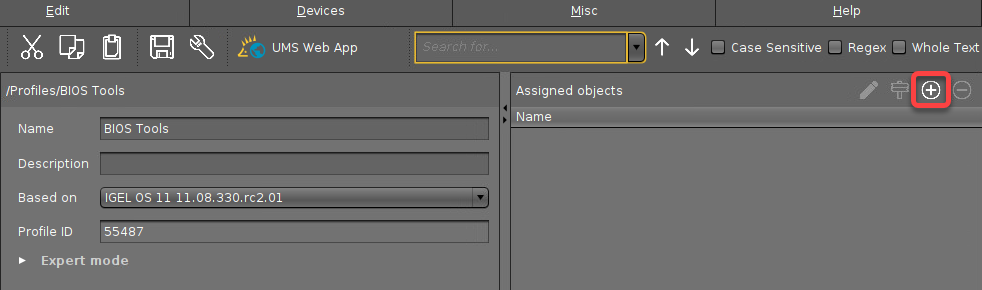
- Make sure that the settings under System > Update > Firmware Update are valid since the device will use this source for installing the BIOS Tools.
- Go to System > Firmware Customization > Features, find BIOS Tools, click the yellow icon next to the parameter (turns blue when active), enable it, and save the profile.

- Assign the profile to the devices in question.
- Reboot the device.
After the reboot, the BIOS Tools are available.
If the External File Source Has Password Protection
If your external source for the BIOS update file, the BIOS settings file, or the BIOS password file has password protection, edit the configuration as follows:
- In the BIOS Tools configuration profile, go to System > Registry > fwtools > bios_tools > bios_download_username , click the yellow icon to activate the parameter (turns blue when active), and enter the username.
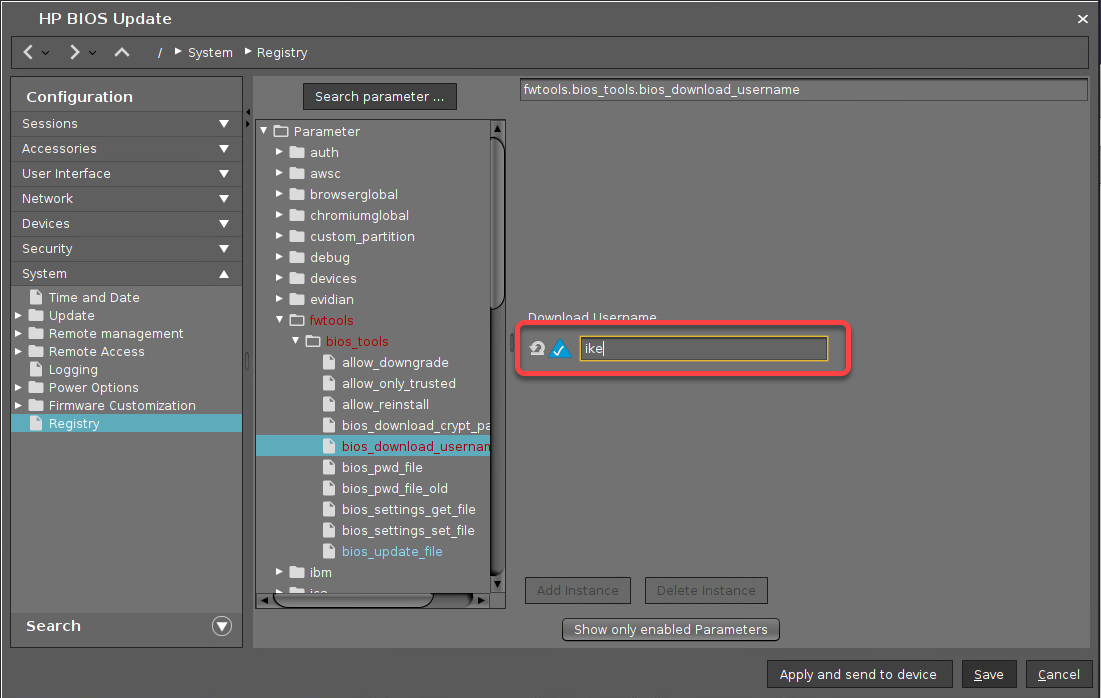
Go to System > Registry > fwtools > bios_tools > bios_download_crypt_password, click the yellow icon to activate the parameter (turns blue when active), and enter the password.

If Your BIOS is Password-Protected: Provide BIOS Password File to Make Changes
If your BIOS is protected by a password, a valid password file must be provided in order to allow any kind of changes to the BIOS. For this purpose, you must create a password file and make it available to the device.
As a precondition, you must of course know the BIOS password of your devices.
- On a Windows machine, download the password tool from https://ftp.ext.hp.com/pub/caps-softpaq/cmit/HPQPswd.html and install it.
- Create a password file with the known password and make it available as described under Setting up the File Source.
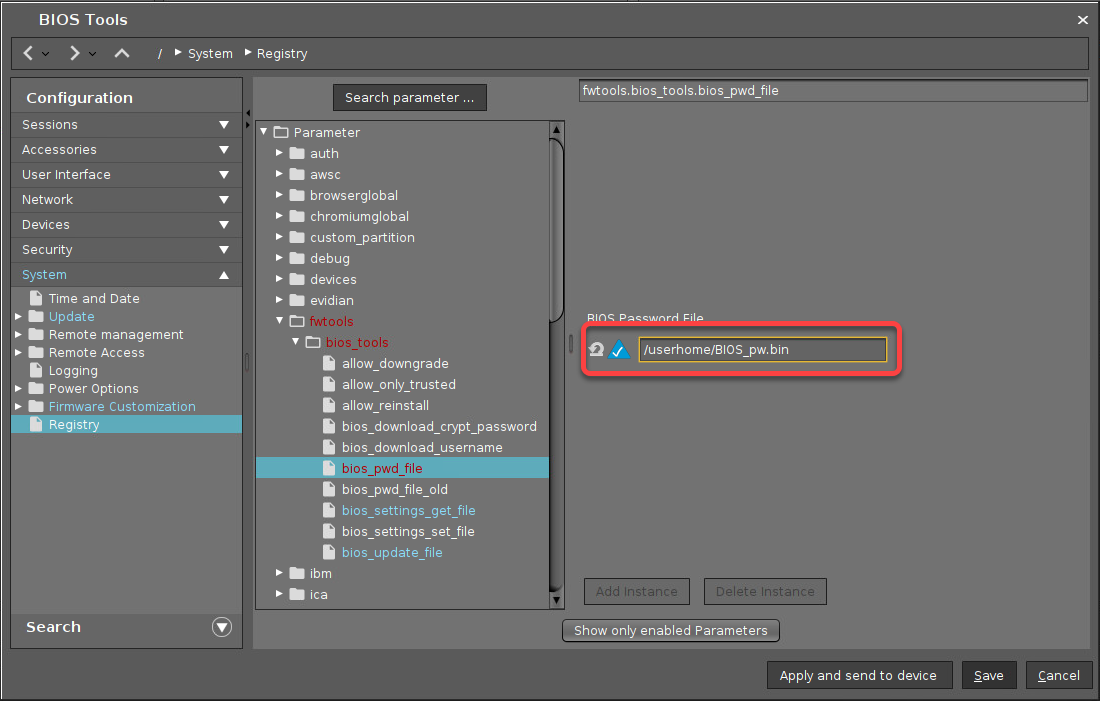
- In the BIOS Tools configuration profile, go to System > Registry > fwtools > bios_tools > bios_pwd_file , click the yellow icon to activate the parameter (turns blue when active), and enter the local or remote file path.
Set a BIOS Password to Protect Your BIOS
If your BIOS is not protected by a password yet and you want to secure it with a BIOS password, proceed as follows:
- On a Windows machine, download the password tool from https://ftp.ext.hp.com/pub/caps-softpaq/cmit/HPQPswd.html and install it.
- Create a password file with the new password and make it available as described under Setting up the File Source.
- In the BIOS Tools configuration profile, go to System > Registry > fwtools > bios_tools > bios_pwd_file , click the yellow icon to activate the parameter (turns blue when active), and enter the local or remote file path.
- Save your settings. Afterward, you can continue with Setting a BIOS Password.
Change the BIOS Password
If your devices already have a BIOS password and you want to change it, proceed as follows:
- On a Windows machine, download the password tool from https://ftp.ext.hp.com/pub/caps-softpaq/cmit/HPQPswd.html and install it.
- Create a password file with the current password and make it available as described under Setting up the File Source.
- Create a password file with the new password and make it available as described under Setting up the File Source.
- In the BIOS Tools configuration profile, go to System > Registry > fwtools > bios_tools > bios_pwd_file_old, click the yellow icon to activate the parameter (turns blue when active), and enter the local or remote file path of the password file with the current password.

- Go to System > Registry > fwtools > bios_tools > bios_pwd_file click the yellow icon to activate the parameter (turns blue when active), and enter the local or remote file path of the password file with the new password.
- Save your settings. Afterward, you can continue with Changing the BIOS Password.
Reset the BIOS Password (Remove Password Protection)
If your devices have a BIOS password and you want to reset it so that the BIOS will be accessible without a password, proceed as follows:
- On a Windows machine, download the password tool from https://ftp.ext.hp.com/pub/caps-softpaq/cmit/HPQPswd.html and install it.
- Create a password file with the old password and make it available as described under Setting up the File Source.
- In the BIOS Tools configuration profile, go to System > Registry > fwtools > bios_tools > bios_pwd_file_old , click the yellow icon to activate the parameter (turns blue when active), and enter the local or remote file path of the password file with the current password.
- Go to System > Registry > fwtools > bios_tools > bios_pwd_file click the yellow icon to activate the parameter (turns blue when active), and enter
RESET_PASSWORD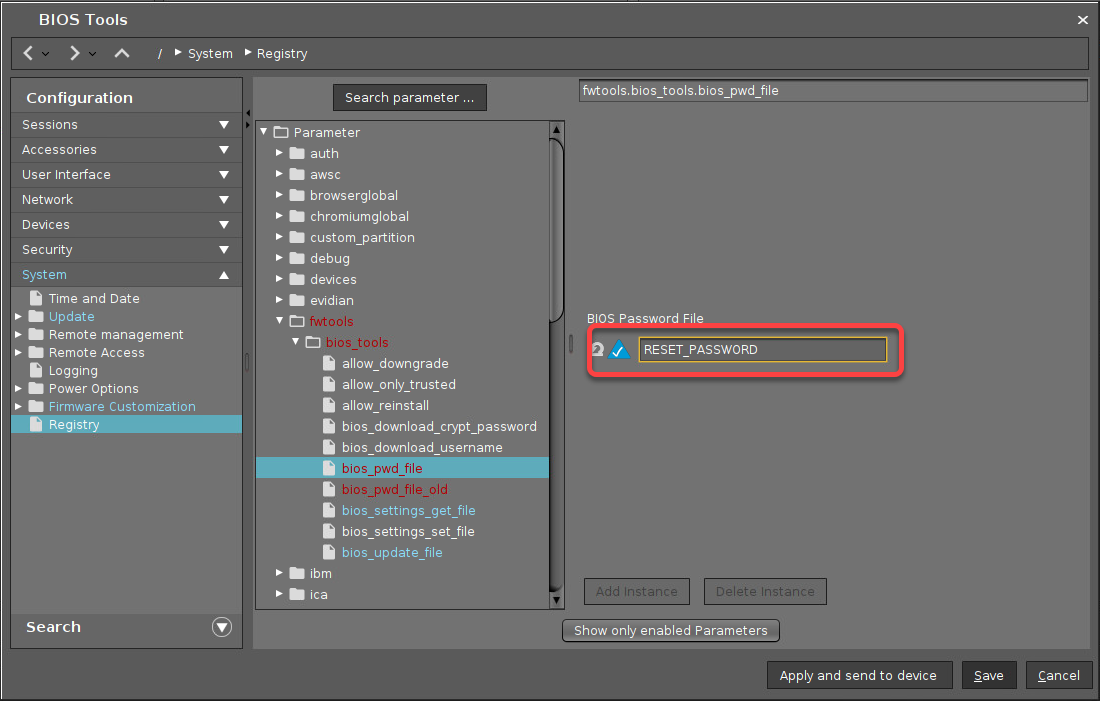
- Save your settings. Afterward, you can continue with Resetting the BIOS Password (Removing Password Protection).
BIOS Update
You can replace the current BIOS with a higher version, but not with the same version. Therefore, restoring the original BIOS that had been installed on the device before is not possible.
Moreover, it is not possible to downgrade the BIOS.
- In the BIOS Tools configuration profile, go to System > Registry > fwtools > bios_tools > bios_update_file , click the yellow icon (turns blue when active), and enter the local path or URL to the BIOS update file.
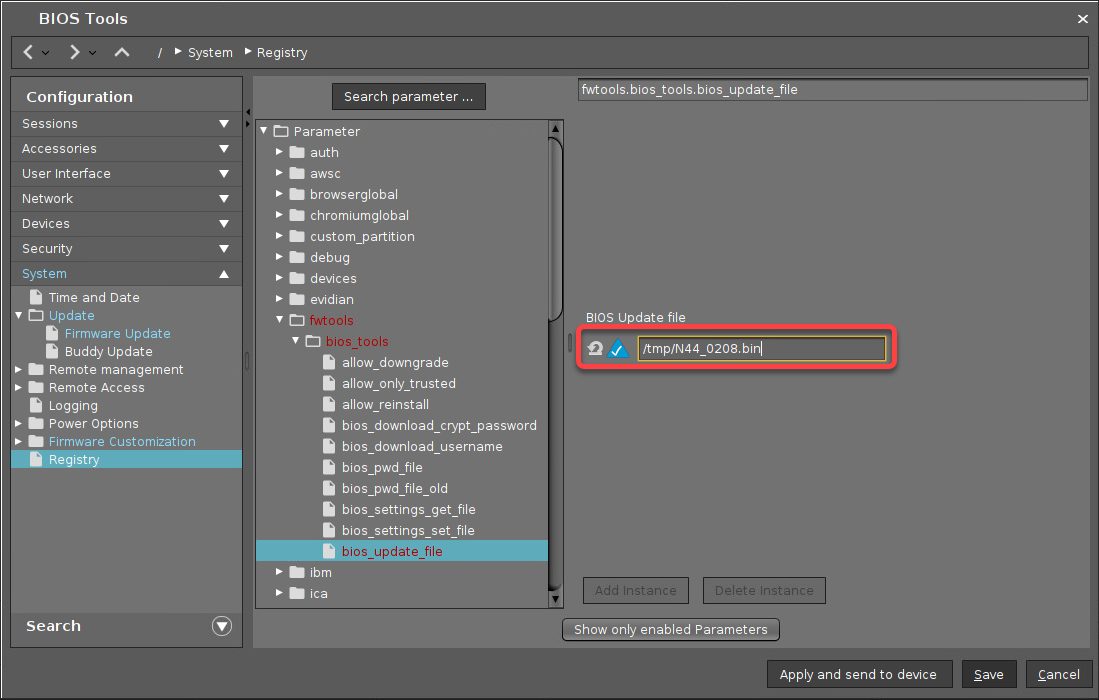
- Save your settings. Afterward, you can continue with Updating the BIOS.
Change the BIOS Settings
In this section, we will first define a local directory path in which the BIOS Tools facility will store the current settings as a file when it has extracted them from the device's BIOS. Then, we will define a local directory path in which the edited settings file will be stored so the BIOS tools facility can apply it to the device's BIOS.
- In the BIOS Tools configuration profile, go to System > Registry > fwtools > bios_tools > bios_settings_get_file , click the yellow icon (turns blue when active), and enter the path on the device where the BIOS update file will be saved.
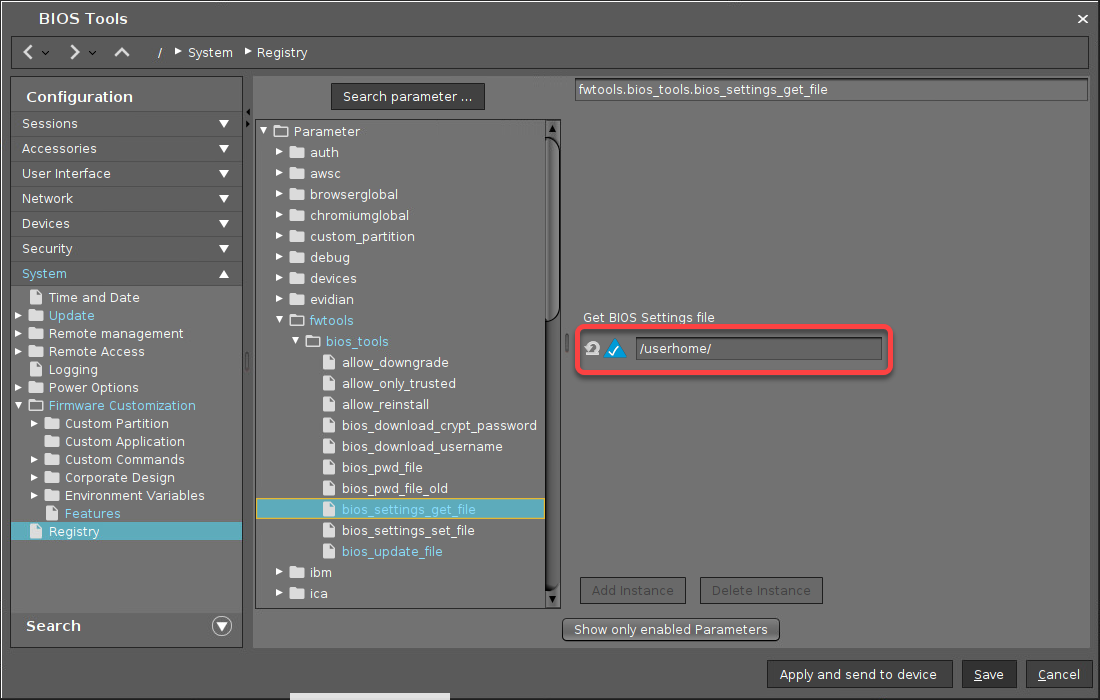
- Go to System > Registry > fwtools > bios_tools > bios_settings_set_file , click the yellow icon (turns blue when active), and enter the directory path on the device where the settings file will be saved. The filename will be
bios_settings<unit_id>; example:bios*settings*005056784DBA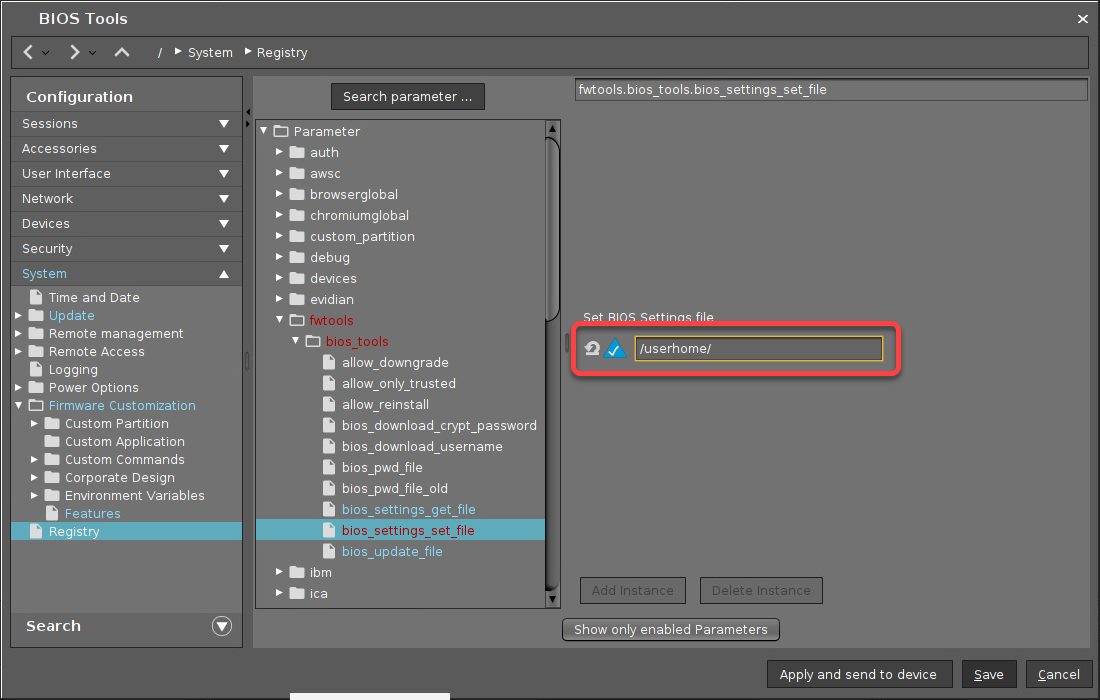
- Save your settings. Afterward, you can continue with Changing the BIOS Settings.
Reset the BIOS Settings to Default
To reset the BIOS setting to default, proceed as follows:
- In the BIOS Tools configuration profile, go to System > Registry > fwtools > bios_tools > bios_settings_set_file , click the yellow icon (turns blue when active), and enter
RESET_SETTINGS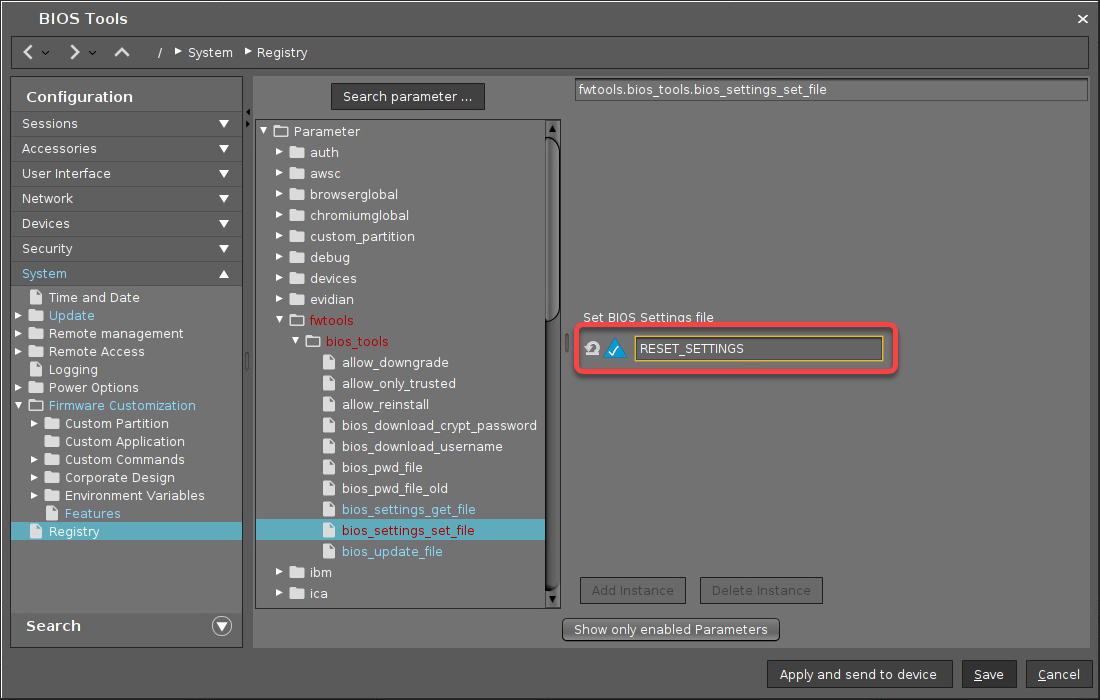
- Click Save.
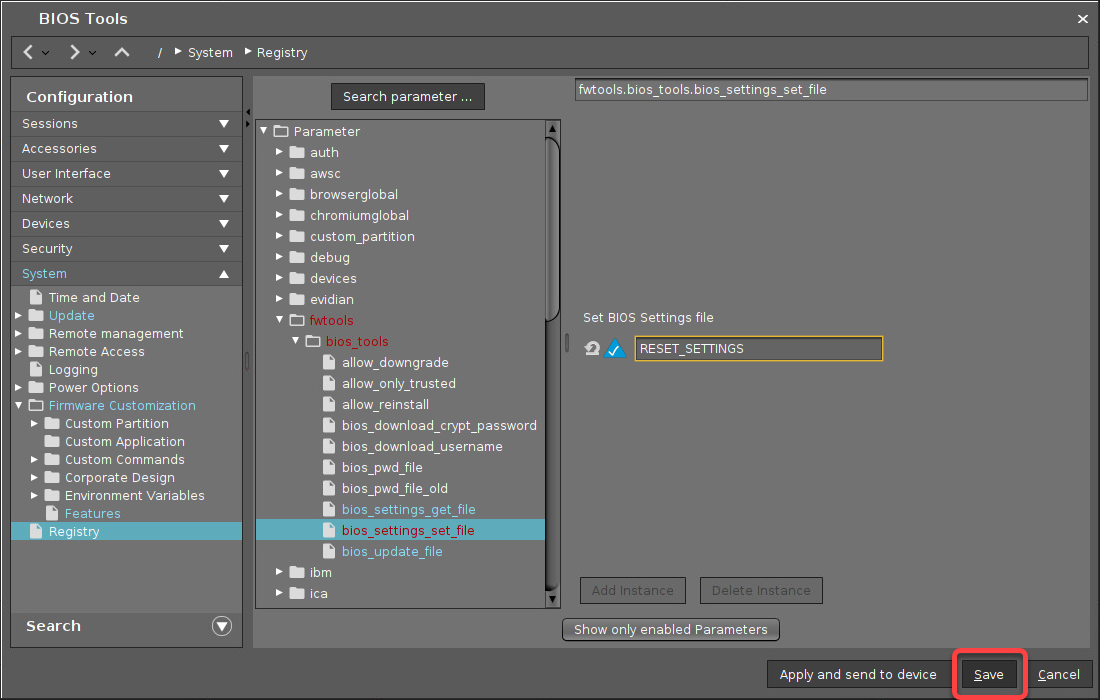
- Save your settings. Afterward, you can continue with Resetting the BIOS Settings to Default.
Updating the BIOS
Getting the BIOS Update File from HP
- Open https://support.hp.com/, select your device, click Software, Drivers and Firmware, and follow the steps.
- Download the file (example:
sp126570.exe) and unzip it. - In the directories created by unzipping, look for a file with the ending
.bin, for instance,M44_0103.bin, and store it in a location that is reachable from your UMS machine.
Making the BIOS Update File Available
![]() Make the BIOS update available to your devices; see Setting up the File Source.
Make the BIOS update available to your devices; see Setting up the File Source.
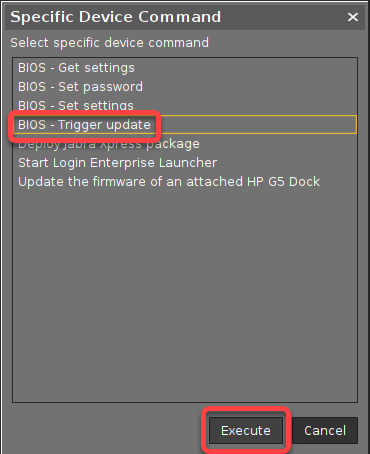
Triggering the BIOS Update
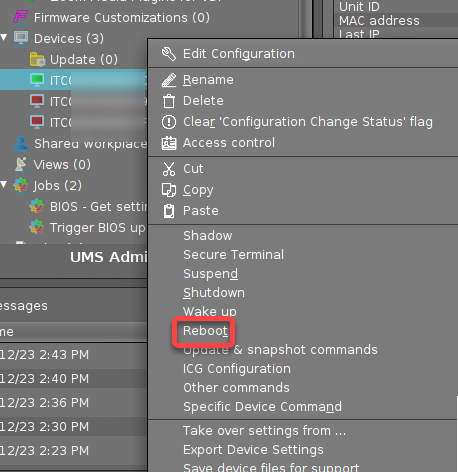
- In the UMS, select the relevant devices (or directory), open the context menu, and select Specific Device Command.
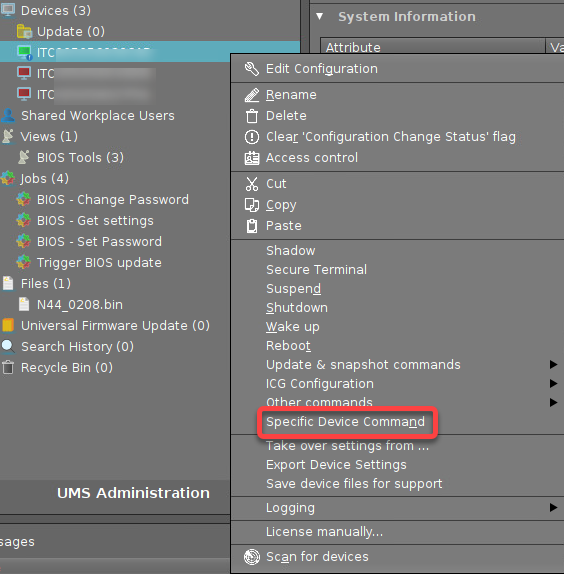
- Select BIOS - Trigger update and click Execute.
Changing the BIOS Settings
To change the BIOS configuration, you must first retrieve the BIOS settings from the device, then edit them, and finally deploy the edited settings to the device.
Getting the BIOS Settings
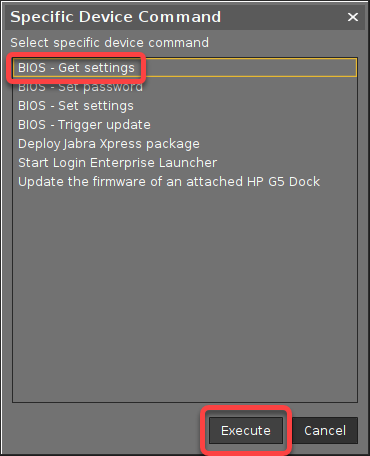
- In the UMS, select the relevant devices (or directory), open the context menu, and select Specific Device Command.
- Select BIOS - Get settings and click Execute.
Editing the BIOS Settings File
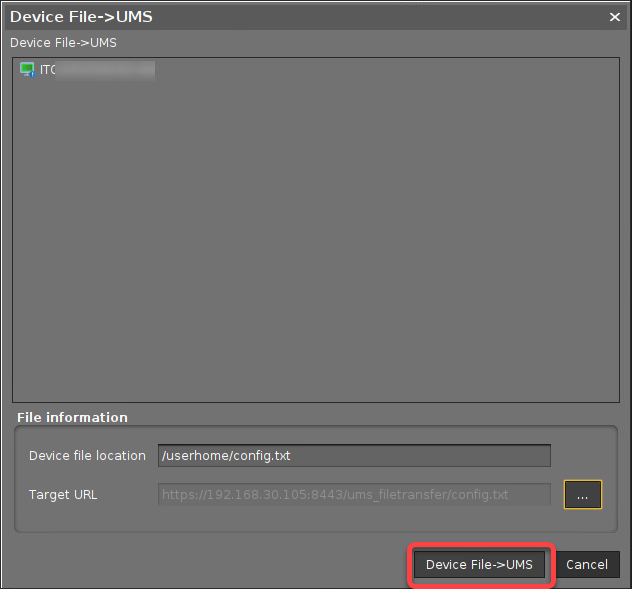
- Look up your device in the UMS structure tree, open the context menu, and select Other commands > Device File -> UMS.

- Under Device file location, provide the local path to which the settings file has been stored; this location has been specified in the step Configuration for Editing the BIOS Settings.
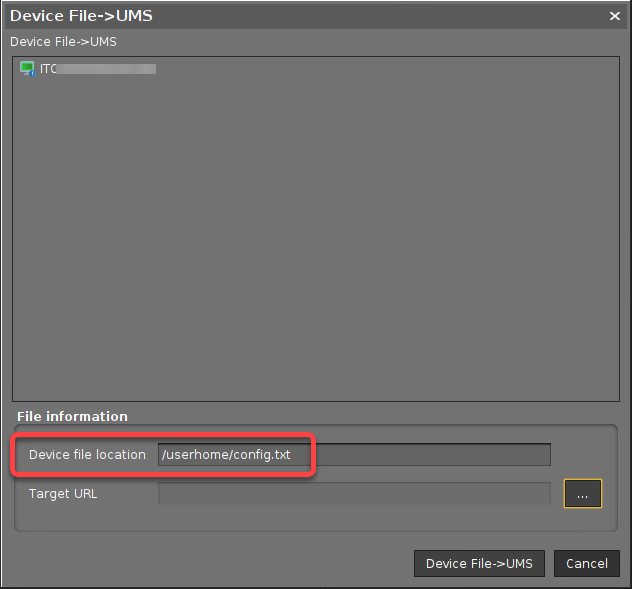
- Define the path on the UMS machine under which the settings file should be stored so you can retrieve and edit it.
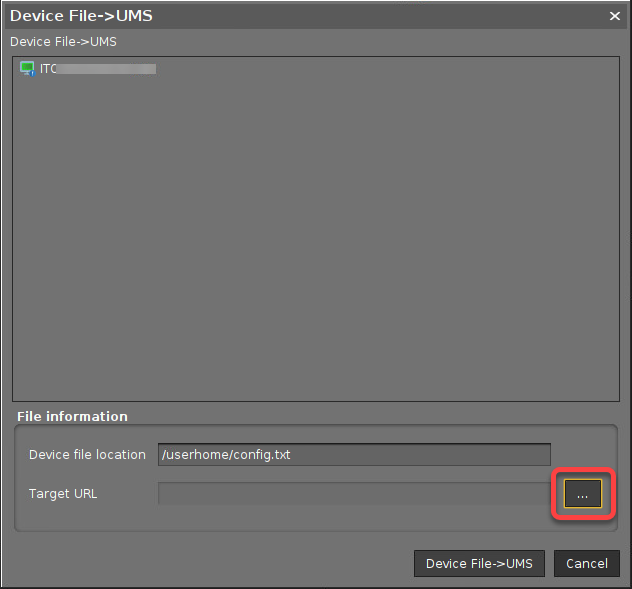
A file chooser opens.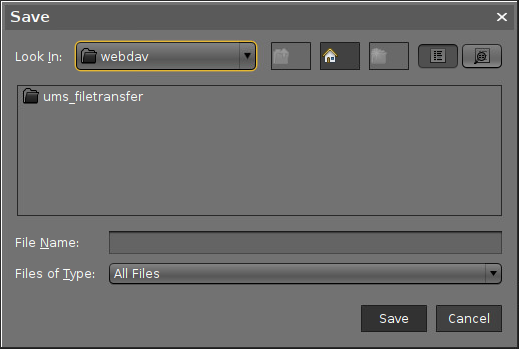
- Set the following parameters and click Save.
- Look in: File path on the UMS machine under which the settings file should be stored, e.g. ums_filetransfer.
- File Name: The file name under which the settings file should be stored.
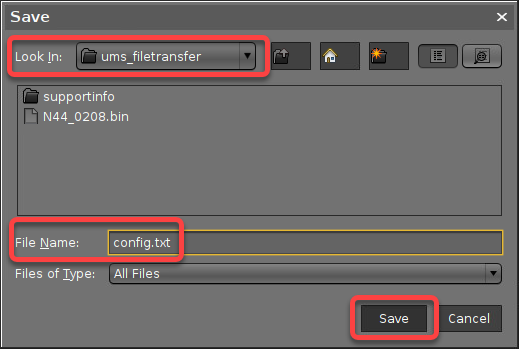
- Click Device File -> UMS to transfer the file from the device to the UMS machine.
- Download and install the HP BIOS Configuration Utility. For information on the download source and the use of the utility, see https://ftp.ext.hp.com/pub/caps-softpaq/cmit/whitepapers/BIOS_Configuration_Utility_User_Guide.pdf.
Edit the configuration file as desired.

Make sure that the BIOS settings file is formatted properly and that the REPSET format is respected. For further information, see https://ftp.ext.hp.com/pub/caps-softpaq/cmit/whitepapers/BIOS_Configuration_Utility_User_Guide.pdf

It is sufficient to specify only those BIOS setting you want to change so that your edited file contains snippets instead of all possible settings.
- Save the settings file, e.g. as
config.txt. Make the edited file available as described under Setting up the File Source.
Deploying the Changed Settings on the Device
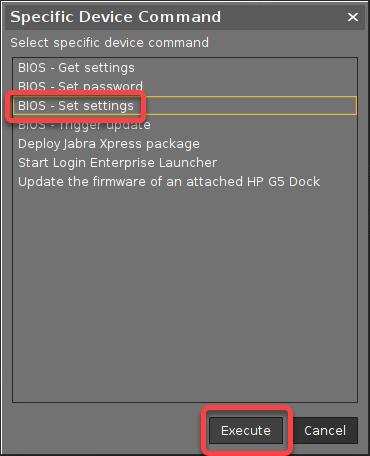
- In the UMS, select the relevant devices (or directory), open the context menu, and select Specific Device Command.
- Select BIOS - Set settings and click Execute.
Resetting the BIOS Settings to Default
- In the UMS, select the relevant devices (or directory), open the context menu, and select Specific Device Command.
- Select BIOS - Set password and click Execute.
Setting a BIOS Password
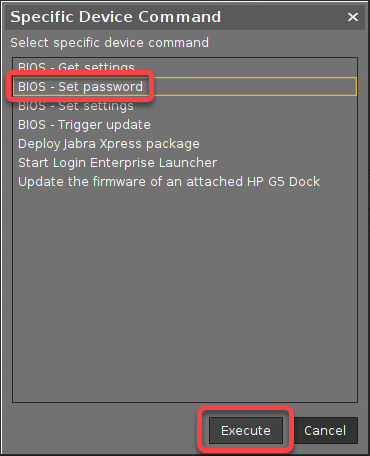
- In the UMS, select the relevant devices (or directory), open the context menu, and select Specific Device Command.
- Select BIOS - Set password and click Execute.
Changing the BIOS Password
- In the UMS, select the relevant devices (or directory), open the context menu, and select Specific Device Command.
- Select BIOS - Set password and click Execute.
Resetting the BIOS Password (Removing Password Protection)
- In the UMS, select the relevant devices (or directory), open the context menu, and select Specific Device Command.
- Select BIOS - Set password and click Execute.
Command Line Interface (CLI) for the BIOS Tools
For testing the BIOS update on a single device, you can use the command line tool as an alternative to a scheduled job from the UMS.
As a prerequisite, the steps described under Setting up the File Source and Configuration for the BIOS Tool must be completed.
When the command has been executed, a dialog informs you that a reboot is required. You can choose between two options:
- Perform the reboot and update right away
- Postpone the update to the next reboot
Usage
bios-tools [OPTIONS] COMMAND [ARGS]...
Options
| Option | Description |
|---|---|
--debug / --no-debug | |
--info / --no-info | |
--test / --no-test | |
--help | Show this message and exit |
Commands
| Command | Argument | Description |
|---|---|---|
password | Set BIOS password | |
settings | Handle BIOS settings | |
-c, --configure | Configure BIOS settings with a configuration file | |
-d, --default | Reset BIOS settings to default | |
-g, --get | Get current BIOS settings | |
--help | Show this message and exit | |
update | Handle BIOS update | |
-e, --enable | Enable BIOS update. The update will be triggered after a reboot. | |
-d, --disable | Disable BIOS update | |
-s, --show | Show if BIOS update is enabled or not | |
--help | Show this message and exit |