Overview

Switching between Okta and Microsoft Entra ID has been facilitated with IGEL OS 12.2.

With IGEL OS 12.01, the behavior of the SSO configuration was as follows: When you wanted to switch the IdP between Okta and Microsoft Entra ID, you had to delete and re-enter the public client identifier and the secret every time. This goes back to the fact that these values were not stored as separate parameters on the device.

With IGEL OS 12.2 or higher, the SSO configuration has been optimized. The public client identifiers and the secrets are now handled separately for Okta and Microsoft Entra ID. To benefit from this improvement, the profile must be based on IGEL OS 12.2. 

Automatic Update Results in Broken SSO

If your devices have been updated because Auto-update Default Version to newest version is active (see Configuring Update Settings for Individual IGEL OS Apps), and the SSO settings are still defined by a profile for IGEL Base System 12.01, SSO will not function anymore. In this case, you must immediately create an appropriate profile for IGEL OS Base System 12.2, as described in this article. 

Important Measures for Devices that Retain Base System 12.01

If some of your devices are to keep IGEL OS Base System 12.01, ensure the following:

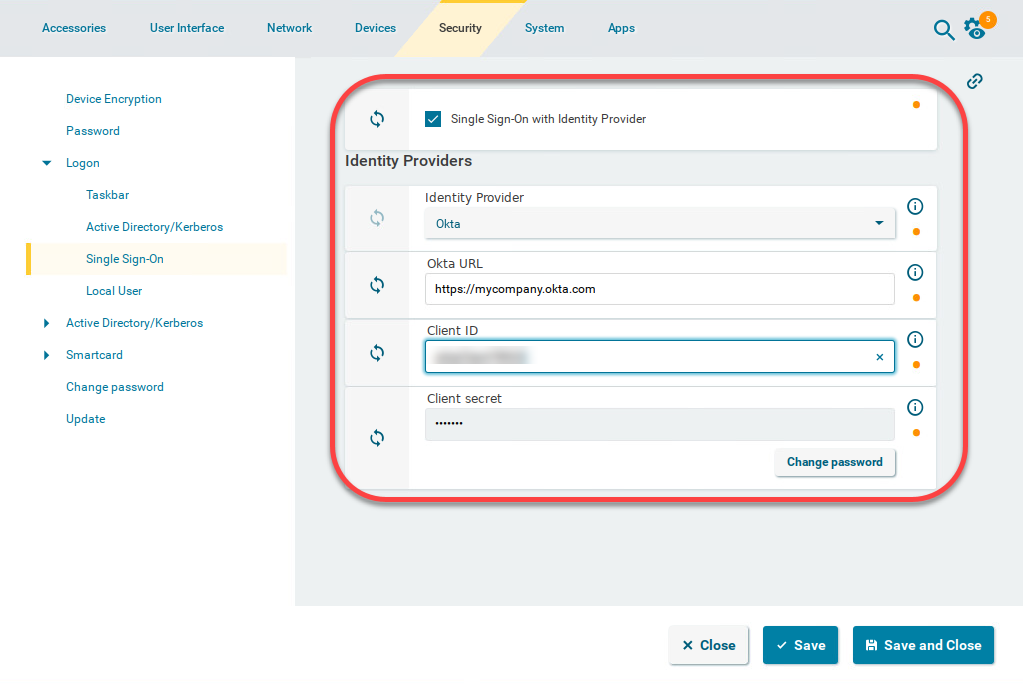
  • The current SSO profile is set to version 12.01.x of the IGEL OS Base System, not to the default version. This is done by setting the App Selector to version 12.01.x explicitly. If the base system version remains set to the default version, and the default version is then set to 12.2 or higher, the settings will be lost when the profile is saved.
  • The current SSO profile (based on IGEL OS Base System 12.01) remains assigned to those devices.


Setting Up a New Profile for Easy IdP Switching

  1. In the UMS Web App, create a new profile for the IGEL OS Base System based on version 12.2. This can be done by setting the profile's App Selector to version 12.2.0 explicitly or by setting the base system's default version to 12.2 and the profile's App Selector to Default version.

  2. For your Okta configuration, go to Security >  Logon > Single Sign-On and edit the settings as follows:
    • Enable Single Sign-On with Identity Provider.
    • Set Identity Provider to Okta.
    • Provide the Okta URL for your user. This is the Okta organization URL. Example: "https://mycompany.okta.com"
    • Provide the Client ID. This is the client ID that was created in Okta.
    • Provide the Client secret.


  3. For your Microsoft Entra configuration, go to Security >  Logon > Single Sign-On and edit the settings as follows:
    • Enable Single Sign-On with Identity Provider.
    • Set Identity Provider to Azure ID.
    • Enter the Azure AD Tenant Name/ID. This is the value you have obtained as Directory (tenant) ID in the Microsoft Entra Portal.
    • Set the appropriate Application (client) ID. This is the value you have obtained as Application (client) ID in your Microsoft Entra ID Portal.
    • Enter the Client secret.

      The secret for Microsoft Entra ID can only be viewed once. If you have not stored it, you need to generate a new one. 


  4. Assign this profile to all relevant devices.

  5. If you want to switch between Okta and Microsoft Entra ID, simply select the appropriate Identity Provider: