Distributed App Repositories can help to securely distribute apps to locations with no internet connection or low bandwidth. You can find more information on the benefits, use cases and best practices in the IGEL blog post.
By enabling and configuring this feature, binaries of apps will be stored on a self-hosted WebDAV server. Devices can then download the binaries of those apps from the WebDAV server, but the metadata will still be downloaded from the UMS Integrated App Repository (that is, the UMS as update proxy) or the IGEL App Repository behind the IGEL App Portal.
For a demo of the architecture, see the video walkthrough.
The feature is offered as an enterprise feature in the IGEL OS Editions licensing model. For details, see IGEL OS Editions.
Prerequisites
Universal Management Suite
You need to have the following UMS permissions :
-
App management; see How to Manage Global Permissions in the IGEL UMS Web App
-
Write access for UMS Administration > UMS Network > Server; for details on access rights, see Object-Related Access Rights
OS 12 Devices
The devices using the Distributed App Repository must run IGEL OS 12.5.0 or higher.
WebDAV Server
At least one self-hosted WebDAV server must exist. This server will act as the Distributed App Repository, therefore, it needs to fulfill the following requirements:
-
Enough disk space to store binaries
-
A user with write permission to update and add new files
-
A user with read permissions used by the devices to download the app binaries
-
Digest login enabled
-
It is recommended to use a secured connection (HTTPS):
-
The UMS needs a certificate for the WebDAV server to be used for file uploads if SSL is used. This certificate is also forwarded to the devices to be used to download the files.
-
To make the certificate visible, the public key has to be imported into the UMS. Use Import a root CA certificate for this. For details, see Web Certificates in the IGEL UMS .
-
The certificate must contain Subject Alternative Names (SANs) to be imported into the UMS.
-
-
Configuration to support file uploads larger than 1 GB, as the OS 12 base image contains large files. It is recommended to configure the upload limit to 2 GB.
Example Configuration with Red Hat
For an example configuration of the upload limit using Red Hat, see https://access.redhat.com/articles/6975397. (This link leads to third-party documentation that we don’t maintain or support. For other third-party solutions, please refer to their respective documentation.)
Process Overview
To use a Distributed App Repository in your UMS environment:
-
Prepare the WebDAV Server. See Prerequisites and Hints.
-
Configure the repository in the UMS Web App or through profiles.
-
Assign priorities to the repositories.
-
Apps are automatically upload to the repositories.
-
Confirm repository configuration on devices.
Configure Distributed App Repositories in the IGEL Environment
There are multiple ways to connect the Distributed App Repositories to your IGEL environment and OS 12 devices:
-
Central configuration in the UMS Web App
-
Configurations applied through profiles
Central Configuration in the UMS Web App
You can add a central app repository configuration in the UMS Web App, under Apps > Settings > UMS as update proxy > Manage Binary App Repositories.
This configuration works as a global configuration and is applied automatically to all OS 12 devices managed by the IGE UMS. This configuration will enable the automatic upload of app binaries from the UMS to the repository server.
Perform the following steps to set up one or multiple repositories in the UMS Web App:
-
Navigate to the Apps area.
-
Open Settings.
-
If not yet done, enable UMS as update proxy. For more information, see Configuring Global Settings for the Update of IGEL OS Apps.
You can also use the app repository without the UMS as an update proxy. In this case, the repository gets the binaries directly from the IGEL App Portal.
-
On the same tab, open Manage Binary App Repositories.
-
By clicking + you can add a new repository with the following parameters:
-
Name
Name of the repository to add. -
WebDAV URL
URL of an existing WebDAV server. Example:http://this.domain/repoDo not use “/” at the end of the Webdav URL. This URL is used by the UMS to upload binaries. If no Load Balancer URL is given, devices will use it to download the binaries. -
Load Balancer URL
URL of the load balancer, if the WebDAV server is balanced by one. Devices will use it to download the binaries. -
Download User
Username that is used to download binaries from the WebDAV server. Username should be given without any domain part. This is the Read user. -
Download User Password
Password that is used to download binaries from the WebDAV server. -
Upload User
Username that is used to upload binaries to the WebDAV server. Username should be given without any domain part. This is the Write user. -
Upload User Password
Password that is used to upload binaries to the WebDAV server. -
Priority
Priority that this repository will be handled by. See more details on priority explanation below.
-
-
If you use a secured connection to the server, you need to import the SSL certificate as root CA certificate. For details, see Web Certificates in the IGEL UMS .
Configuration Through OS 12 Profiles
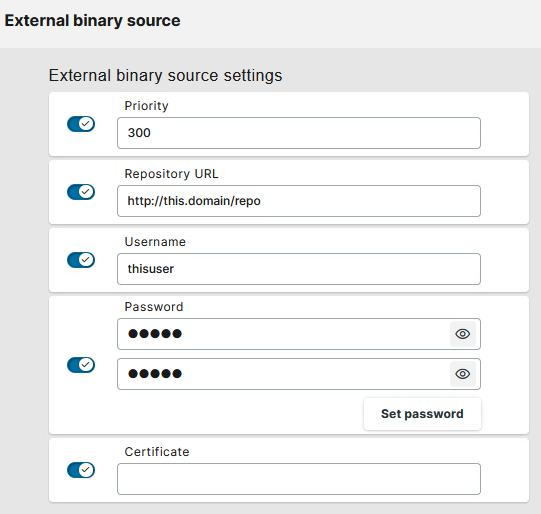
You can add the app repository configuration to the IGEL OS 12 devices through OS 12 base system profiles. You can configure the repositories under System > Update > External binary source.
This way, you can assign different Distributed App Repository configurations to different sets of devices through the profiles.
You can add the repository configuration in a profile:
-
Go to System > Update and add the repository under External binary source.
-
Add the Repository URL and define the Username and Password that is used to download binaries from the WebDAV server.
-
If an HTTPS connection is used, you can also add the file path to the SSL certificate.
-
Set the priority according to your needs. The larger the number, the higher the priority.
Assign Priorities to Distributed App Repositories
During the app update, the device will check for the available repositories, and the repository with the highest priority value will be used to download binaries. If none of the repositories is available, the download will fall back to the UMS Integrated App Repository (UMS as update proxy) or the IGEL App Repository (of the UMS App Portal).
If you first want to configure a Distributed App Repository, but don’t want IGEL OS 12 devices to download from this repository yet, you can assign a negative priority value to that repository in your central configuration. This way, app binaries will be synchronized to that repository, but devices won't download from it. However, the repository can then be configured via profiles for some devices with a higher priority to trigger the download mechanism.
For example:
-
Set up a Distributed App Repository named "Local Download" with priority
-1.
-
Create a base system profile, and configure the same "Local Download" repository under System > Update > External binary source with the highest priority, for example:
300.
-
Assign the profile to the devices that should download from that repository.
App Upload to the Distributed App Repository
App binaries are automatically sent to the configured repository within minutes after the app is imported into the UMS.
Apps normally cached by the UMS update proxy are uploaded to the Distributed App Repositories. If the UMS is not set as the update proxy, all apps imported to the UMS Web App are also uploaded to the Distributed App Repositories.
Once an app is cached in the repository, synchronization to the repository is performed at regular intervals. The interval is defined under Apps > Settings > Automatic Updates.
For details on importing apps, see How to Import IGEL OS Apps from the IGEL App Portal.
Confirm the Application of the Configurations on the Device
After some time, the UMS automatically sends the Distributed App Repository configurations to the devices if the repository was configured centrally. You can check if the configuration is applied to the device doing the following:
-
In the UMS Web App go to Devices and update the device.
-
Shadow the device and go to Setup > System > Update.
-
Under External Binary Sources, you should see your WebDAV server.
-
If the entry is not visible, restart the device.
Tips and Hints for WebDAV Servers
General compatibility is tested with the configurations described in this section. The section serves as an example, but there could be different ways to do the configuration.
Since the configuration involves an external software we cannot provide full support for each version.
SSL Certificate Configuration Check
The SSL certificate related to the WebDAV server must include the FQDN of your WebDAV server not only in Common Name (DN), but also in Subject Alternative Names (SAN).
For example, you can check the certificate of your WebDAV server using the following commands:
-
Windows:
echo | openssl s_client -showcerts -servername gnupg.org -connect gnupg.org:443 2>NUL | openssl x509 -inform pem -noout -text -
Linux:
echo | openssl s_client -showcerts -servername gnupg.org -connect gnupg.org:443 2>/dev/null | openssl x509 -inform pem -noout -text
Replace gnupg.org by the server name (or IP, e.g. 192.xxx.x.xxx) as used in the UMS for the App Repository. And replace gnupg.org:443by the server name, port and base path (or IP, e.g. 192.xxx.x.xxx/webdav) as used in UMS for the App Repository.
The output should match the WEB certificates in UMS. In particular, the Subject Alternative Name should contain the address used by UMS.
Apache HTTP with WebDAV
The password for the WebDAV users should be created with the command ‘htdigest’ to work properly.
Windows Server IIS with WebDAV
Make sure the following features are installed:
-
WebDAV publishing
-
Digest Authentication
When setting up virtual directories, ensure that:
-
The WebDAV users must have access
-
Digest Authentication must be enabled
-
Directory Browsing must be enabled
As the uploaded files could contain + signs, the IIS WebDAV must be configured to accept them. Add the following to ‘web.config’ of your website:
<?xml version="1.0" encoding="UTF-8"?>
<configuration>
    <system.webServer>
        <directoryBrowse enabled="true" />
        <security>
            <requestFiltering allowDoubleEscaping="true" />
        </security>
    </system.webServer>
</configuration>
With SSL enabled, IIS has to buffer some of the request body before it can complete authentication and other checks. The default limit is small, so large uploads over HTTPS hit a limit and fail, while small ones work. You need to change two configurations and then restart the site:
-
Increase
uploadReadAheadSize
-
Increase max request size
Video Walkthrough
In this video, you can see an overview of the IGEL Distributed App Repository architecture.