Migrate a UMS Server with the Same External Database
Use Case
You have a UMS installation with the external database and want to migrate to a new UMS Server with the same external database.
General Overview of the Migration Procedure
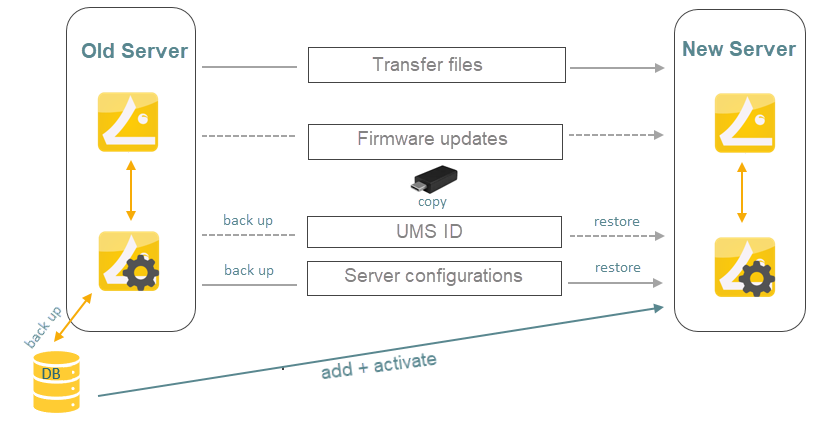
The migration procedure generally involves the following steps:
Setting the IP address of the new server through profiles (only necessary, if devices find the UMS via IP)
Stopping the
IGEL RMGUIServerservice on the old serverBacking up the old server. Checklist for the backups:
 Database Transfer files Firmware updates Server configurations (host-specific server configurations that differ from the defaults are noted down separately) UMS ID (see Transferring or Registering the UMS ID )
Adding the existing external database as the data source for the new server
Activating the data source
Transferring the backed-up data to the new server
Adjusting DHCP tag and DNS alias on the new server (only necessary, if devices find the UMS via DNS/DHCP)
Instructions
On the Old Server
If the devices find the UMS via the IP address, they can only connect to the new server if the IP address of the new server is set before the migration. To set the IP address:
Create an OS 11 and an OS 12 profile with the new UMS server IP. The new server needs to get listed under System > Remote Management. For more information, see Remote Management in IGEL OS 12 and Remote Management in IGEL OS 11 .
Assign the profiles.
Check that all devices got their settings by creating a view with the Last Boot Time criterion under Views. For more information, see How to Create a New View in the IGEL UMS.
Stop the service
IGEL RMGUIServer(for instructions, see IGEL UMS HA Services and Processes)and set the startup type for it to Disabled in order to prevent accidental parallel operation with the new UMS Server.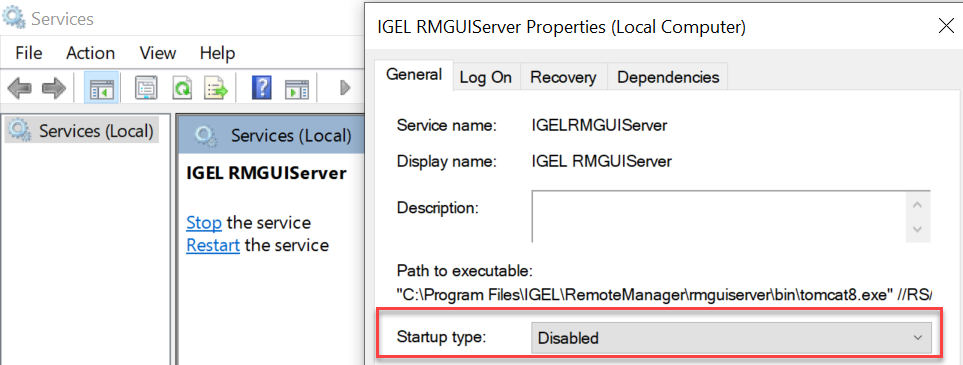
Before the migration, make the backups as described in the "External Database" section under Creating a Backup.
Note the values of host-specific server settings (Web server port, JWS server port, and ciphers).
Create a backup of the UMS ID in the UMS Administrator > UMS ID Backup. For detailed instructions, see Transferring or Registering the UMS ID .
Create a backup of all the files in the following folder. (You will need to restore them on the new server.)
[IGEL installation directory]/rmguiserver/webapps/ums_filetransfer
In the UMS Console, go to UMS Administration > UMS Network > Server and note the process ID of the server.
On the New Server
Install the UMS on the new server. For the installation instructions, see IGEL UMS Installation.
Go to UMS Administrator > Datasource > Add and enter the connection properties of the existing database.
Activate the data source. Wait until the UMS Server fully starts, i.e. the UMS Console can connect with it.
In the UMS Administrator > Backups, restore the backup of server configurations. If necessary, transfer host-specific server configurations to the new server.
Transfer the UMS ID of the previous UMS installation to the new server: UMS Administrator > UMS ID Backup > Restore. Alternatively, you can register the new UMS ID, which was created during the installation of the new server. For detailed instructions, see Transferring or Registering the UMS ID.
It is recommended to use the same UMS ID. The connection to ILP, App Portal and other services are all dependent on the UMS ID, and would be affected if it changes.
Restore the files to the folder keeping the folder structure of the old server:
[IGEL installation directory]/rmguiserver/webapps/ums_filetransfer
If the ICG is used: Connect the existing ICGs as described under How to Connect to the ICG after the UMS Server Migration or New Installation with the Same Database.
Restart the service
IGEL RMGUIServer. If the devices find the UMS via the IP address, they should connect automatically.If the devices find the UMS via DNS/DHCP:
Adjust the DHCP tag and the DNS alias
igelrmserverwith the IP or FQDN of the new UMS Server. See Registering Devices Automatically on the IGEL UMS.Assign the new server to the old server certificate or create and assign a new certificate with the FQDN of the new server. For more information, see How to Use Your Own Certificates for Communication over the Web Port (Default: 8443) in IGEL UMS.
The configuration of the DHCP tag and the DNS alias is not a setting that can be made within the IGEL software. You must configure these within your individual network environment on the corresponding DHCP and DNS servers.
For HA installations only: Update the host assignment for job execution. For the instructions, see Updating Host Assignment for Job Execution.
After the procedure is complete, open the UMS Console and go to UMS Administration > UMS Network > Server to check if there is an entry for the previous UMS Server among the listed components. If so, select the entry and click Delete in the context menu.