When an unconfigured device starts for the first time, the Setup Assistant for IGEL OS guides you through the initial configuration process.
If you have configured the IGEL Onboarding Service, you use it to register your IGEL OS 12; see Register IGEL OS 12 Devices with the UMS via IGEL Onboarding Service.
For an alternative device registration method, see Alternative Onboarding Method: Registering Devices with the UMS Using the One-Time Password.
If you decide for some reason not to use the IGEL Onboarding Service or the one-time password method, you can skip the corresponding steps in the Setup Assistant. Your IGEL OS 12 device will start with a Starter license.
To register this device with the UMS Server, you can use the Scan for devices function, see How to Scan the Network for Devices and Register Devices on the IGEL UMS. For other device registration methods, see Registering IGEL OS Devices on the UMS Server.
By default, passwords in the UMS are hashed in SHA-512. From UMS 12.12.100 you change to BCrypt, however, this needs to be done before any devices are registered and profiles are created. For more information, see Configure BCrypt Password Hashing in the IGEL UMS.
Register IGEL OS 12 Devices with the UMS via IGEL Onboarding Service
-
Switch your device on.
The Setup Assistant starts. -
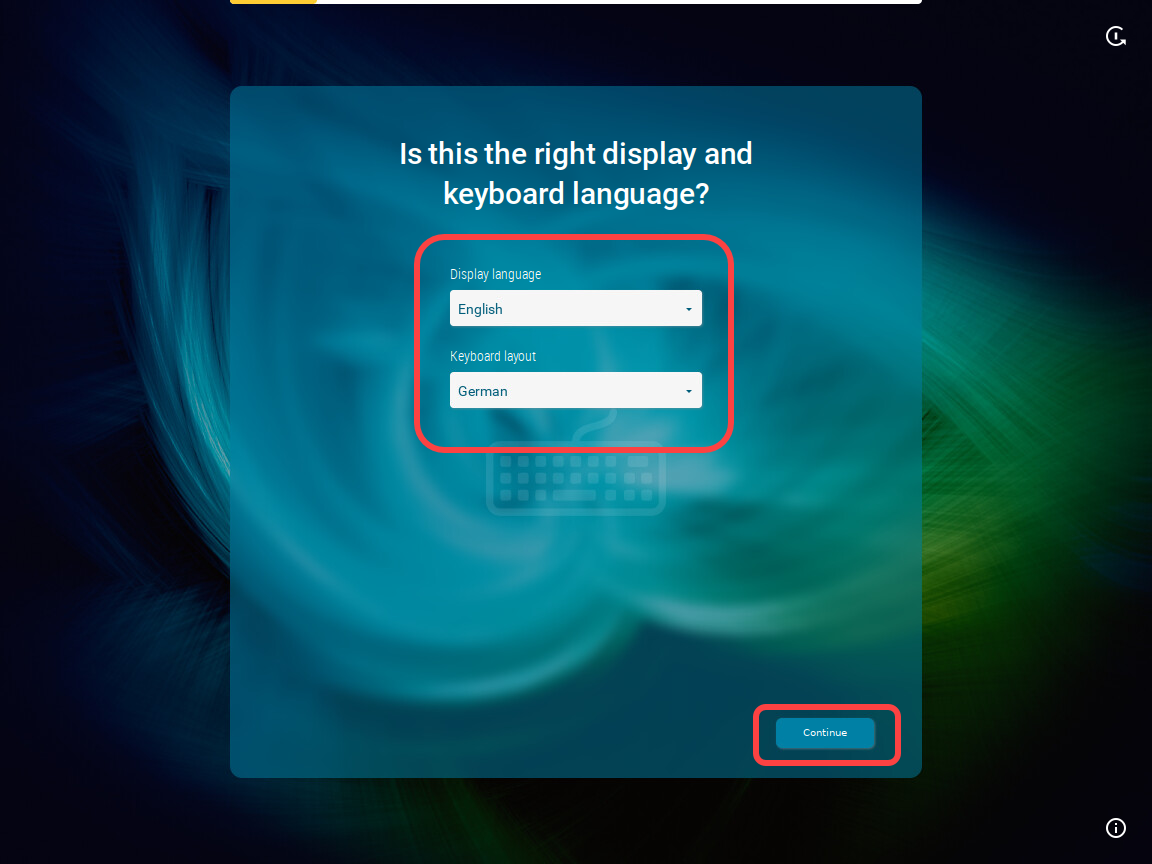
Choose the display language and set your keyboard layout. Click Continue.
-
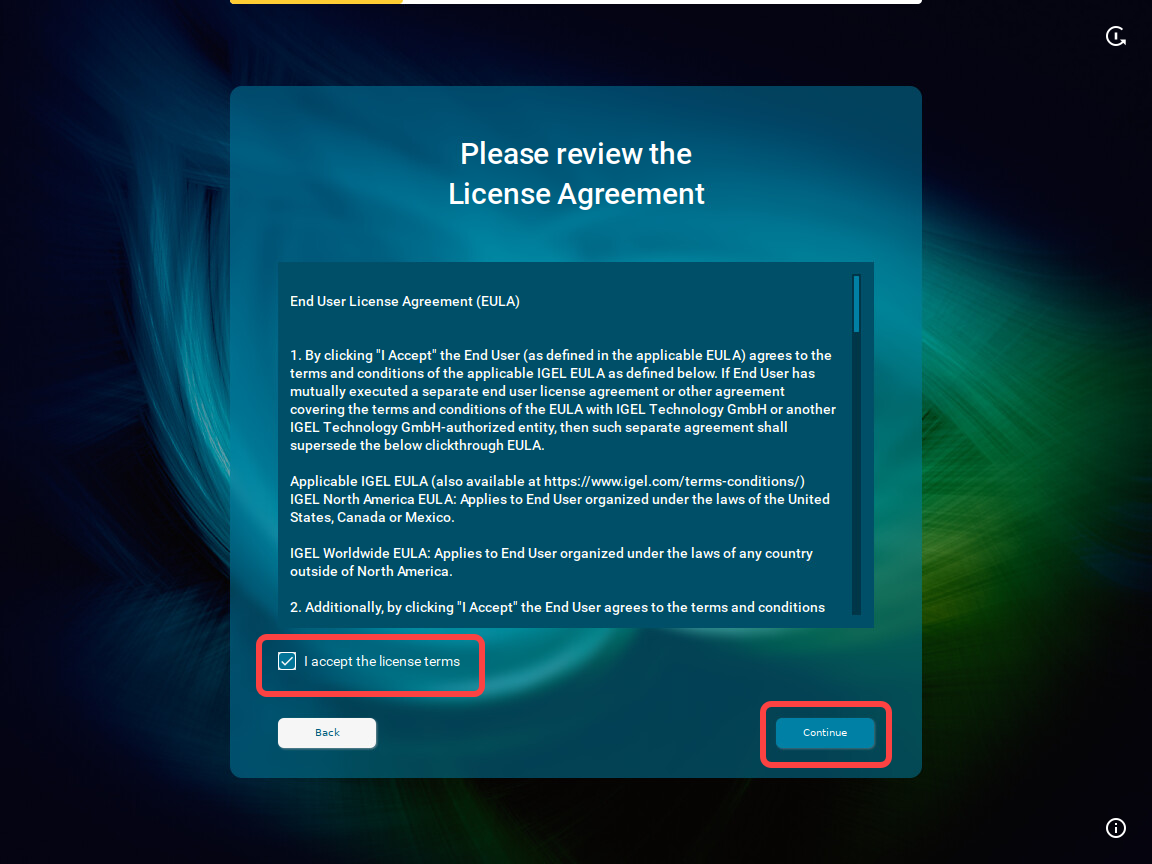
Read the End User License Agreement (EULA) and accept the license terms. Click Continue.

-
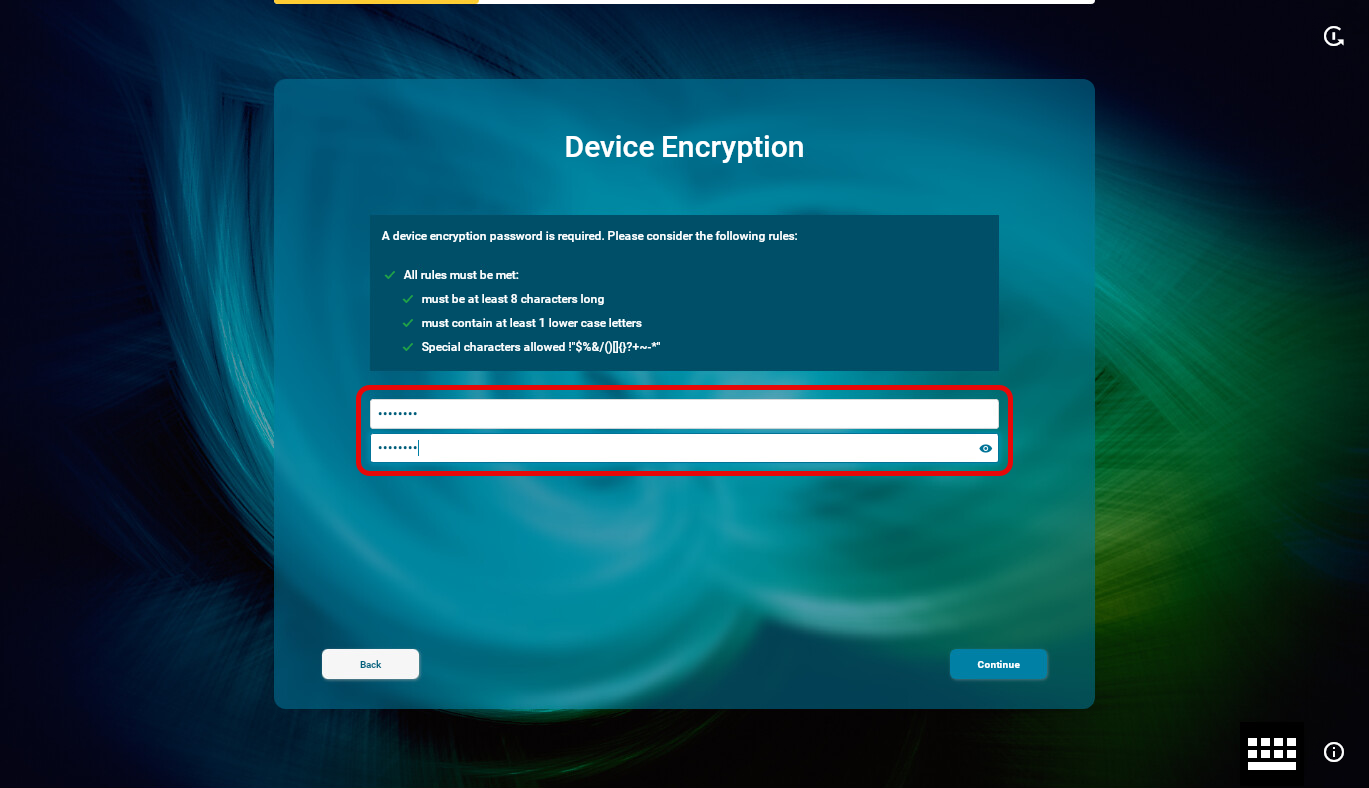
If device encryption has been preconfigured, you are prompted to define a password. This password will be required to unlock the device with every startup.
-
If you are not connected to a LAN, a network configuration screen is displayed. In this case, follow the instructions under Troubleshooting: Configuring a Network during the Onboarding.
-
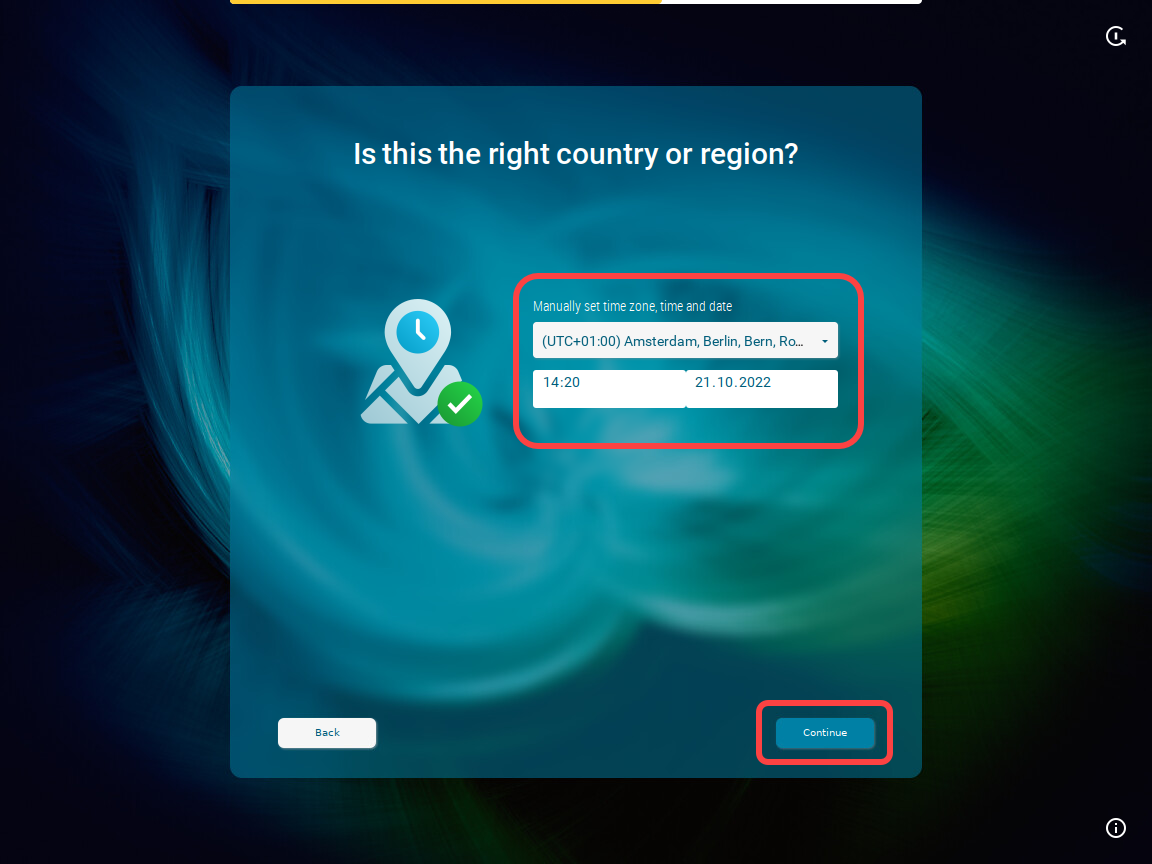
To automatically set the time zone, activate I agree to automatically detect the device and click Continue.
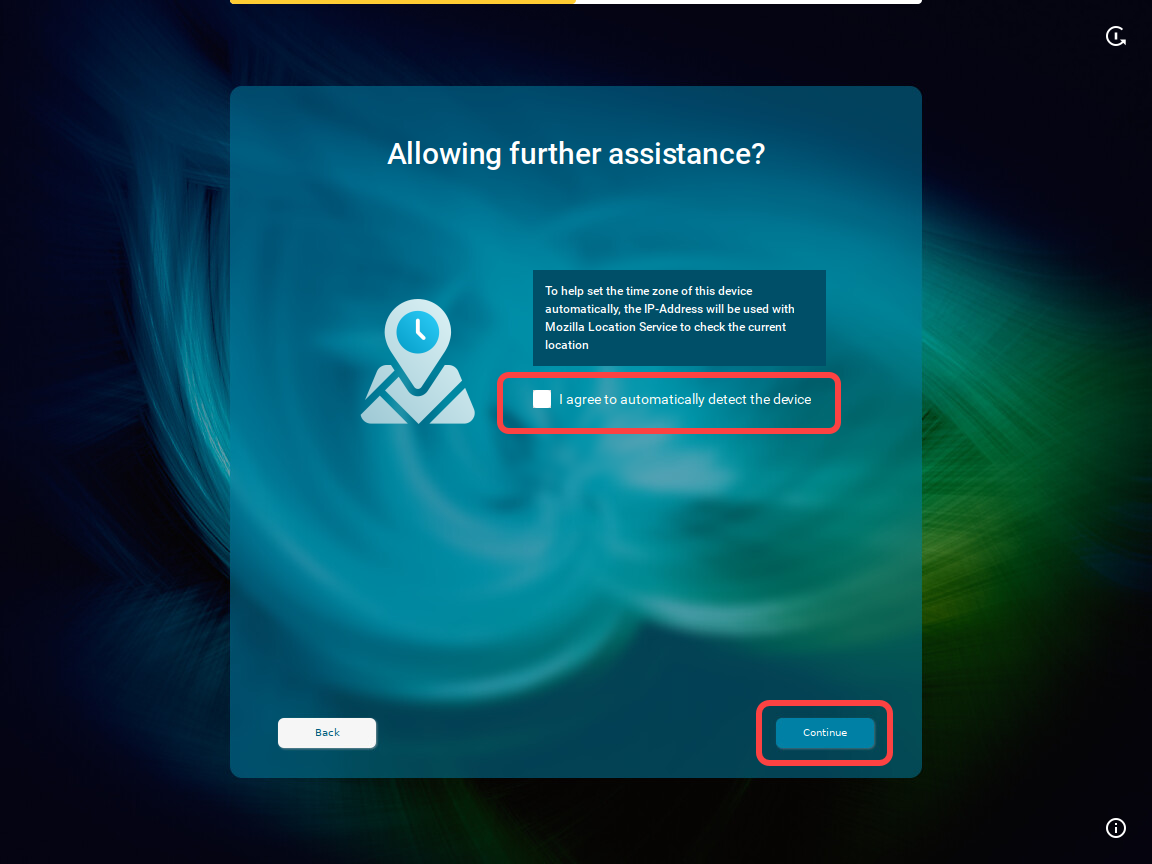
Or click Continue and set your time zone, time, and date manually, then click Continue.

-
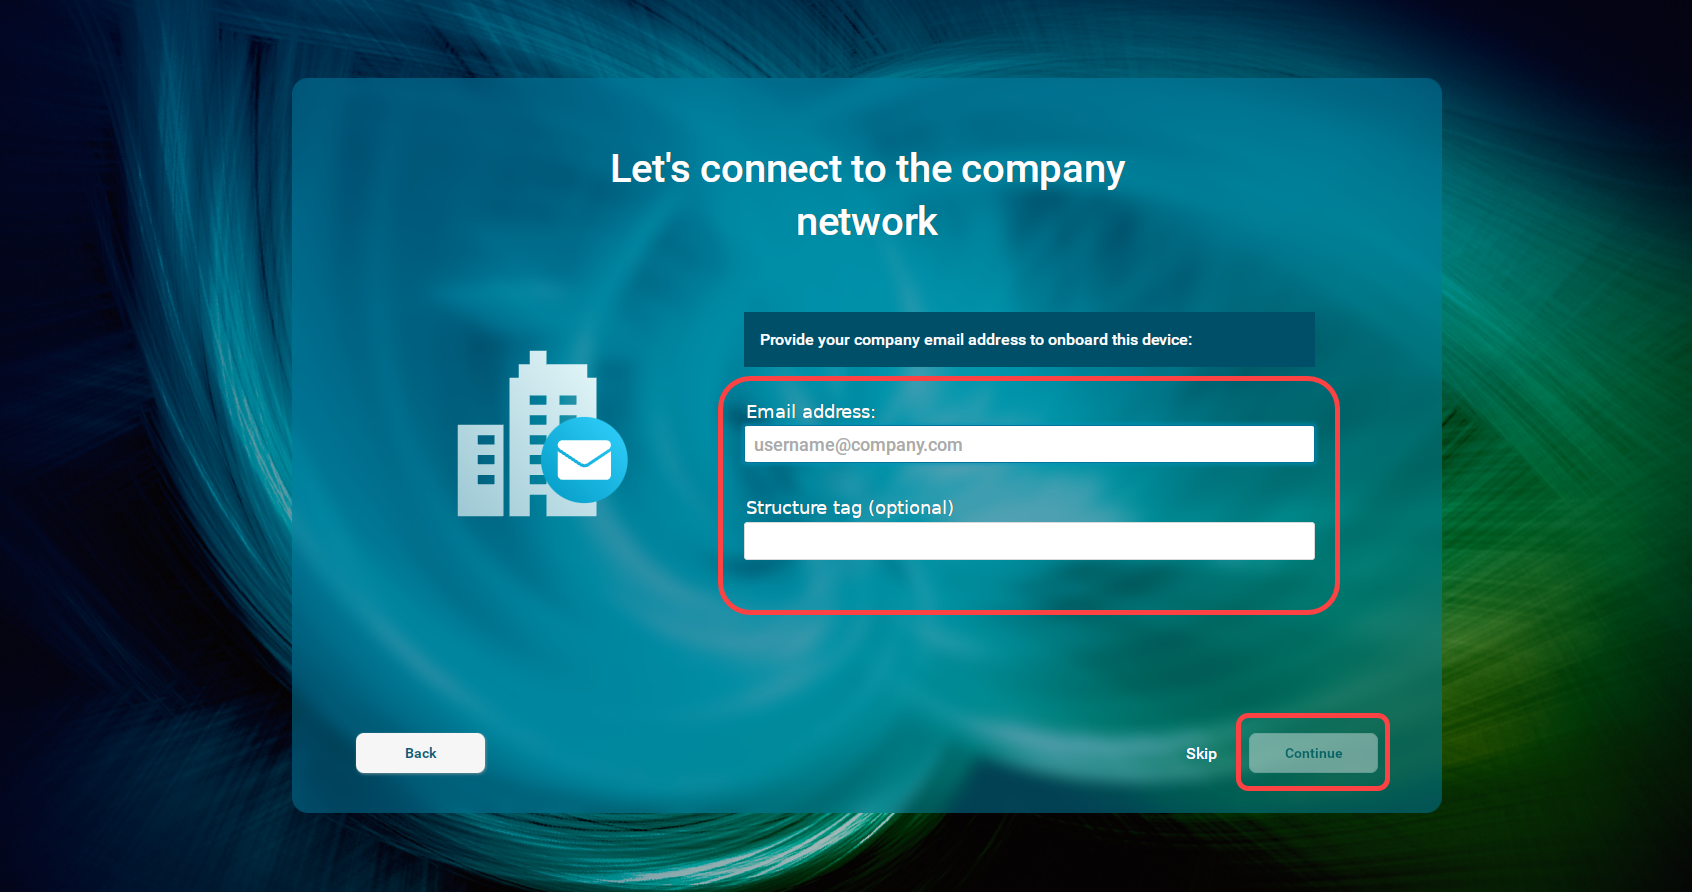
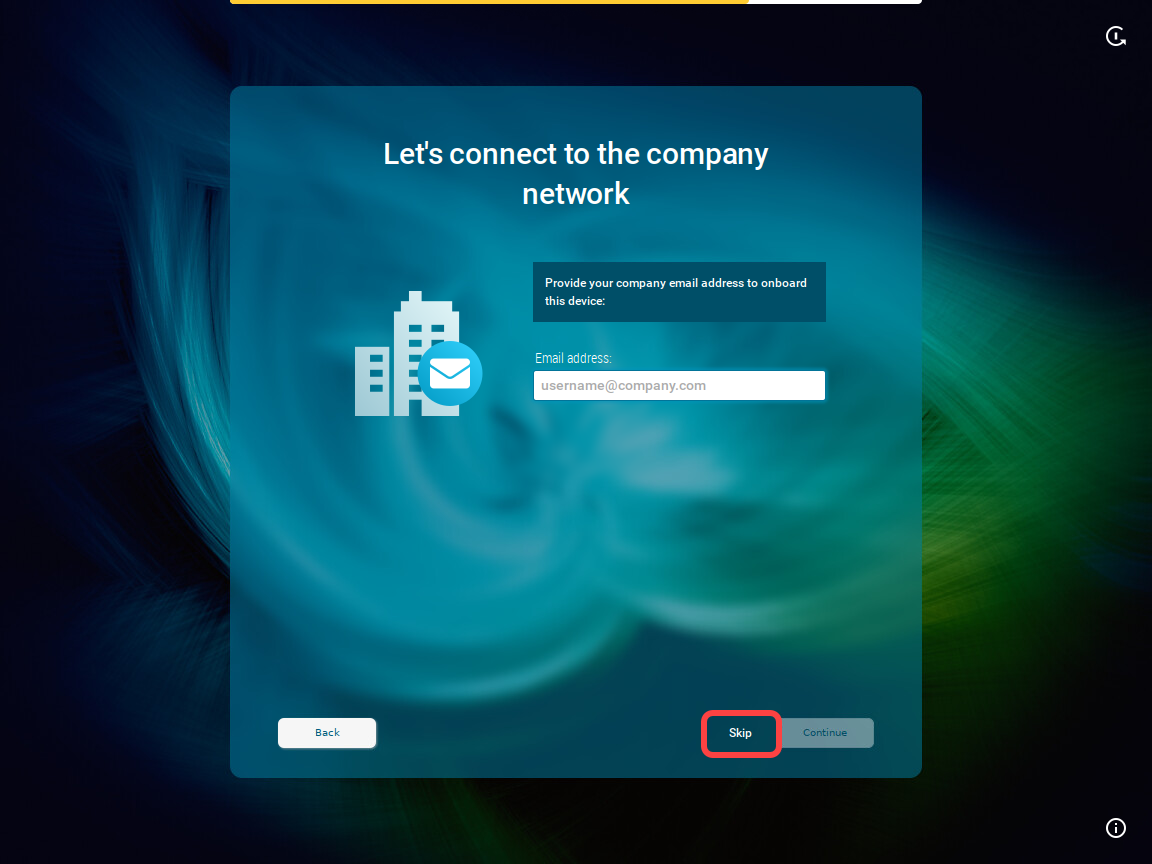
Enter your e-mail address (using the correct upper/lowercase) and click Continue.
Optionally, you can also enter a Structure tag starting from IGEL OS 12.7.3. Using structure tags, newly registered devices will automatically have the information on where they are to be placed in the structure tree of the UMS Console. For details, see How to Automate the Rollout Process in the IGEL UMS and Using Structure Tags with IGEL OS Devices.
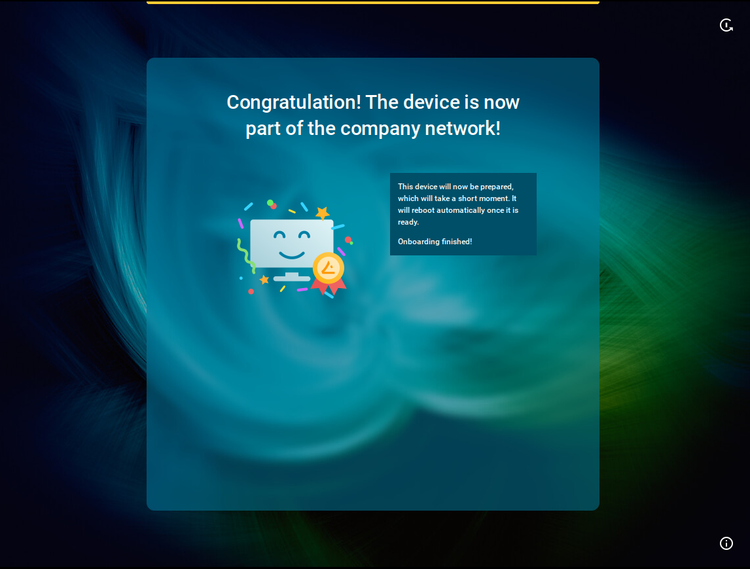
When everything goes well, your device will be integrated into your company network after the reboot. This means it has been connected to your IGEL Universal Management Suite (UMS) which provides your device with the appropriate licenses, settings, and IGEL OS Apps.

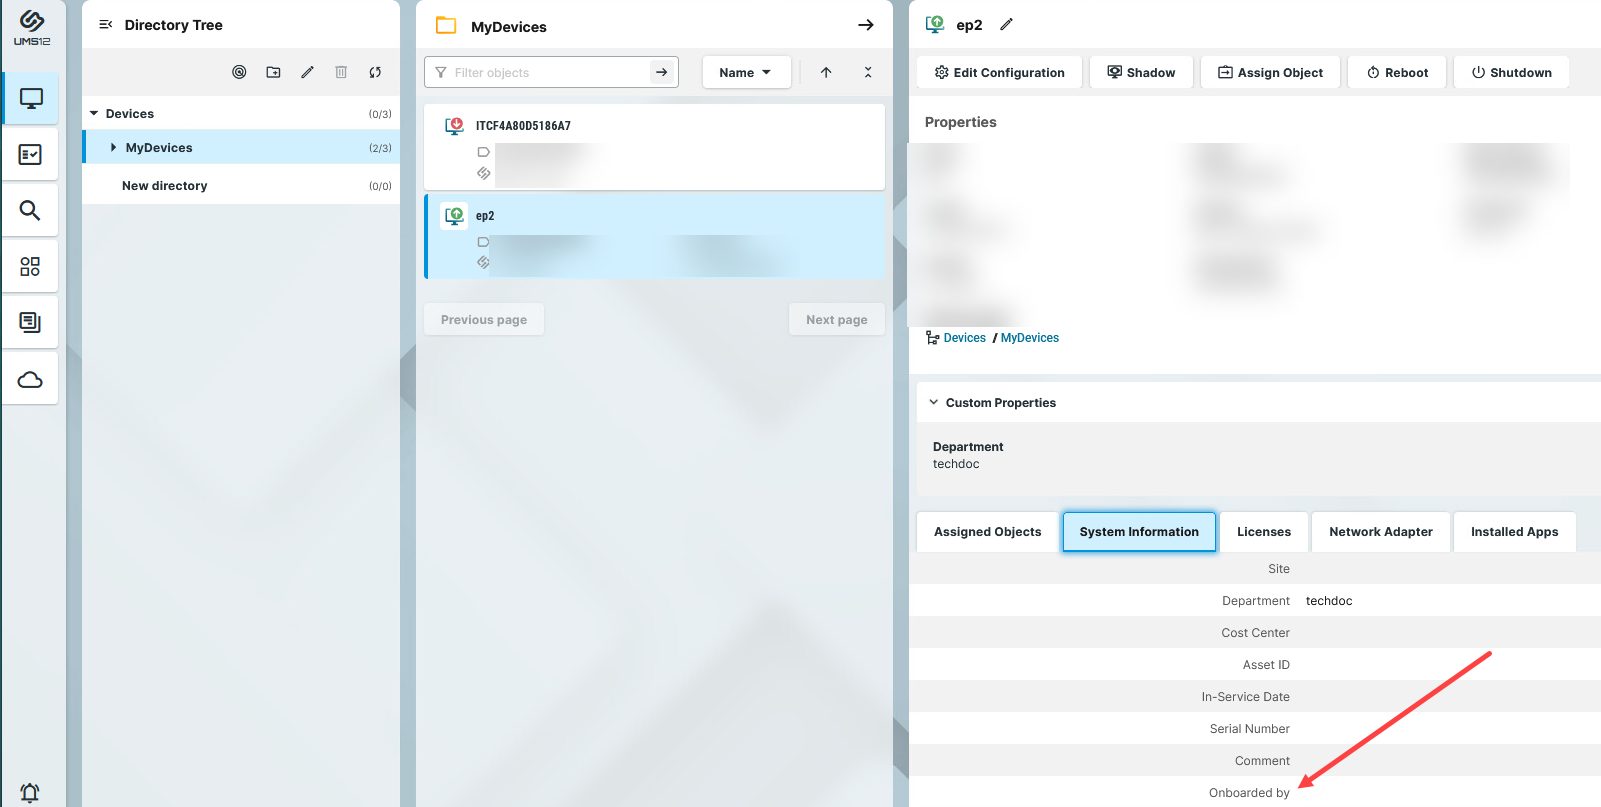
If you need later to check who onboarded the device, you can view this information in the UMS Web App > Devices > [name of the device] > Properties / System Information > Onboarded by.
Alternative Onboarding Method: Registering Devices with the UMS Using the One-Time Password
If you decide not to use IGEL Onboarding Service for the registration of your IGEL OS 12 devices, you can use a one-time password method as an alternative.
-
Switch your device on.
The Setup Assistant starts.
-
Choose the display language and set your keyboard layout. Click Continue.

-
Read the End User License Agreement (EULA) and accept the license terms. Click Continue.
-
If device encryption has been preconfigured, you are prompted to define a password. This password will be required to unlock the device with every startup.
-
If you are not connected to a LAN, a network configuration screen is displayed. In this case, follow the instructions under Troubleshooting: Configuring a Network during the Onboarding.
-
To automatically set the time zone, activate I agree to automatically detect the device and click Continue.

Or click Continue and set your time zone, time, and date manually, then click Continue.
-
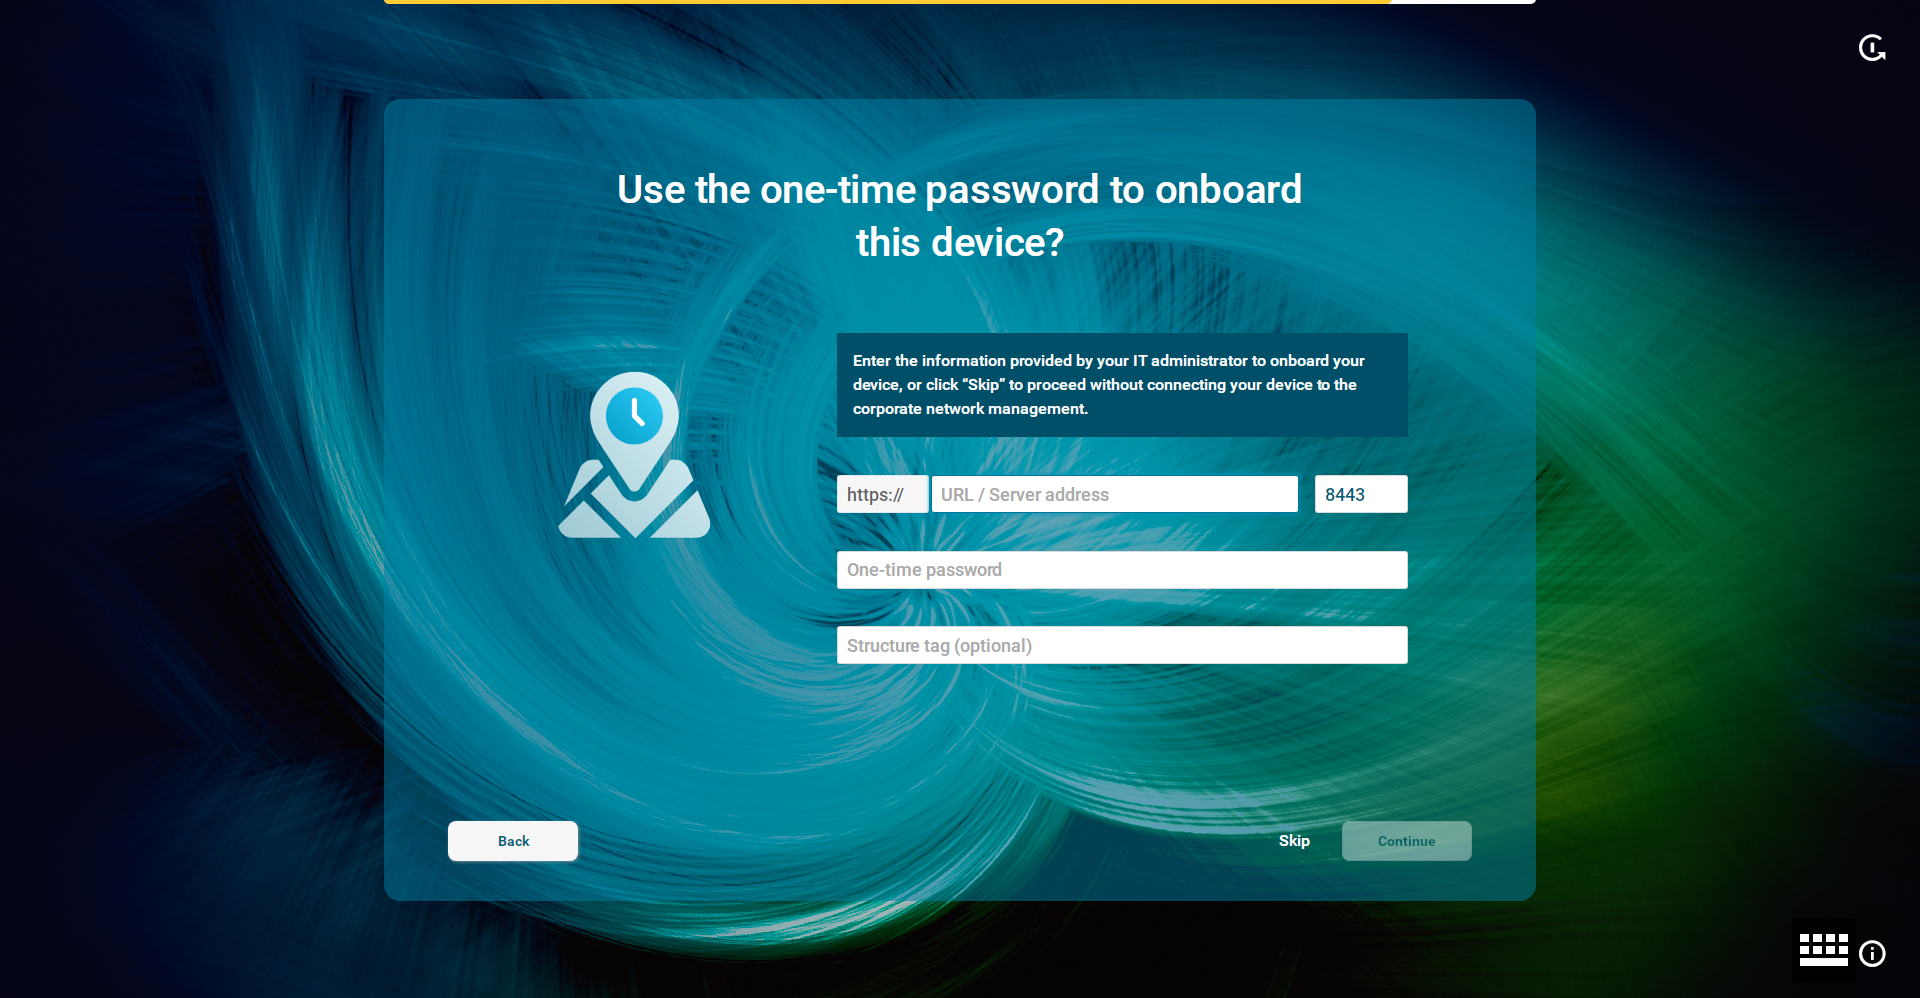
When the IGEL Setup Assistant asks for your company e-mail, click Skip.
You will be asked to enter the data provided by your administrator:
-
Enter the following data and click Continue:
URL / Server address: Host name or IP address of the UMS Server. If configured, you can alternatively use the public address (see Server - View Your IGEL UMS Server Information) of the UMS Server or the cluster address (see Server Network Settings in the IGEL UMS).
Port: Web server port (Default: 8443). If configured, you can alternatively use the public web port (see Server Network Settings in the IGEL UMS).
One-time password: First-authentication key (no matter one-time key or mass-deployment key), which you create under UMS Console > UMS Administration > Global Configuration > First-authentication Keys.
Structure tag: Using structure tags, newly registered devices will automatically have the information where they are to be placed in the structure tree of the UMS Console. For details, see How to Automate the Rollout Process in the IGEL UMS and Using Structure Tags with IGEL OS Devices.
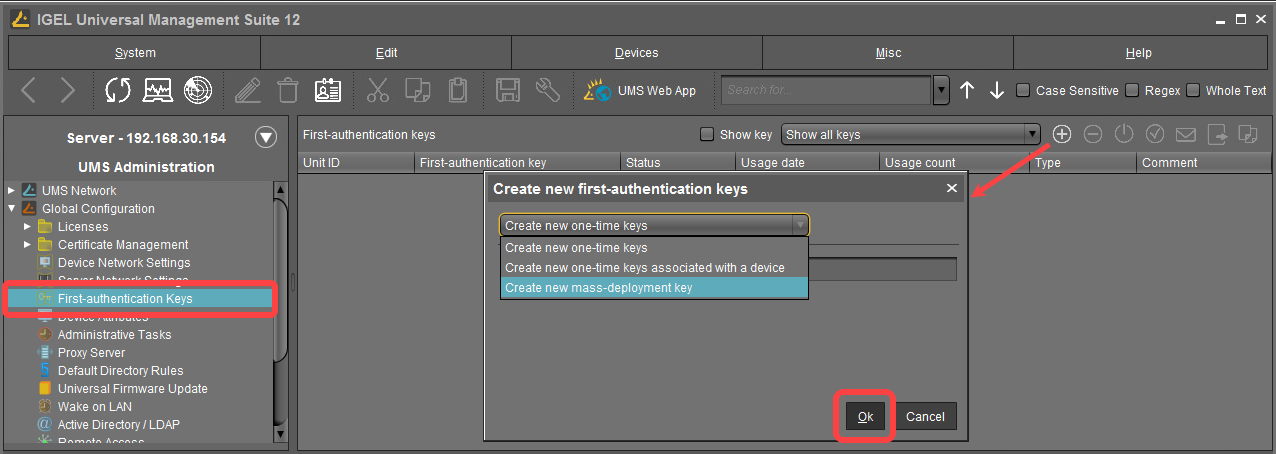
Creating a one-time password in the UMS Console
You can create the following first-authentication keys:
-
One-time keys: Can be used by any random device, but cannot be re-used by any other device. Hence, the number of keys must match the number of devices.
-
One-time keys associated with a device: Can only be used by a specific device and will be invalidated after use. Therefore, only devices with the specified UnitIDs will be registered.
-
Mass-deployment keys: Multiple-time keys that can be used by any device and will remain valid after use. If you choose to create a mass-deployment key, there is a possibility to set your own password.
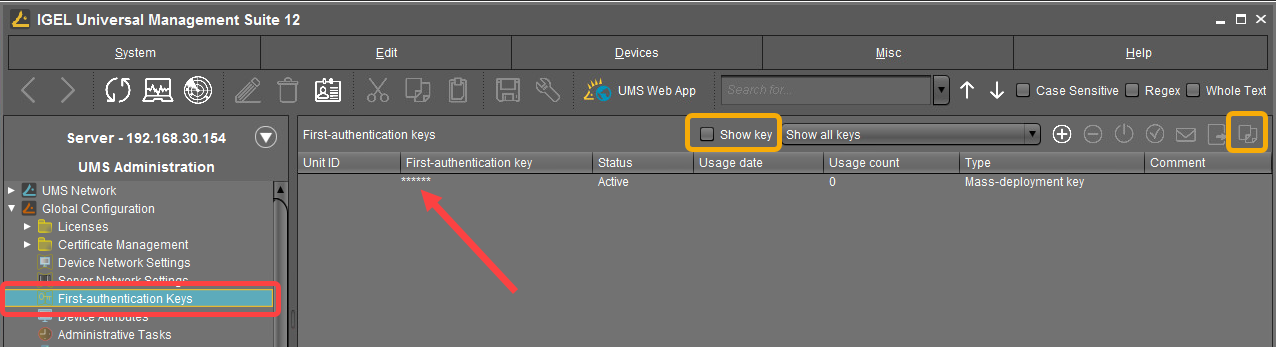
You can view the created key by clicking Show key; or simply copy it to the clipboard.
-
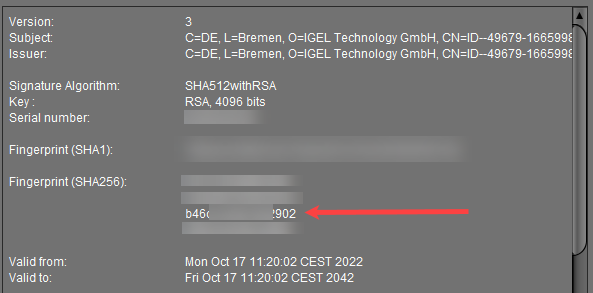
In the mask opened, enter the communication token. The communication token is the third part of the SHA256 fingerprint of the root certificate of your UMS Server. Then click Continue.
.png?cb=cc8b095aedd32f9cd48823b55b123083)
How to Find Out the Communication Token / Root Certificate Fingerprint (SHA256)
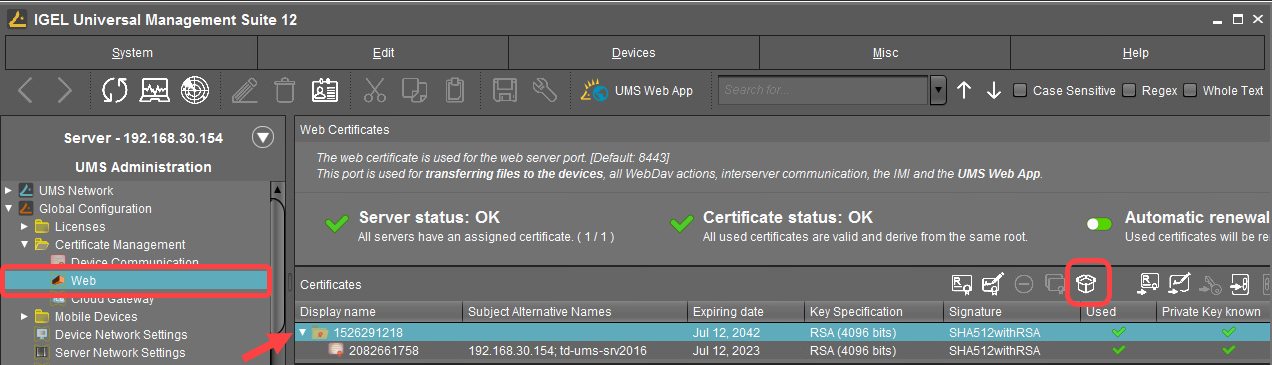
Go to UMS Console > UMS Administration > Global Configuration > Certificate Management > Web, select the certificate and click ![]()
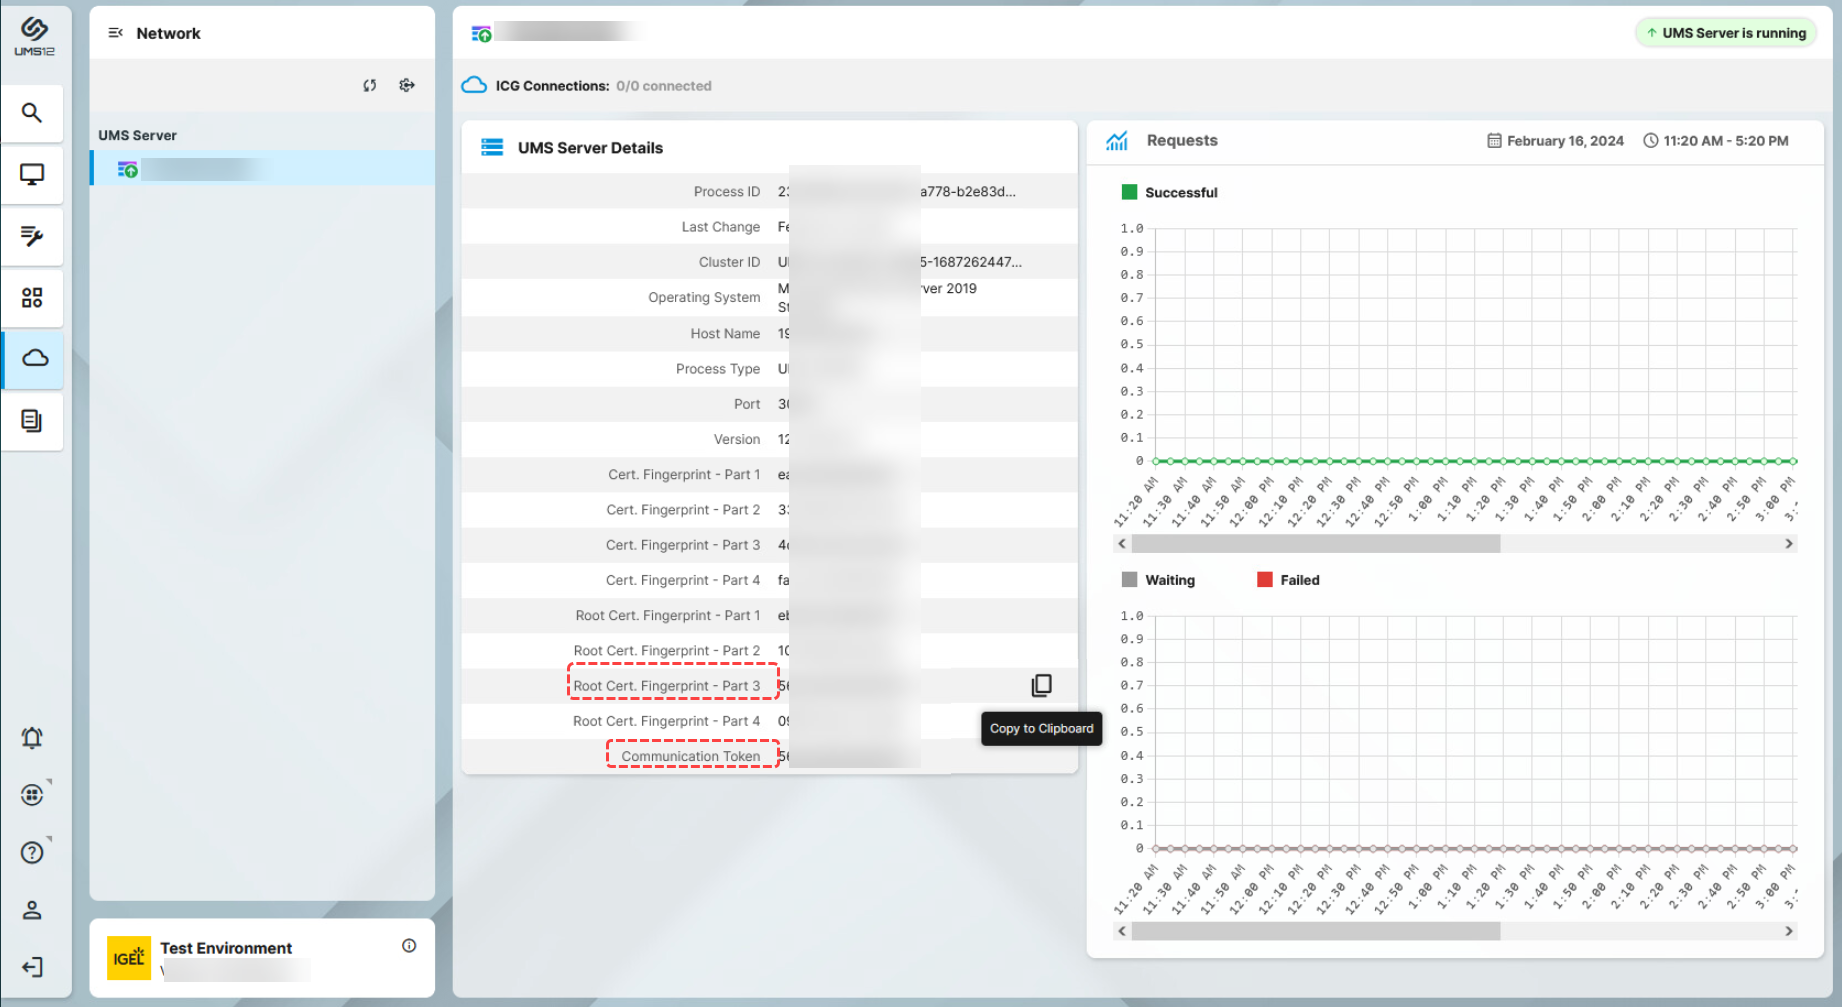
Alternatively, go to UMS Web App > Network > UMS Server Details and copy Root Cert. Fingerprint - Part 3. or Communication Token.
If You Use IGEL Cloud Gateway
If you want to connect the device via the IGEL Cloud Gateway (ICG), use the following as credentials under steps 7 and 8:
-
URL / Server address: Host name or IP address of the ICG server
-
Port: ICG port (Default: 8443)
-
One-time password: First-authentication key created as described above. You may find it also interesting to read Generating and Distributing First-Authentication Keys for Devices.
-
Communication token: Fingerprint of the root certificate of the ICG server (the third part)
When everything went well, your device will be integrated into your company network after the reboot. This means it has been connected to your IGEL Universal Management Suite (UMS) which provides your device with the appropriate licenses, settings, and IGEL OS Apps.