Download PDF
Download page How to Deploy IGEL OS 12 with PXE.
How to Deploy IGEL OS 12 with PXE
Internet Access Required
In contrast to a typical PXE environment, the installation of IGEL OS 12 requires Internet access because the endpoint devices must be able to reach the IGEL App Portal.
Prerequisites
- Your devices meet the requirements for IGEL OS 12. For further information, see Devices Supported by IGEL OS 12.
- Your devices are able to boot via the network
- Your devices are in a network with Internet access
- A DHCP Server is available in your network
Retrieving the Required Files from the OSC ZIP File
- Open a web browser, go to https://www.igel.com/software-downloads/cosmos/, and select the folder OS 12 BASE SYSTEM IMAGE FOR PXE.
- Download the ZIP file (e.g.
osc_12.2.1_pxe.zip) and extract it.
We will distribute the required files to their appropriate locations later on.
Setting up the DHCP Server
When the devices are powered on, they need to be directed to the TFTP server that provides the low-level files required for booting. This is done by the DHCP server. In our example, we use a Microsoft Windows DHCP server; other DHCP can be used as well.
In the following, we will create three vendor classes, two for UEFI and one for BIOS.
- On your Windows server, go to DHCP and right-click on IPv4.
- Define each vendor class as follows:
- In the DHCP Vendor Classes dialog, click Add.
- Enter the data according to the vendor class you are creating:
- Vendor class for UEFI on an x86 architecture:
- Display name:
PXEClient (UEFI x86) - Description:
PXEClient:Arch:00006
- Display name:
- Vendor class for UEFI on an x64 architecture:
- Display name:
PXEClient (UEFI x64) - Description:
PXEClient:Arch:00007
- Display name:
- Vendor class for BIOS on x86 and x64 architectures:
- Display name:
PXEClient (BIOS x86 & x64) - Description:
PXEClient:Arch:00000
- Display name:
- Vendor class for UEFI on an x86 architecture:
- Perform the following steps for each vendor class you have created:
- Right-click Scope ([IP address]) DHCP range > Policies and select New Policy from the context menu.
- At Policy Name, enter the name exactly as you did for the vendor classes, i.e, once
PXEClient (UEFI x86), once,PXEClient (UEFI x64), and oncePXEClient (x86 & x64). - Click Next.
- In the Configure Conditions for the policy screen, click Add.
- In the Add/Edit Condition dialog, click the drop-down menu Value:.
- Select the appropriate vendor class.
- Activate Append wildcard. click Add and then OK.
- Click Next,
- Answer the question Do you want to configure an IP address range for the policy? with No and click Next.
- Activate option 060 and edit it, according to the policy you are at:
- For
PXEClient (UEFI x86), enterPXEClient. - For
PXEClient (UEFI x64), enterPXEClient. - For
PXEClient (BIOS x86 & x64), leave the option empty.
- For
- Activate option 066 and enter the Fully Qualified Domain Name (FQDN) or the IP address of your TFTP server.
- Activate option 067 and enter the path to the appropriate .efi file on your TFTP server. For example, this might be
grub/bootx64.efifor thePXEClient (UEFI x64)vendor class if you are using GRUB as the bootloader.
- Review your Scope Options; they should be similar to this:

- Go to Server Options, add option 066, and enter the Fully Qualified Domain Name (FQDN) or the IP address of your TFTP server.

Deploying the TFTP Server
In this step, we deploy that TFTP server that provides the bootloader and a minimal OS that will load the higher-level components of IGEL OS.
- Install a TFTP server, e.g. SolarWinds. see https://www.solarwinds.com/de/free-tools/free-tftp-server
- Specify the directory in which the PXE boot files will be stored, typically
C:\TFTP-Root
- Copy the directories and files from the
tftp/directory of your OSC ZIP file to the TFTP root directory, in our exampleC:\TFTP-Root. The directory structure must be preserved.
The most important contents are:- GRUB Bootloader for 64-bit EFI systems
- GRUB Bootloader for i386/BIOS systems
- Configuration file for GRUB Bootloader
Providing the PXE Configuration File (pxe-config.json)
The file pxe-config is used at an early stage of the boot process and will be provided by the TFTP server. It specifies the download paths for specific necessary files, an authentication token for connecting with the IGEL App Portal, and the version of the Base System that is to be installed.
First, we retrieve the file from the UMS, then we edit it to adapt it to our environment. Afterward, we put it into the appropriate directory on the TFTP server.
Retrieving the File from the UMS
- Open the UMS Web App, go to Apps and click the
 icon.
icon.
- In the area PXE Configuration, select the version of the IGEL OS Base System you want to install and the validity period for the authentication token that enables access to the App Portal.
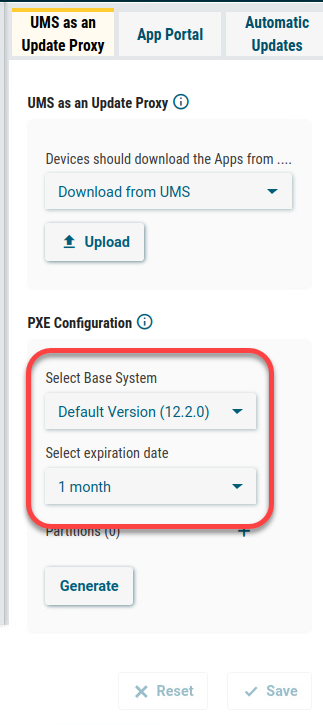
- Click Generate.

The filepxe-config.jsonis downloaded by your browser.
Editing the "pxe-config.json" FIle
- In the OSC ZIP file (example:
osc_12.2.1_pxe.zip), check out the contents of thewebserver/directory. We will create a reference for each file in step 2.
Example:osc.bsplosc.nvgfxosc.sys Edit
pxe-config.jsonas follows:"osc"/"partitions": Enter a list of the URLs of the files to be downloaded from your web server. The format ishttp://<WEB SERVER ADDRESS>/<PATH>/<FILENAME>"apps"/"version": Ensure that the desired version of IGEL OS is specified.Example:
{
    "osc": {
        "partitions": [
            "http://igel-pxe-weberver/osc.bspl",
            "http://igel-pxe-weberver/osc.nvgfx",
            "http://igel-pxe-weberver/osc.sys"
        ]
    },
    "appdata": {
        "app_portal": "https://app.igel.com/api/",
        "auth_token": "eyJ0eXAiOiJKV1QiLCJhbGciOiJSUzUxMiJ9.eyJmaW5nZXJwcmludCI6IjQ2Njc
E4NkMyMTk4Njg3MUIzMEUwMzU3NUQ5Q0NFRTQzNUJGRkU3M0IxQjYxRkMiLCJib2R5Ijp7InVtc0lkIjoiVU1TL
UNMVVNURVItLTQ0MDMxLTE2ODgxMzQzNTY4NDEtMi0wIn0sInR5cGUiOiJ1bXMiLCJleHAiOjE3MDA0ODAxMDgs
ImlhdCI6MTY5NzgwMTcwOH0.p-03tX5Zoesud95cpZBJuBCJU77fGzd17J3i1cbCIvhdIAB8D6CmAdN6kFQ-9Qn
q35SmhyN8f8Jyn63AZEhmiAKPYVGNu1OgVxN-oIU3SBTE74JlU0W26kQuYNEa-WqyAh4BGm-dJ2qnyqH7_5L08F
DFalJChN8v7DlZ5MVA_G9IWNQ6d87cM13dNFbuH4gK9z6lvKKI2s9Mfr2WQcu5qxBi3HhR-f3M45zCMyUfm95Tu
eON48tAyfLPbxlqBUjm2FREJN89dqoZpo-obfcLQ85od6bFyotnK-MDm27-BQvSlOpRujki2wMMYHz1vBeEJJfN
l78aGha5wRDpvrffrOgd_vY4Taicd8hwETcAmI9ihksOHO4gj6GIYZ1dBTbSGBMdooBkB4T5nKtrSX3IOkKCm79-
x_c9gfRNKS-5ox8fvYPIVTK42gHBkQvpgJ5c0G2PqpFCiA8wSBU1bx6bgJdNpQQA1WhadKjOjMICp49pf5PPrfA
zvDzRpXxzQ43HpA86r2Jd59KSOi7QuW7Jb0D2WvjaoCSUFvXhaB-UTsey61DKJJH73xqXbOoA5bdon123m8eTVK
wUJRTL6By41wG6nHnQ0dCYg8noucCg_rOCPBxVfvAhgxzwxllWNgQbGBWtG9Iw1qZIpEuvJa3ux3YxJE5flMsXm
qDtpsyRURBQ0E2RTc3Qzg4RDI5Mjfzzhbs",
        "apps": [
            {
                "name": "base_system",
                "version": "12.2.1"
            }
        ]
    }
}
CODE
Proving the PXE Configuration File (pxe-config.json) via the TFTP Server
![]() Copy
Copy pxe-config.json to <TFTP ROOT>/images/. Example file path: C:\TFTP-Root\images\pxe-config.json
Configuring the Web Server (IIS)
For installing the components of IGEL OS 12, we need a web server. In our example, we will use the Microsoft Internet Information Server (IIS).
- If IIS is not already available on your Windows server, install it.
- Add the file name extensions and the corresponding MIME types for all file types that are present in the
webserver/directory of the OSC ZIP file. In our example:- File name extension
.bspl; MIME typeapplication/octet stream - File name extension:
.sys; MIME typeapplication/octet stream - File name extension:
.nvgfx; MIME typeapplication/octet stream
- File name extension
- Specify a directory in which the required files will be stored, in our example
C:\HTTP-Root Copy all files from the
webserver/directory of the OSC ZIP file into the directory on the web server that has been defined in the section"osc"/"partitions"of yourpxe-config.json(see Editing the "pxe-config.json" File). In our example, the directory isC:\HTTP-Rootand the files areosc.bspl,osc.nvgfx, andosc.sys. The files may vary depending on the version of your OSC ZIP file.
Web Server Check
We recommend checking the URLs for these files in a web browser to ensure the download is functional.
Installing IGEL OS via PXE
![]() Start the devices in your PXE environment.
Start the devices in your PXE environment.
If everything has been set up correctly, your devices boot into IGEL OS 12.