Jobs in the IGEL Universal Management Suite (UMS) allow administrators to schedule and automatically execute certain commands consistently on multiple IGEL OS devices. By using jobs, IT teams can ensure that all IGEL OS devices remain up to date with the latest configurations. Scheduling jobs during off-peak hours also helps minimize user disruption and optimize network usage.
A job consists in sending a command to IGEL OS devices automatically at a defined time. Jobs can be repeated at intervals or on specific days of the week.
In the IGEL UMS Web App, you can assign jobs to device directory or to the saved searches created in the UMS Web App only. You cannot assign jobs to individual devices or to views / search history.
If you need to assign jobs to specific devices or to views / search history, you can do it in the UMS Console. See Jobs - Sending Automated Commands to Devices in the IGEL UMS.
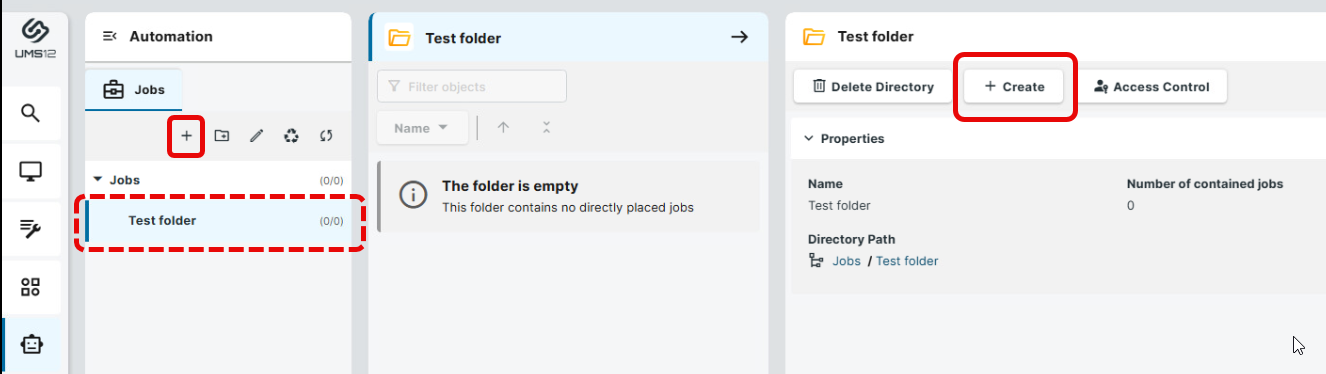
Overview of the Job Section
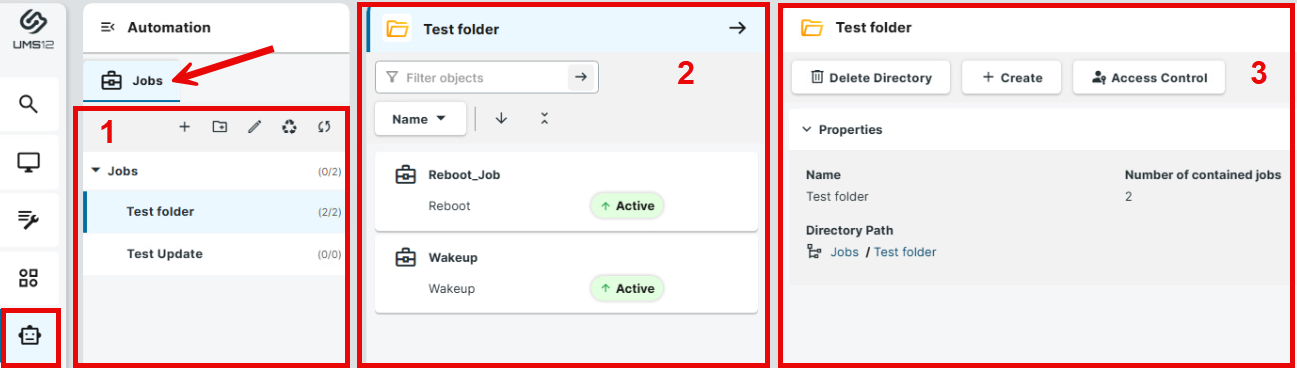
Menu path: UMS Web App > Automation > Jobs
|
1 |
Job Directory List |
Shows all created directories and subdirectories with information on the contained jobs. The format (x/y) specifies: x - the number of jobs contained directly in the directory and y - the total number of jobs in the directory and all subdirectories of this directory. Click for details on how to manage a job directory list→ To create a directory, click → To rename a directory, click → To set and/or view permissions, select the required directory and click Access Control in the management panel. For detailed information, see Object Permissions in the IGEL UMS Web App.
→ To delete a directory, click Delete Directory → To view all removed jobs / job directories and to restore / permanently delete them, click Recycle Bin → To refresh the tree, click → To expand/minimize the list of subdirectories of a directory, click the arrow icon next to the directory name, or double click the directory element.
→ To move a job to another directory, select the job and move it per drag & drop to the desired directory.
→ To move a directory to another directory, select the directory and move it per drag & drop to the desired directory. |
|
2 |
Job List |
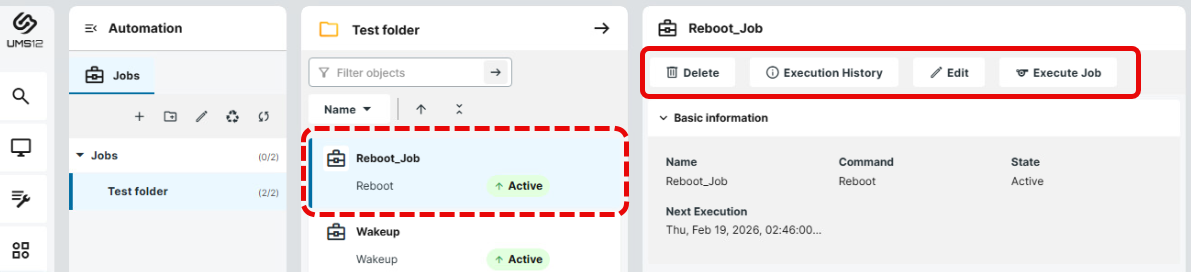
When you select a directory in the tree, the job list shows all jobs contained in that directory. → Right-click on the job opens a context menu with the actions available for jobs. These are the same actions that are also available in the management panel. |
|
3 |
Management Panel |
The content of the panel changes based on the selected item.
If recycle bin is enabled, this will send the object to the recycle bin, where you can restore / permanently delete it. To view all removed jobs / job directories and to restore / permanently delete them, click Recycle Bin For more information, see How to Use the Recycle Bin in the IGEL UMS Web App.
→ To manually trigger a job execution, select the job in the job list and click Execute Job button or context menu item. The job will be executed immediately.
→ To rename a job or to change the configuration parameters of a job, select the job in the job list and click Edit button or context menu item. If you edit a saved job, it is not possible to change a job command.
→ To view job execution results, select the job in the job list and click Execution History button or context menu item. For more details, see Execution History section below.
→ To delete a job, select the job in the job list and click Delete button or context menu item. If recycle bin is enabled, this will send the object to the recycle bin, where you can restore / permanently delete it. To view all removed jobs / job directories and to restore / permanently delete them, click Recycle Bin For more information, see How to Use the Recycle Bin in the IGEL UMS Web App. |


How to Create a New Job
The user requires write rights in order to create jobs. To set permissions, click Access Control. For more information, see Object Permissions in the IGEL UMS Web App.
Step 1: Access the Jobs Tab
-
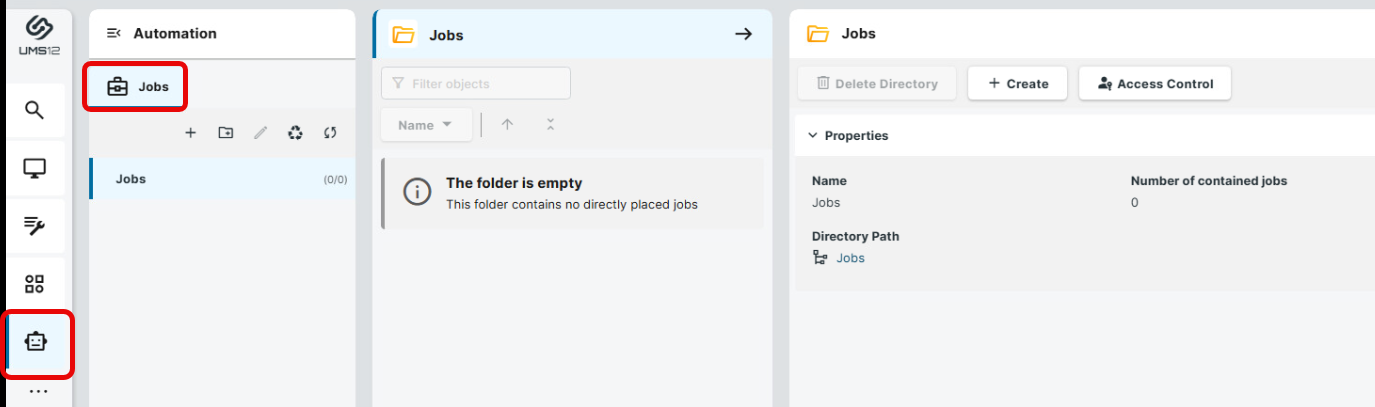
In the UMS Web App, go to Automation and select the Jobs tab.
-
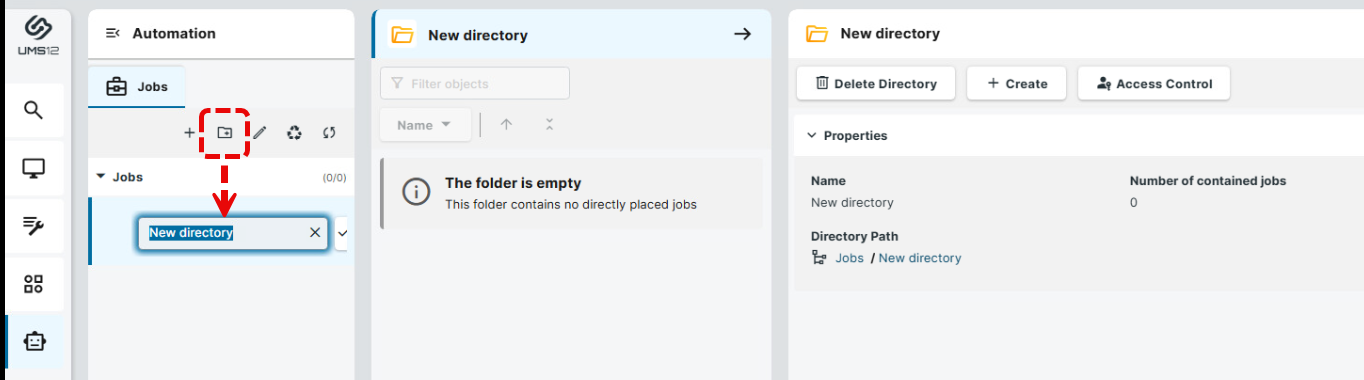
Optionally: To create a new job directory, click

-
To create a new job, select the required directory and click + or the Create button.
-
Configure the settings described in the following steps.
Step 2: Configure a Job Type / Command
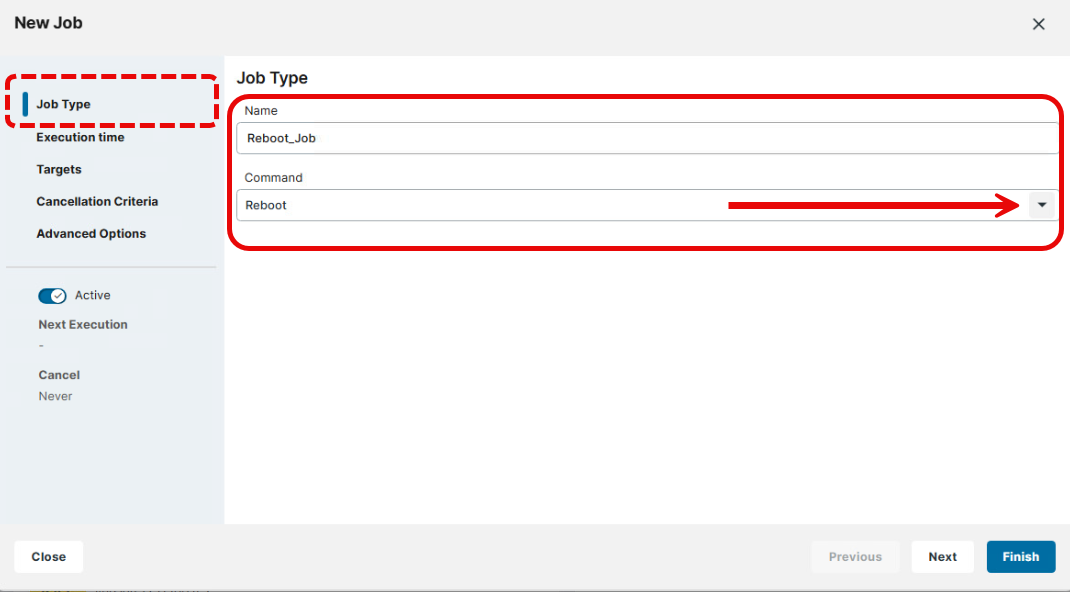
→ Under Job Type, specify the following settings:
Name
Name of the job.
Command
Command which is executed for all assigned devices.
Some commands that are available for jobs in the UMS Console are not supported in the UMS Web App.
Examples of such commands:
-
Send Message: Sends a selected message template to the devices. You can create templates for messages in the UMS Console under UMS Administration > Global Configuration > Messages to Devices. For more information on templates, see Sending Messages to Devices in the IGEL UMS.
For information on sending messages in the UMS Web App, see How to Send a Message to Devices via the IGEL UMS Web App. -
Partial Update: Executes the partial update with the existing settings (WES).
-
Download Flashplayer: Downloads the Flash Player plugin for Firefox. See General Information 11.01.100.
-
Remove Flashplayer: Removes the Flash Player plugin for Firefox.
Step 3: Define Execution Time for a Job
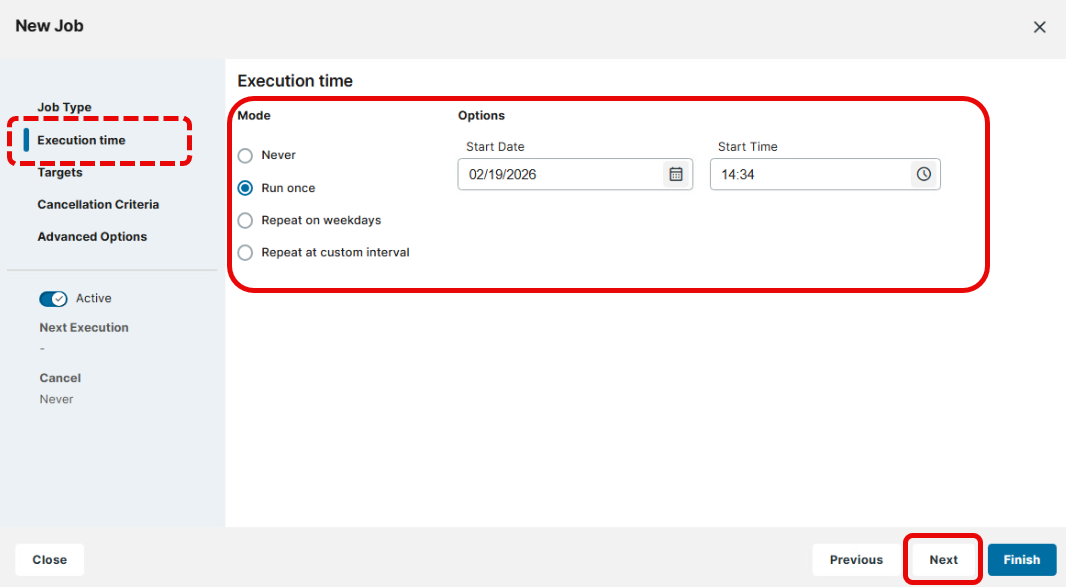
→ Under Execution time, schedule the job according to your needs.
If Firmware Update / Update, Update Next Reboot or Update on Shutdown is selected as the command for the job, Repeat job schedule should not be used.
Never
A job command is never sent.
Run once
A job command is executed only once at the time defined under Start Date and Start Time.
Start Date: Date of the job execution.
Start Time: Time of the job execution.
Repeat on weekdays
A job is repeated on specific days activated under Repeat on weekdays.
Repeat on weekdays: Specify here the days when a job command must be executed.
Start Date: Date of the first execution.
Start Time: Time of the first execution.
Job expires
- No further commands will be executed after the time configured under End Date and End Time.
- If set on Active, the job will never expire. (Default)
End Date: Date of the job expiration
End Time: Time of the job expiration
Repeat at custom interval
A job is repeated at fixed intervals defined under Days and Hours.
Days: A job is repeated every [number of days] starting from Start Date and Start time.
Hours: A job is repeated every [number of hours] starting from Start Date and Start time.
Job expires
- No further commands will be executed after the time configured under End Date and End Time.
- The job will never expire. (Default)
End Date: Date of the job expiration
End Time: Time of the job expiration
Step 4: Define the Targets
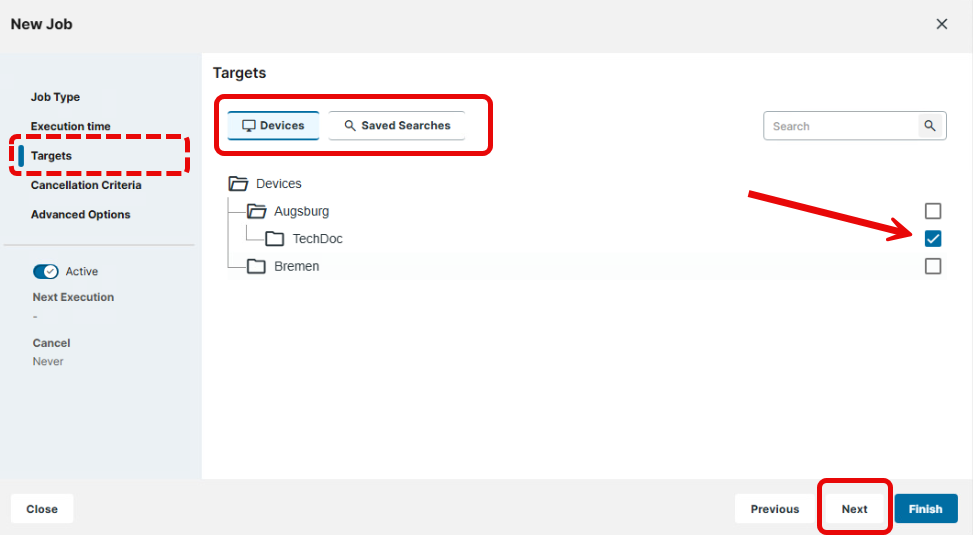
-
Under Targets, navigate to the required tab to assign the job to the desired objects.
-
Devices: You can select a device directory; the selection of specific devices is not possible. The job will then be assigned to all devices located in this directory at the point of execution.
-
Saved Searches: You can use saved searches created in the UMS Web App as dynamic device selection. At the point of execution, the devices will first be ascertained on the basis of the selection conditions for the saved search. The jobs will then be assigned to them.
-
Write authorization for the relevant objects is required in order to set up static devices assignment via the MAC address or dynamic assignment via the directory. At the point of execution, the user who has set up the job must have write authorization for the relevant devices. This must be taken into account, even if other users have write authorization for a job and especially if the database user has set up a job.
-
Enable the object in the tree.
Step 5: Define Cancellation Criteria
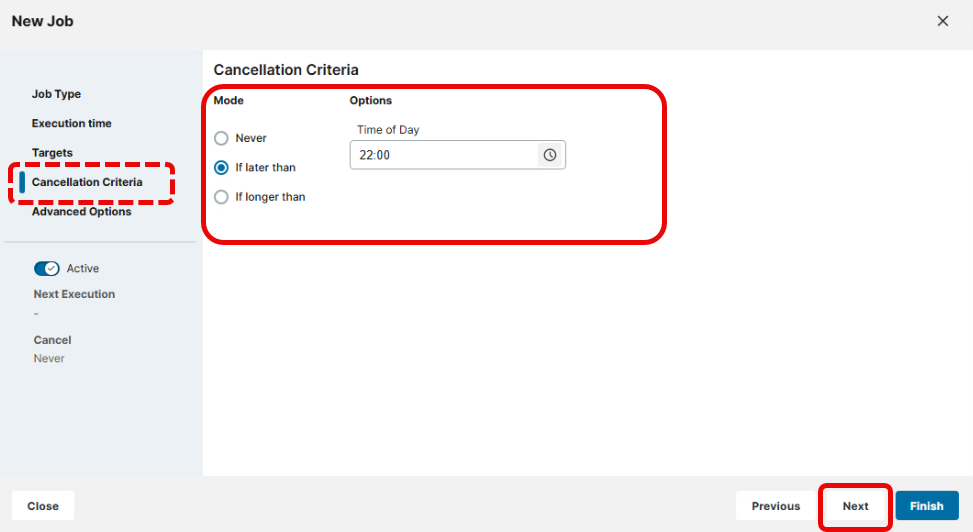
→ Under Cancellation criteria, define how long the system is allowed to wait for the completion of the job execution.
Never: Jobs are never aborted.
If later than: Point in time in hours and minutes defined under Time of Day when the job execution will be aborted.
Example: If the Start time for job execution and If later than for cancelling job are set to "20:00" and "22:00" respectively, the timeout for the job execution amounts to 2 hours. After 22:00, no further commands for the job execution will be sent to devices.
If longer than: The maximum waiting time in hours and minutes defined under Hours for the completion of the job execution.
Example: If If longer than is set to "00:05", the timeout for the job execution amounts to 5 minutes. After 5 minutes starting from the Start time, no further commands for the job execution will be sent to devices.
The values under Next run and Cancel are calculated for a saved job only (e.g. when you edit a job), not during the creation of a new job.
Step 6: Configure Advanced Options
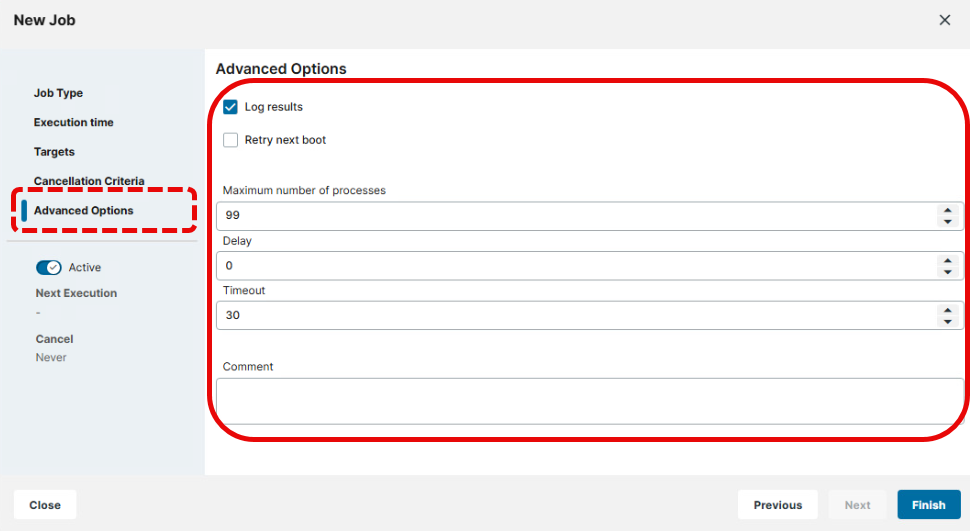
→ Check Advanced Options and configure them according to your needs.
Log results
- Loggable results are collected in the database and can be viewed under Execution History. This is not possible with the
Wake-on LANcommand. (Default) - The results of the job execution are not logged.
Retry next boot
- Parameter for the Update command - devices that are switched off perform the update when they next boot.
- The next attempt to update will not be performed on next boot. (Default)
Maximum number of processes
Maximum number of processes executed simultaneously, these processes may thus be executed in block fashion. (Default: 99)
Delay
The minimum waiting time in seconds before the UMS sends the command to the next device. (Default: 0)
Timeout
The maximum waiting time before the UMS sends the command to the next device. (Default: 30)
The Maximum number of processes, Delay, and Timeout options make sense for all commands which take a long time to execute or cause heavy network traffic, e.g. downloading a firmware update, codec or snapshot. To prevent a large number of devices downloading data from a file server at once, it is advisable to reduce the number of simultaneous processes (e.g. to 10) and to set up a delay (e.g. 1 minute).
Comment
Further information regarding the job can be added here.
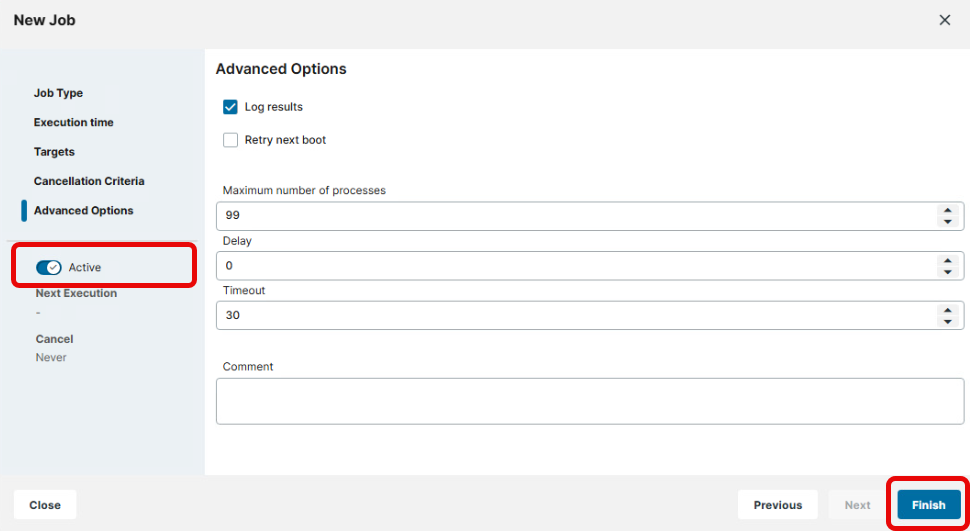
Step 7: Activate and Save the Job
-
Use the toggle button Active / Inactive to activate the job.
-
Click Finish to save the job.
To optimize performance, it is recommended to create an administrative task under UMS Console > UMS Administration > Administrative Tasks > Dialog "Create Administrative Task" > Action "Delete job execution data", see Delete Job Execution Data as an Administrative Task in the IGEL UMS.
Details for the Saved Job
To view details for the created job:
-
Select the required job.
-
Expand the job details.
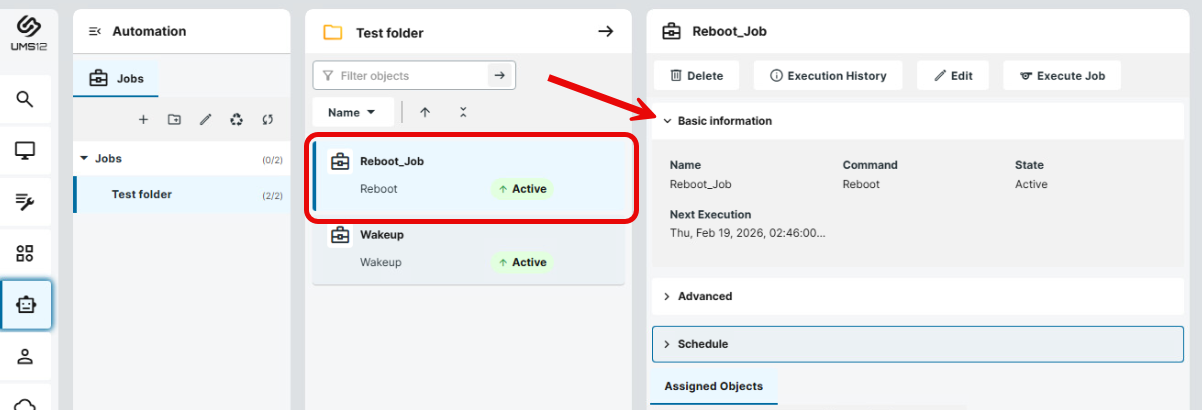
-
Basic information: You can see here information about the job’s Name, Command, State and Next execution time.
-
Advanced:
-
Maximum number of processes: Maximum number of processes executed simultaneously, these processes may thus be executed in block fashion.
-
Timeout: The maximum waiting time before the UMS sends the command to the next device.
-
JobId: Internal job number which cannot be changed.
-
User: Name of the UMS user executing the command. This may be important for checking write authorizations.
-
-
Schedule: Depending on the configured options, you can see here details on Start Job Execution, Expiration Date, Repeat Job, and Cancel Job Execution.
-
-
Under Assigned Objects, check to which devices / objects the job is assigned.

|
Filter objects |
Use the free text filter to filter for objects that contain the text in their name |
|
|
Filters for device directories assigned to the selected job. |
|
|
Filters for specific devices assigned to the selected job. Such assignment is possible via the UMS Console only. |
|
|
Filters for searches created in the UMS Web App that are assigned to the selected job. |
|
|
Filters for views and searches created in the UMS Console that are assigned to the selected job. However, no detailed information on these objects is provided. → Switch to the UMS Console to view, edit or remove these assignments. |
|
|
Removes all filters. |
|
|
Detaches the selected object from the job. |
Execution History
→ To view job execution results, select the job in the job list and click Execution History button or context menu item.
Execution History is displayed for a completed job if you have not disabled Log results setting for a job. Here, you are given an overview of the status for the execution of a job.

|
Execution Time |
→ Filter job execution results by time the job was performed. Start typing the date or time for quicker selection from the list. 
|
|
Contains Text |
→ Use the free text filter to filter for job execution results that contain the required text. |
|
State |
→ Filter the results by the job execution status. The status is always displayed for individual devices.
|

|
→ Use the paging for the navigation in the list of results. → Set the number of results to be displayed on one page. |