Download page Transferring or Registering the UMS ID.
Transferring or Registering the UMS ID
There are two different ways to handle the UMS ID if you migrate the UMS Server:
Transferring the UMS ID (recommended): With this method, you make a backup of the old UMS ID and take it with you. The UMS ID, which is automatically created during the installation of the new UMS Server, is overwritten. Advantage: You do not have to reassign the license packages in the ILP and to re-register your UMS.
Registering the New UMS ID: With this method, you register the UMS ID of the new server in the IGEL License Portal. Advantage: You do not need to know the UMS ID of the old server. Disadvantage: To authenticate your UMS to the IGEL Cloud Services, you also have to re-register your UMS in the IGEL Customer Portal using the new UMS ID.
The UMS ID is now stored in the new UMS environment.
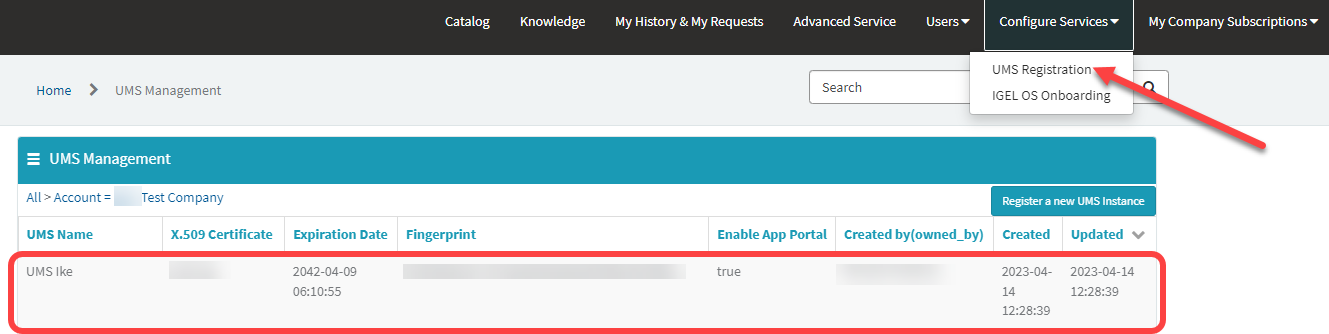
Registering the New UMS ID
In the IGEL License Portal (ILP)
Log in to the IGEL License Portal (ILP) at https://activation.igel.com. If you have not registered yet, you must register first. Your dashboard is shown.
Select UMS ID. The page UMS ID is shown.
Click Register UMS ID. The dialog Register UMS ID opens.
Under UMS ID Name, enter a name for the UMS ID.
Upload the certificate file you have exported in the UMS (see Obtaining Your UMS ID) and click OK. The UMS ID is registered. If this is the first UMS ID you registered, or if you just defined it as the default UMS ID, the dialogAssign loose Product Packsis shown.