IGEL Contextual Access (ICA) extends the IGEL Adaptive Secure Desktop by using contextual signals to determine what a user should receive when they connect to an IGEL OS device. Instead of treating every device the same way, ICA enables IT to deliver workspace controls and resources based on the user’s context. Persona Profiles enables the persona-based layer of ICA through the IGEL Universal Management Suite (UMS).
With Persona Profiles, configurations and applications are assigned to user personas rather than individual devices. When a user signs in to an IGEL OS 12 device through Single Sign-On (SSO), the IGEL UMS uses role information from the Identity Provider (IdP) to activate the appropriate persona profile. This allows different user types to receive a personalized, role-specific desktop with the applications and settings they need. Through Persona Profiles, IT can manage access at the persona level instead of device by device.
Some system settings cannot be used in a persona profile, as they cause undefined behavior or they do not trigger the reconfiguration.
The parameters which cannot be configured effectively with persona profiles are listed below.
How Persona Profiles Work
-
The administrator configures persona profiles in the UMS. See the How to Configure Persona Profile section below.
-
The user logs in to an IGEL OS 12 device via SSO.
-
The Identity Provider authenticates the user and provides role information to the UMS.
-
The IGEL UMS evaluates the user’s role and applies the persona profile based on the role and the device.
-
Assigned configurations and applications are dynamically applied based on the persona profile.
-
On logout, the session is cleared and settings are removed.
When multiple persona profiles are assigned to a device, the applications from all assigned profiles are downloaded to the device. At login, only the applications associated with the user's matching persona profile are activated.
Apps Fully Supported with Persona Profiles
Some apps available in the IGEL App Portal are not yet fully supported in combination with Persona Profiles.
Supported Apps Created by IGEL
The apps created by IGEL and fully supported with Persona Profiles are listed below. Support is introduced with the listed versions. To ensure support, use the listed app version or higher available in the IGEL App Portal. If you are using an older version of an app, full Persona Profiles support cannot be guaranteed.
Full support for other apps is planned for future releases. The list will be updated accordingly.
IGEL Ready Partner Apps
Support for Persona Profiles in applications developed by IGEL Ready Partners is optional and depends on implementation by the respective partner.
Prerequisites
External IdP Configuration
-
Supported cloud IdP providers with Persona Profiles:
-
Okta
-
Ping
-
Microsoft Entra ID
-
Feature Enablement
-
The Persona Profiles feature is enabled in the UMS under System > Settings > UMS Features. See System Settings in the IGEL UMS Web App.
-
User has access to the Persona Profiles tab. See How to Manage Object Permissions in the IGEL UMS Web App
-
Licenses: IGEL Contextual Access Add-on License and UMS Enterprise License
Version Requirements
-
IGEL UMS 12.12.100 or higher
-
IGEL OS 12.9.0 or higher
Configuring a Fallback Login Option
A persistent connection to the IGEL UMS is required for Persona Profiles to function correctly. During a UMS update, the UMS is temporarily unavailable and cannot deliver configurations to devices.
It is recommended to configure a fallback user at the device level to ensure continued access when the UMS is temporarily unreachable.
-
You can configure a fallback using SSO. For details, see How to Configure Single Sign-On (SSO) on IGEL OS 12.
-
You can also enable local login as a fallback. For details, see Enabling Local Login (Optional).
Connect the UMS to an Identity Provider for Persona Profiles
Persona Profiles use role information from the access token issued when a user signs in to an IGEL OS device. The device sends the token to the IGEL UMS, which validates the token, reads the configured role claim, and selects the persona profiles that match the user’s roles.
UMS supports one role claim name for Persona Profiles. If devices authenticate against multiple IdPs, configure all IdPs to place the persona role values in a claim with the same name.
This process is separate from Single Sign-On (SSO) for UMS administrators. You do not have to configure an IdP connection under User Management or map IdP roles to UMS administrator groups to use Persona Profiles.
Step 1: Configure SSO Login on IGEL OS
→ Configure one of the supported cloud IdPs to enable SSO Login on the devices. For details, see How to Configure Single Sign-On (SSO) on IGEL OS 12.
Step 2: Configure Persona Roles in the IdP
In general, you need the following IdP configuration:
-
Open the OIDC application or authorization server used for IGEL OS SSO.
-
Configure an access-token claim containing the persona role or group values.
-
Assign the applicable roles or groups to the users.
-
Note the exact claim name and the values returned in the claim, you will need them for the UMS configuration.
For example, an IdP might issue the following claim:
{
  "groups": ["Clinician", "Support"]
}
In this example, you will configure groups as the role claim name in UMS and you will use Clinician and Support as the IDP Role values in the persona profiles.
For more information on claims used in Okta, see Customize tokens returned from Okta with a groups claim.
For more information on claims used in PingOne, see Customizing access tokens in PingOne.
Example Configuration: Microsoft Entra ID App Roles
-
In the Microsoft Entra admin center, go to Entra ID > App registrations.
-
Open the application used for IGEL OS SSO.
-
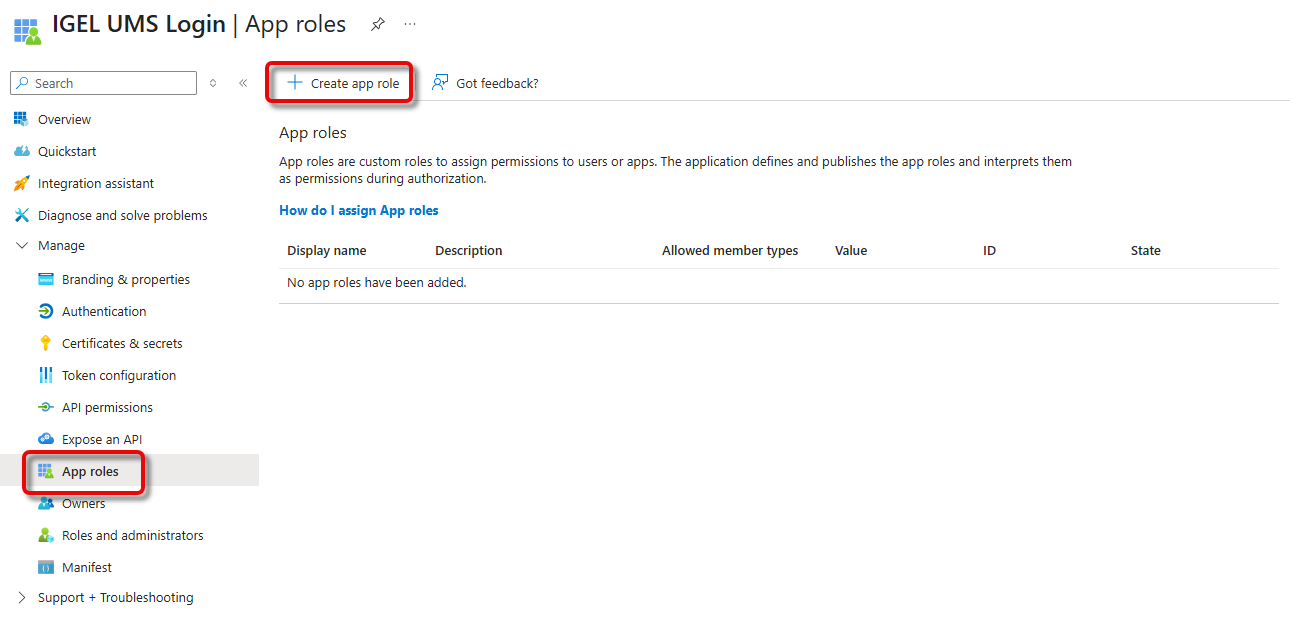
Select App roles.
-
Click Create app role.
-
Configure the app role:
-
-
Display name: Enter a descriptive name.
-
Allowed member types: Select Users/Groups.
-
Value: Enter the value to map to a persona profile, for example,
Clinician. -
Description: Describe the purpose of the role.
-
Do you want to enable this app role?: Enable the app role.
-
-
Click Apply.
-
Go to Entra ID > Enterprise applications.
-
Open the enterprise application associated with the app registration.
-
Select Users and groups.
-
Click Add user/group.
-
Select the users or groups and assign the appropriate app role.
-
Click Assign.
The value configured under Value, is included in the roles claim value. Enter this value exactly, including capitalization, when you create the persona profile.
Step 3: Configure the Persona Role Claim in UMS
You can skip this configuration if the role values of the IdP are in roles. UMS uses roles by default for the claim name. For example, you can leave the claim field empty with Microsoft Entra ID.
-
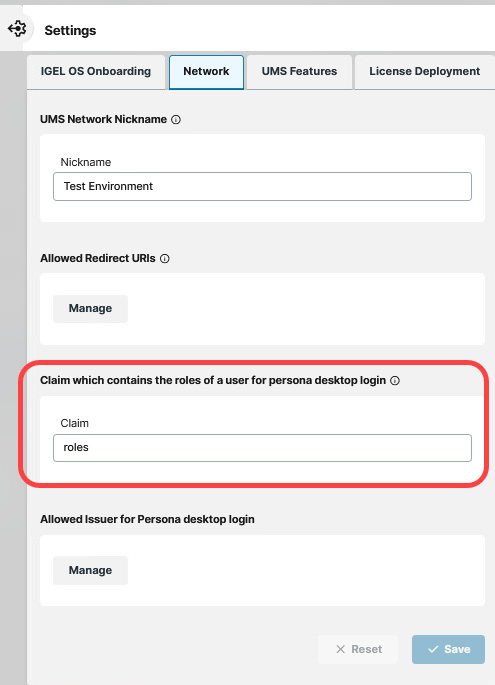
In the UMS Web App, go to System > Settings > Network.
-
Locate Claim which contains the roles of a user for persona desktop login.
-
Enter the claim name according to the access-token content. The UMS will read the role of the user from this claim when the user logs in.
Enter only the claim name, for exampleumsroles, do not enter an individual role value such asClinician.
{
  "iss": "https://login.microsoftonline.com/<tenant-id>/v2.0",
  "umsroles": ["Clinician", "Support"]
}
The claim name is case-sensitive. Only one claim name can be configured globally. If multiple IdPs are used, they must all provide persona role values under the same claim name.
The claim name can contain either one role string or an array of role strings.
Step 4: Configure Token Trust in the UMS
UMS uses the trusted issuer to obtain the IdP signing keys from its JWKS endpoint. UMS then validates the token signature and expiration before processing the persona roles. Tokens from an issuer that is not in the allowed issuer list are rejected.
To ensure that UMS trusts the authentication tokens issued by the IdP for the persona profile login:
-
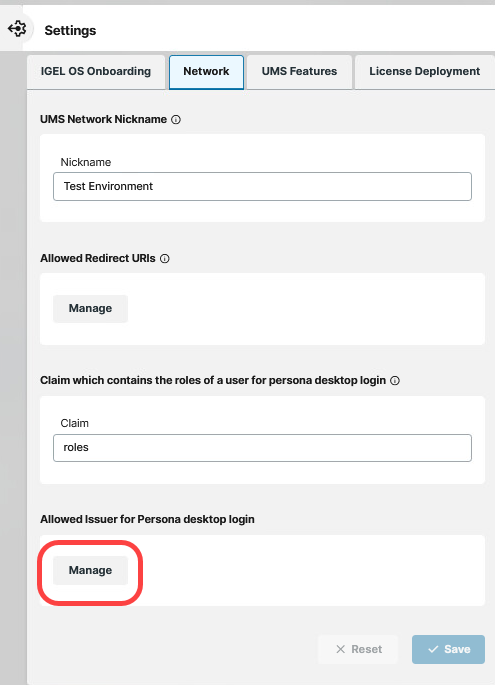
Under Allowed Issuer for Persona Desktop login, click Manage.
-
Add the issuer URI of the IdP configured for SSO Login on IGEL OS. Enter the exact issuer URI from the IdP OpenID Connect configuration.
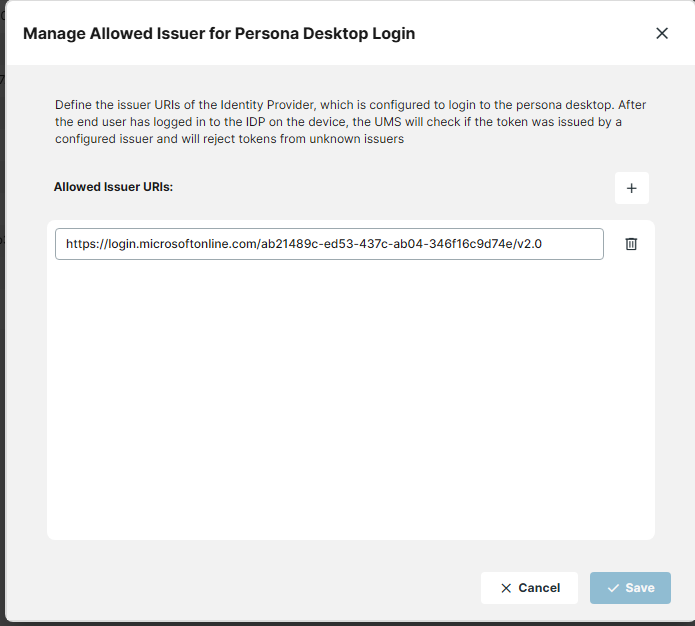
The issuer URI must exactly match the iss value in the access token. For example, for a single-tenant Microsoft Entra v2 token, the issuer normally has the following format:
https://login.microsoftonline.com/<tenant-id>/v2.0
Microsoft requires an exact issuer match during token validation, see Microsoft access-token validation guidance.
Use Persona Profiles for Access Management
Step 1: Create Persona Profiles for IdP Roles
-
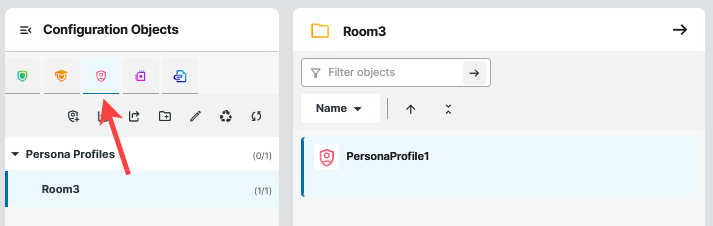
In the UMS Web App, go to Configuration Objects > Persona Profiles
-
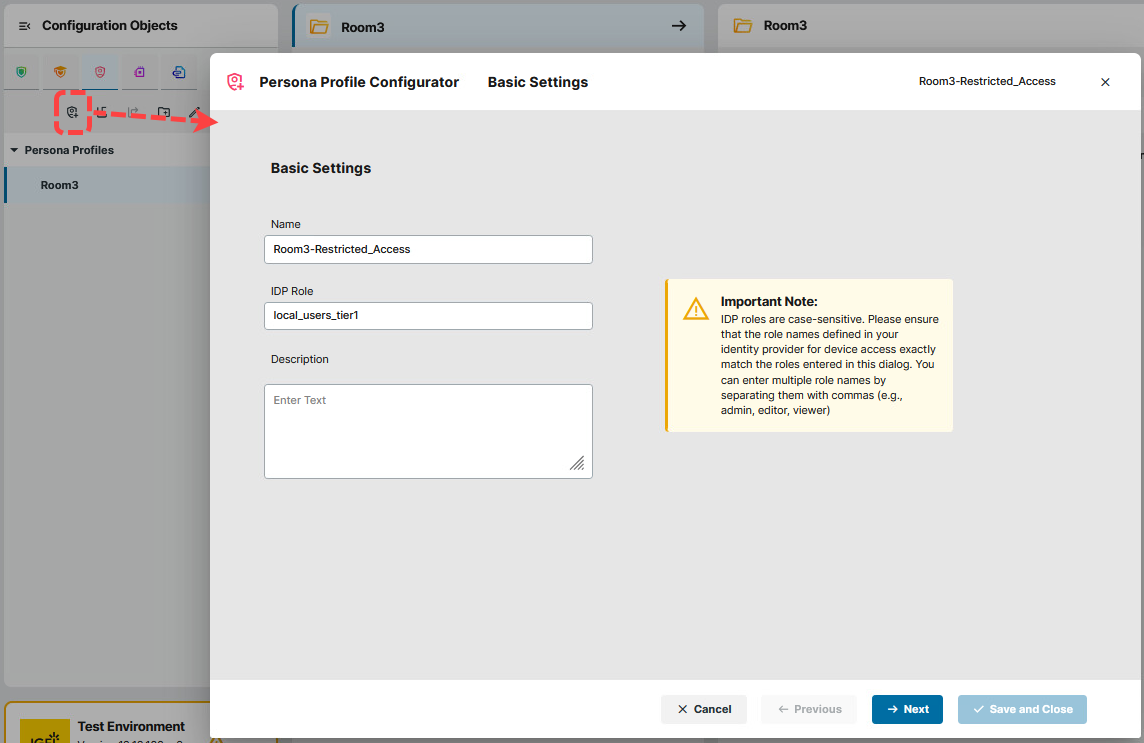
Create a new persona profile.
-
Enter Name and Description for easy profile management.
-
List the claim values issued by the IdP separated by commas under IDP Role to connect the persona profile to these IdP roles.
You can use the claim values issued by the IdP to connect the users with the persona profiles. For example, if groups are used in the IdP claim and the IdP issues the claim below, you can enter Clinician,Suppor or Clinician or Suppor in the field, depending on the users you want connect.
{
  "groups": ["Clinician", "Support"]
}
-
Click Next.
Step 2: Assign Configuration Objects to Persona Profiles
→ Assign configuration objects to the persona profile, like profiles, apps, etc. For more information on configuration objects, see Configuration - Centralized Management of Device Settings in the IGEL UMS Web App.
These configurations will be applied to all users mapped to the corresponding IdP roles.
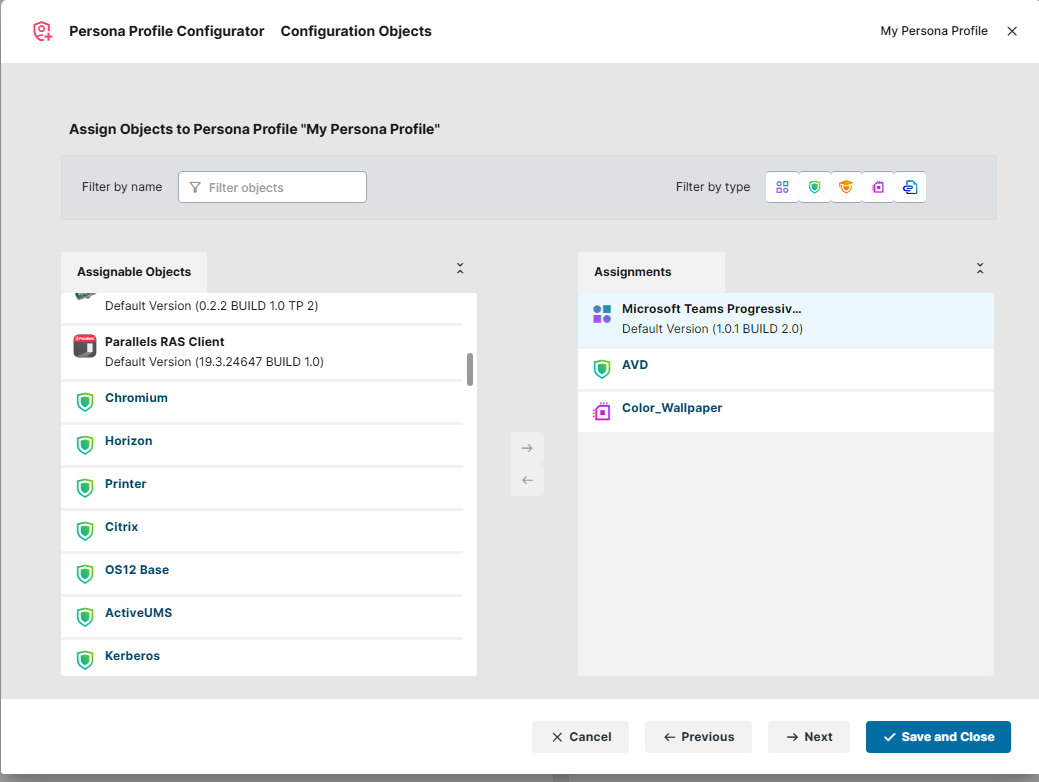
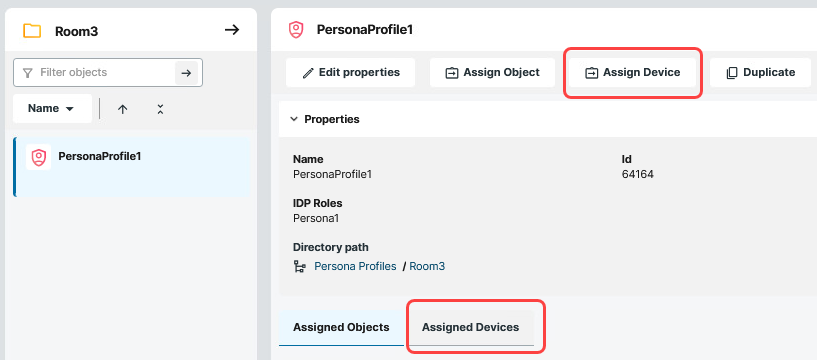
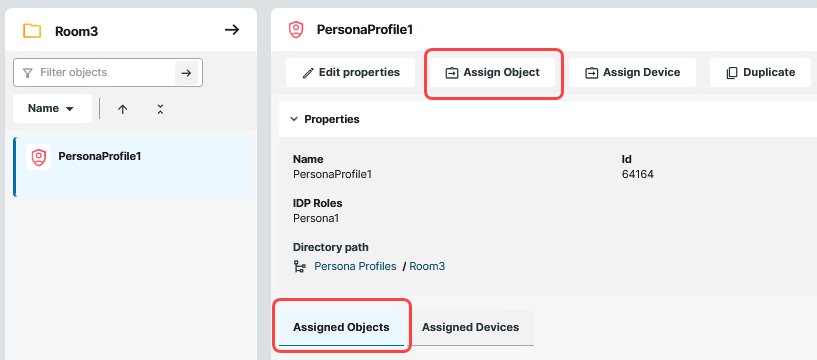
Once the persona profile is saved, you can assign/remove objects through the Assign Object action.
You can see assigned objects in the Assigned Objects tab.
Step 3: Assign Persona Profiles to Devices
→ Select the devices or device directories for which this persona profile should be active.
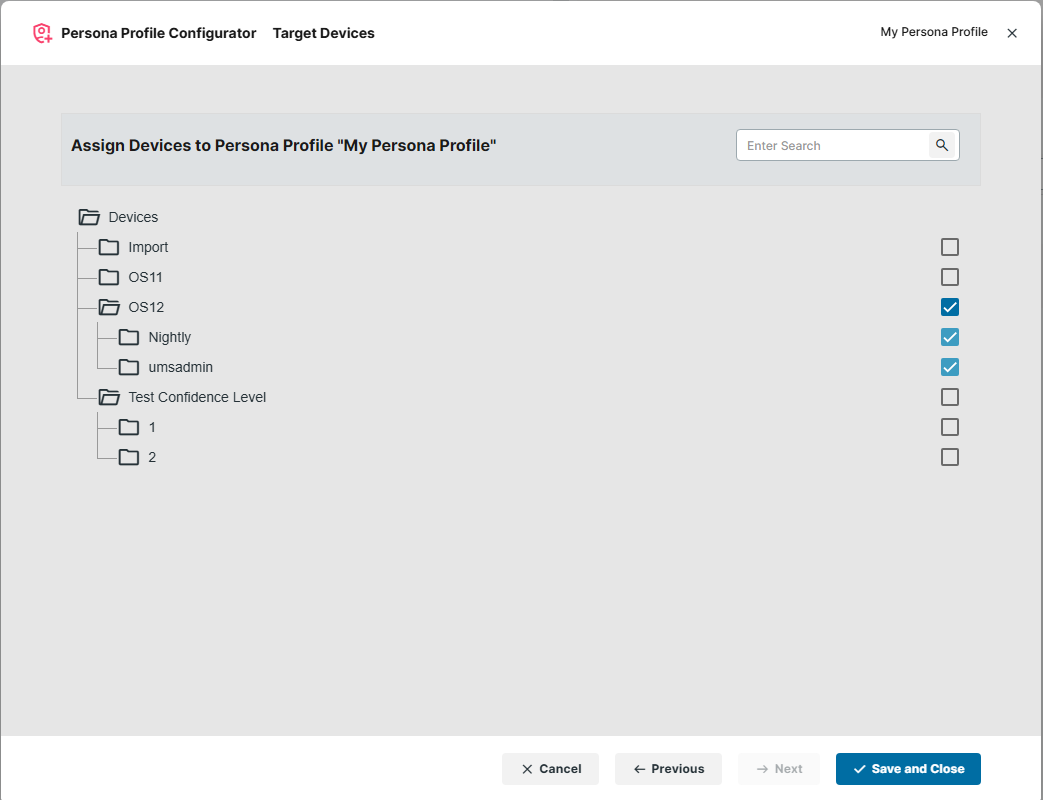
This way, the persona profile controls which users can access specific devices.
Example:
-
A persona profile linked to a specific IdP role is only active on the assigned devices.
-
Users without a matching persona profile cannot log in to the device.
Once the persona profile is saved, you can assign/remove devices through the Assign Device action button.
You can check on the assigned devices in the Assigned Devices tab.