Evidian Authentication Manager enables token‑based authentication (RFID or smartcard) for Citrix, RDP, and Horizon, supplementing traditional username/password login.
To configure the app, two methods are available:
-
Configuring Evidian Authentication Manager via UMS / IGEL Setup
-
Configuring Evidian Authentication Manager via Configuration File
Requirements
-
IGEL OS Base System 12.7.0 or higher is running on the devices
-
An Evidian EAM Controller, version 10.3 or higher, is installed and licensed
-
A Web‑server X.509 certificate, issued specifically for the EAM Controller Server, is required to enable HTTPS security for the Web Service.
-
When using HTTPS, the User Access Server's CA root certificate must be saved locally on the device.
-
The device and the server(s) must be part of the same Microsoft Active Directory (AD) domain.
-
A supported RFID reader or Smartcard reader (e. g., OMNIKEY 5022 CL, OMNIKEY 5422) is connected to the device. Please note the following:
-
Keystroke-only readers are not supported
-
Readers that are compatible with the SDK from rf IDEAS are supported (see https://www.rfideas.com/products/tools-utilities/software-development-kits/universal-enroll-sdk)
-
Configuring Evidian Authentication Manager via UMS / IGEL Setup
Configuring EAM Controllers
-
In the IGEL UMS, create a profile that configures the IGEL Secure Kiosk app. For details on profile creation, see How to Create and Assign Profiles in the IGEL UMS Web App.
-
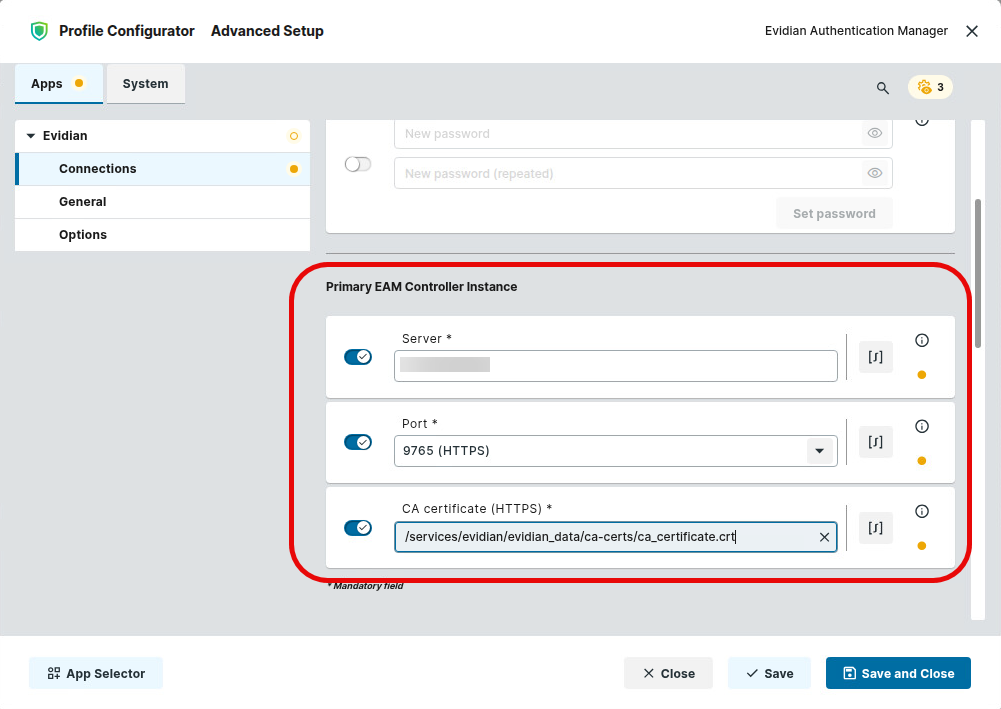
In the profile configurator, go to Apps > Evidian > Connections, section Primary EAM Controller Instance, and provide the following data:
-
Server: Enter the IP address or the DNS name of the EAM controller.
-
Port: Select the communication port for the EAM service. Possible Options:
-
9764 (HTTP): Select this port to use unencrypted HTTP for communication with the EAM service.
-
9765 (HTTPS): Select this port to use HTTPS for communication with the EAM service.
-
-
CA certificate: This parameter is only active when 9765 (HTTPS) is selected as the Port. Enter the file path to the CA certificate for HTTPS. Preferred storage path:
/services/evidian/evidian_data/ca-certs. For further information on transferring certificates to endpoint devices, see Files - Registering Files on the IGEL UMS Server and Transferring Them to Devices.
-
-
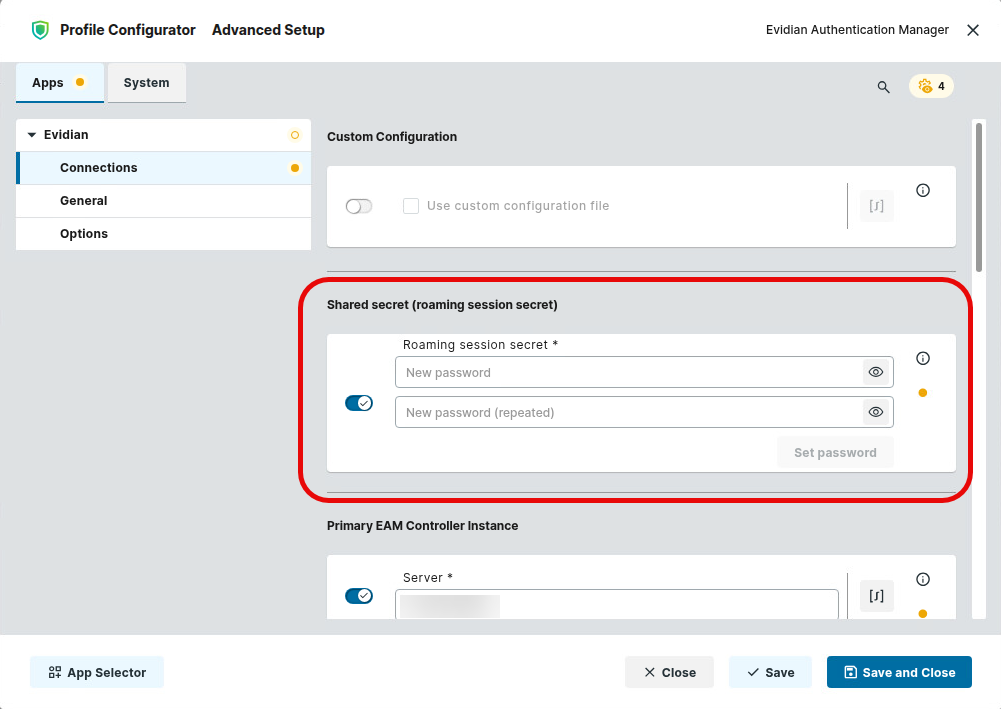
In the section Shared secret (roaming session secret), enter the roaming secret that will be used for secure communication between the endpoint device and the EAM controller. The secret must match the corresponding EAM controller registry entry.
-
If you have more than one EAM controller, provide the relevant parameters in the sections Secondary EAM Controller (optional) and Third EAM Controller Instance (optional), as applicable. Follow the instructions in step 2.
Configuring a Target Session
-
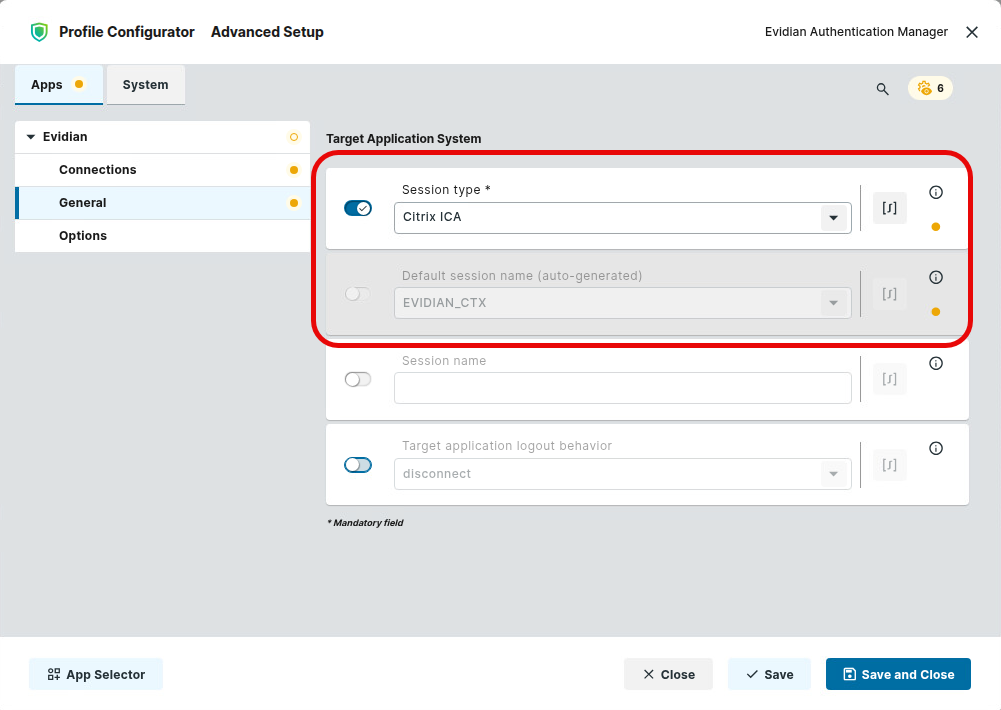
In the profile configurator, go to Apps > Evidian > General and select the desired Session Type.
Ensure that a target system is configured. The session name when creating the target system connection is auto-generated, depending on the selected session type:
|
Session Type |
Default session name (auto-generated) |
|---|---|
|
Citrix ICA |
EVIDIAN_CTX |
|
RDP |
EVIDIAN_RDP |
|
Horizon |
EVIDIAN_HZN |
-
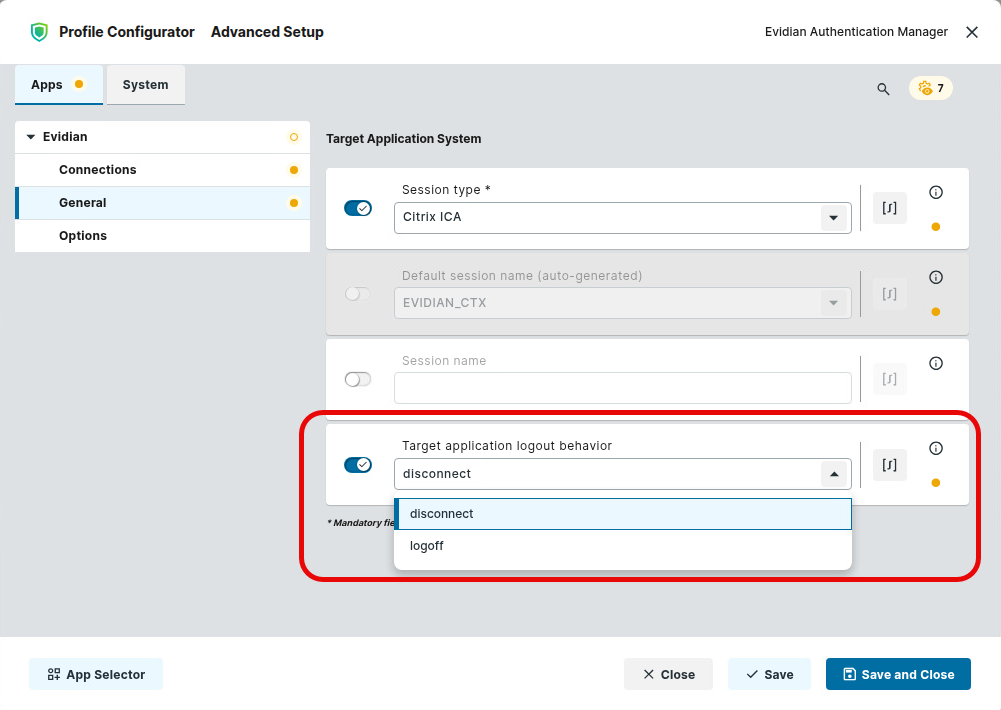
If your target system is Citrix, select the Target application logout behavior according to your requirements.
-
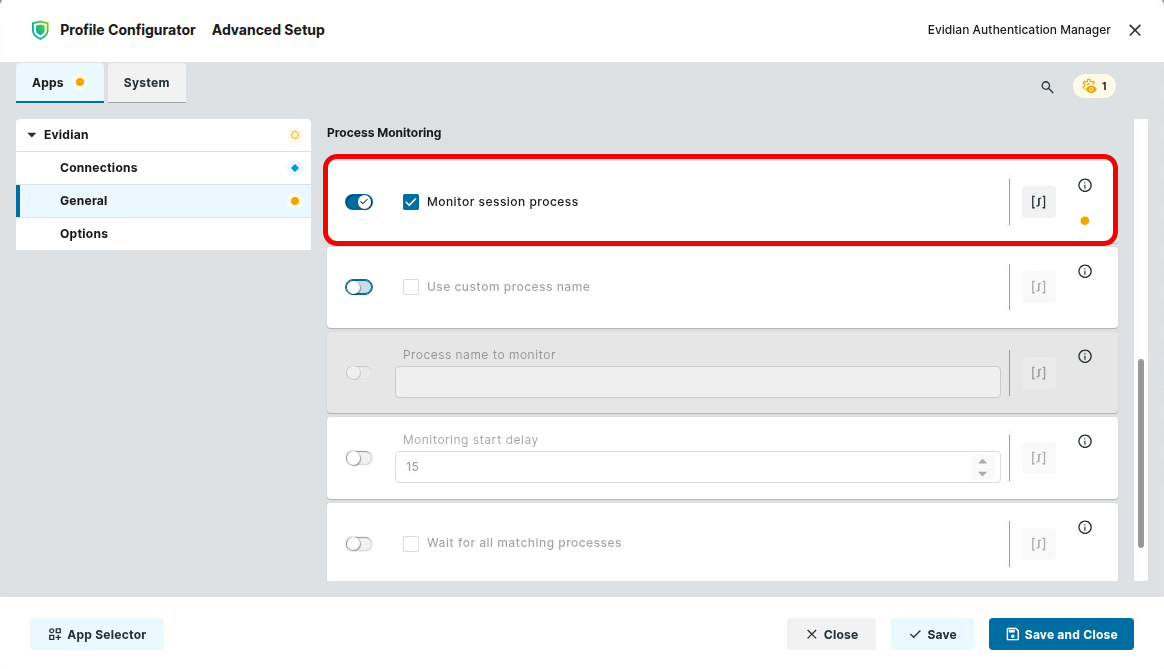
(Optional) If the session should be ended when the corresponding client process exits, enable Monitor session process.
Configuring the Authentication Manager Dialog
→ In the profile configurator, go to Apps > Evidian > Options, section Authentication Manager Dialog, and edit the settings according to your needs.
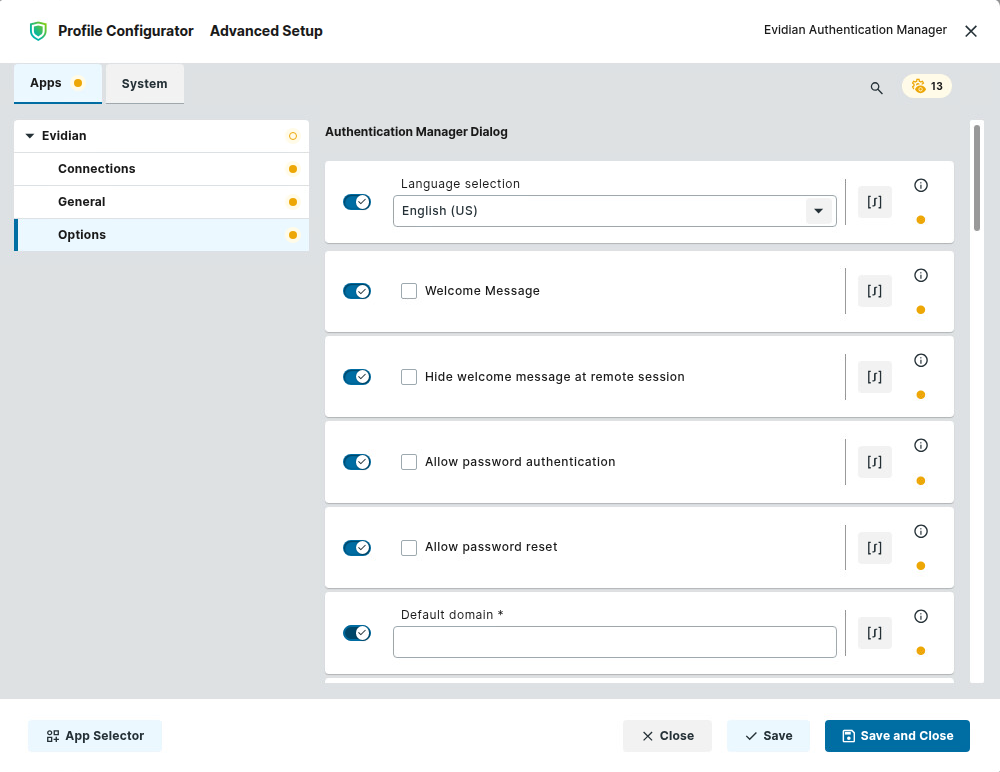
Language Selection
The Authentication Manager is displayed in the selected language.
Possible values:
-
English (US)
-
German
-
French
-
Danish
-
Custom: A language catalogue file is used; the file path is defined by the parameter Custom message catalogue language file (*.cat).
Custom message catalogue language file (*.cat)
This parameter is required if Language Selection is set to Custom. Enter the file path for the relevant language catalogue.
Format: /services/evidian/evidian_data/[LANGUAGE]/rsUserAuth.cat
Example (Spanish): /services/evidian/evidian_data/es/rsUserAuth.cat
Welcome Message
☑ The Authentication Manager dialog is displayed.
☐ The Authentication Manager dialog is not displayed. (Default)
Hide welcome message at remote session
☑ The Authentication Manager dialog is displayed during a remote session.
☐ The Authentication Manager dialog is not displayed during a remote session. (Default)
Allow password authentication
☑ Password authentication button is displayed on the Authentication Manager dialog.
☐ The password authentication button is not displayed on the Authentication Manager dialog. (Default)
Allow Password reset
☑ A “Password forgotten” button is displayed on the Authentication Manager dialog.
☐ No “Password forgotten” button is displayed on the Authentication Manager dialog. (Default)
Default domain *
Default domain name for password authentication. NETBIOS format must be used. This parameter is only available if Domain not editable is disabled.
Domain not editable
☑ The default domain is not editable.
☐ The default domain is editable. (Default)
Include user-defined image
You can add an image to the Authentication Manager dialog, for instance, your company logo.
Preferred path: /services/evidian/evidian_data/
Format: PNG
Configuring RFID Management
→ In the profile configurator, go to Apps > Evidian > Options, section RFID Management, and edit the settings according to your needs.
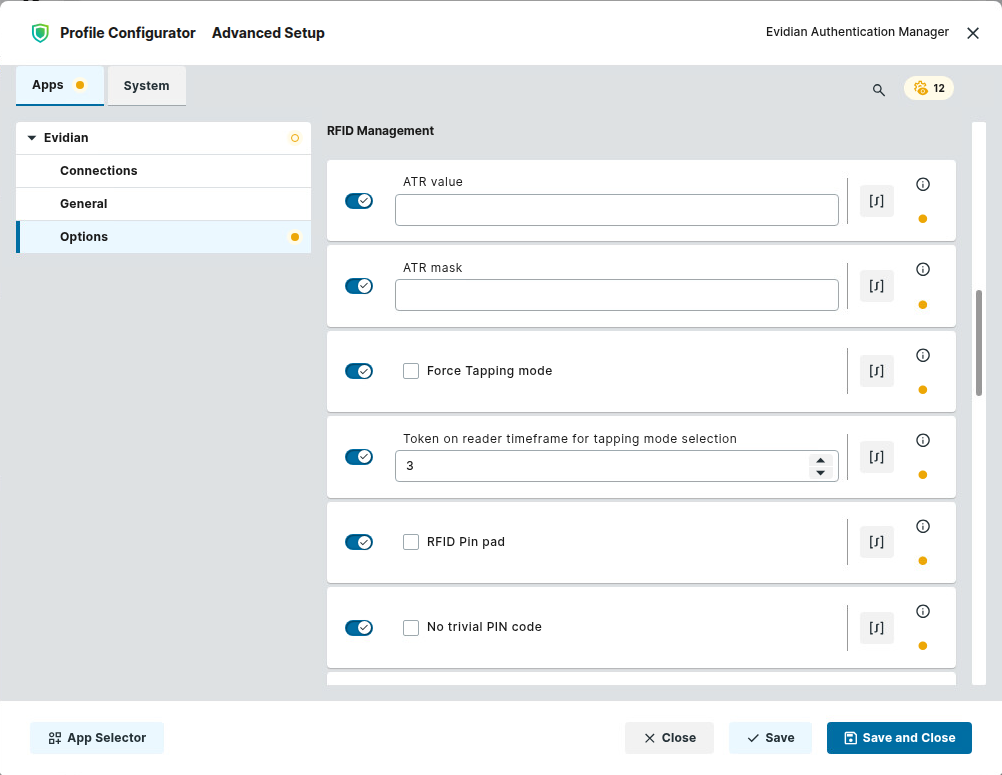
ATR value
RFID ATR value e. g. 3B8F8001804F0CA000000306030001000000006a. The same ATR value must be contained in TokenManagerStructure.mxl
ATR mask
RFID ATR mask e. g. ffffffffffffffffffffffffffffffffffffffff. The same ATR value must be contained in TokenManagerStructure.mxl
Force Tapping mode
☑ The operating mode can be changed by briefly tapping the card on the reader. Each tap triggers an action.
☐ The operating mode cannot be changed by tapping the card on the reader. (Default)
Token on reader timeframe for tapping mode selection
Time frame in seconds within which the token must remain on the reader to avoid entering tapping mode. Deactivate with value “-99”. (Default: 3)
RFID Pin pad
☑ Activate a numeric keyboard dialogue.
☐ Deactivate a numeric keyboard dialogue. (Default)
No trivial PIN code
☑ A trivial PIN, i.e., a PIN consisting of three or more consecutive numbers or identical digits, is not allowed.
☐ A PIN can consist of three or more consecutive numbers or identical digits. Examples: 2345,1111 (Default)
RFIDeas
☑ RFIDeas is activated.
☐ RFIDeas is deactivated. (Default)
Configuring Smartcard Management
→ In the profile configurator, go to Apps > Evidian > Options, section Smartcard Management, and edit the settings according to your needs.
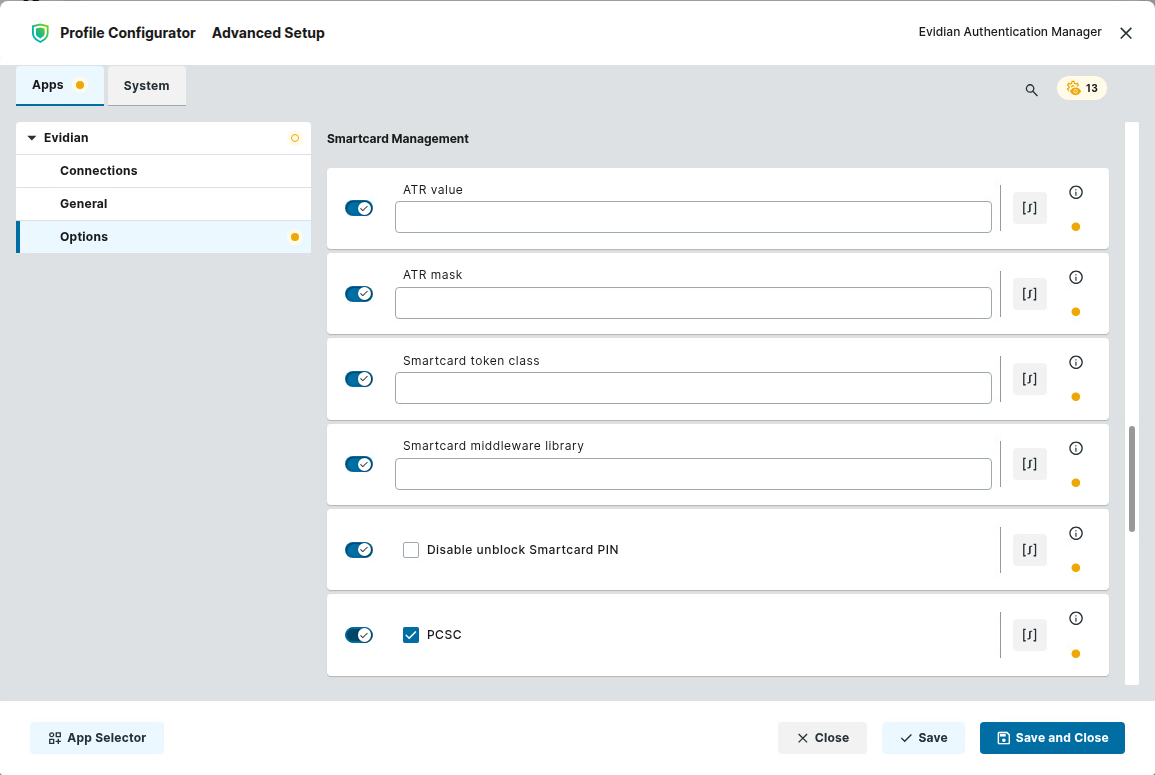
ATR value
Smart card ATR value, e. g., 3bd218008131fe58c90316. The same ATR value must be contained in TokenManagerStructure.mxl
ATR mask
Smart card mask, e. g., ffffffffffffffffffffff. The same ATR mask must be contained in TokenManagerStructure.mxl
Smartcard token class
Definition of the class of the token, for example, for CARDOS.
Smartcard middleware library
Path to the pkcs#11 library.
Disable unblock Smartcard PIN
☑ Prohibit unlocking smartcard PIN.
☐ Do not prohibit unlocking the smartcard PIN. (Disable)
PCSC
☑ Activate PCSC for Smartcards. (Default)
☐ Deactivate PC/SC for Smartcards.
Ignore given reader device
If more than one reader is connected, a reader exclusion can be defined here. Wildcards are possible, e. g., "*3x21*"
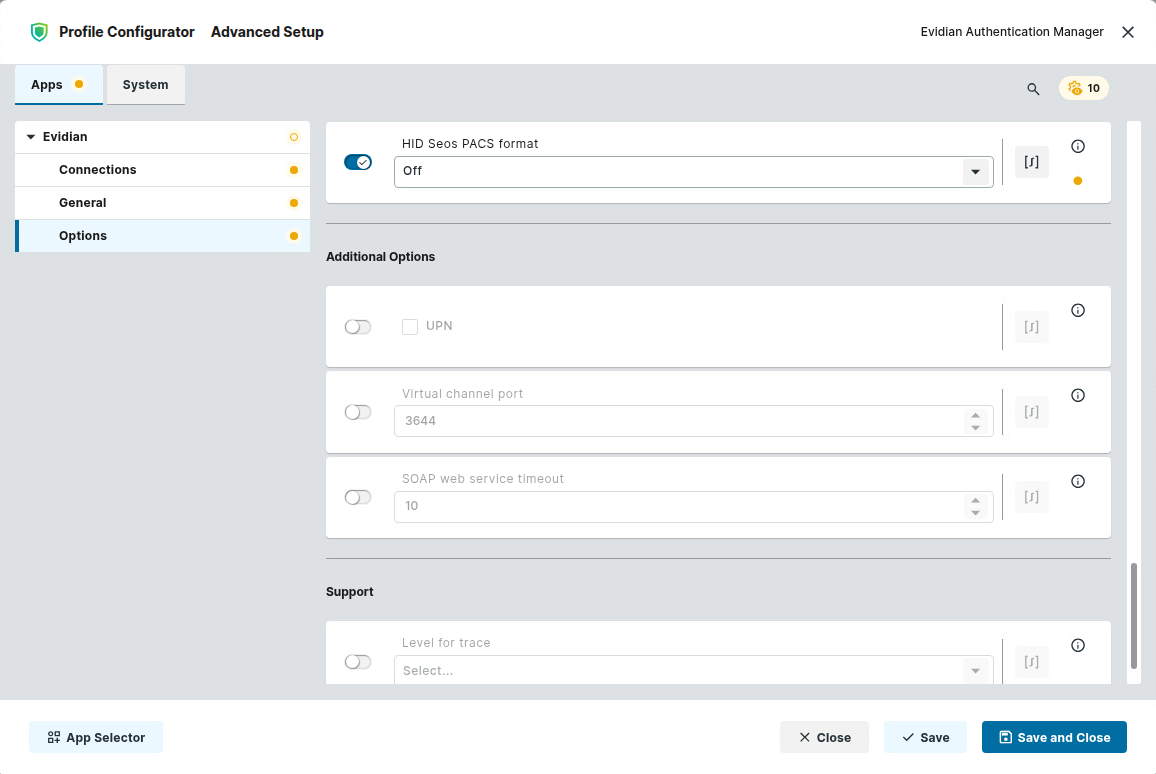
HID Seos PACS format
Possible options:
-
Off: The support of HID Seos cards is disabled.
-
[Format]: The selected format is supported.
Configuring Additional Options
→ In the profile configurator, go to Apps > Evidian > Options, section Additional Options, and edit the settings according to your needs.
UPN
☑ The credentials username and domain are transmitted in UPN (User Principal Name) format.
Virtual Channel Port
This port is required for the 4-eyes principle (signing). (Default: 3644)
SOAP web service timeout: 10
Timeout of the web service in seconds. (Default: 10)
Configuring the Log Level for Support
→ In the profile configurator, go to Apps > Evidian > Options, section Support, and edit the settings according to your needs.
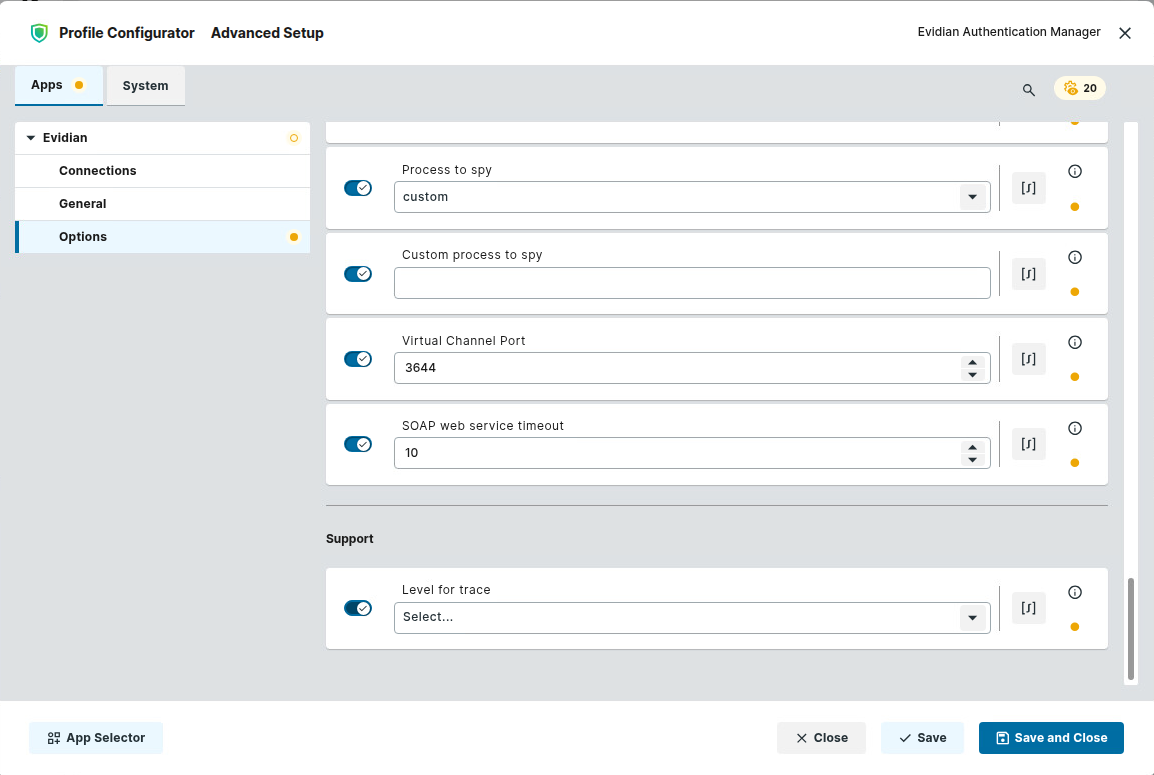
Level for trace
Specifies the trace level. The level of detail of the log messages decreases as you move down through the selection list.
Possible values:
-
Select...: Debug mode is deactivated.
-
low
-
medium
-
high
-
details
Log directory
This parameter is only available if Level for trace is set to any value except Select…. Enter the path for the log directory.
Configuring Evidian Authentication Manager via Configuration File
As an alternative to a UMS profile, you can use a configuration file to configure your Evidian Authentication Manager app. Please note that this requires in-depth knowledge about Evidian Authentication Manager and about the syntax of the configuration file. A commented template file can be found on any endpoint device on which the Evidian Authentication Manager has been installed under /etc/rsUserAuth/rsUserAuth.ini. To obtain the file from the device, see How to Transfer a File to the IGEL UMS Server.
For in-depth information on configuring the Evidian Authentication Manager, obtain the “Authentication Manager for Linux Installation and Configuration Guide“ from https://customercare.evidian.com.
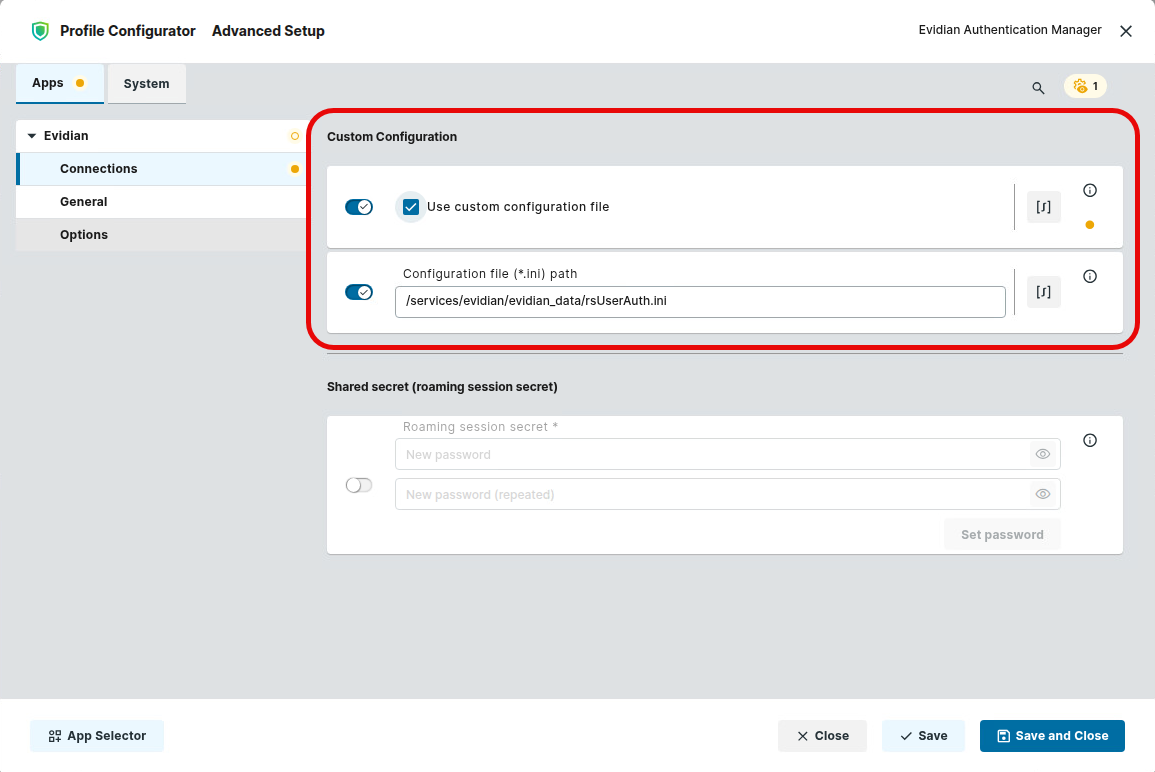
Do Not Store the Secret in the Configuration File
The secret should not be stored in the configuration file, as it would be stored as plain text. Instead, use Apps > Evidian > Connections > parameter Shared secret (roaming session secret) for this purpose.
-
Create the configuration file and save it with an appropriate filename, for instance,
rsUserAuth.ini
-
Transfer the file to all relevant endpoints. The default path on the endpoint device is
/services/evidian/evidian_data/rsUserAuth.ini. For further information on transferring certificates to endpoint devices, see Files - Registering Files on the IGEL UMS Server and Transferring Them to Devices.
-
In the profile configurator, go to Apps > Evidian > Connections, section Custom.
-
Edit the settings as follows.
-
Activate Use custom configuration file.
-
Under Configuration file (*.ini) path, edit the file path or leave it as is, depending on the location of the configuration file (see step 2).
-
Configuring Citrix for Use with Evidian Authentication Manager
Configuring the StoreFront Login
-
In the profile configurator, go to Apps > Citrix > Citrix Sessions > [session name] > Server and ensure that Type of the session is set to StoreFront.
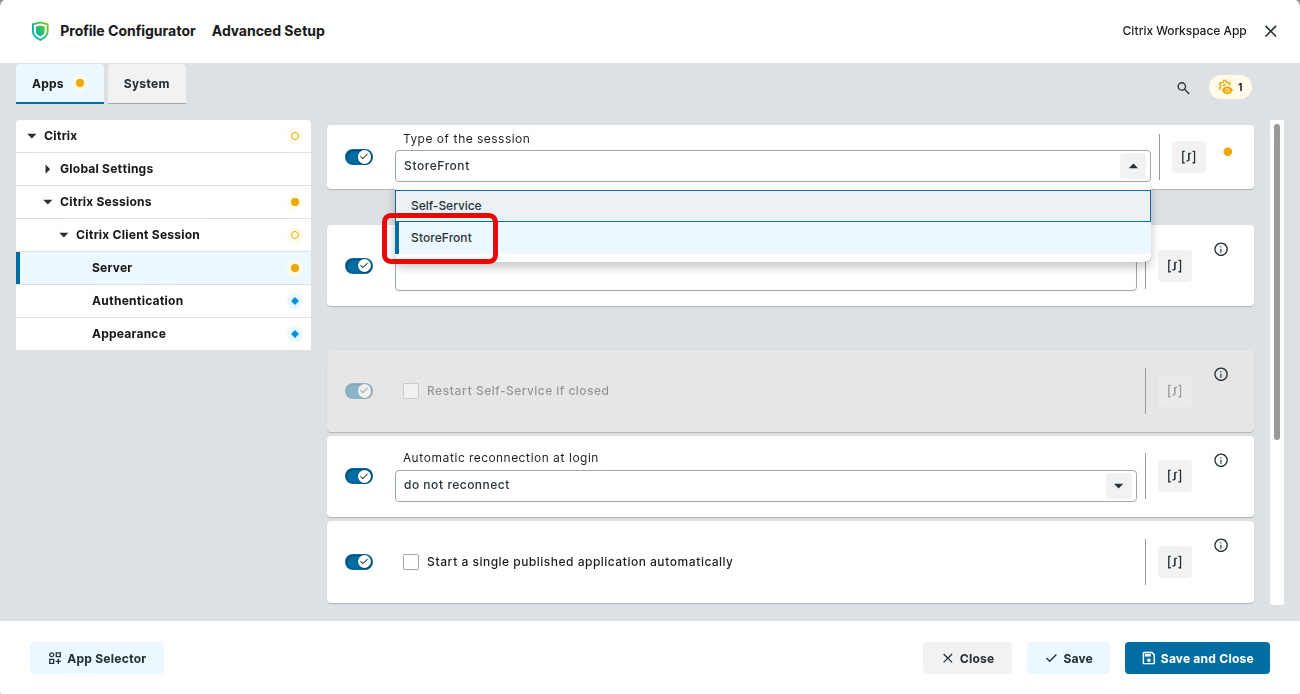
-
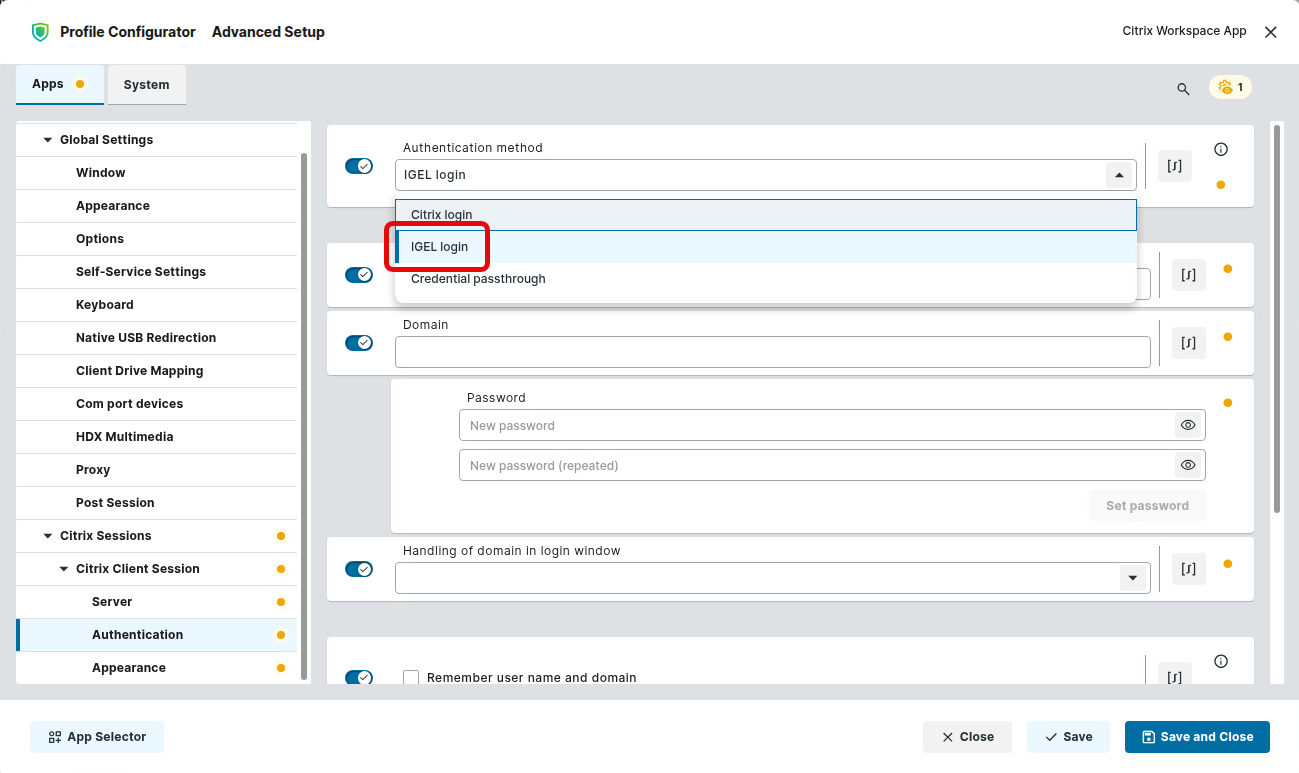
Go to Apps > Citrix > Citrix Sessions > [session name] > Authentication and set the Authentication method to IGEL login.
-
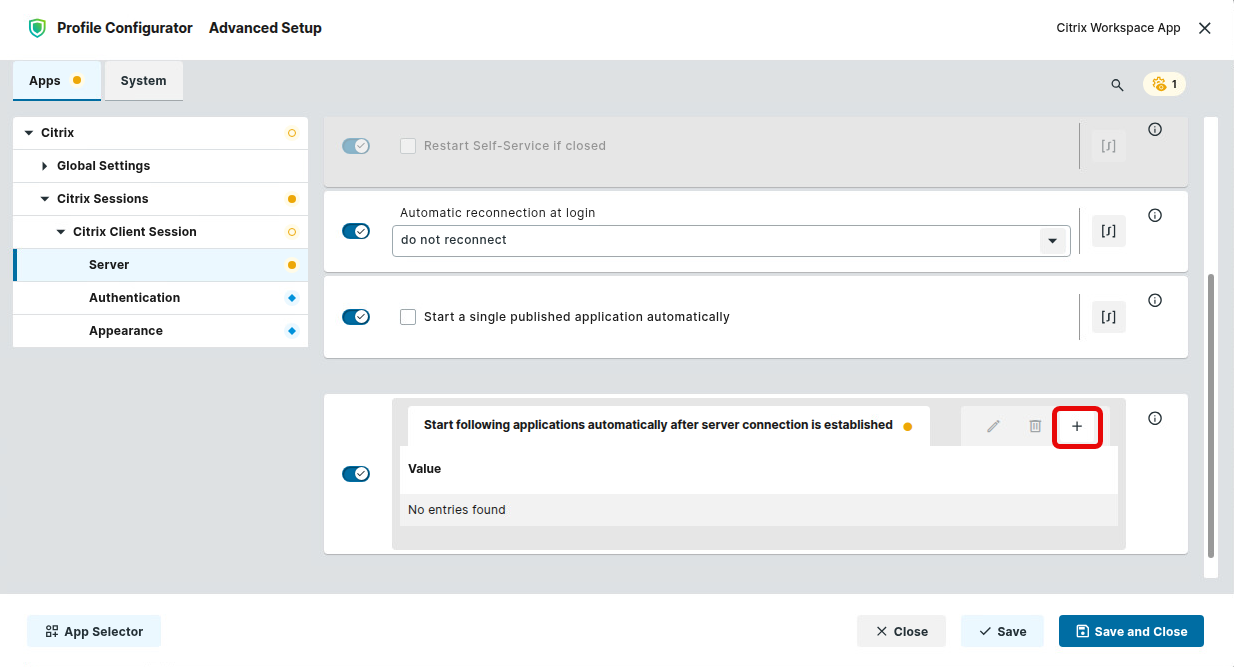
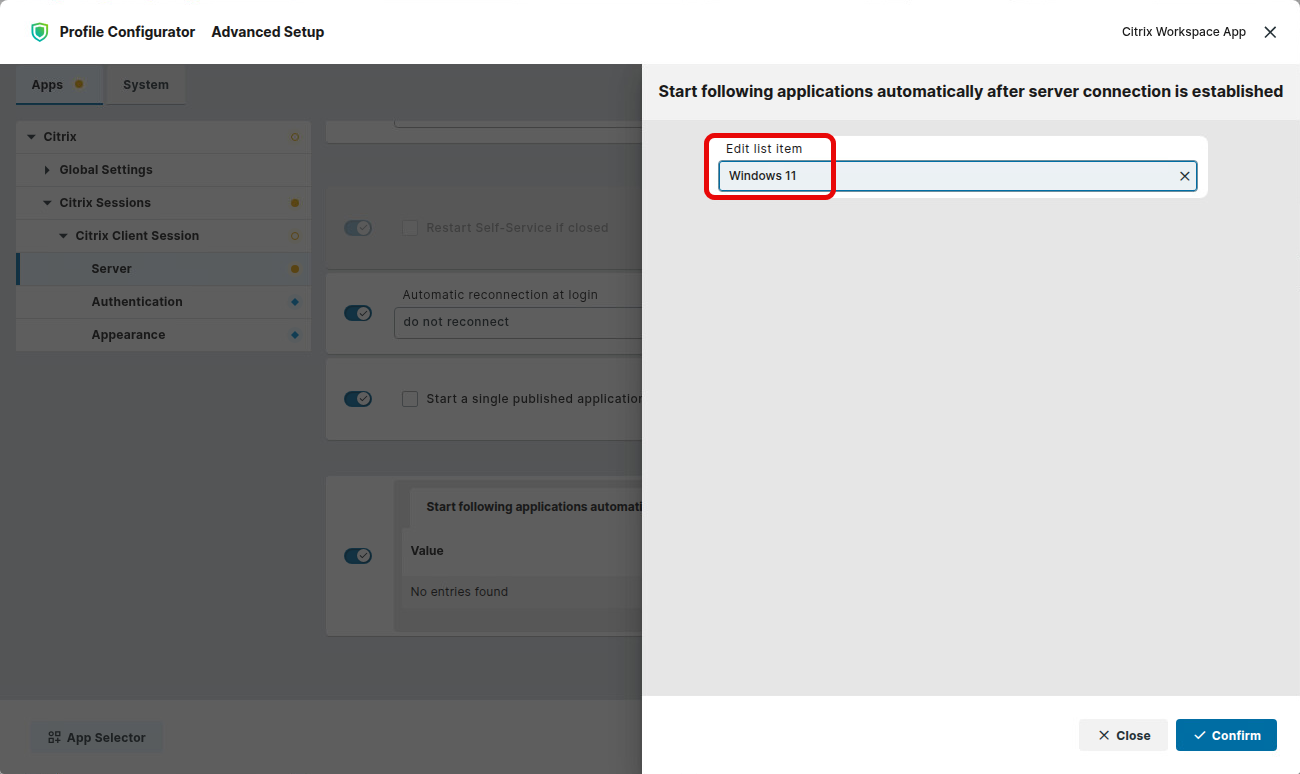
Under Start following applications automatically after server connection is established, specify the name of the resource you want to connect to, e. g. “Windows 11”.
Optimizing the Starting Performance for Citrix Sessions
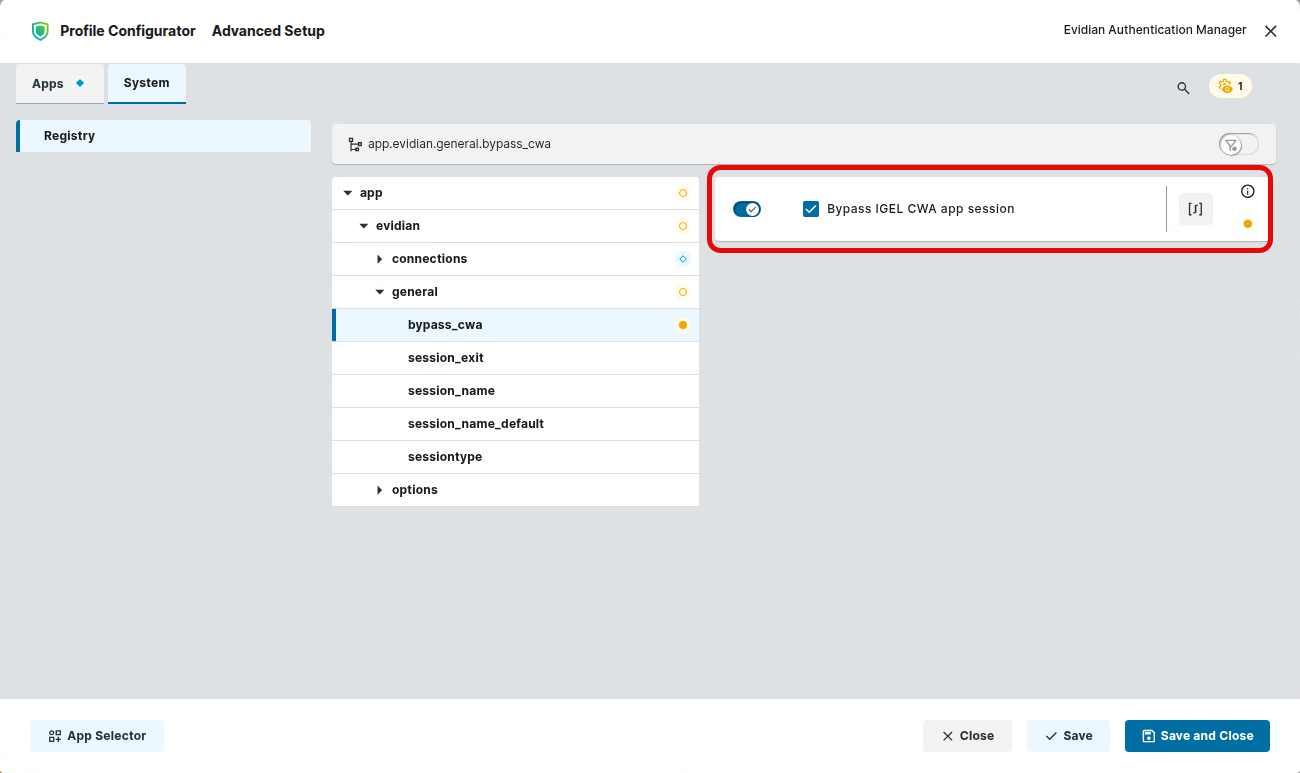
Depending on your Citrix configuration, the optimization described below may cause issues. It is recommended to test it before distributing it to all devices.
→ In the profile configurator, go to System > Registry > app > evidian > general > bypass_cwa and activate Bypass IGEL CWA app session.
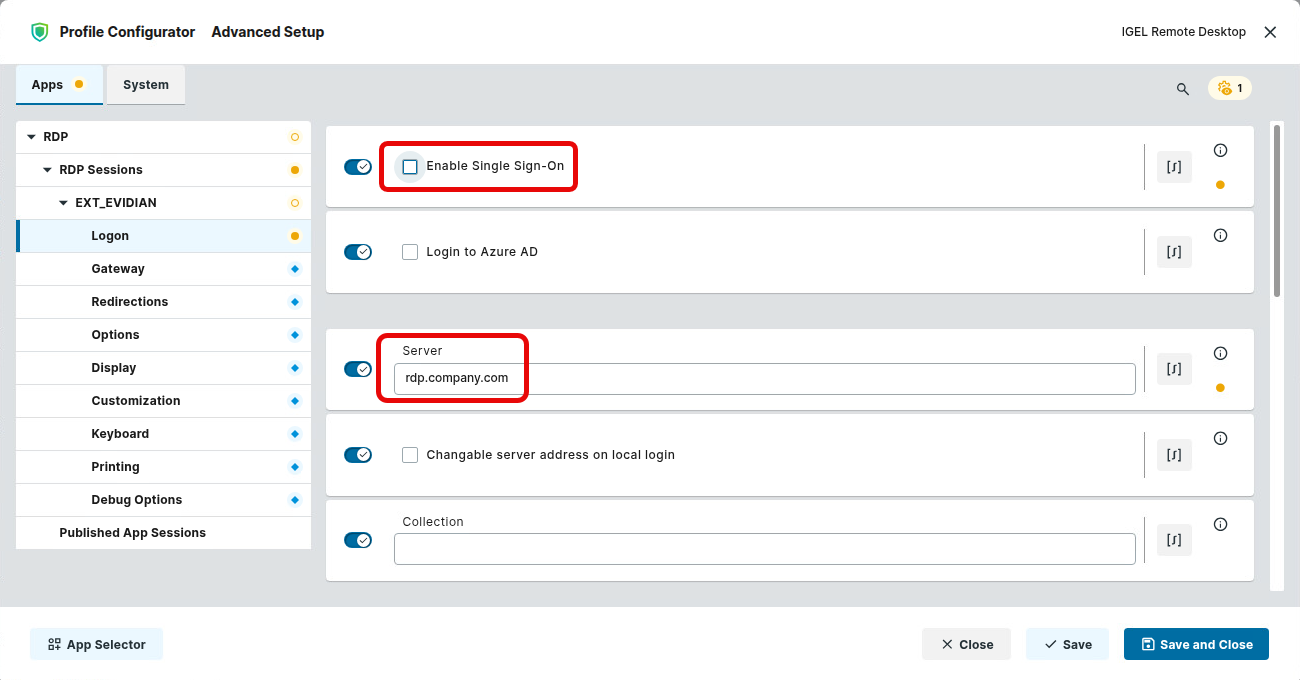
Configuring RDP for Use with Evidian Authentication Manager
→ In the profile configurator, go to Apps > RDP > RDP Session [session name] > Logon and edit the settings as follows:
-
Deactivate Enable Single-Sign-On.
-
In the Server field, provide the server address for your RDP connection.
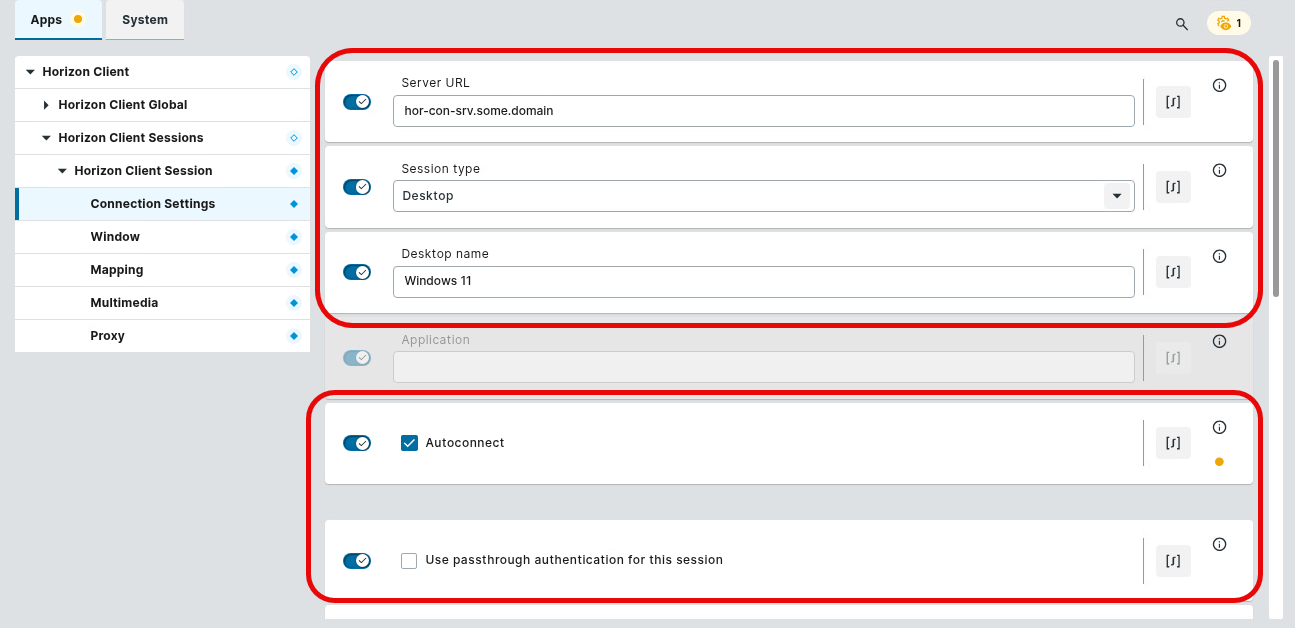
Configuring Horizon for Use with Evidian Authentication Manager
→ In the profile configurator, go to Apps > Horizon Client > Horizon Client Global > Horizon Client Sessions > Horizon Session [session name] > Connection Settings and edit the settings as follows:
-
In the Server URL field, insert the Horizon connection server address.
-
Set Session type to Desktop.
-
Set Desktop name to the name of the Horizon desktop pool.
-
Enable Autoconnect.
-
Deactivate Use passthrough authentication for this session.
Do not enter user credentials; they will be provided by the Evidian Authentication Manager.
How to Use Token-Based Login/Logout with the Evidian Authentication Manager
→ To start your session, place your RFID badge on the RFID reader (or tap it on the reader if you have configured the tapping mode).
On the first login, the user must enter the Windows password and an initial PIN.
→ To end the session, the user must remove the RFID badge (or tap the reader again).