This article describes how you can create an IGEL for Windows session and configure it on IGEL OS. IGEL for Windows was formerly IGEL Azure Virtual Desktop; for details, see IGEL for Windows.
Requirements
-
IGEL OS 12.5 or higher
-
IGEL for Windows app is imported to your IGEL UMS. For details on app import, see How to Import IGEL OS Apps from the IGEL App Portal.
Known Limitations
-
The device must support SSE4.1 at least.
How to Create a Session
This is how you can create an IGEL for Windows session via the profile configurator:
-
In the IGEL UMS, create a profile configuring the app. For details on profile creation, see How to Create and Assign Profiles in the IGEL UMS Web App.
-
In the profile configurator, go to Apps > IGEL for Windows > IGEL for Windows Sessions and click +.
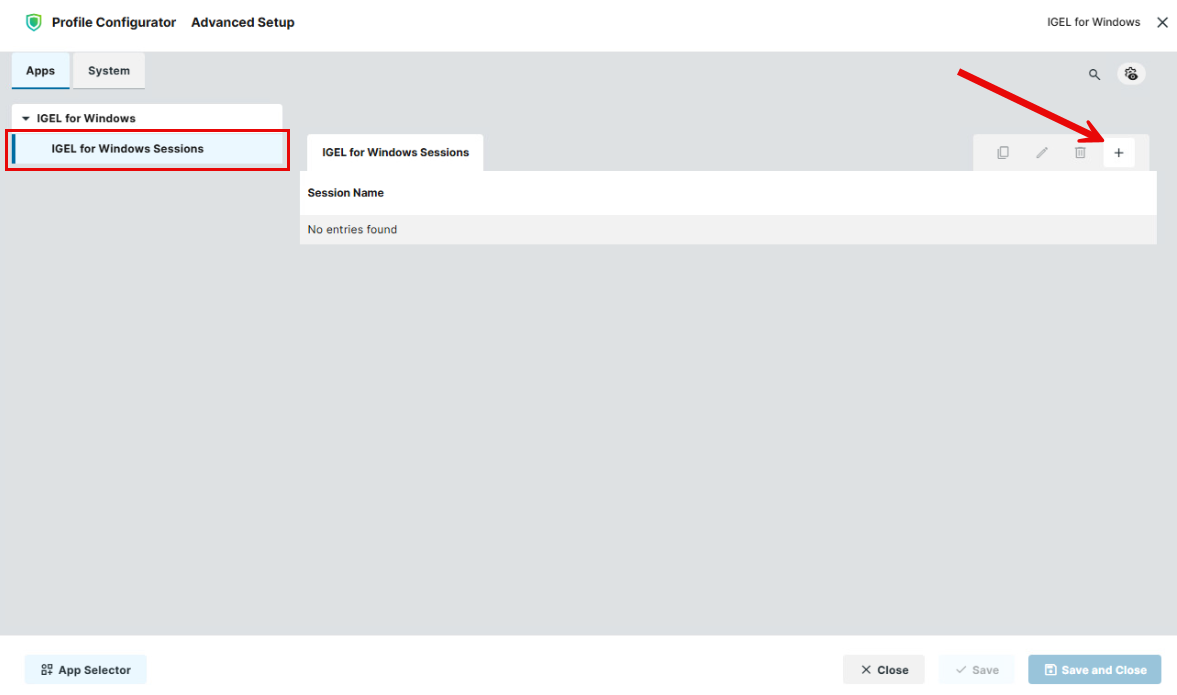
The session is created.
-
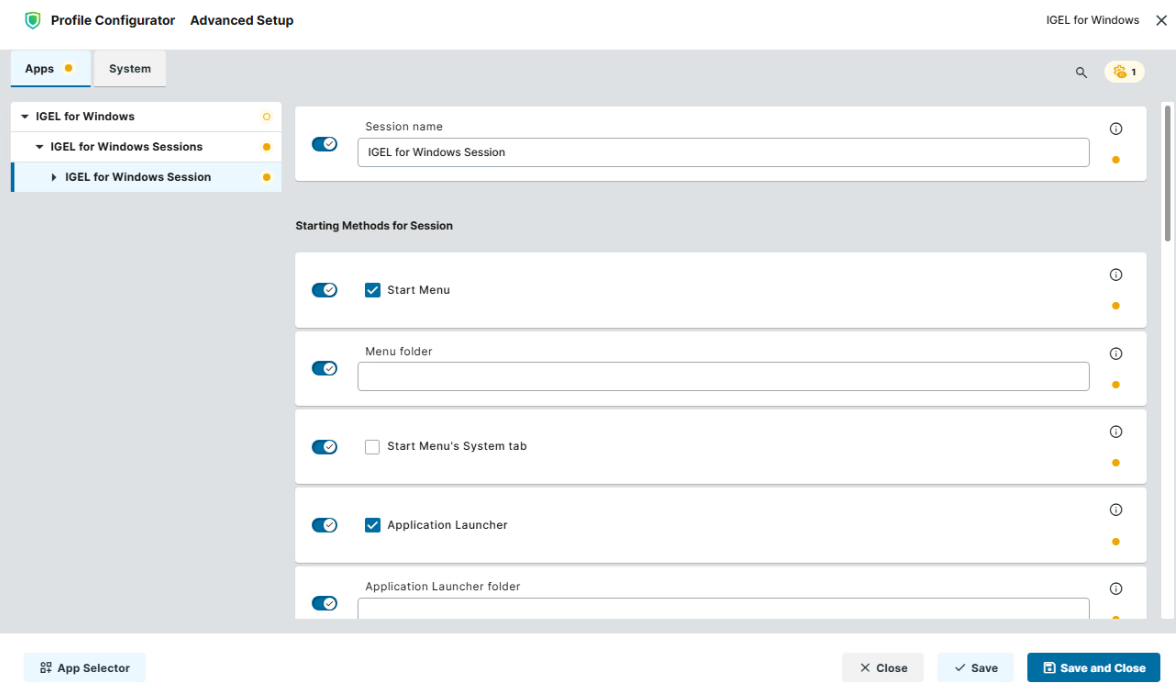
Configure the starting methods for the created session. For details, see Starting Methods for Apps.
-
Edit the settings described below according to your needs.
-
Save the settings and assign the profile to the required devices / device directories. For details on profile assignment, see How to Create and Assign Profiles in the IGEL UMS Web App.
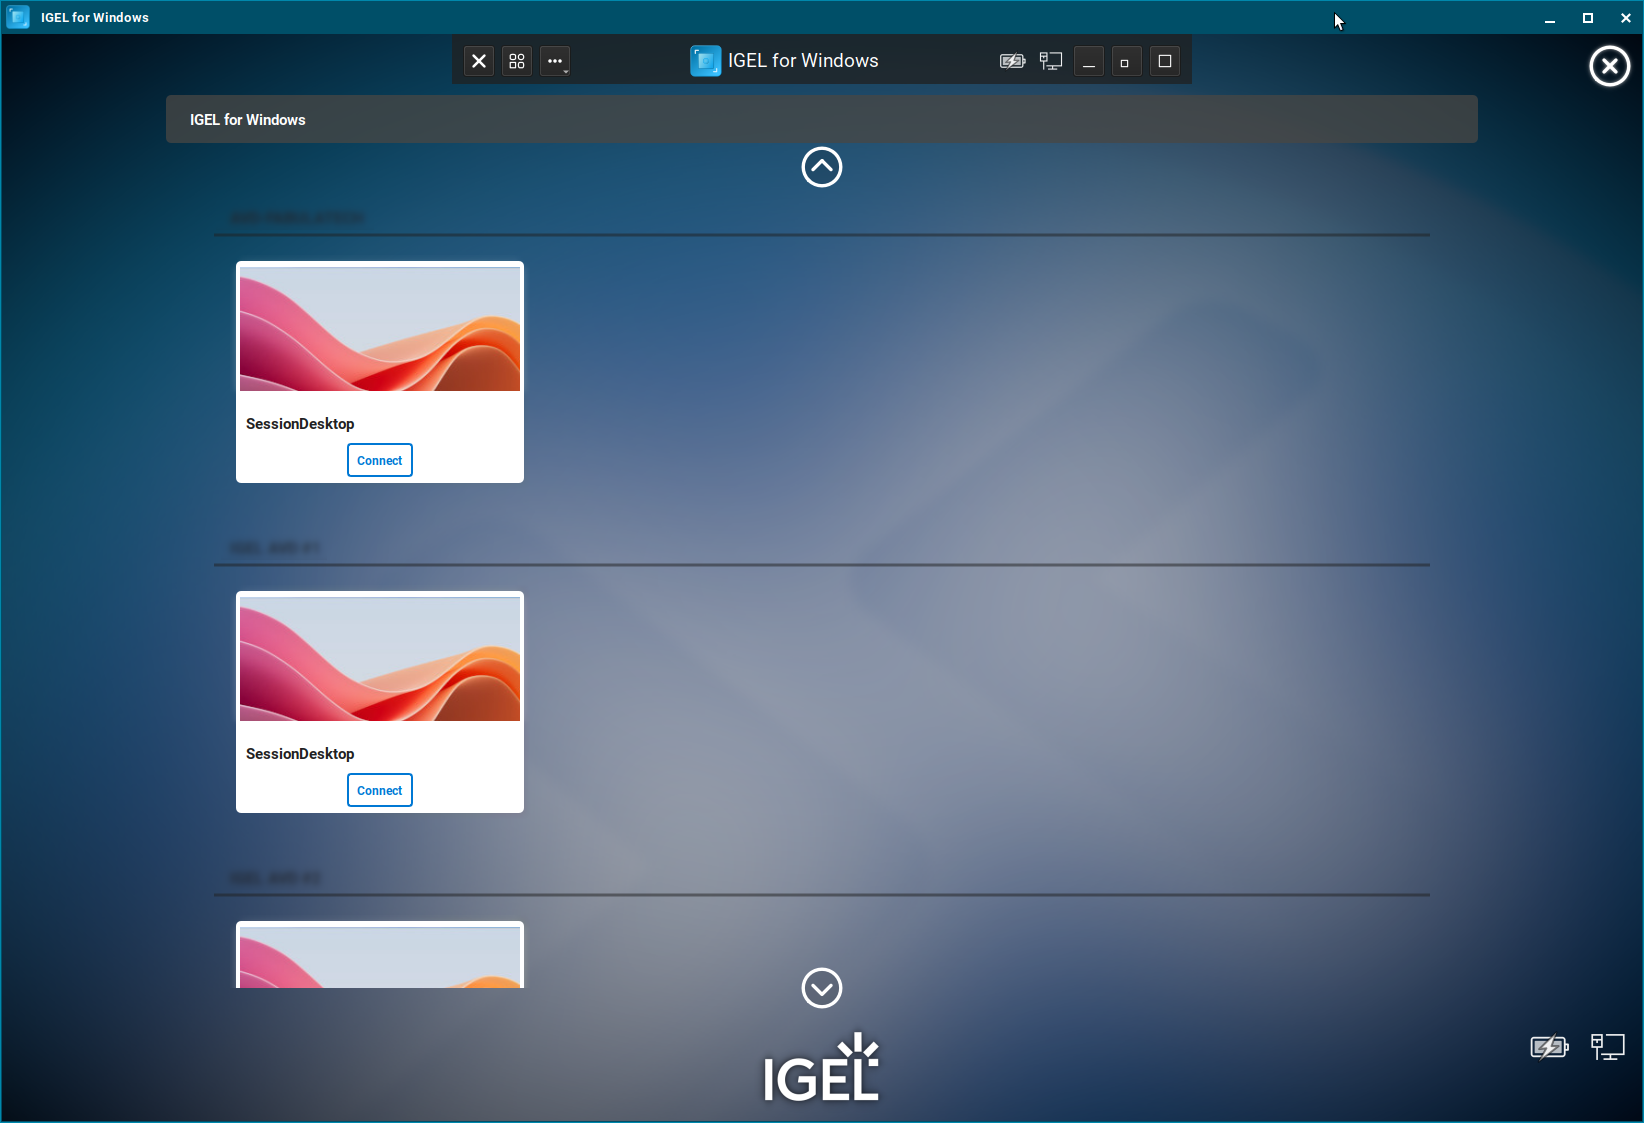
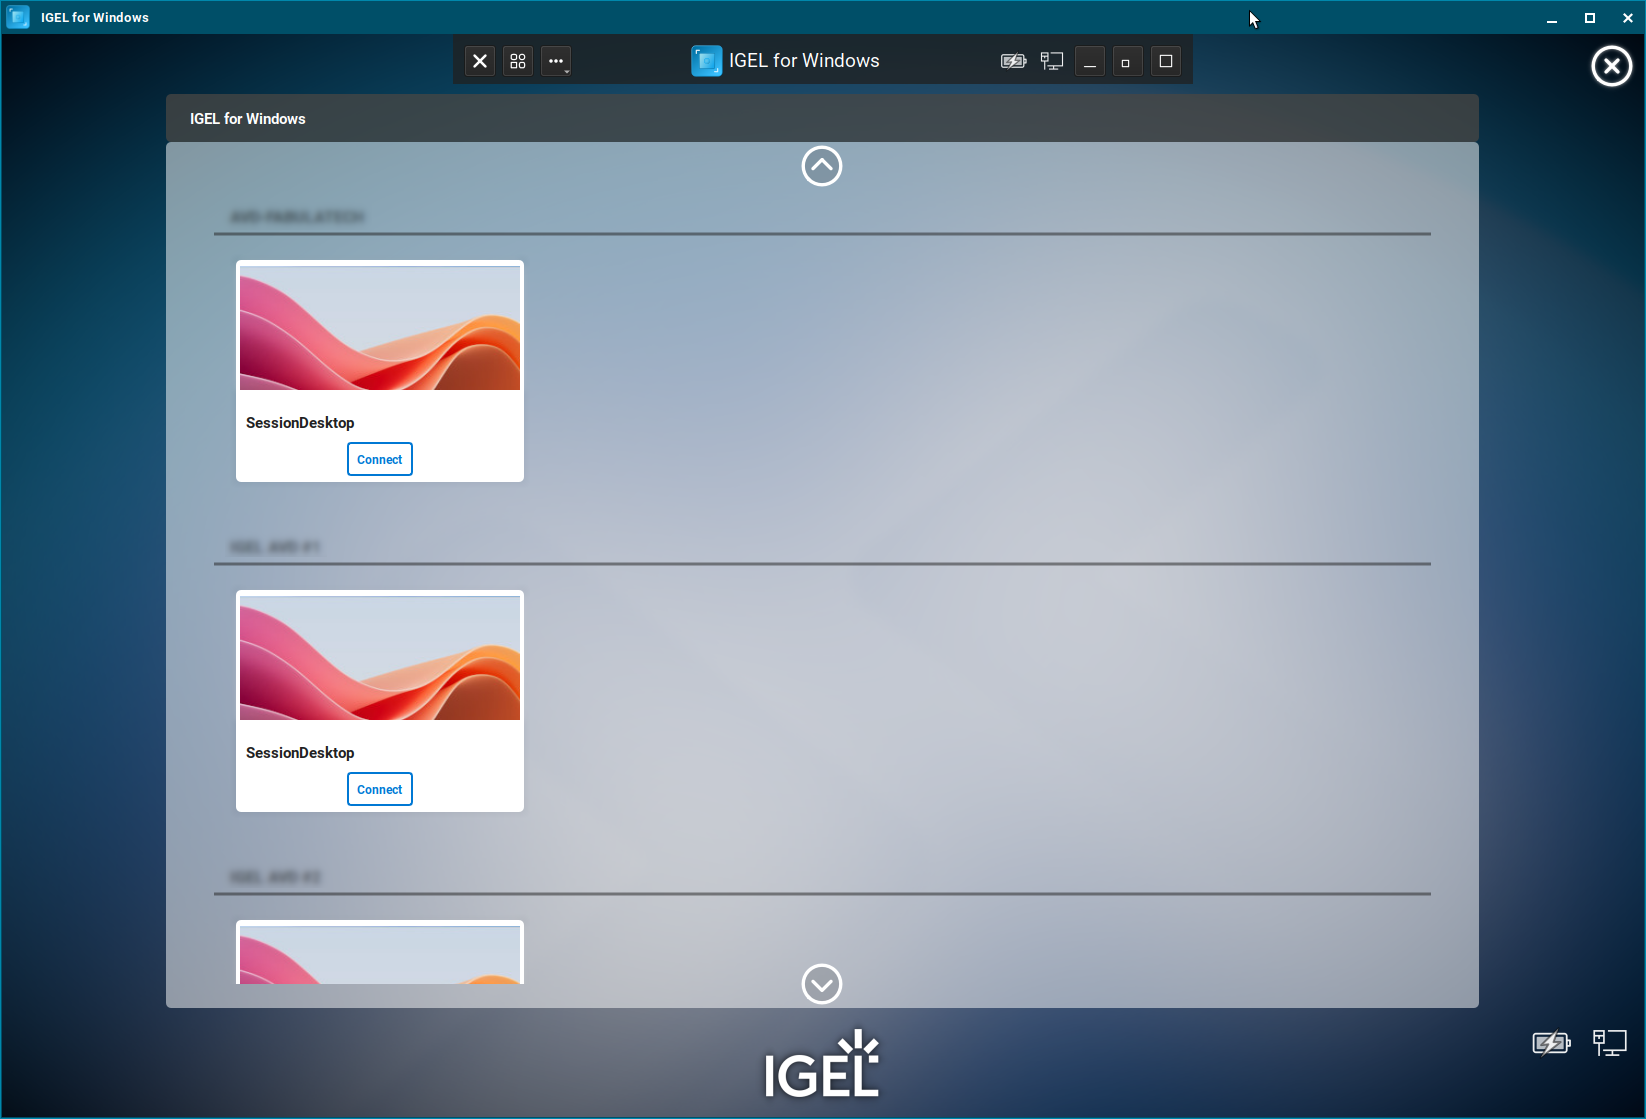
After the app installation is complete, you can start the IGEL for Windows session: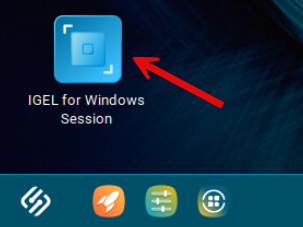
Configuring the Logon
-
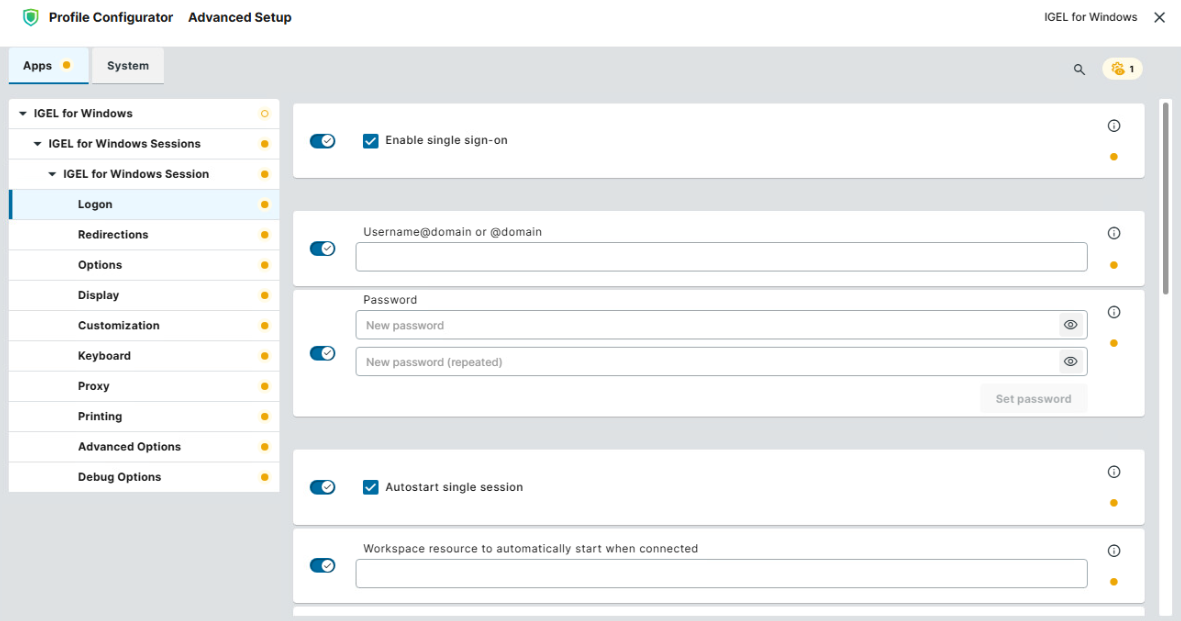
In the profile configurator, go to Apps > IGEL for Windows > IGEL for Windows Sessions > [session name] > Logon.
-
Edit the settings according to your needs. The parameters are described below.
Enable single sign-on
- The user is automatically authenticated via the configured SSO and does not have to re-enter the credentials to log in to the remote Windows session. (Default)
For how to configure SSO, see How to Configure Single Sign-On (SSO) on IGEL OS 12 and Single Sign-On in IGEL OS 12. - Authentication via SSO is disabled.
Username@domain or @domain
The user name or a preset domain name that will be used for the automatic connection to the remote Windows session. The string after "@" is taken as a preset domain name.
Example:
avd@your.domain.com: To log in, the user does not need to enter the username and the domain name.
@your.domain.com: To log in, the user only needs to enter the username, e.g. avd. The preset domain – your.domain.com – will automatically be appended.
Overwriting the Preset Domain Name
Use the setting Allow preset domain overwrite to specify whether the user should be able to overwrite the preset domain, e.g. with username@other-domain.com.
If you define preset domain @your.domain.com under Username@domain or @domain, the setting Show local login dialogue must be set to “Auto” or “Always”.
Password
This password is used for the automatic connection to the remote Windows session. Click Set password to save the password.
Autostart single session
- If there is only one published app or desktop session configured for the user, it will be started automatically upon successful authentication. (Default)
- The picker for resource selection is always displayed.
Workspace resource to automatically start when connected
Name of the specific published app or desktop session that is to be started automatically upon successful authentication.
Autostart session in background
- A published app or desktop session that is started automatically is displayed in preview mode. The user must actively click on it to connect.
- A published app or desktop session that is started automatically is displayed in full-screen mode. (Default)
Resources to download
The following resource types will be shown for the user.
Possible values:
-
Desktop + Apps
-
Desktops
-
Apps
Show local login dialog
Possible values:
-
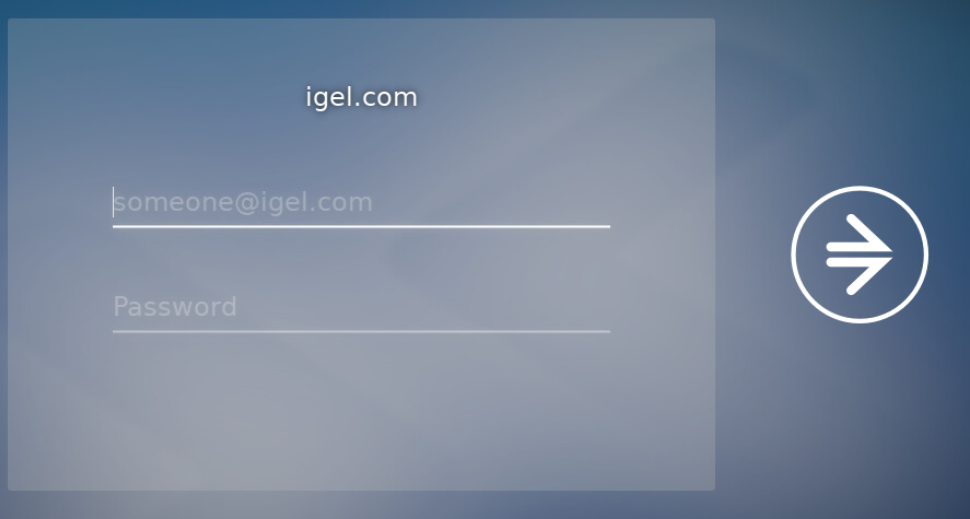
Auto: When a domain under Username@domain or @domain is preset like "@igel.com", the local login dialog will be shown automatically. (Default)
-
Always: Before logging in via Entra ID, the local dialog for the user name and password will always be displayed.
-
Never: The local dialog for the user name and password will never be displayed.
Example:
Hide the Microsoft Entra ID login
- Microsoft Entra ID login dialog will not be displayed.
- Microsoft Entra ID login dialog will be displayed. (Default)
Max. time the Microsoft Entra ID login will be hidden in milliseconds!
Specifies the waiting time in milliseconds, until Microsoft Entra ID login dialog is automatically shown to the user. This setting is active if Hide the Microsoft Entra ID login is enabled. (Default: 5000)
Remember previous username
Possible values:
-
Auto: The same as Enabled (Default)
-
Enabled: The previously entered username will be remembered and prefilled by the next login.
-
Disabled: The previously entered username will not be remembered and used for the next login.
Allow preset domain overwrite
- The domain entered by the user is accepted.
- The domain entered by the user is replaced with the preset domain configured under Username@domain or @domain. (Default)
Always prompt for username and password upon session host connection
- The user will be forced to re-enter his username and password each time when connecting to the remote Windows session. Use this setting if the login credentials configured under Username@domain or @domain and Password should not be applied automatically.
- The user will not be forced to re-enter his username and password each time when connecting to the remote Windows session. (Default)
Always prompt for password upon session host connection
- The user will be forced to re-enter his password each time when connecting to the remote Windows session. Use this setting if the password set under Password should not be applied automatically.
On the server side, you can enable the RDP group policy "Always prompt for password upon connection" to achieve the same result.
- The user will not be forced to re-enter his password each time when connecting to the remote Windows session. (Default)
Deny empty passwords
Specifies if empty passwords can be used in the local login dialogue if it is enabled under Show local login dialogue.
- Empty passwords are forbidden. (Default)
- Empty passwords are allowed. Note, however, that empty passwords pose a security risk and should be avoided.
Editing the Redirections
-
In the profile configurator, go to Apps > IGEL for Windows > IGEL for Windows Sessions > [session name] > Redirections.
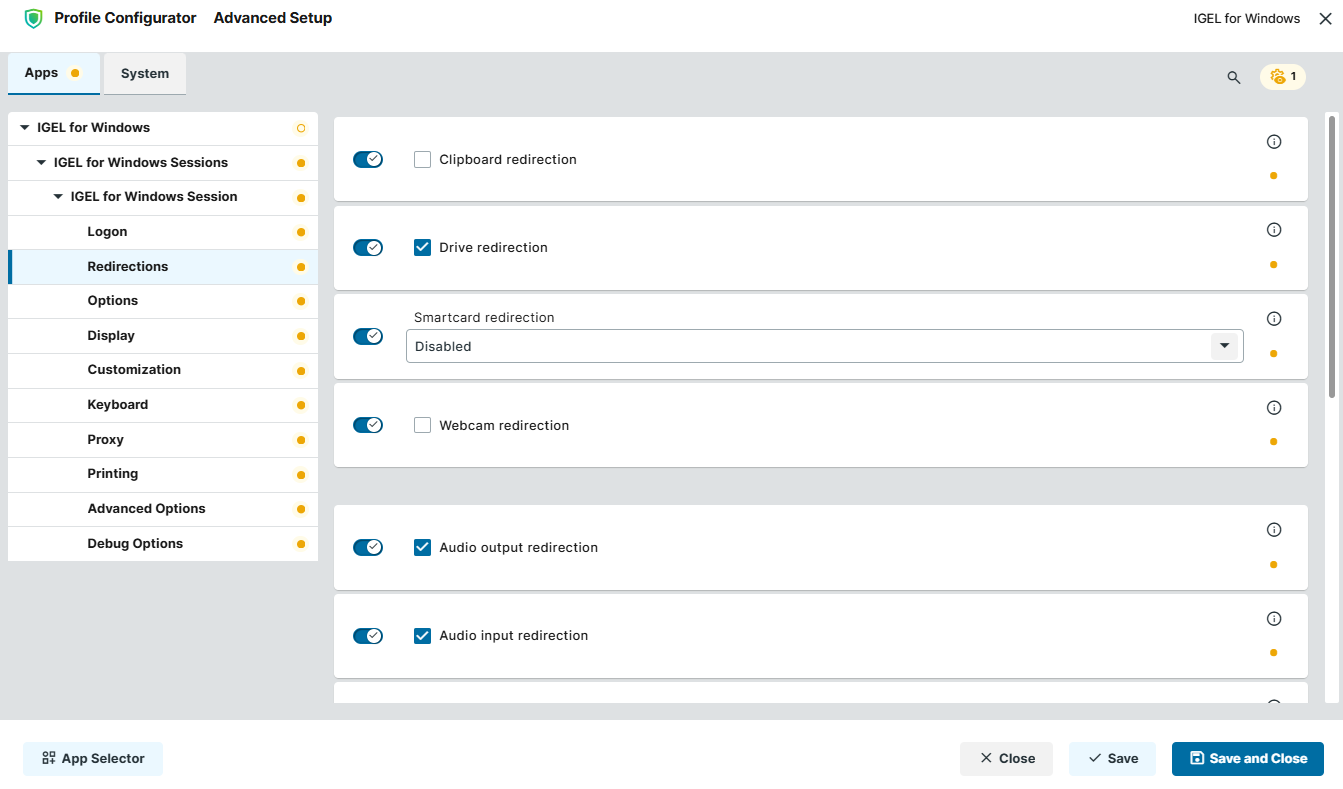
-
Edit the settings according to your needs. The parameters are described in the following.
Clipboard redirection
- Text and images from the clipboard are shared between the IGEL for Windows session and the local client.
- Text and images from the clipboard cannot be shared between the IGEL for Windows session and the local client. (Default)
Drive redirection
- Redirection is bound to the
/mediafolder, so that locally mounted storage devices, including USB sticks, are forwarded to the IGEL for Windows session. (Default)
Smartcard redirection
Possible values:
-
Disabled: Smartcards are not forwarded to the remote Windows session. (Default)
-
Enabled: Smartcards are forwarded from the local device to the remote Windows session. The Microsoft RdClientSDK implementation is used.
-
IGEL: Smartcards are forwarded from the local device to the remote Windows session. A custom IGEL implementation is used. For details on the use of smartcards in IGEL OS, see How to Use Smart Card and Smart Key Authentication in IGEL OS 12.
Webcam redirection
- Local webcams are forwarded to the IGEL for Windows session.
- Local webcams are not forwarded to the IGEL for Windows session. (Default)
Audio output redirection
- The audio output is redirected between the IGEL for Windows session and the local client. (Default)
Audio input redirection
- The audio input (microphone) is redirected between the local client and the IGEL for Windows session. (Default)
AAC codec
- The AAC (Advanced Audio Coding) codec used for support of audio output redirection is enabled. (Default)
H264 hardware acceleration
- H.264 hardware acceleration is activated and used to offload the decoding / encoding of H.264 video to a specialized hardware component. A compatible GPU on the endpoint device is required. (Default)
- H.264 hardware acceleration is not used. Disabling H.264 hardware acceleration may be considered if your hardware does not support it and/or you experience black screens, battery problems, app crashes or similar.
H264 hardware acceleration level
Possible values:
-
Video content: H.264 hardware acceleration will only be used for the playback of videos.
-
Fullscreen: H.264 hardware acceleration will be used for the complete desktop. (Default)
Serial port redirection
- Devices connected to the serial port(s) of the IGEL OS endpoint will be redirected to the remote session.
- Devices connected to the serial port(s) of the IGEL OS endpoint will not be forwarded to the remote session. (Default)
To add serial port redirection:
-
Enable Serial port redirection.
-
Click + to define the serial port to be redirected.
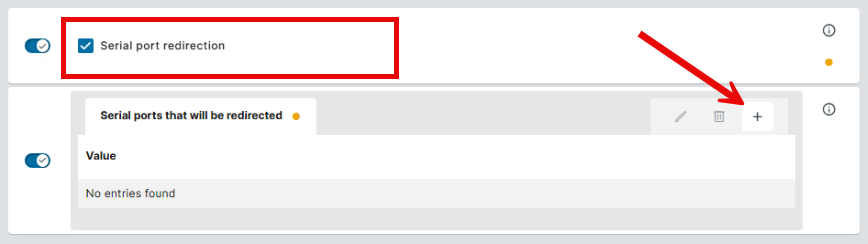
-
Specify the port under Serial ports that will be redirected.
Example: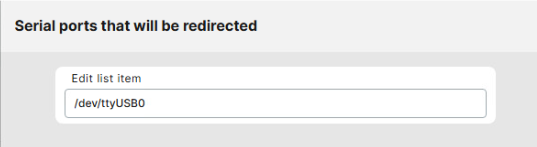
-
Click Confirm to save the settings.
Geolocation redirection
Configures and enables location redirection on the local device. Note that it must also be configured on the server side, see e.g. Configure location redirection over the Remote Desktop Protocol.
Possible values:
-
Off: Geolocation information is not forwarded to the remote session. (Default)
-
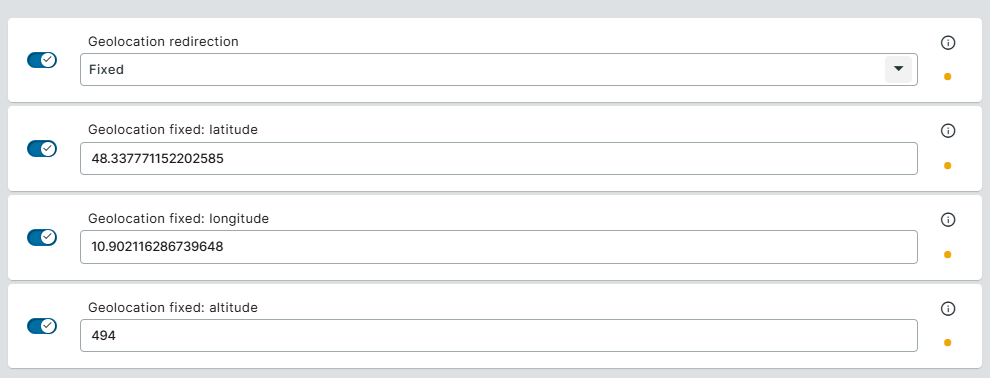
Fixed: Geolocation information is forwarded to the remote session. The location is manually defined as fixed geographic coordinates in the following fields:
-
Geolocation fixed: latitude: Fixed latitude value for the geolocation
-
Geolocation fixed: longitude: Fixed longitude value for the geolocation
-
Geolocation fixed: altitude: Fixed altitude value for the geolocation
-
-
Auto (Command): Geolocation information is forwarded to the remote session. To dynamically detect the current location, the custom command must be defined under Geolocation auto: command.
-
Geolocation auto: command: Shell command to be executed in order to dynamically detect the geolocation. The command needs to look up your public IP address.
If you use the commandcurl --max-time 10 -s https://ipinfo.io, it is not necessary to define other settings.
Note thathttps://ipinfo.iois a commercial service and requires a valid license. It is only an example service here.
Example: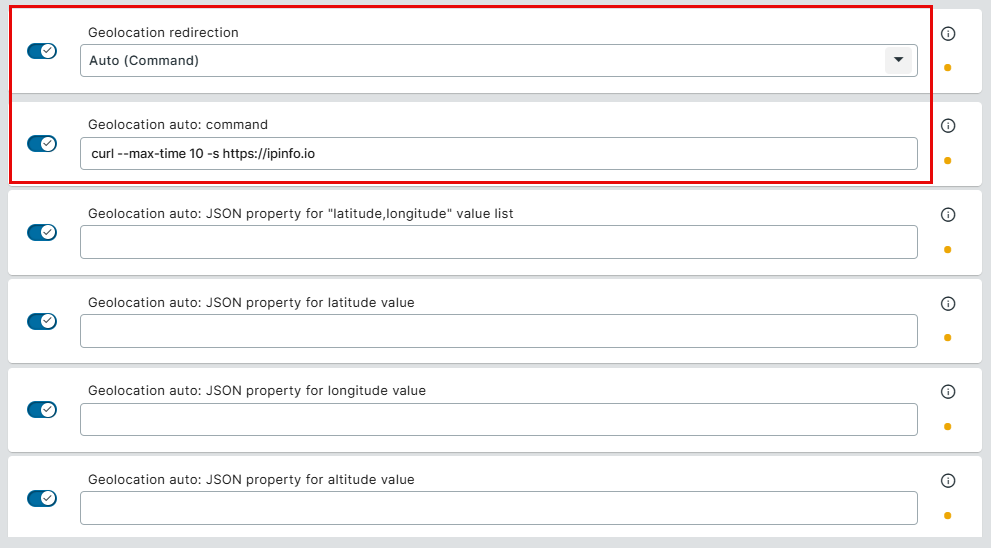
If you use your own command, note that the command must return a valid JSON response that contains the JSON property specified by the related setting below: -
Geolocation auto: JSON property for "latitude,longitude" value list: Name of the JSON property that contains the "latitude,longitude" value list
Example:loc
if the JSON file contains"loc" : "48.337771152202585,10.902116286739648" -
Geolocation auto: JSON property for latitude value: Name of the JSON property that contains the "latitude" value
Example:lat
if the JSON file contains"lat" : "48.337771152202585" -
Geolocation auto: JSON property for longitude value: Name of the JSON property that contains the "longitude" value
Example:long
if the JSON file contains"long" : "10.902116286739648" -
Geolocation auto: JSON property for altitude value: Name of the JSON property that contains the "altitude" value
Example:alt
if the JSON file contains"alt" : "494"
-
For further information on geolocation redirection, see the blog IGEL for Windows app – for Windows 365 and AVD tech preview- New Feature – Geo Location Redirection – From now on your online ordered Pizzas will not end up at the Microsoft Azure Datacenters!
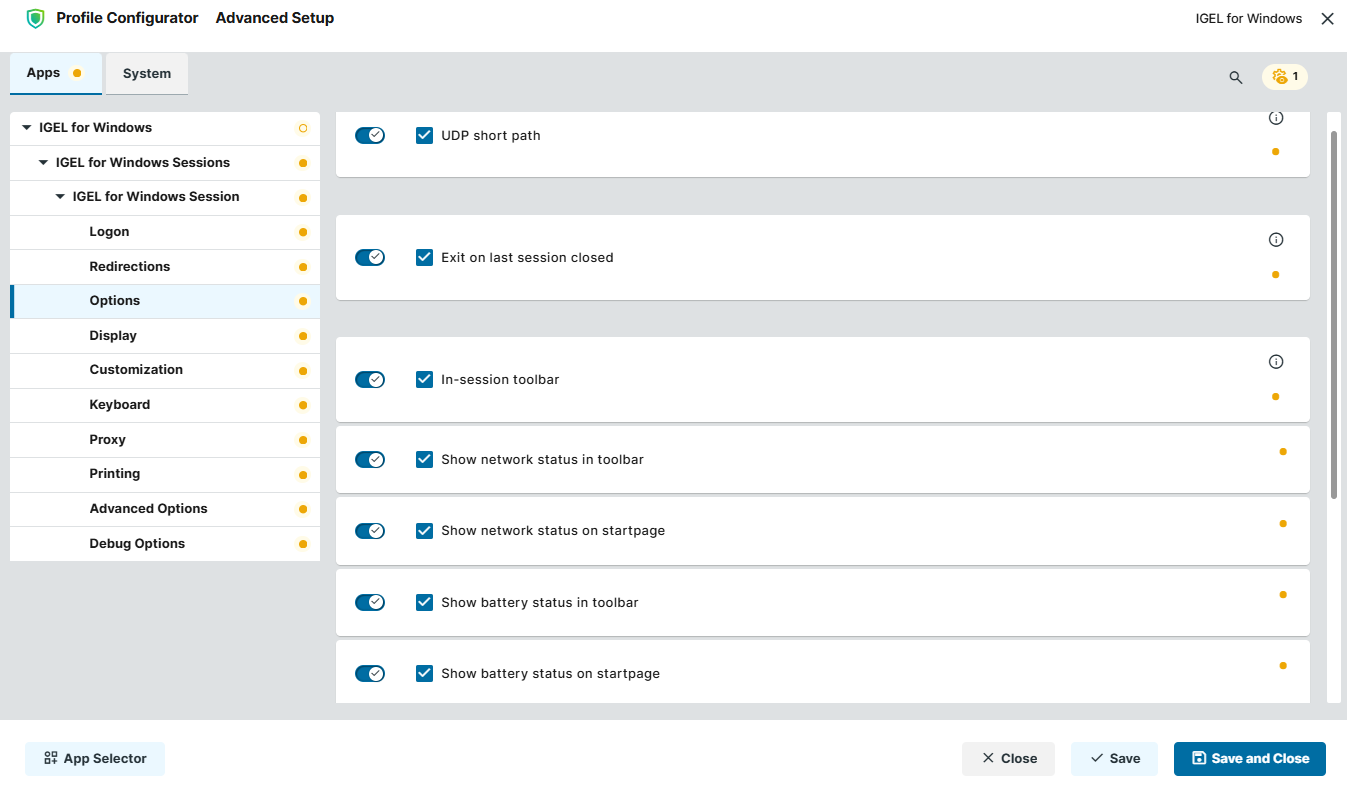
Editing the Options
-
In the profile configurator, go to Apps > IGEL for Windows > IGEL for Windows Sessions > [session name] > Options.
-
Edit the settings according to your needs. The parameters are described below.
UDP short path
- RDP short path is activated. A direct UDP-based connection to the session host will be established. (Default)
Exit on last session closed
- When the last session window is closed, the entire IGEL for Windows client automatically closes. (Default)
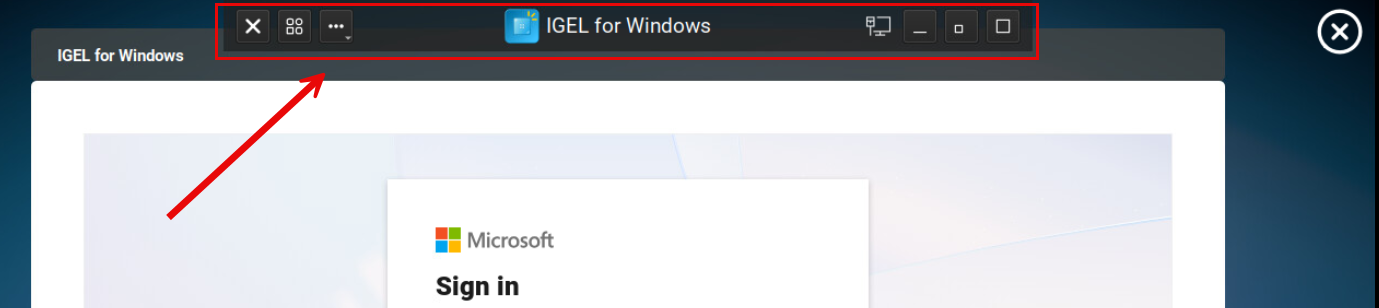
In-session toolbar
Allows you to minimize / maximize the session window, open Virtual Channel Statistics, view network and battery status if enabled, close the session.
- The in-session toolbar is activated and will be shown in the IGEL for Windows session as soon as you move the cursor to the top edge of the screen. (Default)
Show network status in toolbar
- The current network status of the IGEL OS device is displayed on the in-session toolbar. (Default)
Show network status on startpage
- The current network status of the IGEL OS device is displayed on the login window and in the resource picker. (Default)
Show battery status in toolbar
- The current status of the battery of the IGEL OS device is displayed on the in-session toolbar. (Default)
Show battery status on startpage
- The current status of the battery of the IGEL OS device is displayed on the login window and in the resource picker. (Default)
Custom session name
- The client name will not be “IGEL for Windows”, but will reflect the session name specified under Apps > IGEL for Windows > IGEL for Windows Sessions > [session name] > Session name.
- The client name will be “IGEL for Windows”. (Default)
Disconnect notification timeout
Time in seconds the notification window informing about the disconnection to the remote session is displayed. (Default: 5)
Configuring the Display
-
In the profile configurator, go to Apps > IGEL for Windows > IGEL for Windows Sessions > [session name] > Display.
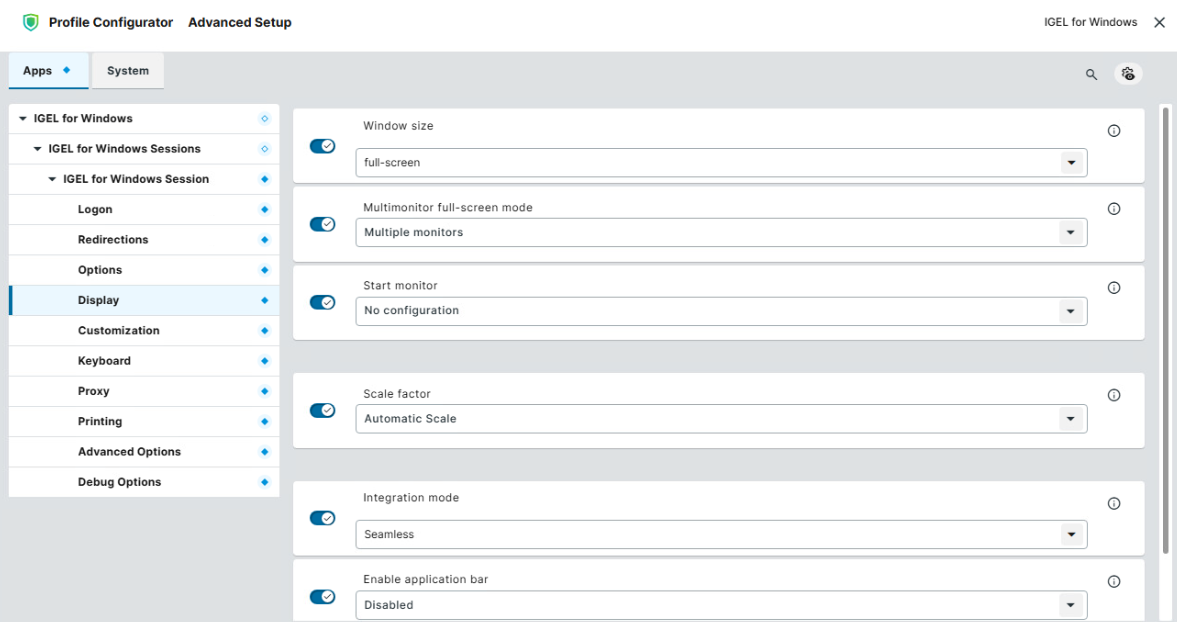
-
Edit the settings according to your needs. The parameters are described below.
Window size
Specifies the width and height of the window.
Possible options:
-
Full-screen: The session is shown on the full screen. The device's taskbar is not visible. (Default)
-
Work area: The session is shown on the full screen, minus the area needed by the device's taskbar.
-
[Numeric details]: The session is shown in the selected resolution or on the selected percentage of the screen area.
Multimonitor full-screen mode
This setting is relevant if more than one monitor is connected to the terminal.
Possible options:
-
Single monitor: Restricts the full-screen session to one monitor.
-
Multiple monitors: Displays the full-screen session on multiple monitors. (Default)
-
Expand to all monitors: Expands the full-screen session across all monitors.
Start monitor
Specifies the monitor on which the session is displayed.
Possible options:
-
No configuration: The monitor is selected according to the current position of the mouse pointer. (Default)
-
1st monitor ... 8th monitor: The selected monitor is the start monitor.
Scale factor
Specifies the desktop scaling in percent.
Possible values:
-
Automatic scale: The resolution set under User Interface > Display > Options > Monitor DPI is used for the session. (Default)
-
Numeric details: The display is magnified by the factor given here.
Integration mode
Possible values:
-
Immersive: Remote apps are displayed with one container window.
-
Seamless: Remote apps are displayed with individual windows per app on the desktop. (Default)
Enable application bar
The application bar displays active sessions and provides a quick way to switch between them.
Possible values:
-
Auto: When remote apps are started, the application bar is activated automatically. (Default)
-
Enabled: The application bar is always activated.
-
Disabled: The application bar is never shown.
Setting the Customization
-
In the profile configurator, go to Apps > IGEL for Windows > IGEL for Windows Sessions > [session name] > Customization.
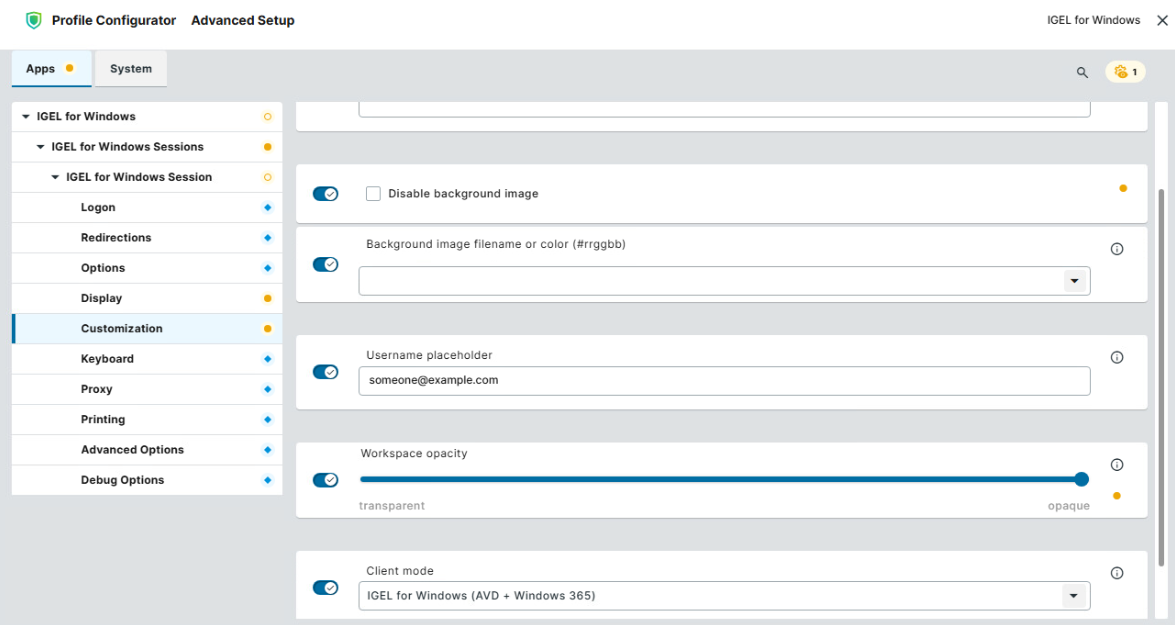
-
Edit the settings according to your needs. The parameters are described below.
Disable company logo
- Custom company logo cannot be specified. IGEL company logo will not be displayed in the IGEL for Windows session.
- Company logo can be defined for the IGEL for Windows session under Logo image filename. If not defined, IGEL company logo will be displayed at the bottom of the IGEL for Windows session window. (Default)
Logo image filename
Name of the company logo file. The download source must be configured for the base system under User Interface > Desktop > Background (1st Monitor) > Custom Wallpaper Server, see Custom Wallpaper Server.
Disable background image
- Custom background image cannot be specified.
- Custom background image or custom color can be defined for the IGEL for Windows session under Background image filename or color (#rrggbb). (Default)
Background image filename or color (#rrggbb)
Possible values:
-
From Desktop Background: Background defined under User Interface > Desktop > Background (1st Monitor) > Wallpaper (1st monitor) will be applied to the IGEL for Windows session.
-
[Color]: Type the color code in the format
#rrggbb. -
[Background image filename]: Name of the background image file. The download source must be configured for the base system under User Interface > Desktop > Background (1st Monitor) > Custom Wallpaper Server, see Custom Wallpaper Server.
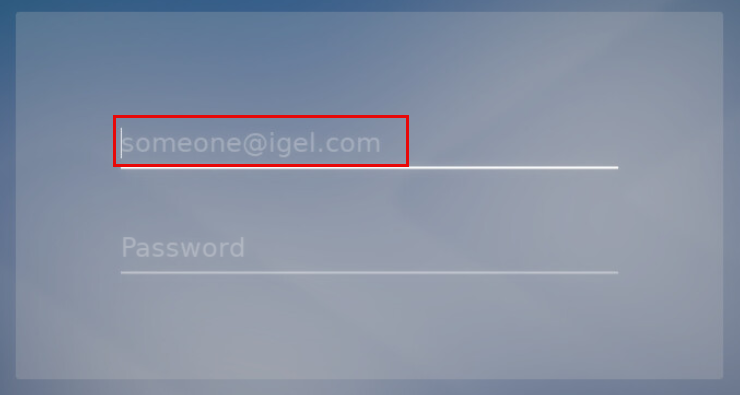
Username placeholder
Text shown for the username field in the local login dialog. It should provide hints on what to input, e.g. username@example.com, name@company.com (Default: someone@example.com)
Example:
Workspace opacity
Defines the opacity of the workspace during the login and in the resource picker in the range between 0 (fully transparent) and 100 (fully opaque). (Default: 100)
Example:
Workspace opacity set to “0” (fully transparent):
Workspace opacity set to “50”:
Workspace opacity set to “100” (fully opaque):
Client mode
Defines user interface layout for the IGEL for Windows session.
Possible values:
-
IGEL for Windows (AVD + Windows 365): Fully supports AVD and Windows 365 sessions. (Default)
-
IGEL Azure Virtual Desktop (AVD): Legacy user interface mode that uses the previous layout of IGEL AVD app
-
IGEL Windows 365 (Cloud PC): Legacy user interface mode that uses the previous layout of IGEL Windows 365 app
Configuring Keyboard and Mouse
-
In the profile configurator, go to Apps > IGEL for Windows > IGEL for Windows Sessions > [session name] > Keyboard & Mouse.
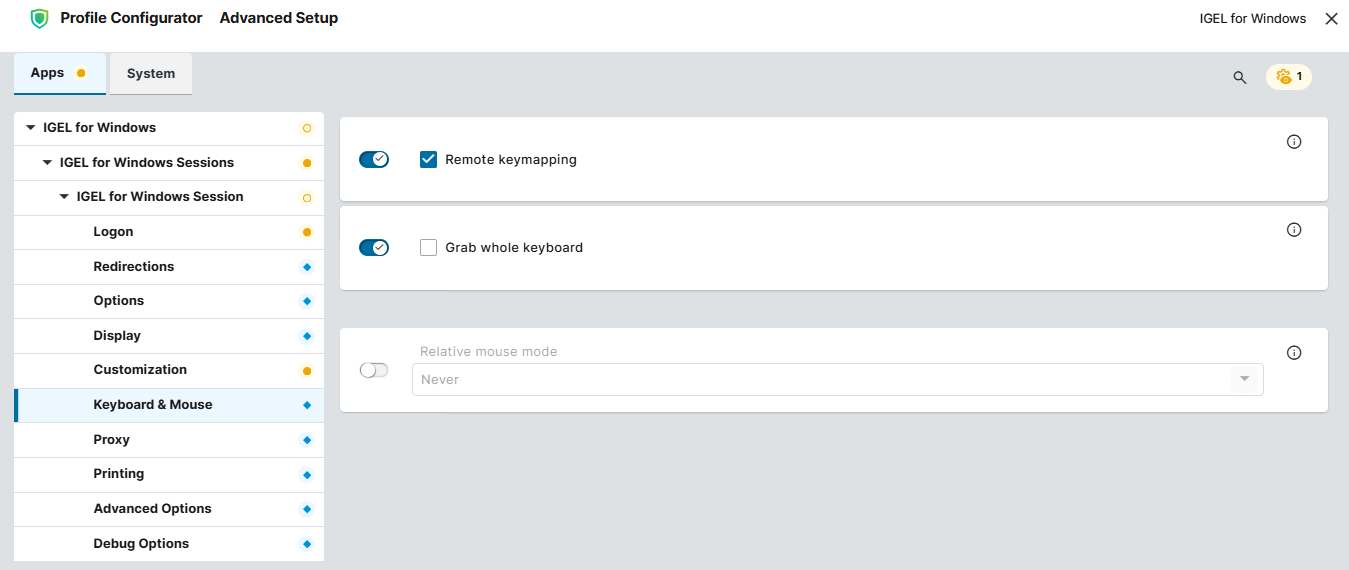
-
Edit the settings according to your needs. The parameters are described below.
Remote keymapping
- Sends keyboard events as Windows scan codes. This ensures that the remote session fully respects the client’s keyboard layout and mapping. It can be required for certain input methods to function correctly. (Default)
- Sends keyboard events as Unicode characters.
Grab whole keyboard
- All local hotkeys will be forwarded to the remote Windows session, and therefore they will not function locally. For information on hotkeys in IGEL OS, see e.g. Hotkeys.
- Local hotkeys will not be forwarded to the session. (Default)
Relative mouse mode
Allows the mouse to move beyond the borders of the screen. Relative mouse mode is typically used in 3D applications and video games. For further information, see the blog IGEL for Windows app – introducing Relative mouse support!
Possible values:
-
Never: Relative mouse mode is disabled. (Default)
-
Auto: The relative mouse mode is automatically activated when an application hides the mouse pointer. Note, however, there are applications in Windows that do not support relative mouse although they hide the mouse pointer. If you need to toggle relative mouse, press
Ctrl+Alt+M. -
Always: Relative mouse mode is always active. If you need to toggle relative mouse, press
Ctrl+Alt+M.
Configuring a Proxy
-
In the profile configurator, go to Apps > IGEL for Windows > IGEL for Windows Sessions > [session name] > Proxy.
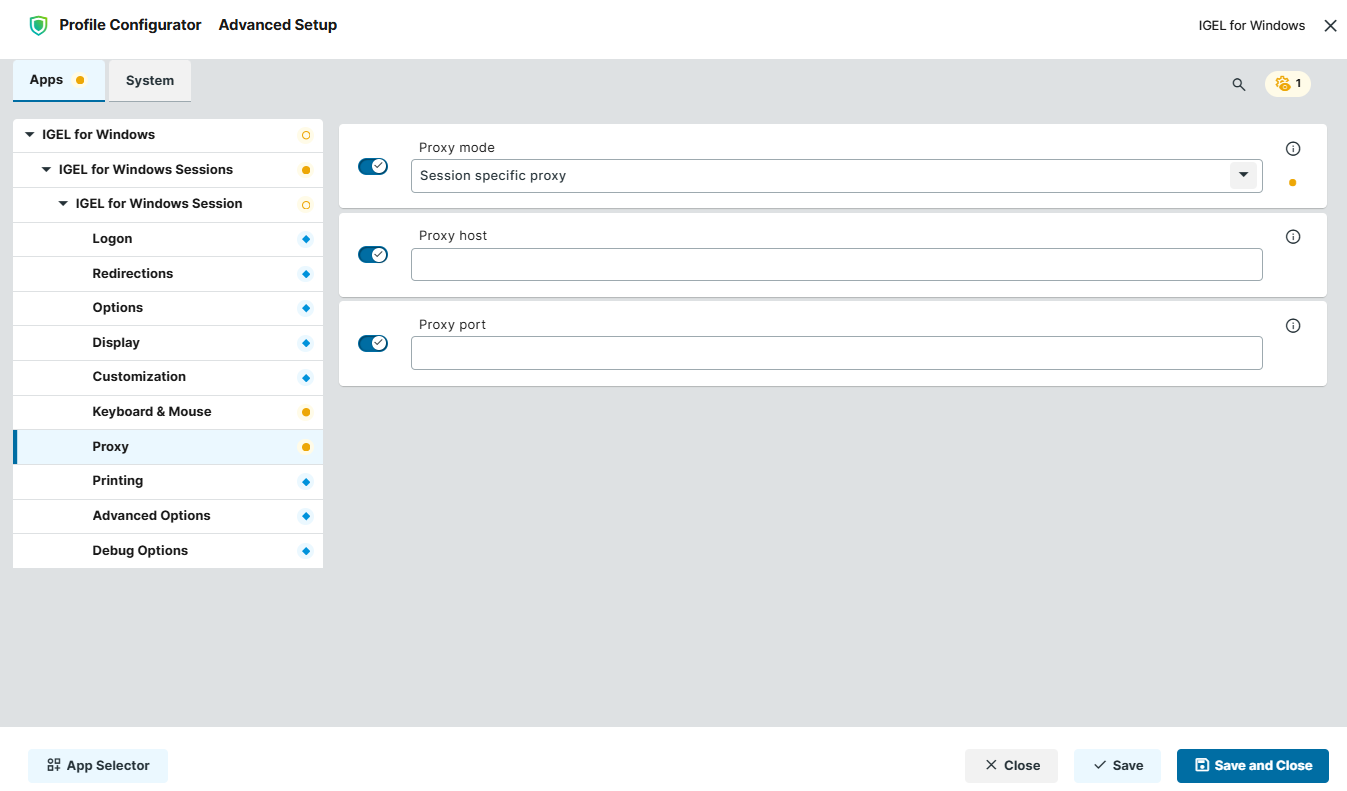
-
Edit the settings according to your needs. The parameters are described below.
Proxy Configuration via a PAC File
If you want to use a PAC file, set Proxy mode to "Global proxy setting" and specify the URL of the PAC file under Network > Proxy > System-wide proxy configuration > Automatic proxy configuration.
Proxy mode
Specifies if a proxy should be used.
Possible options:
-
Off: The use of a proxy is disabled. A direct connection to the Internet is used. (Default)
-
Global proxy setting: The proxy configured under Network > Proxy is used.
-
Session specific proxy: The proxy configuration specified under Proxy host and Proxy port is used.
The following fields are active if Proxy mode is set to Session specific proxy:
Proxy host
Hostname or IP address of the proxy server
Proxy port
Port on which the proxy service is available
Configuring Printing
-
In the profile configurator, go to Apps > IGEL for Windows > IGEL for Windows Sessions > [session name] > Printing.
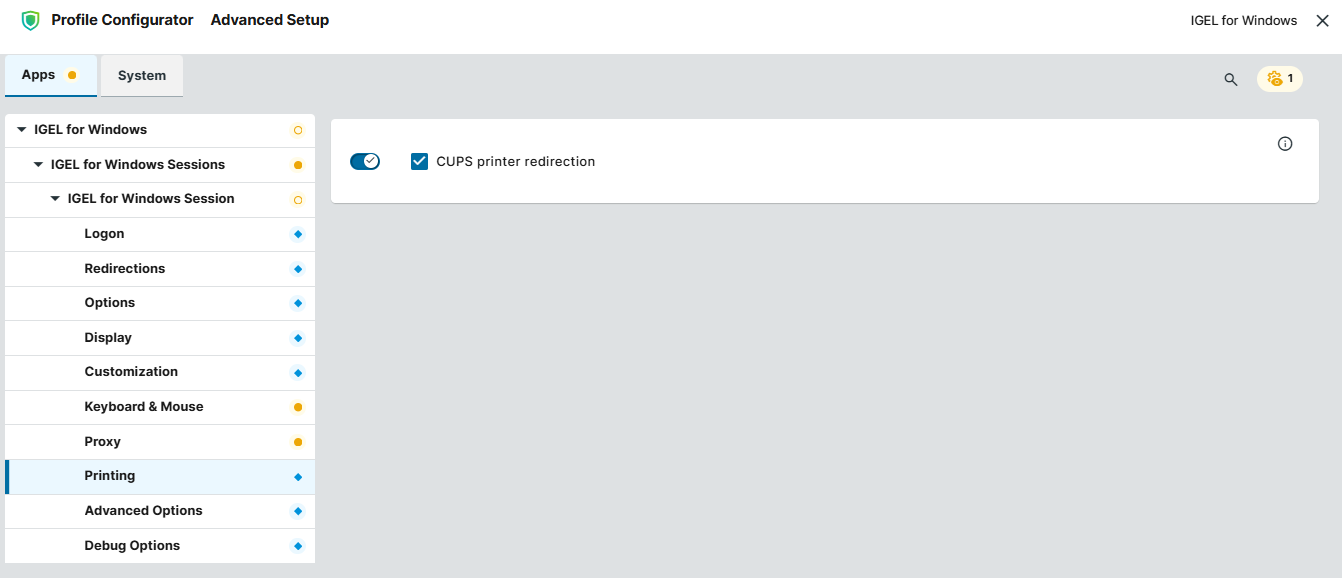
-
Edit the settings according to your needs. The parameters are described below.
CUPS printer redirection
- CUPS printers are redirected to the remote session from the local endpoint. CUPS printers are configured under CUPS Printing > Printer and must be mapped into the session under Use printer in RDP-based sessions. (Default)
Set the printer driver name under CUPS Printing > Printer > Driver to use in RDP-based sessions:
-
The default Windows driver name is "Microsoft PS Class Driver"; it is usually installed by default and works generically.
-
In the case of a custom printer driver, make sure the driver is installed on the server side and enter the exact name of the driver.
Configuring Advanced Options
-
In the profile configurator, go to Apps > IGEL for Windows > IGEL for Windows Sessions > [session name] > Advanced Options.
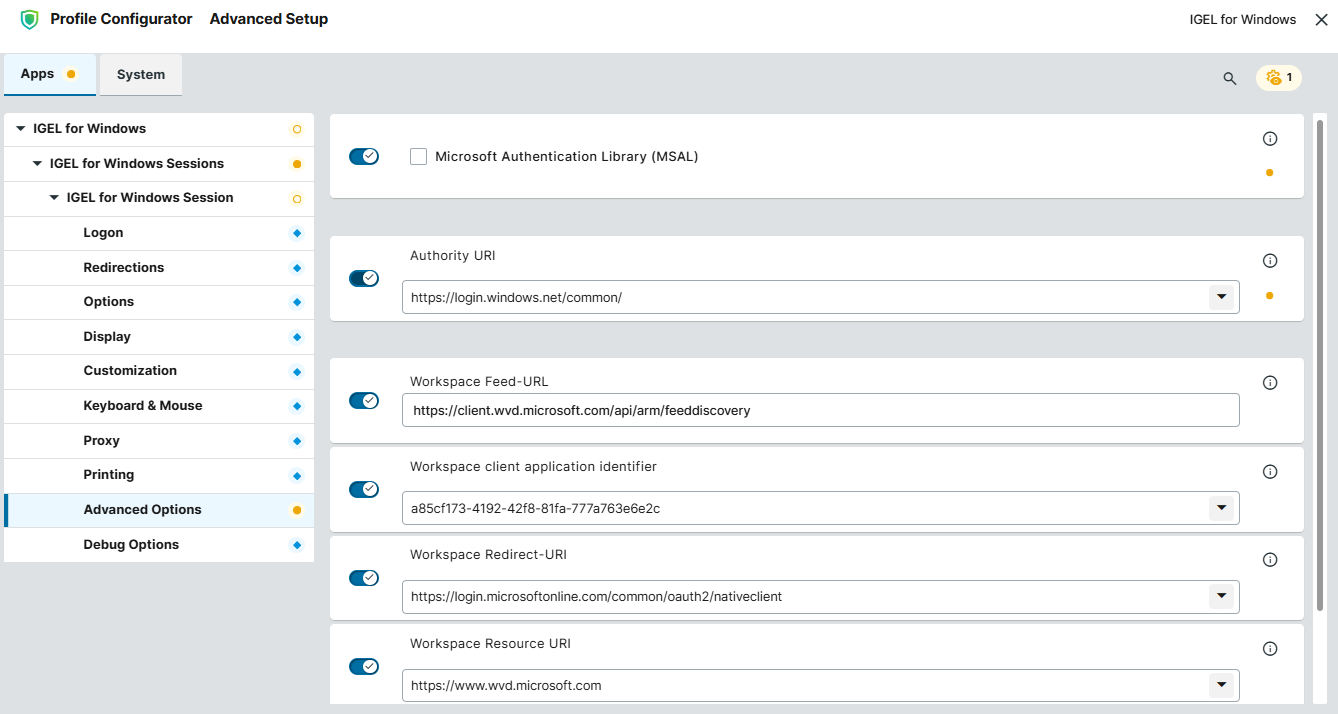
-
Edit the settings according to your needs. The parameters are described below.
Microsoft Authentication Library (MSAL)
- MSAL will be used for Microsoft Entra ID login. Currently, MSAL is used mainly for smartcard-based authentication, see e.g. How to Use Smart Card and Smart Key Authentication in IGEL OS 12.
If Microsoft Authentication Library (MSAL) is enabled, only predifined username is supported. Predefined passwords are not supported by MSAL.
- MSAL will not be used for Microsoft Entra ID login. (Default)
Authority URI
Authority URI (Uniform Resource Identifier) used for user login. It refers to the identity provider used for authentication. Usually, you need to modify it only if you have special Azure deployments like Azure GOV.
Possible values:
-
Auto: If Workspace Feed-URL is customized, Authority URI will be discovered automatically.
-
https://login.windows.net/common/ (Default)
-
[custom value]: Depends on your Azure environment.
Workspace Feed-URL
Feed URL related to this workspace. This URL is used to sign in and access the assigned desktops and applications. Usually, you need to modify it only if you have special Azure deployments like Azure GOV. (Default: https://client.wvd.microsoft.com/api/arm/feeddiscovery)
Workspace client application identifier
Client application identifier related to this workspace
Possible values:
-
Auto: If Workspace Feed-URL is customized, workspace client application identifier will be discovered automatically.
-
a85cf173-4192-42f8-81fa-777a763e6e2c (Default)
-
[custom value]: Depends on your Azure environment.
Workspace Redirect-URI
Redirection URI related to this workspace. This is the address where the Microsoft Entra authentication server sends the user after successful authentication.
Possible values:
-
Auto: If Workspace Feed-URL is customized, Workspace Redirect-URI will be discovered automatically.
-
https://login.microsoftonline.com/common/oauth2/nativeclient (Default)
-
[custom value]: Depends on your Azure environment.
Workspace Resource URI
Resource URI related to this workspace.
Possible values:
-
Auto: If Workspace Feed-URL is customized, Workspace Resource URI will be discovered automatically.
-
https://www.wvd.microsoft.com (Default)
-
[custom value]: Depends on your Azure environment.
Configuring Debug Options
-
In the profile configurator, go to Apps > IGEL for Windows > IGEL for Windows Sessions > [session name] > Debug Options.
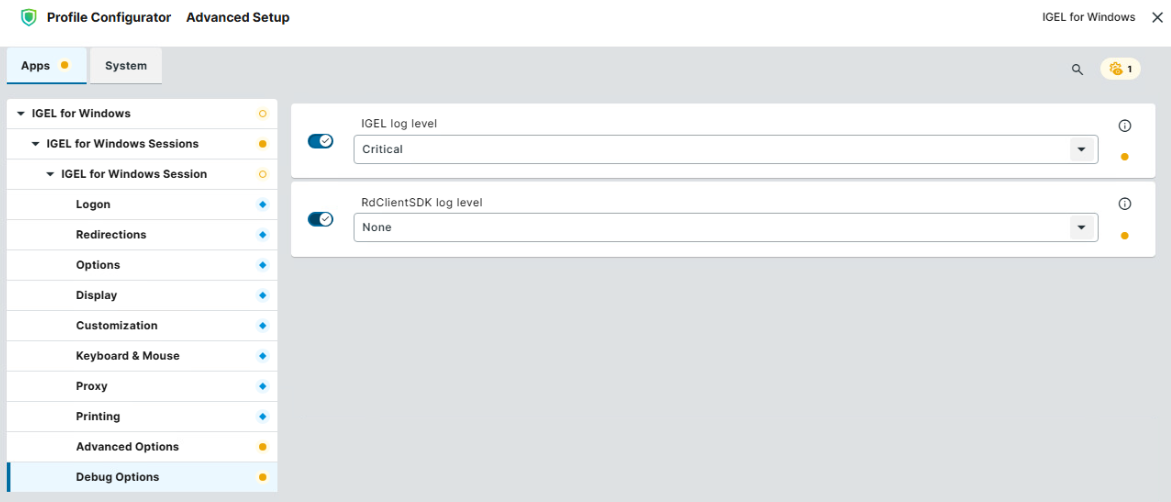
-
Edit the settings according to your needs. The parameters are described below.
IGEL log level
Possible values:
-
Critical: Logs severe system failures that require immediate attention. (Default)
-
Error: Logs failures where something did not work as expected but the system may continue running.
-
Warning: Logs potential issues or unusual situations that are not errors yet but could cause problems.
-
Info: Logs general operational messages about normal system behavior.
-
Debug: Logs detailed information useful for troubleshooting and development.
-
Trace: Logs very fine-grained, step-by-step details of program execution for deep debugging.
RdClientSDK log level
Possible values:
-
None: No logging is recorded, or only minimal essential events are captured. (Default)
-
Low: Logs only basic, high-level information such as major events and errors.
-
Medium: Includes more detailed operational data useful for general troubleshooting.
-
High: Captures extensive, verbose details (including debug-level data) for in-depth diagnostics.