
In IGEL OS 12, you can use the Mobile Device Access app to access files on supported Android, iOS, and iPadOS devices connected by USB. The app integrates mobile-device storage with the Thunar file manager and can make the storage available in supported virtual desktop infrastructure (VDI) sessions. In this article, you can find how to configure the app and how to use it to access mobile devices from the endpoint.
Requirements
-
The Mobile Device Support app is imported to your Universal Management Suite (UMS). For details on app import, see How to Import IGEL OS Apps from the IGEL App Portal.
-
IGEL OS 12.10.0 or higher
-
The USB cable used with the mobile device supports data transfer. A charging-only cable cannot provide file access.
-
The mobile device is unlocked and the user authorizes access on the mobile device.
-
If USB Access Control is enabled, its rules permit the mobile device.
-
For access in a virtual session, client drive mapping is enabled for the applicable session.
Configure the App
Assign the Mobile Device Support App to Devices
-
Assign the imported app to the required device or device directory.
-
Apply the changes to the device.
-
Verify that the app and its dependencies are installed on the device.
No Profile Configuration Required
The Mobile Device Support app does not have any configurable parameters or app profile settings. Assigning and deploying the app installs the required framework components, including GVFS backends, udisks2, GVFS volume daemons, and the Thunar file manager integration.
Depending on your environment, you might need to configure settings that control USB access, file permissions, and session redirection in an IGEL OS Base System profile. These are explained below.
Configure USB Access
By default, USB Access Control is inactive. You only need to configure it only when your security policy restricts USB devices.
USB Access Control governs access to the device at the operating-system level. It is separate from USB redirection and client drive mapping in remote sessions. For details, see USB Access Control in IGEL OS 12.
If USB Access Control is enabled and Default rule is set to Deny, create an appropriate allow rule for the mobile device:
-
In the profile configurator go to Devices > USB Access Control.
-
Review the default rule and existing class or device rules.
-
If required, add an Allow rule for the mobile device.
-
Set the required permission:
-
Read only
-
Read/Write
-
-
Save and apply the configuration.
Enabling USB Access Control with a default rule of Deny can block devices required by users. Configure USB Access Control only when required by your security policy and test all affected peripherals before deployment.
Configure Mobile Device Redirection
Configure these settings only when files from the mobile device must be available inside a supported virtual session.
-
In the profile configurator, go to Devices > Storage Devices > Storage Hotplug.
-
Enable Enable dynamic client drive mapping.
-
Configure Default permission according to your security requirements:
-
Read only
-
Read/Write
-
-
Save and apply the configuration.
The Enable dynamic client drive mapping setting controls drive creation in supported sessions. It does not determine whether Thunar can access the mobile device locally. For more information, see Storage Hotplug in IGEL OS 12.
To configure the use in the session:
-
In the Citrix Workspace app, Omnissa Horizon Client, or IGEL for Windows configuration, enable the applicable client drive mapping.
-
If the session requires an explicit local path, map:
/media/mobile-devices/
The Mobile Device Support app automatically creates Windows-compatible subdirectory names for connected mobile devices. There is no separate app setting for predictable mount point names.
Configure the Sidebar
The sidebar of the Thunar file manager can be configured using the following registry keys in the Setup:
|
Parameter |
Sidebar Visibility |
Directory to add in the sidebar |
Directory's icon path |
|
Registry |
|
|
|
|
Default Value |
Auto |
empty |
empty |
|
Description |
The default setting only shows the sidebar automatically when a removable device is connected. When no removable device is detected while the sidebar is present, a placeholder is shown: |
The parameter allows configuring a shortcut in the sidebar’s PLACES section. Add the absolute path to the directory. |
The absolute path to a custom icon (.png, .svg, .ico, .jpg) can be added to display the icon as the directory’s icon. |
Access Mobile Devices from the Endpoint
Supported Devices and Access Methods
|
Device |
Access method |
Available content |
|---|---|---|
|
Android phone or tablet |
Media Transfer Protocol (MTP) |
Storage made available after the user enables file transfer |
|
iPhone or iPad |
|
Photos and videos from the camera roll |
|
iPhone or iPad |
Apple File Conduit ( |
App-shared documents made available through iOS or iPadOS file sharing |
|
Supported digital camera |
|
Photos and videos exposed by the camera |
Android devices normally appear as one MTP storage location. An iPhone or iPad can appear as separate entries for camera media and app-shared documents.
The content and available operations can differ according to the device model, mobile operating system, application permissions, and device authorization state.
Access an Android Device
-
Connect the Android device with a data-capable USB cable.
-
Unlock the device.
-
Select File transfer, Transfer files, or the equivalent MTP option on the device.
-
Double-click Mobile Device Support to open Thunar.
-
Under Devices, select the Android device.
-
Browse or transfer the available files.
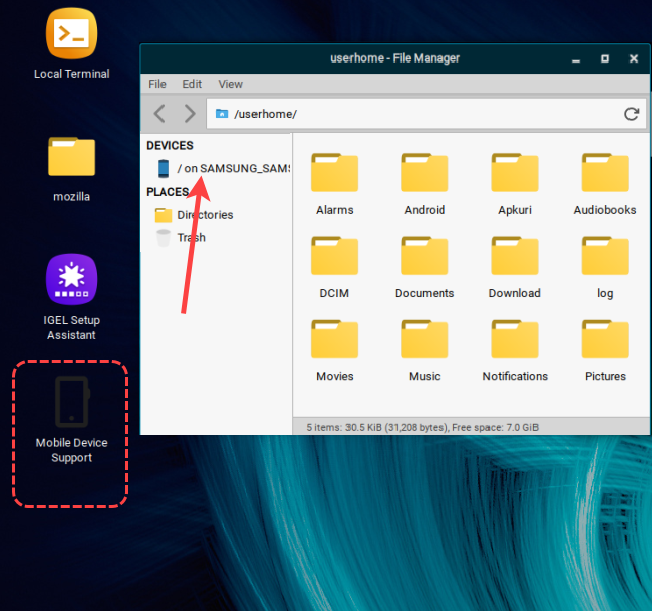
If the Android device remains in charging mode, its storage does not appear in Thunar.
Access an iPhone or iPad
-
Connect the iPhone or iPad with a data-capable USB cable.
-
Unlock the device.
-
Select Trust when prompted.
-
Complete device authentication if requested.
-
Wait for IGEL OS to refresh the available device services.
-
Start Mobile Device Support to open Thunar.
-
Select the entry that provides the required content:
-
-
Use the
gphoto2://entry for camera-roll photos and videos. -
Use the
afc://entry, often displayed as Documents on iPhone, for app-shared documents.
-
The AFC connection does not expose the complete iOS or iPadOS filesystem. It shows only content shared by applications that support Apple file sharing.
Seeing separate gphoto2:// and afc:// entries for the same device is expected.
Troubleshooting
If the device does not appear in Thunar:
-
Confirm that the Mobile Device Support app and its dependencies are installed.
-
Confirm that the USB cable supports data transfer.
-
Unlock the mobile device.
-
On Android, enable file transfer or MTP mode.
-
On an iPhone or iPad, confirm that the device trusts the endpoint.
-
Disconnect and reconnect the mobile device.
-
Close and restart Mobile Device Support.
-
Check the rules under Devices > USB Access Control.
If local access works but session mapping does not:
-
Confirm that Enable dynamic client drive mapping is enabled.
-
Verify that the device has a directory below
/media/mobile-devices/. -
Confirm that client drive mapping is enabled for the remote session.
-
Confirm that the session can access
/media/mobile-devices/. -
Verify that the current Mobile Device Support app and its dependencies are installed.
After a device is disconnected, a remote Windows session might temporarily continue to show its directory because of client-side caching. Access to files in the disconnected directory fails, and the local directory is removed automatically.