
This article describes how you can create an Omnissa Horizon session and configure it on IGEL OS.
This article is based on Omnissa Horizon Client version 26.6.0 BUILD 1.0.
Requirements
-
Omnissa Horizon Client app is imported to your IGEL UMS. For details on app import, see How to Import IGEL OS Apps from the IGEL App Portal.
How to Create a Session
-
In the IGEL UMS, create a profile configuring the app. For details on profile creation, see How to Create and Assign Profiles in the IGEL UMS Web App.
-
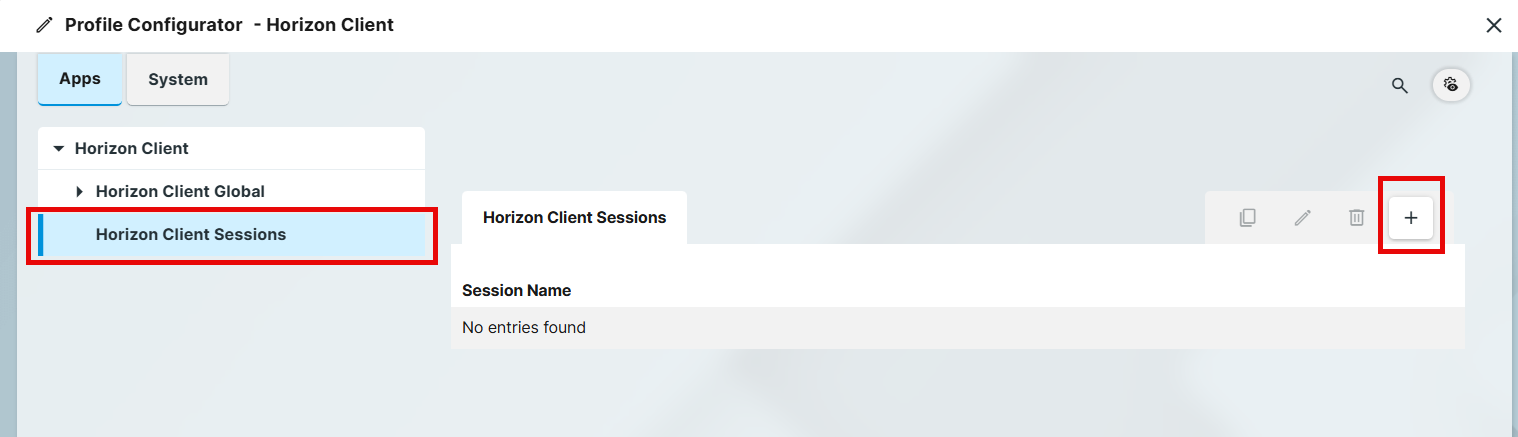
In the Profile Configurator, go to Apps > Horizon Client > Horizon Client Sessions and click + to add a session.
-
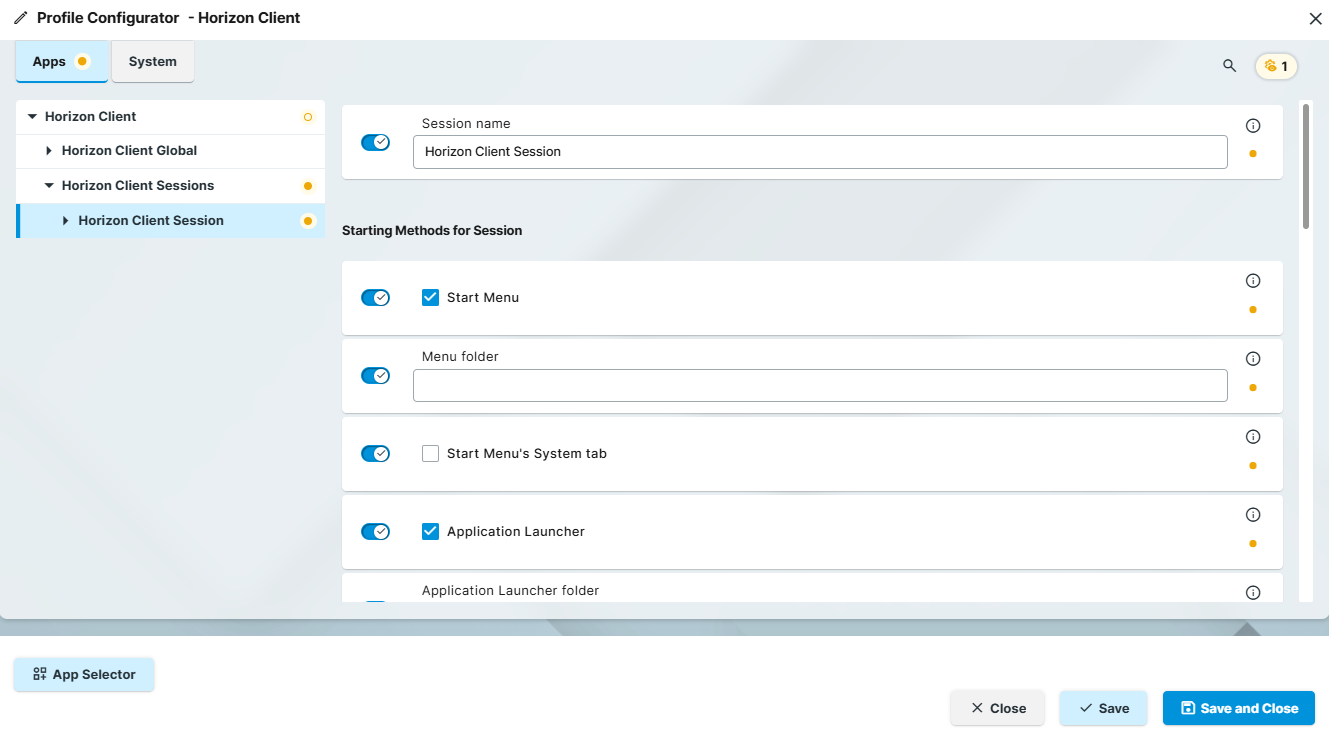
Configure the starting methods for the created session. For details, see Starting Methods for Apps.
-
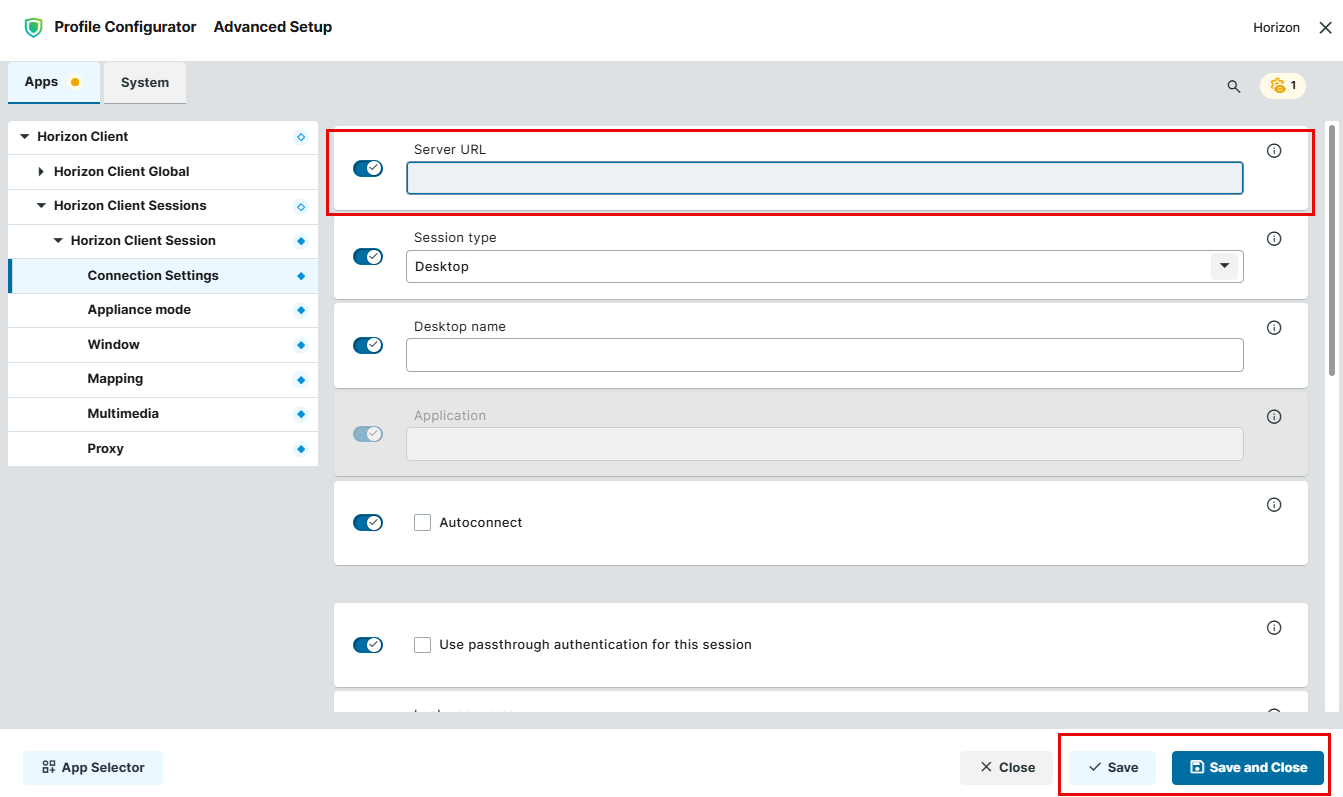
Under Apps > Horizon Client > Horizon Client Sessions > Connection Settings, specify the Server URL.
-
Configure the settings described below according to your needs.
-
Save the profile and assign it to the required devices. For details on profile assignment, see How to Create and Assign Profiles in the IGEL UMS Web App.
Configuring Server Options (Global)
-
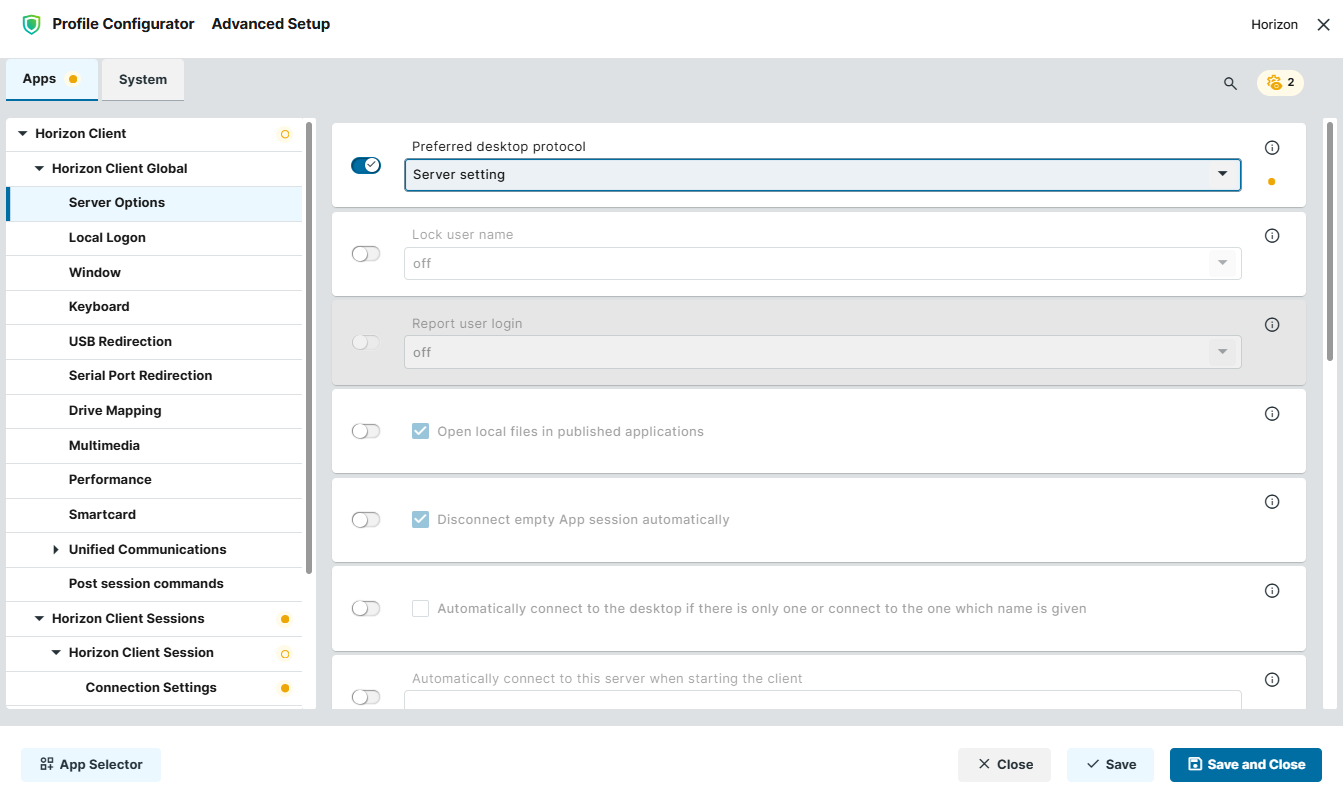
In the Profile Configurator, go to Apps > Horizon Client > Horizon Client Global > Server Options.
-
Edit the settings according to your needs. The parameters are described in the following.
Preferred desktop protocol
The selected option is preferred by the client when negotiating the connection protocol. If the server does not accept the connection protocol preferred by the client, the connection protocol preferred by the server will be used.
Possible values:
-
Server setting: The client does not provide the server details of a preferred connection protocol. The connection protocol preferred by the server is used. (Default)
-
PCoIP: The client tells the server that it prefers PCoIP as the connection protocol.
Known Issue
PCoIP protocol is not included in Horizon Client anymore but you can still choose this protocol under Apps > Horizon Client > Horizon Client Global > Server Options > Preferred desktop protocol. Horizon Client silently ignores this setting and uses Omnissa Blast protocol instead.
-
Omnissa Blast: The client tells the server that it prefers Omnissa Blast as the connection protocol.
Hardware video acceleration can be used for Omnissa Blast. Whether hardware video acceleration can be used or not is dependent on the device's hardware. If no hardware video acceleration is available, rendering will take place via software, without acceleration.
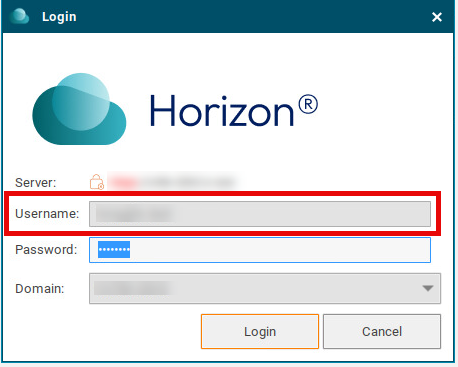
Lock user name
Locks the user name specified under Apps > Horizon Client > Horizon Client Session > [session name] > Connection Settings > User name.
Possible values:
-
on: The user name will be locked and cannot be changed in the login window.
-
off: The user name will not be locked in the login window. (Default)
Report user login
This setting can only be configured if you activate Lock user name.
Possible values:
-
off: Username login and connection timestamps will not be reported to the IGEL UMS. (Default)
-
on: Username login and connection timestamps will be reported to the IGEL UMS and shown in the UMS Console / UMS Web App under Devices > [Name of the directory] > [Name of the device] > User Login History, see View Device Information in the IGEL UMS and Devices - View and Manage Your Endpoint Devices in the IGEL UMS Web App.
Report user login only functions if you activate Lock user name and preset the username in the session, i.e. Apps > Horizon Client > Horizon Client Session > [session name] > Connection Settings > User name. If you want also the domain to be reported to the UMS, you need to use UPN (user@domain) or NetBIOS format (DOMAIN\user) for the User name field.
Note that the username reporting currently does not work in Local Logon mode.
Open local files in published applications
- Users can open local files in Windows-based published applications directly from the local file system. (Default)
- Users cannot open local files in published applications.
Disconnect empty app session automatically
- If the app session becomes empty because the user closes all applications, the session is automatically disconnected. (Default)
- If the app session becomes empty because the user closes all applications, the session remains open.
Automatically connect to the desktop if there is only one or connect to the one which name is given
Automatically connects to the desktop if there is only one entitled desktop on the server or to the desktop specified under Apps > Horizon Client > Horizon Client Session > [session name] > Connection Settings > Desktop name.
- Automatic connection is allowed.
- Automatic connection is not allowed. (Default)
Automatically connect to this server when starting the client
Automatically connects to the specified server when Horizon Client is started.
Client behavior when all sessions have been disconnected
Customizes the client behavior when all sessions are disconnected.
Possible values:
-
Unconfigured: The setting is not configured. (Default)
-
Quit client: The client will quit when all sessions are disconnected.
-
Logoff from server: The client will log off from the server when all sessions are disconnected.
-
Keep current state: The client will remain in its current state when all sessions are disconnected.
Auto-connect to remote desktop or published app in case there's only one of them
If there is only one entitled remote desktop or published application, Horizon Client will automatically connect to that desktop or application after the user authenticates to the server.
- Automatic connection is allowed.
- Automatic connection is not allowed. (Default)
High Color Accuracy Mode
Enables H.264 encoding with high color accuracy in Omnissa Blast sessions. Horizon Client uses high color accuracy only if the agent supports it.
On mobile devices that are running on battery, this feature might reduce battery life and performance.
- High color accuracy is allowed.
- High color accuracy is not allowed. (Default)
Server certificate verification mode
Specifies what will happen if server certificate verification fails.
Possible values:
-
Reject if verification fails
-
Warn if verification fails (default)
-
Allow unverifiable connections
Action to take in case there are running applications from previous sessions
Specifies the start behavior of an application-type session if applications from a previous session are still running. The session type is defined under Apps > Horizon Client > Horizon Client Sessions > [Session Name] > Connection Settings > Session Type.
Possible values:
-
Ask to reconnect to open applications: When the session starts, the user is asked whether they want to re-establish the connection. If the connection is reestablished, the applications running will be available. The applications will have the same status as when the connection was terminated. (Default)
-
Reconnect automatically to open applications: The connection will be re-established automatically. The application running will be available. The application will have the same status as when the connection was terminated.
-
Do not ask to reconnect and do not reconnect: The connection will not be re-established.
Use single view window
- The Horizon Client window will be hidden after a remote desktop or published application opens. (Default)
Kiosk mode
- Horizon client sessions are held in kiosk mode.
- Horizon client sessions are held in normal mode. (Default)
Maximum count of core dump files allowed
Specifies the maximum number of core dump files allowed for Horizon Client processes. (Default: 0)
Configuring the Local Logon (Global)
-
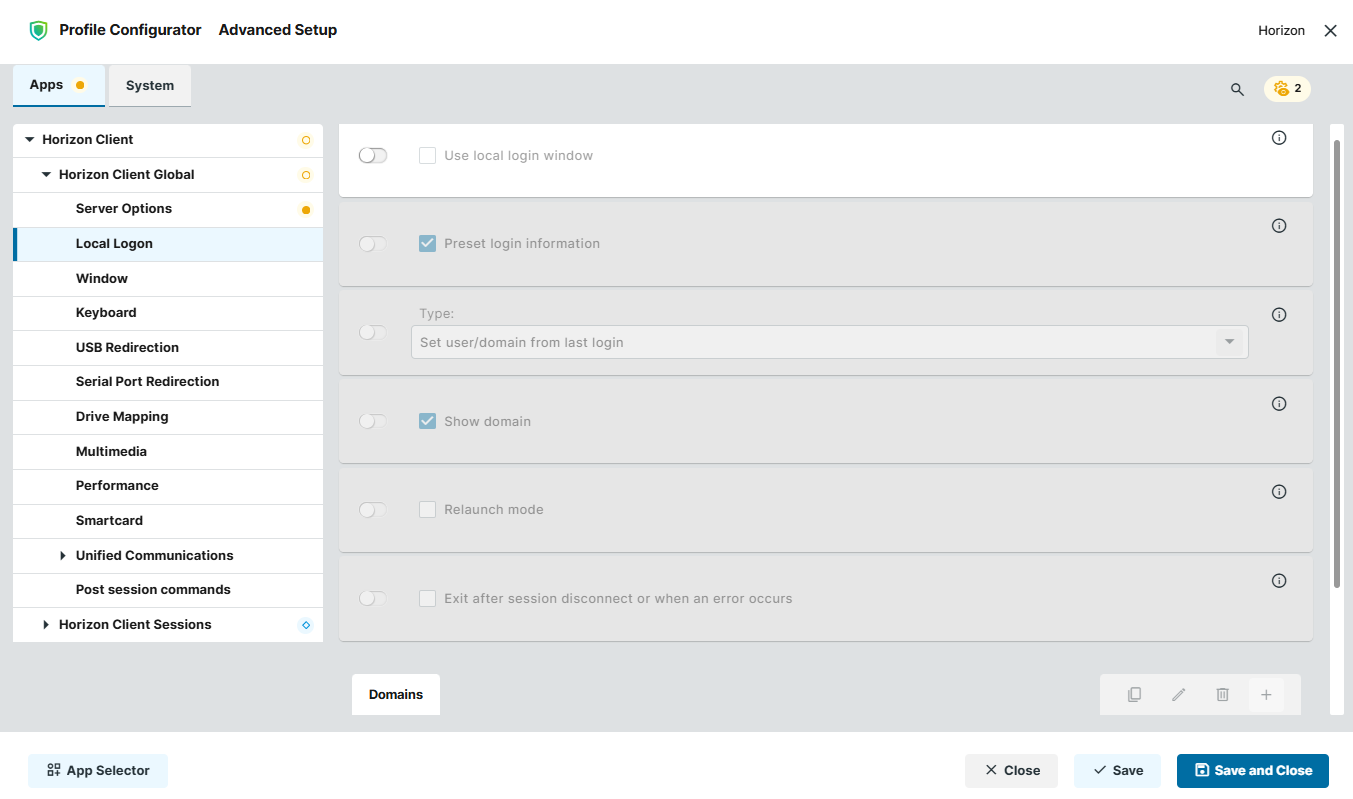
In the Profile Configurator, go to Apps > Horizon Client > Horizon Client Global> Local Logon.
-
Edit the settings according to your needs. The parameters are described in the following.
Use local login window
- The local login window of the endpoint device will be used to log in to the server. If you use the local login window, you can prepopulate login information.
- The local login window will not be used. (Default)
Preset login information
Only available if Use local login window is enabled.
- Login information will appear automatically in the login window. With Type, you can specify the source of the login information. (Default)
Type
Only available if Use local login window is enabled.
-
Set user/domain from last login: The login information from the last session will appear automatically in the login window. (Default)
-
Set user/domain from session setup: Session-specific login information will appear automatically in the login window. The session-specific login information is described under Connection Settings > [session name] > Connection Settings.
Show domain
- The domain will be shown in the login window. (Default)
Relaunch mode
- The login window is shown in relaunch mode and cannot be closed.
- The login window is not shown in relaunch mode. (Default)
Exit after session disconnect or when an error occurs
- The session will be ended completely when the connection is terminated.
- The connection overview will be shown when the connection is terminated. (Default)
Domain
Defines one or more domains under which the user can log in.
→ Click 
→ Click 
→ Click 
→ Click 
Configuring the Window (Global)
-
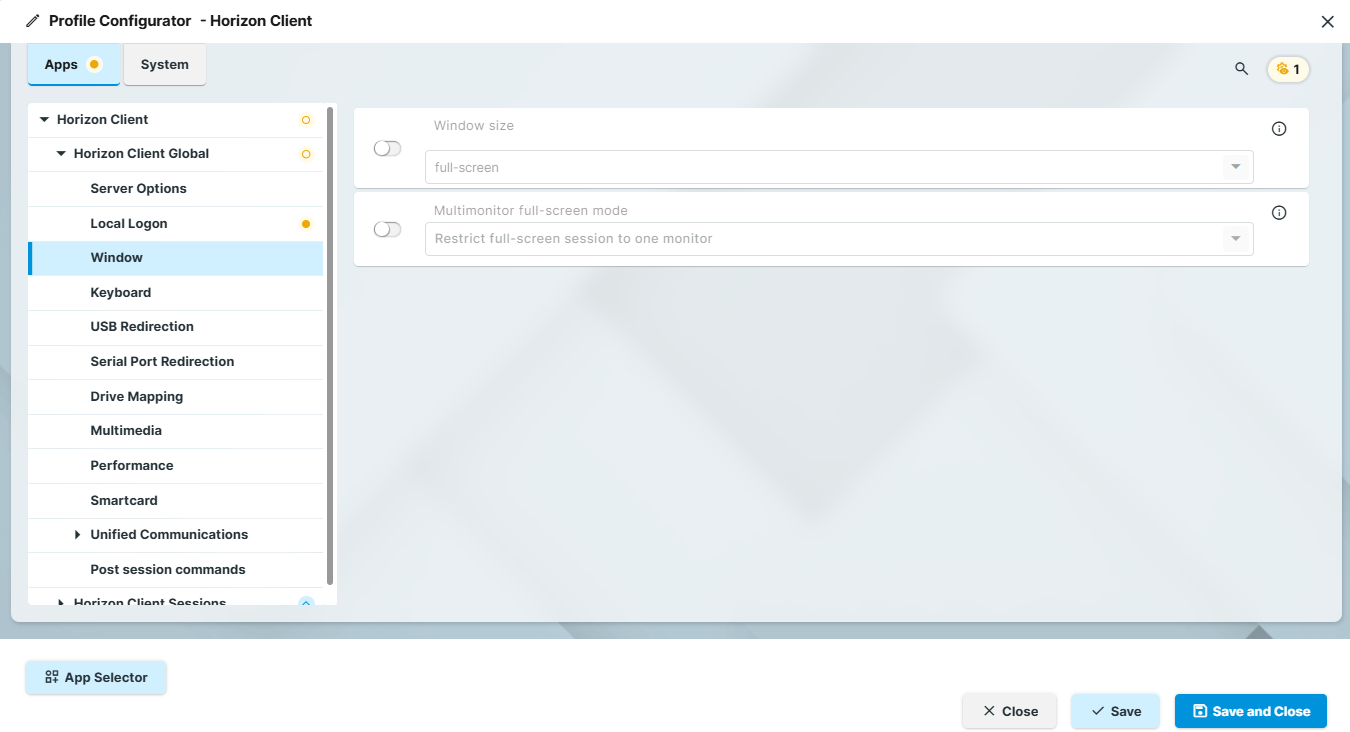
In the Profile Configurator, go to Apps > Horizon Client > Horizon Client Global > Window.
-
Edit the settings according to your needs. The parameters are described in the following.
Window size
Specifies the width and height of the window.
Possible options:
-
full-screen: The session is shown on the full screen. The device's taskbar is not visible. (Default)
-
Numeric details, e.g. 1280x1024: The session is shown in the selected resolution or on the selected percentage of the screen area.
Multimonitor full-screen mode
Specifies how the session window is distributed across multiple screens.
-
Restrict full-screen session to one monitor (Default)
-
Display full-screen session on all monitors
Configuring the Keyboard Settings (Global)
-
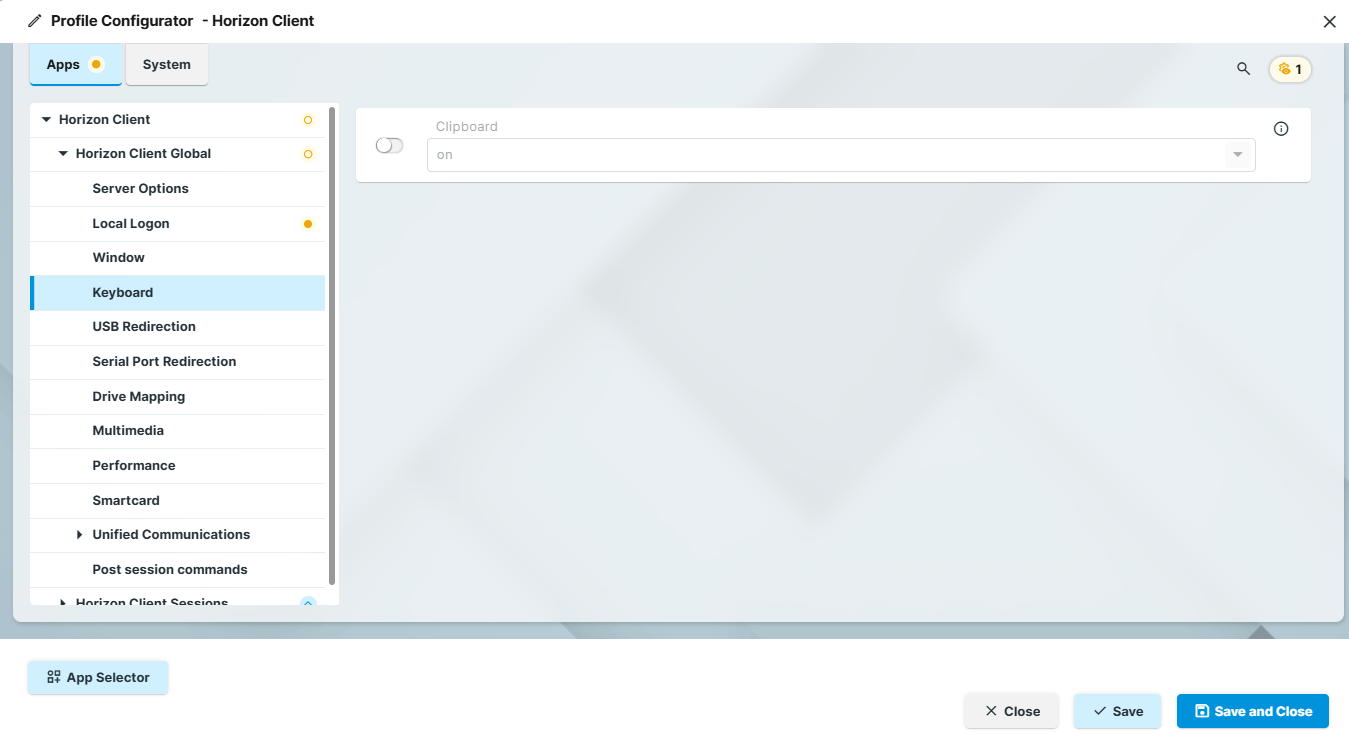
In the Profile Configurator, go to Apps > Horizon Client > Horizon Client Global > Keyboard.
-
Edit the settings according to your needs. The parameters are described in the following.
Clipboard
Possible options:
-
on: The clipboard of the device is redirected to the session.
-
off: The clipboard is not redirected.
Configuring USB Redirection (Global)
You can enable and configure USB redirection for specific devices. A USB composite device can be split into its components (interfaces). Example: A USB dictation device that is split into the components loudspeaker, microphone, storage device/drive, and control buttons.
Ensure that the power supplied by the USB connection is adequate for the device.
If USB redirection is enabled, dynamic drive mapping should be disabled. Otherwise, USB redirection can cause a storage device to be removed from the drive mapping. This is the case if the Automatically connect when inserted option is enabled.
-
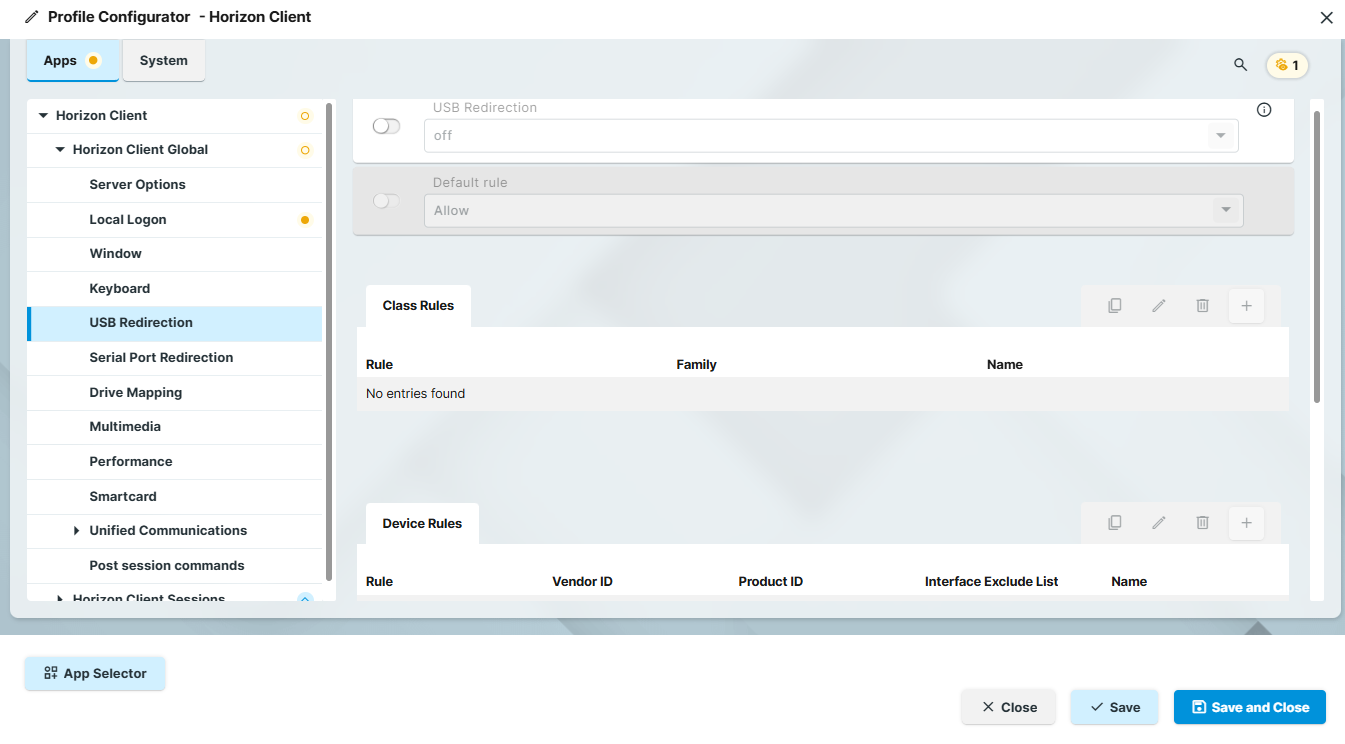
In the Profile Configurator, go to Apps > Horizon Client > Horizon Client Global > USB Redirection.
-
Edit the settings according to your needs. The parameters are described in the following.
USB Redirection
-
on: USB redirection is enabled,
-
off: USB redirection is disabled (Default)
Default rule: This rule will apply if no special rule was configured for a class or a device.
-
Allow
-
Deny
To secure your endpoint, it is generally recommended to set Default rule to Deny and to configure Allow rules only for the required USB devices and USB device classes.
Creating a Class Rule
-
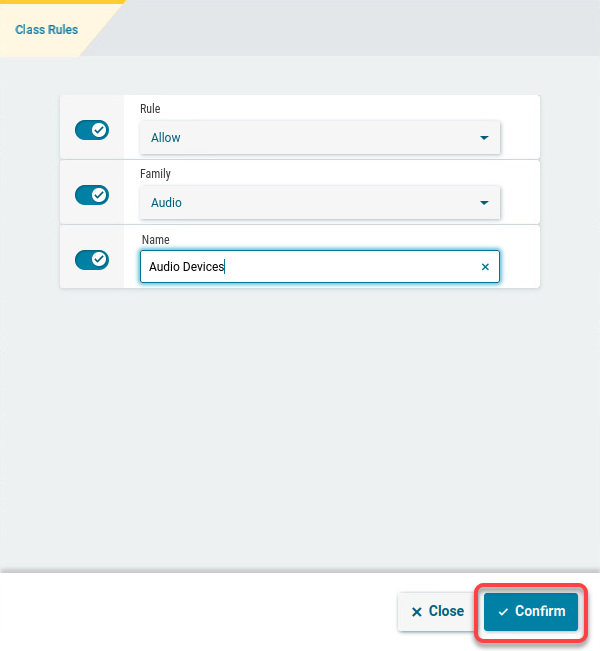
To create a new rule, click

-
Choose a Rule. The rule specifies whether the use of the device class defined here is allowed or denied.
-
Under Family, select the class of device for which the rule should apply. Examples: Audio, Printer, Smartcard, Storage Devices.
-
Under Name, give a name for the rule.
-
Click on Confirm.
Creating a Device Rule
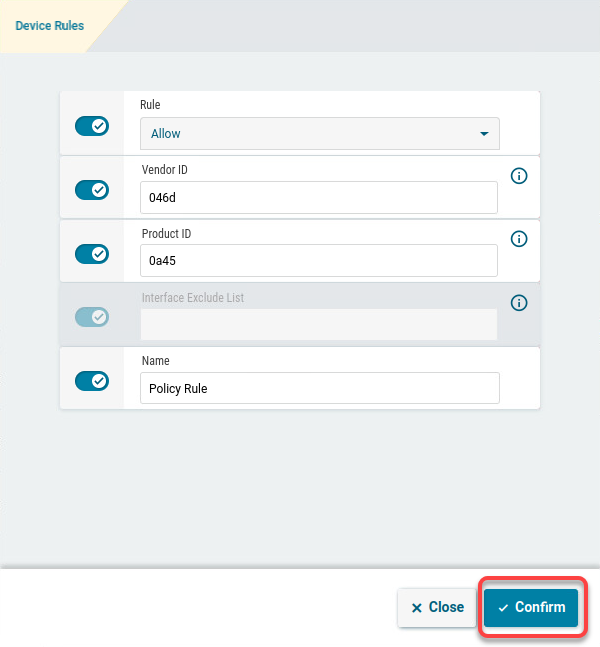
When a rule is defined, at least one of the properties Vendor ID or Product ID must be given.
-
To create a new rule, click

-
Choose a Rule. The following rules are available:
-
Deny: The device will not be redirected via USB redirection.
-
Allow: The device will be redirected via USB redirection.
-
Split: A USB composite device will automatically be split into its individual components (interfaces).
-
No auto-split: A USB composite device will not be split.
-
-
Provide the Vendor ID of the device as a hexadecimal value.
-
Provide the Product ID of the device as a hexadecimal value. The product ID can contain asterisks '*', each asterisk representing one hexadecimal digit. If the field is left empty, any product ID is matched.
Getting USB Device Information
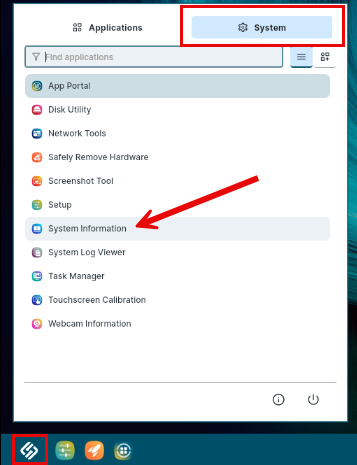
To find out the Class ID, Subclass ID, Vendor ID and Product ID of the connected USB device, you can use the System Information tool.
-
Locally on the device, go to

-
Select USB Devices.
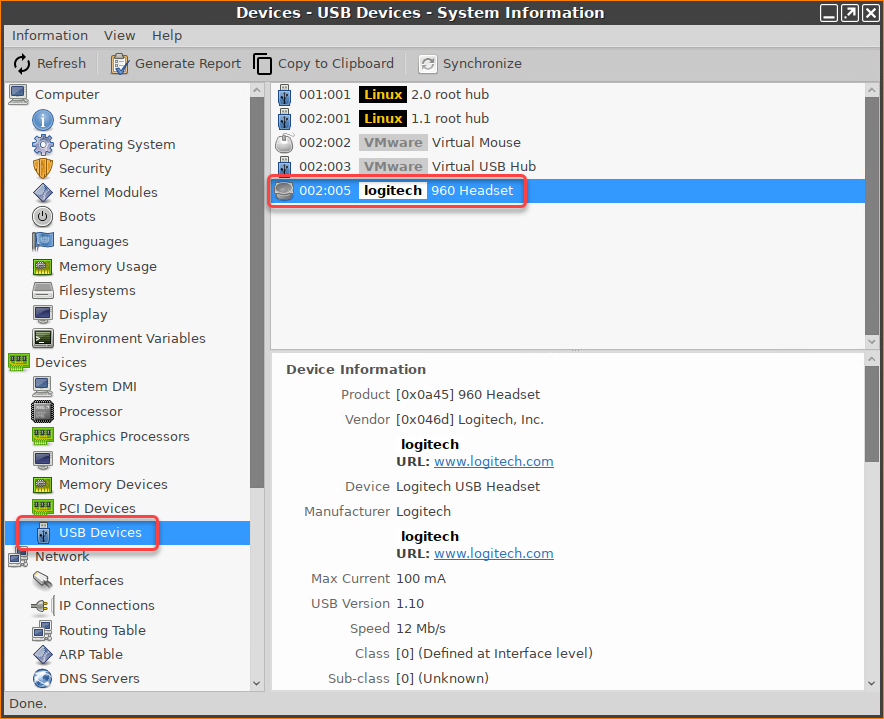
Alternatively, you can use the command lsusb (or lsusb | grep -i [search term]) in the terminal.
Example:

-
Only for USB composite devices: Under Interface Exclude List, enter a list of interfaces that are to be excluded from USB redirection. The individual interfaces are separated by spaces. Example: "0 1 2".
How to Find Out Interface Numbers for USB Composite Devices
Sometimes, you need to find out numbers of individual interfaces, e.g. to exclude them from USB redirection. For example, when using a dictation microphone like Philips SpeechMike, it is necessary to configure the device for USB redirection but it is better to exclude audio interfaces since Horizon should automatically handle audio interfaces with its RTAV feature.
To find out the interface numbers using the System Information tool:
→ Locally on the device, go to Start menu
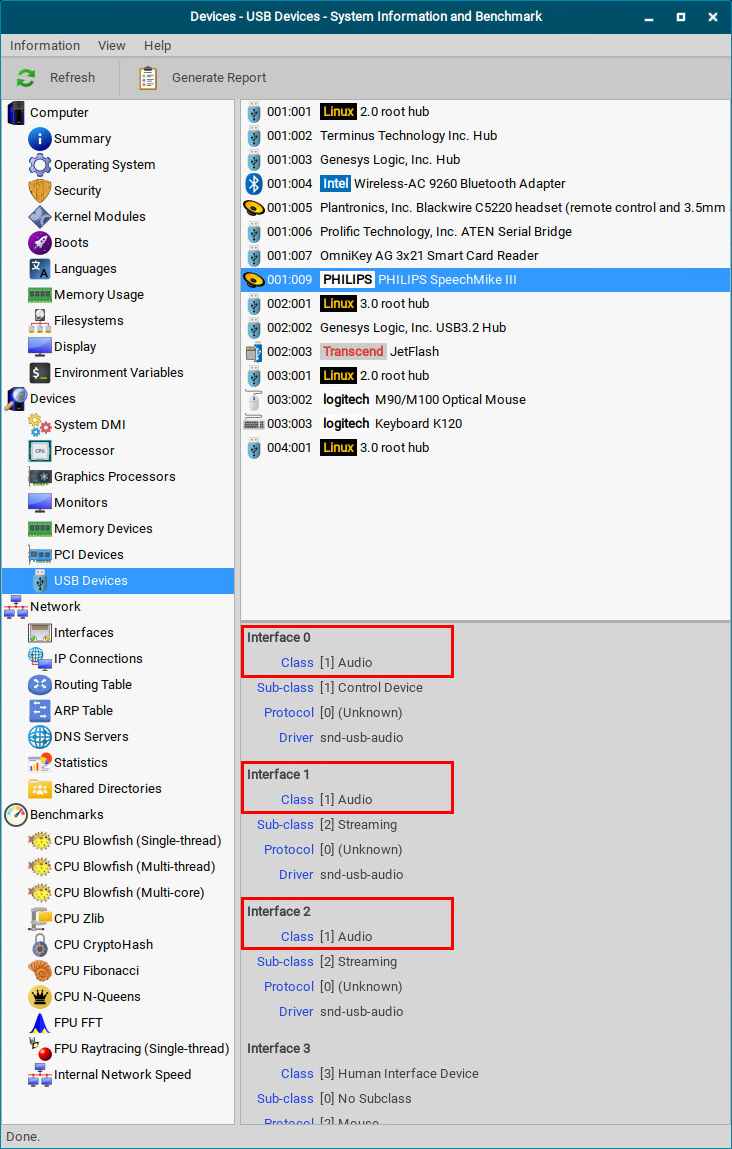
To find out the interface numbers using the terminal:
-
To list the devices and find out the relevant Vendor ID and Product ID (vid:pid), use the following command:
lsusb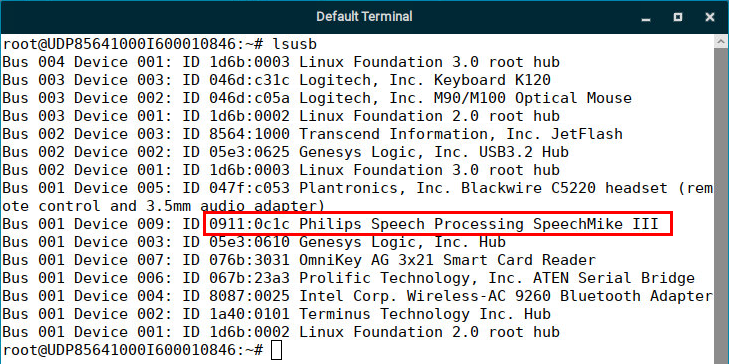
-
To list the device details, including interfaces and their classes, use the command:
lsusb -v -d <vid>:<pid>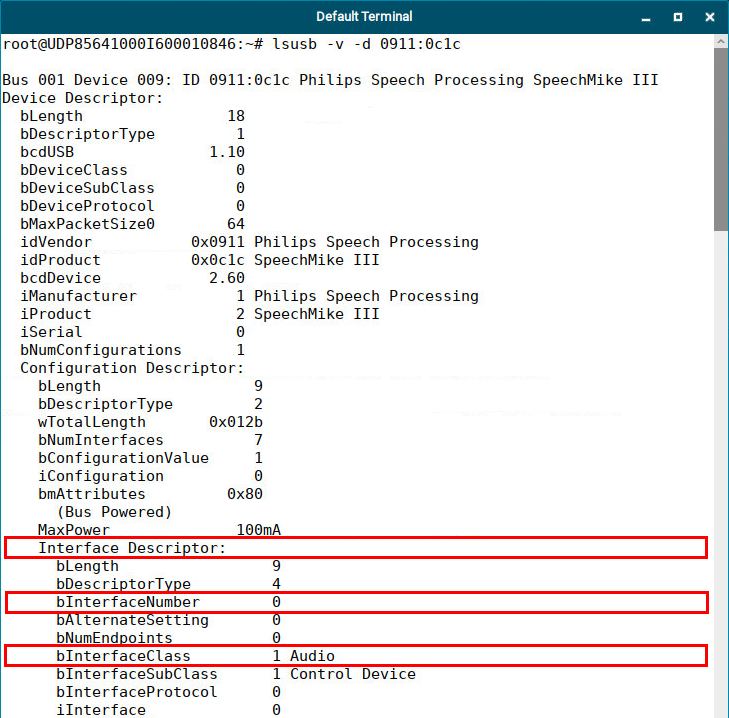
-
Check
bInterfaceNumberlines in the output and match the numbers with the descriptions and device classes.
-
Under Name, give a name for the rule.
-
Click Confirm.
Automatically connect at startup
- USB devices that were inserted before the start of the session are available in the session. (Default)
Automatically connect when inserted
- USB devices that are inserted during the session are available in the session. (Default)
Automatic splitting of composite USB devices
- A USB composite device will automatically be split into its individual components (interfaces). The class rules will be applied to these individual devices.
- The device will not be split into its components. (Default)
Configuring Serial Port Redirection (Global)
-
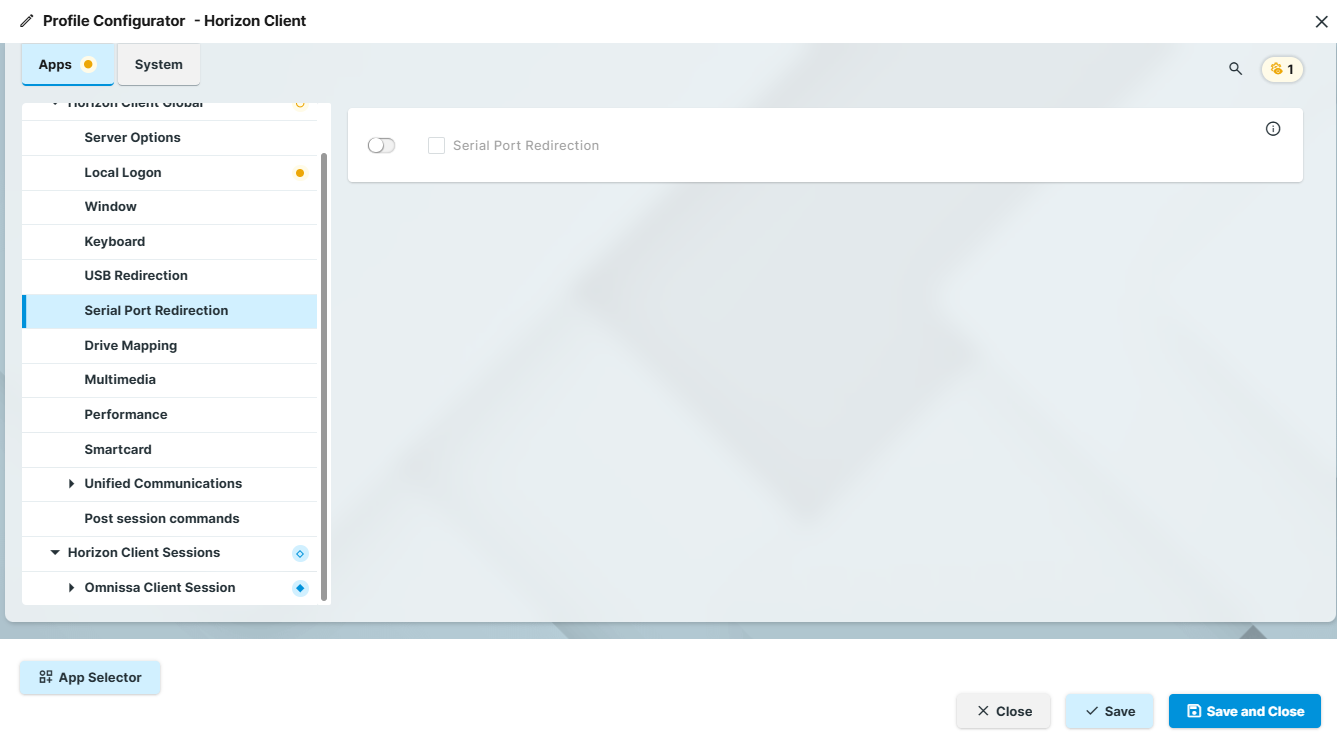
In the Profile Configurator, go to Apps > Horizon Client > Horizon Client Global > Serial Port Redirection.
-
Edit the settings according to your needs. The parameters are described in the following.
Serial Port Redirection
With the serial port redirection feature, you can redirect locally connected serial (/dev/ttyS) ports, such as built-in RS232 ports or USB-to-Serial adapters, to their RDS-hosted desktops.
-
on: The serial port is redirected.
-
off: The serial port is not redirected. (Default)
Configuring Predefined Drive Mapping (Global)
You can make specific directories on USB storage devices available to your Horizon session. These directories will appear in the session, in addition to the drives that are mapped automatically (provided that Devices > Storage Devices > Storage Hotplug > Enable dynamic client drive mapping is enabled). Please note that Devices > Storage Devices > Storage Hotplug > Enable dynamic client drive mapping must be enabled to allow for predefined drive mapping.
You can define specific directories on a local drive that should be mapped.
-
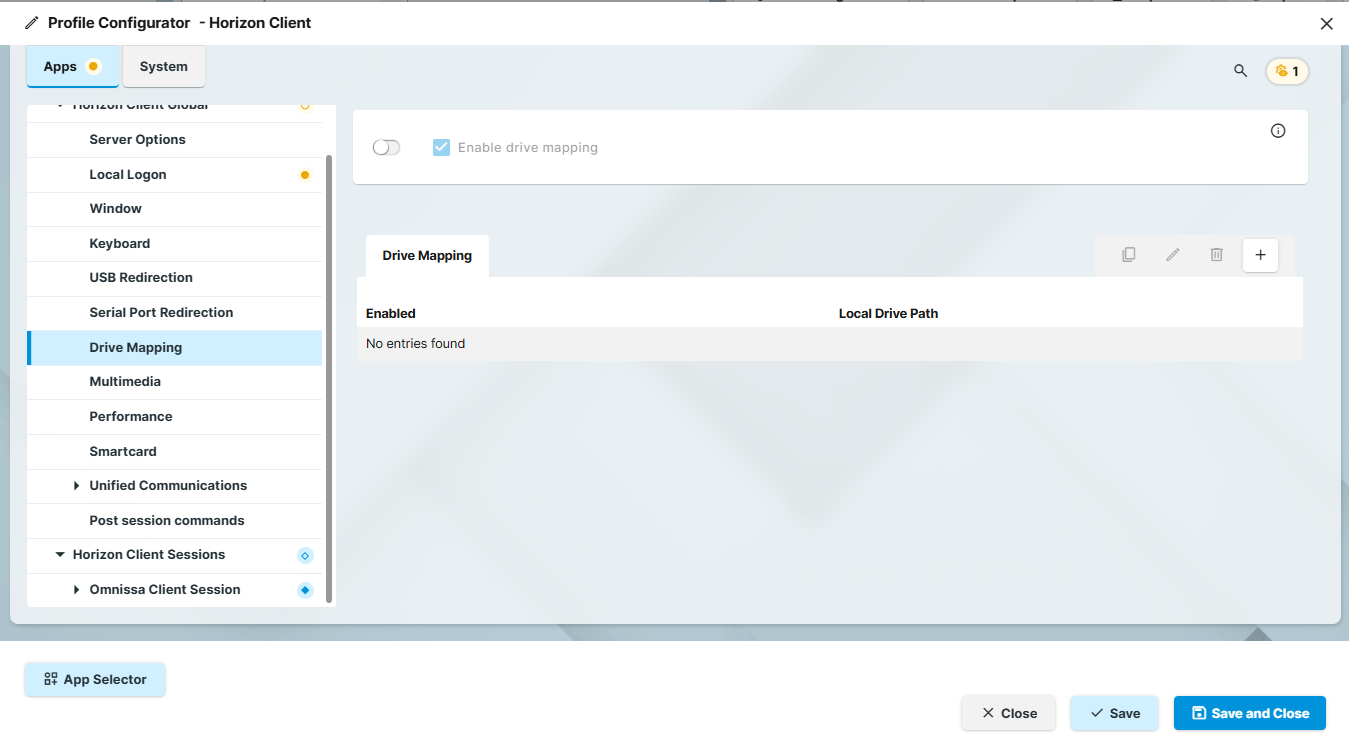
In the Profile Configurator, go to Apps > Horizon Client > Horizon Client Global > Drive Mapping.
-
Edit the settings according to your needs. The parameters are described in the following.
Enable Drive Mapping
- Drive mapping is enabled. (Default)
Before you unplug a hotplug storage device from the endpoint device, you must safely remove it. Otherwise, data on the hotplug storage device can be damaged. Depending on the configuration, there are one or several possibilities to safely remove a hotplug storage device:
-
Click on

-
Click on

-
Function Accessories > Safely Remove Hardware with further starting possibilities; amongst other things, a hotkey can be defined here.
If the following warning is displayed: Volume(s) still in use. Don't remove the device, then the hotplug storage device must not be removed. First, exit the program concerned or close all files or directories that reside on the hotplug storage device.
Maping a Specific Directory
-
Click

-
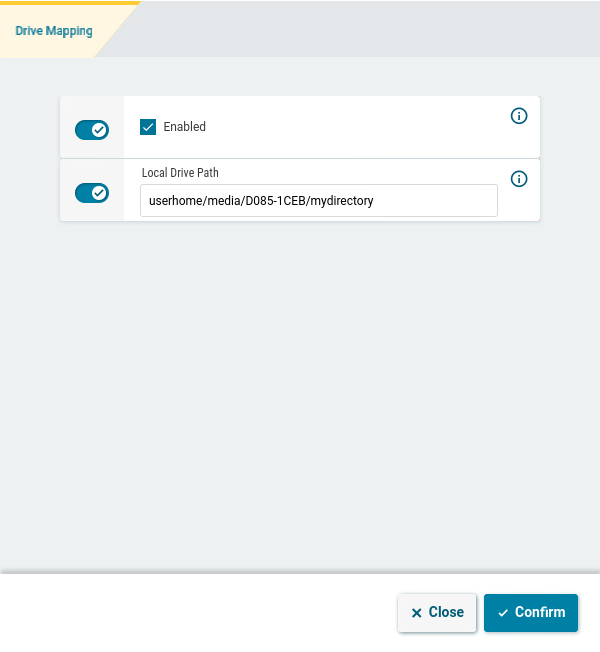
Click Enabled to enable the drive connection.
-
Provide the Local Drive Path of the local directory to which the mapping is to refer.
Configuring Multimedia (Global)
-
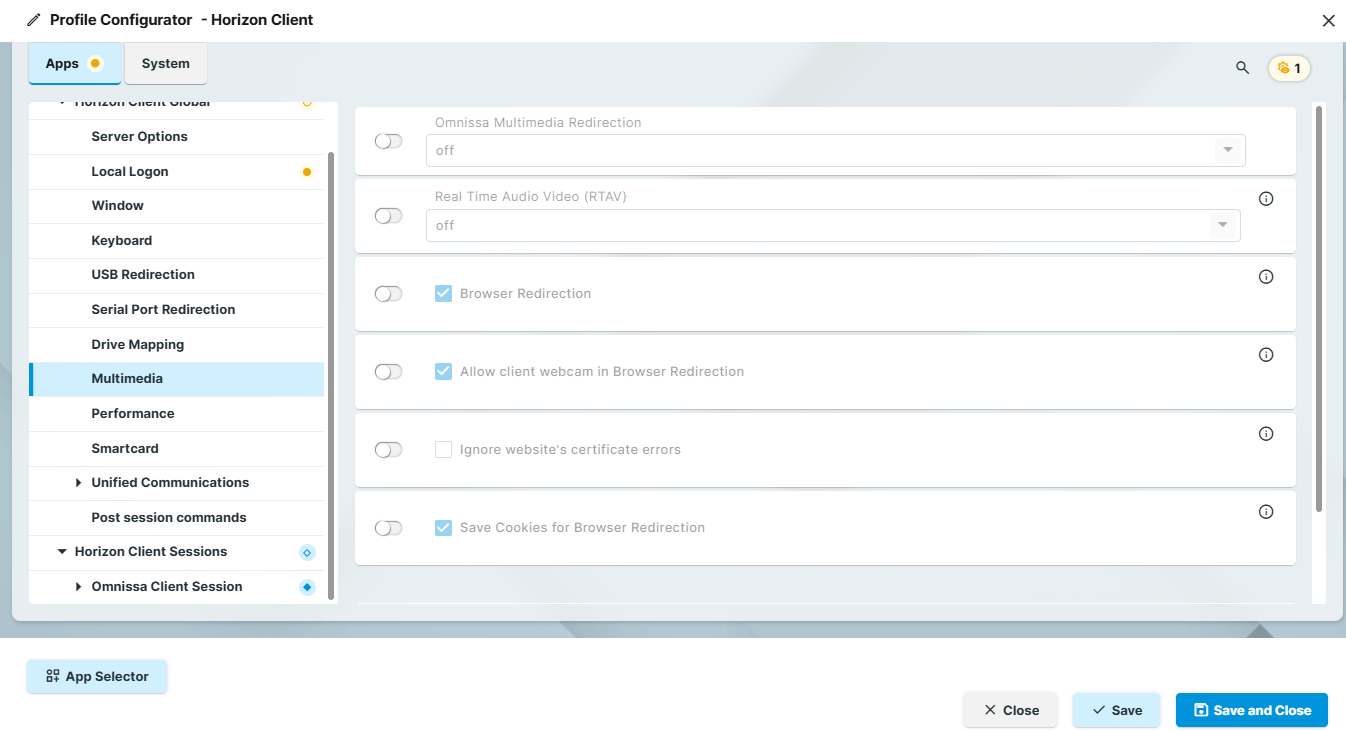
In the Profile Configurator, go to Apps > Horizon Client > Horizon Client Global > Multimedia.
-
Edit the settings according to your needs. The parameters are described in the following.
Omnissa Multimedia Redirection
Possible values:
-
off: The server renders the multimedia data and sends the individual images to the client. (Default)
-
on: The client renders the multimedia data supplied by the server.
Real Time Audio Video (RTAV)
Specifies the redirection of video data from the client USB webcam.
Possible values:
-
off: The client does not forward the webcam data as video data. (Default)
With USB redirection, data from the webcam can be forwarded to the server even if RTAV is disabled.
-
on: The client forwards the webcam data as video data.
Browser Redirection
- The rendering of the web page content is forwarded from the server to the local device, e.g. to reduce the load on the server. (Default)
Allow client webcam in Browser Redirection
- Local webcam will be used in browser redirection. (Default)
Ignore website’s certificate errors
- Websites with certificate errors can be visited.
- Websites with certificate errors cannot be visited. (Default)
Save Cookies for Browser Redirection
- Cookies will be saved. This allows the user to stay logged in on websites across remote sessions. (Default)
Select audio output devices
Possible values:
-
Default: Audio is played back on the default audio output device attached to the endpoint. (Default)
-
All: All the available audio output devices are redirected to the remote session. If you connect or remove a device during a remote session, the devices are updated dynamically during a remote session.
-
User selection: Only the selected audio output device is redirected to the remote session. If you connect or remove a device during a remote session, the changes do not take effect in the remote session.
Configuring Performance Settings (Global)
-
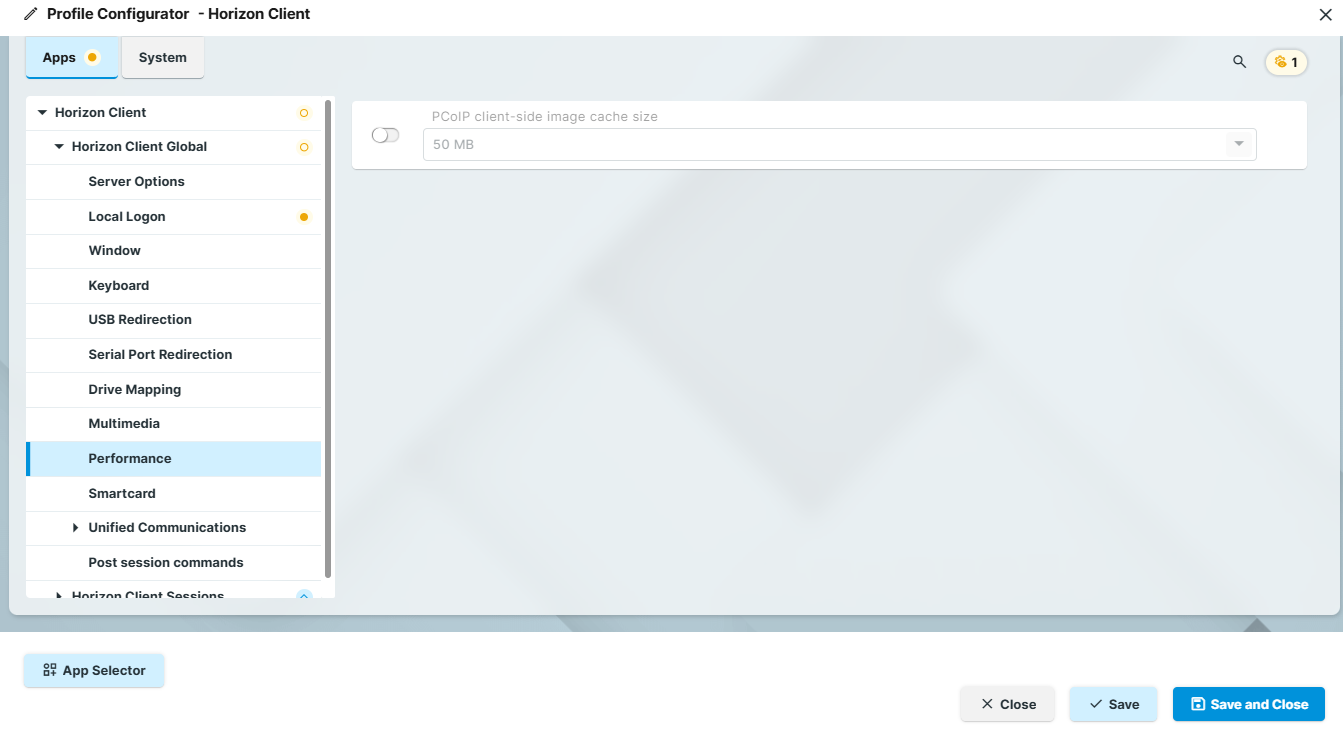
In the Profile Configurator, go to Apps > Horizon Client > Horizon Client Global > Performance.
-
Edit the settings according to your needs. The parameters are described in the following.
PCoIP client-side image cache size
Specifies the size of the cache for images. Caching parts of the display reduces the amount of data to be transferred. (Minimum: 50 MB; maximum: 300 MB; default: 50 MB)
Larger cache sizes of 250 MB or more should only be used if at least 2 GB RAM or more is available.
Configuring Smartcard Access (Global)
-
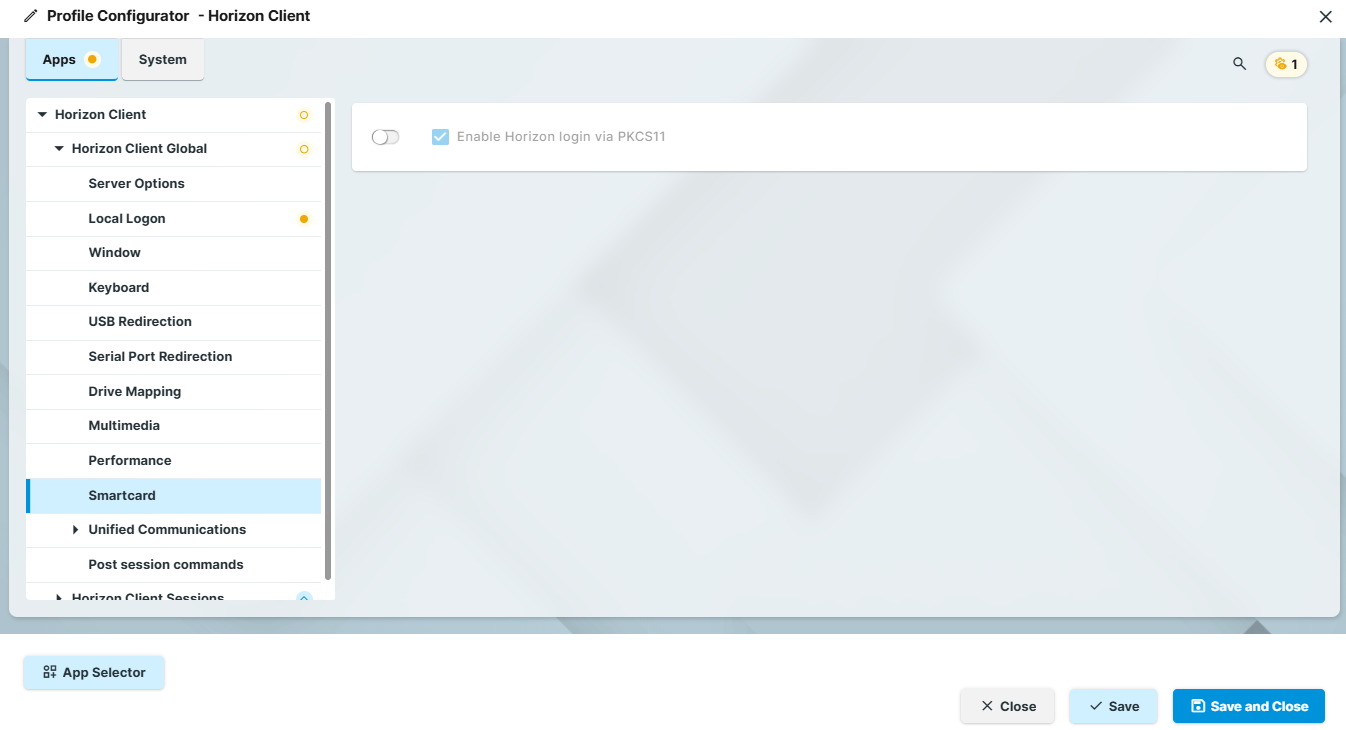
In the Profile Configurator, go to Apps > Horizon Client > Horizon Client Global > Smartcard.
-
Edit the settings according to your needs. The parameters are described in the following.
Enable Horizon login via PKCS11
- The user can log in to a Horizon session via PKCS11. (Default)
Configuring HTML5 and Microsoft Teams Optimization (Global)
-
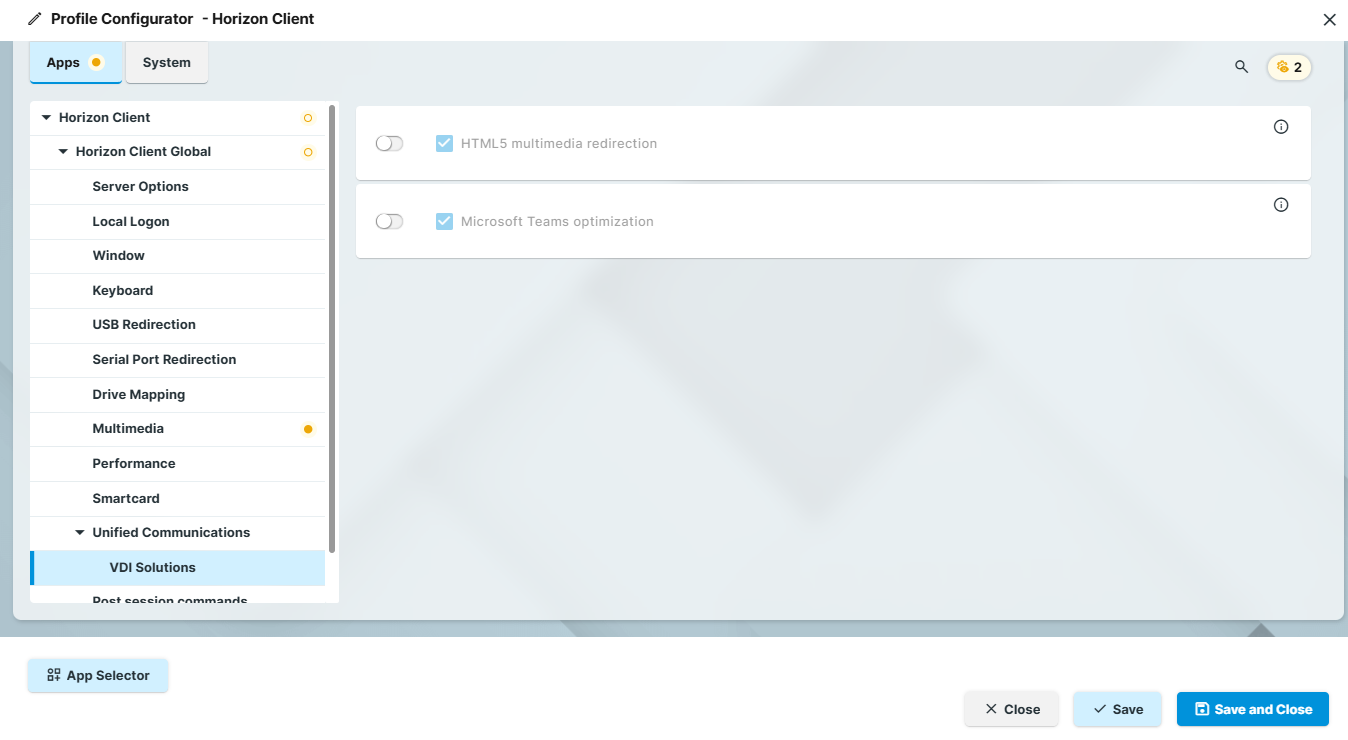
In the Profile Configurator, go to Apps > Horizon Client > Horizon Client Global > Unified Communications > VDI Solutions.
-
Edit the settings according to your needs. The parameters are described in the following.
HTML5 multimedia redirection
Server and Browser Requirements
HTML5 multimedia redirection requires additional configuration on the server side.
- HTML5 multimedia content is redirected from a remote desktop to the endpoint devices. (Default)
Microsoft Teams optimization
Server and Network Requirements
Microsoft Teams optimization requires additional configuration on the server side.
- The audio and video streams for Microsoft Teams are redirected to the endpoint devices. Audio and video data are not processed by the server. (Default)
Configuring Post-Session Commands
-
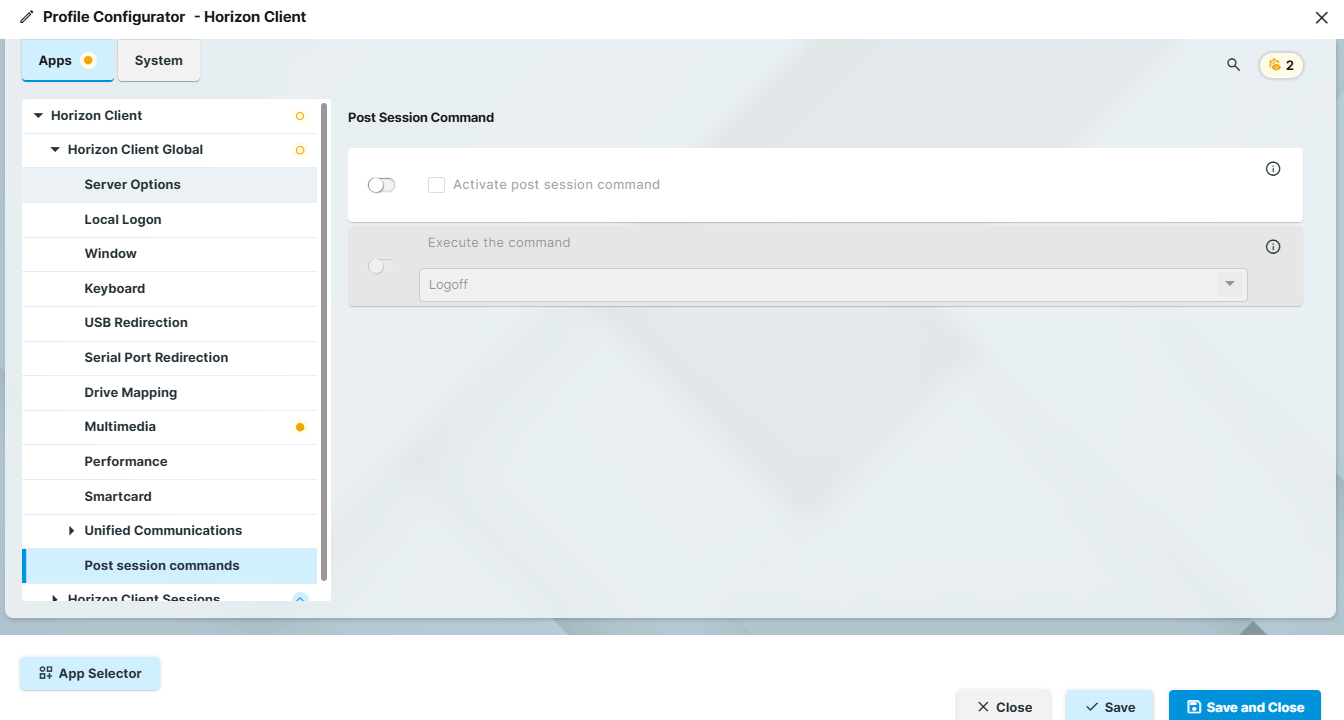
In the Profile Configurator, go to Apps > Horizon Client > Horizon Client Global > Post session commands.
-
Edit the settings according to your needs. The parameters are described in the following.
Activate post session command
Allows to define an action that is performed when the last Horizon session is ended. For information on global post-session commands, see Post-session Custom Commands in IGEL OS 12.
- The post-session command specified under Execute the command will be executed.
- The post-session command specified under Execute the command will not be executed. (Default)
Execute the command
Action that is carried out after the end of the Horizon session(s).
Possible values:
-
Logoff: The user is automatically logged off; a login method must be defined for this purpose. Further information can be found under Logon Settings in IGEL OS 12. (Default)
-
Shutdown: The device will be shut down.
-
Enter custom command here: Command to be executed.
Configuring the Connection Settings (Session Specific)
-
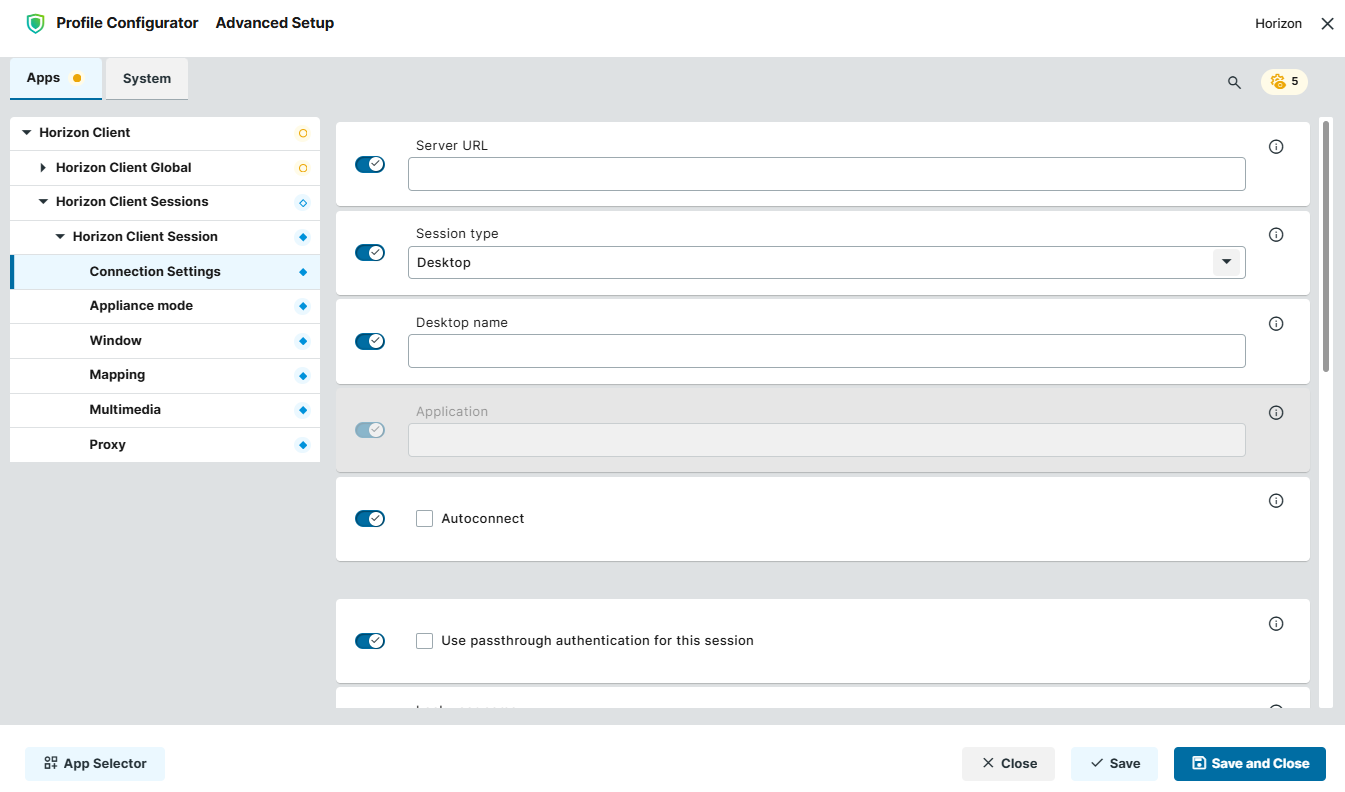
In the Profile Configurator, go to Apps > Horizon Client > Horizon Client Sessions > [session name] > Connections Settings.
-
Edit the settings according to your needs. The parameters are described in the following.
Server URL
URL of the Horizon server.
Session type
Specifies whether the session contains a desktop or an individual application.
Possible values:
-
Desktop: The session contains a desktop. (Default)
-
Application: The session contains an individual application.
Desktop name
Specifies a name for the desktop. This option is available if Session type is set to “Desktop”.
Application
The name of the application that is launched during the session. This option is available if Session type is set to “Application”.
Autoconnect
- When the session starts, the connection to the desktop or application will automatically be established. For this to be possible, the name of the desktop or application must be defined.
- When the session starts, the overview will be shown. (Default)
Use passthrough authentication for this session
- The username and password are temporarily saved and used for authentication purposes in this session.
- Passthrough authentication is not used. (Default)
Lock user name
Locks the user name specified under Apps > Horizon Client > Horizon Client Session > [session name] > Connection Settings > User name.
Possible values:
-
Global setting: The setting from Apps > Horizon Client > Horizon Client Global > Server Options > Lock user name will be used. (Default)
-
on: The user name will be locked and cannot be changed in the login window.
-
off: The user name will not be locked in the login window.
Report user login
This setting can only be configured if you activate Lock user name.
Possible values:
-
Global setting (Default): The setting from Apps > Horizon Client > Horizon Client Global > Server Options > Report user login will be used.
-
off: Username login and connection timestamps will not be reported to the IGEL UMS.
-
on: Username login and connection timestamps will be reported to the IGEL UMS and shown in the UMS Console / UMS Web App under Devices > [Name of the directory] > [Name of the device] > User Login History, see View Device Information in the IGEL UMS and Devices - View and Manage Your Endpoint Devices in the IGEL UMS Web App.
Report user login only functions if you activate Lock user name and preset the username in the session, i.e. Apps > Horizon Client > Horizon Client Session > [session name] > Connection Settings > User name. If you want also the domain to be reported to the UMS, you need to use UPN (user@domain) or NetBIOS format (DOMAIN\user) for the User name field.
Note that the username reporting currently does not work in Local Logon mode.
User name
User name when logging in to the Omnissa Horizon server
User password
Password when logging in to the Omnissa Horizon server
Domain
Domain when logging in to the Omnissa Horizon server
Save last user name
- The login window will be prefilled with the last used user name.
- The last used user name will not be saved. (Default)
Kiosk mode
-
Global setting: The setting from Apps > Horizon Client > Horizon Client Global > Server Options > Kiosk mode will be used. (Default)
-
on: Horizon Client is run in a non-interactive mode that is suitable for kiosk mode operation.
-
off
Configuring Appliance Mode for the Horizon Session
In appliance mode, only one specific session is accessible. The end user has no access to local IGEL OS desktop and cannot escape from the session. By default, the session starts automatically when the device boots.
-
Global settings for appliance mode are configured in the IGEL OS base system under User Interface > Appliance Mode, see Appliance Mode in IGEL OS 12.
-
If the IGEL OS base system is older than 12.10, appliance mode is not available.
-
Make sure that appliance mode is enabled only for one session. Running two or more sessions in appliance mode simultaneously is not supported.
To enable appliance mode for a Horizon session:
-
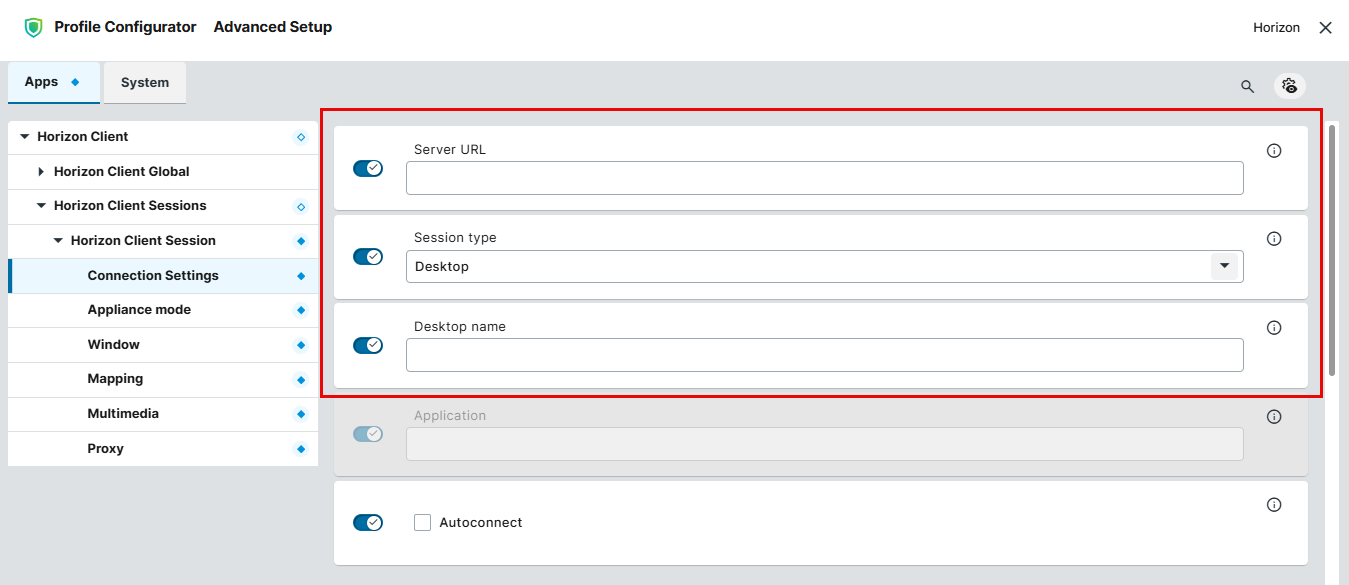
In the Profile Configurator, go to Apps > Horizon Client > Horizon Client Sessions > [session name] > Connection Settings and configure Server URL, Session type and Desktop name / Application.
Note: If multiple Horizon pods share the same pool Display Name, Desktop name is used to direct endpoints to the correct Horizon desktop pool.
-
Go to Apps > Horizon Client > Horizon Client Sessions > [session name] > Appliance mode and activate Appliance mode enabled.
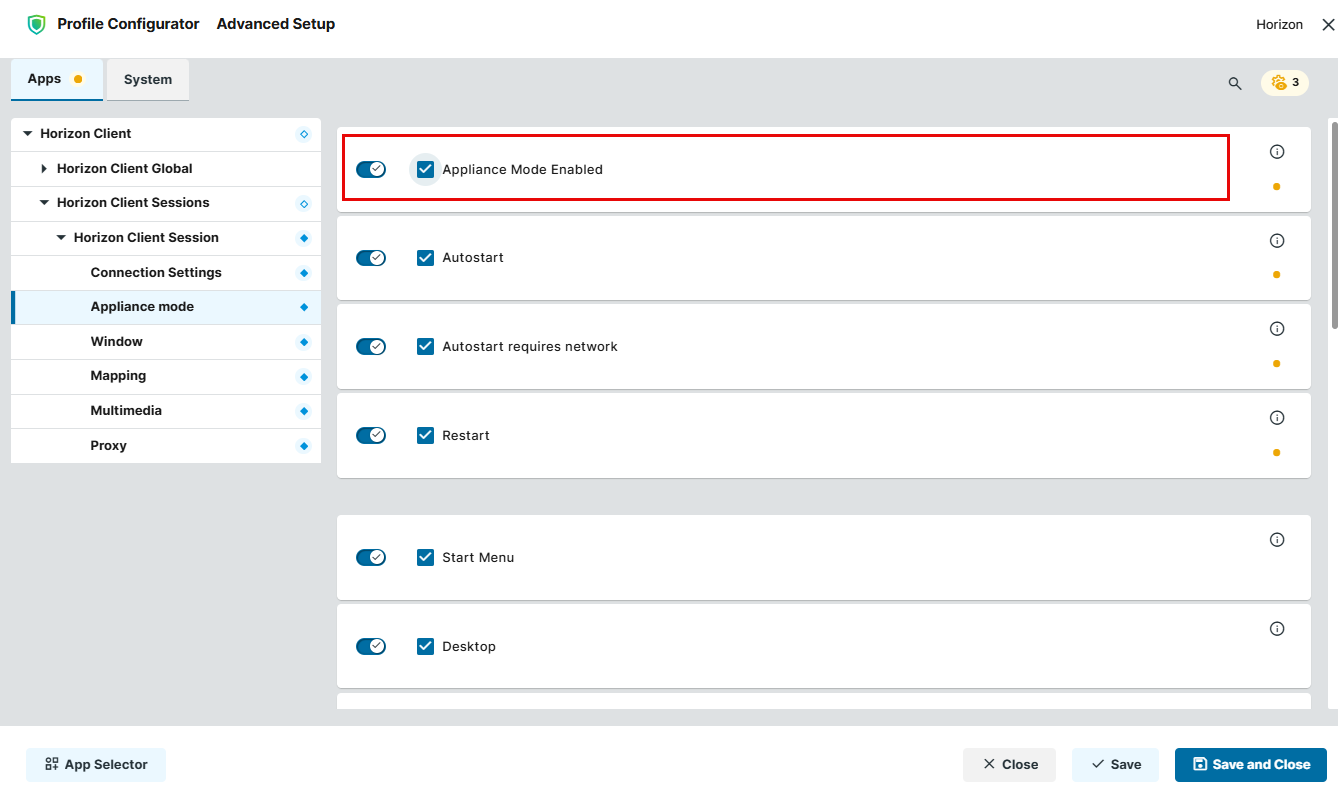
If Appliance mode enabled is activated, all parameters below it are automatically adjusted to the appliance mode needs. Exception: parameters listed below under “Known Issues”.
Known Issues
When enabling appliance mode for a specific Horizon session, starters for the desktop, start menu and Application Launcher as well as the Horizon Client menu bar setting are not automatically disabled. Therefore, perform the following if required:
-
Disable Start menu, Desktop, and Application Launcher.
-
Disable Show full-screen drop down menu bar.
-
If necessary, adjust the below settings according to your needs.
Starting methods for the session are described under Starting Methods for Apps.
Window size
Specifies the width and height of the window.
Possible values:
-
Global setting: The window size is carried over from the global settings defined under Apps > Horizon Client > Horizon Client Global > Window.
-
full-screen: The session is shown on the full screen. (Default)
-
user selection
-
Numeric details: The session is shown in the selected resolution or on the selected percentage of the screen area.
Multimonitor full-screen mode
Specifies how the session window is distributed across multiple screens.
-
Restrict full-screen session to one monitor
-
Display full-screen session on all monitors (Default)
Activate post session command
Allows to define an action that is performed when the last Horizon session is ended. For information on global post-session commands, see Post-session Custom Commands in IGEL OS 12.
- The post-session command specified under Execute the command will be executed. (Default)
- The post-session command specified under Execute the command will not be executed.
Execute the command
Action that is carried out after the end of the Horizon session(s).
Possible values:
-
Logoff: The user is automatically logged off; a login method must be defined for this purpose. Further information can be found under Logon Settings in IGEL OS 12. (Default)
-
Shutdown: The device will be shut down.
-
Enter custom command here: Command to be executed.
Show full-screen drop down menu bar
- The Horizon Client drop-down menu bar is displayed while a remote session is running in full-screen mode. The bar provides access to client-side session controls without leaving full-screen mode. (Default)
Auto-hide menu bar (tool bar)
- The Horizon Client drop-down menu bar will automatically be hidden when it is not being used, maximizing the remote desktop's usable screen area.
- The Horizon Client drop-down menu bar is pinned and cannot be hidden. (Default)
Exit on disconnect or when an error occurs
Possible values:
-
Global setting: The setting configured under Apps > Horizon Client > Horizon Client Global> Local Logon > Exit after session disconnect or when an error occurs will be effective.
-
on: The session will be ended completely when the connection is terminated. (Default)
-
off: The connection overview will be shown when the connection is terminated.
Autoconnect
- When the session starts, the connection to the desktop or application will automatically be established. For this to be possible, the name of the desktop or application must be defined under Apps > Horizon Client > Horizon Client Sessions > [session name] > Connection Settings. (Default)
- When the session starts, the overview will be shown.
Use single view window
- The Horizon Client window will be hidden after a remote desktop or published application opens. (Default)
Configuring the Window Settings (Session Specific)
-
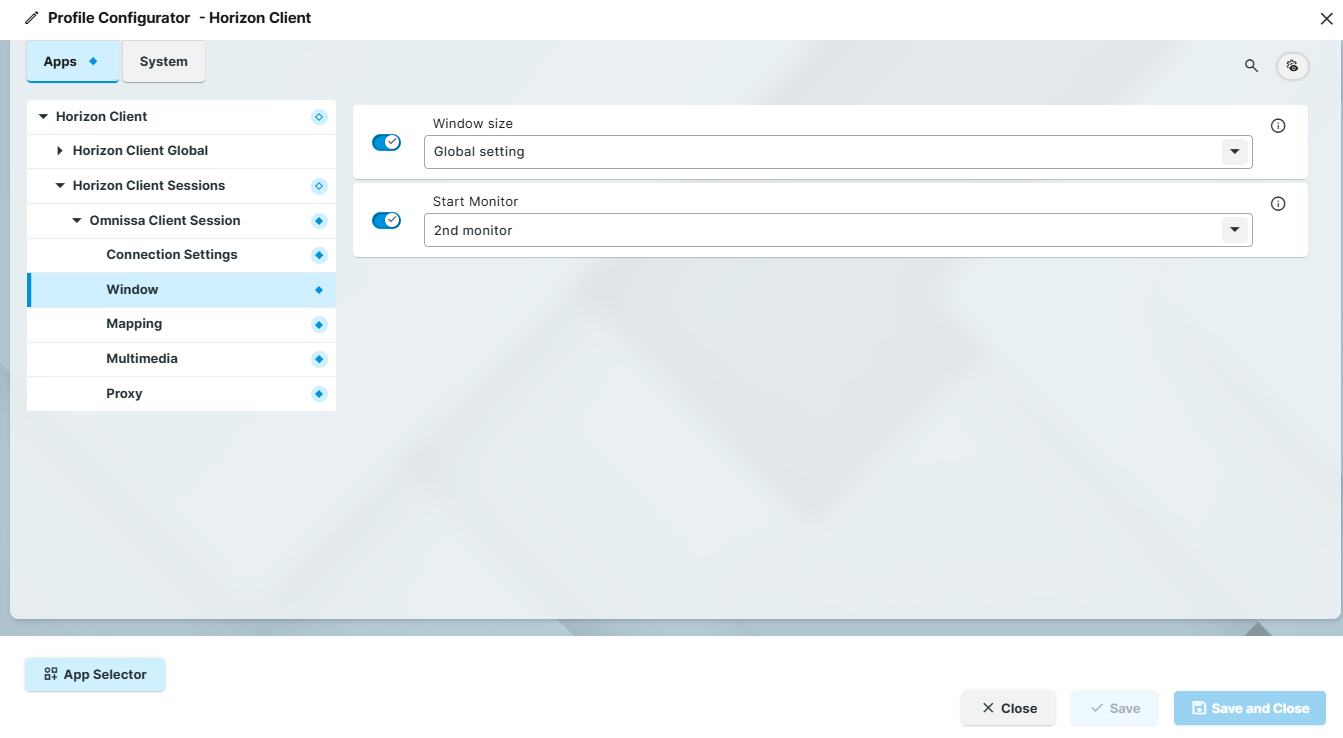
In the Profile Configurator, go to Apps > Horizon Client > Horizon Client Sessions > [session name] > Window.
-
Edit the settings according to your needs. The parameters are described in the following.
Window size
Specifies the width and height of the window.
Possible values:
-
Global setting: The window size is carried over from the global settings defined under Apps > Horizon Client > Horizon Client Global > Window. (Default)
-
full-screen: The session is shown on the full screen.
-
user selection
-
Numeric details: The session is shown in the selected resolution or on the selected percentage of the screen area.
Start monitor
Specifies the monitor on which the session is shown.
Configuring Drive Mapping and USB Redirection (Session Specific)
-
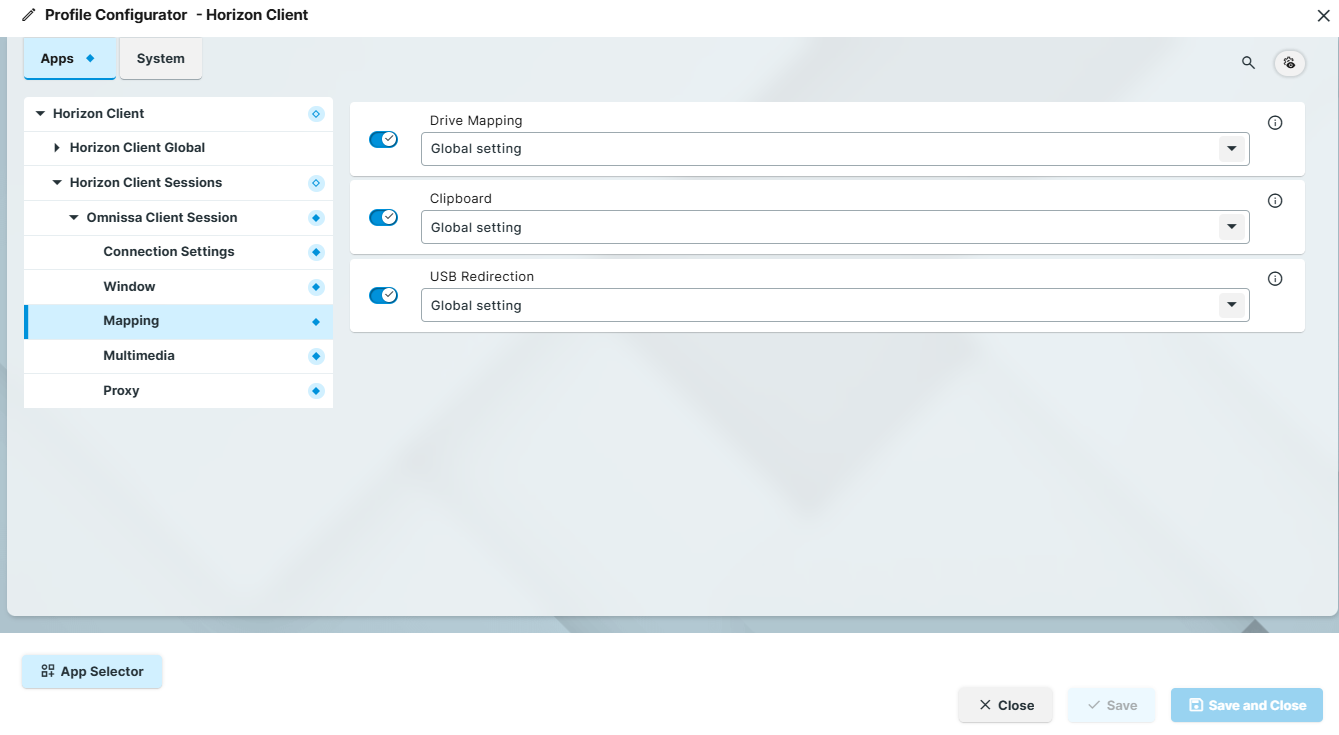
In the Profile Configurator, go to Apps > Horizon Client > Horizon Client Sessions > [session name] > Mapping.
-
Edit the settings according to your needs. The parameters are described in the following.
Drive Mapping
Possible options:
-
Global setting: The setting Apps > Horizon Client > Horizon Client Global > Drive Mapping > Enable drive mapping will be used.
-
on
-
off
Clipboard
Possible options:
-
Global setting: The setting Apps > Horizon Client > Horizon Client Global > Keyboard > Clipboard will be used.
-
on
-
off
USB Redirection
If the global setting Apps > Horizon Client > Horizon Client Global > USB Redirection > USB Redirection is disabled, USB redirection can not be enabled on a session-specific basis.
Possible options:
-
Global setting: The setting Apps > Horizon Client > Horizon Client Global > USB Redirection > USB Redirection will be used.
-
off
Configuring Multimedia Settings (Session Specific)
-
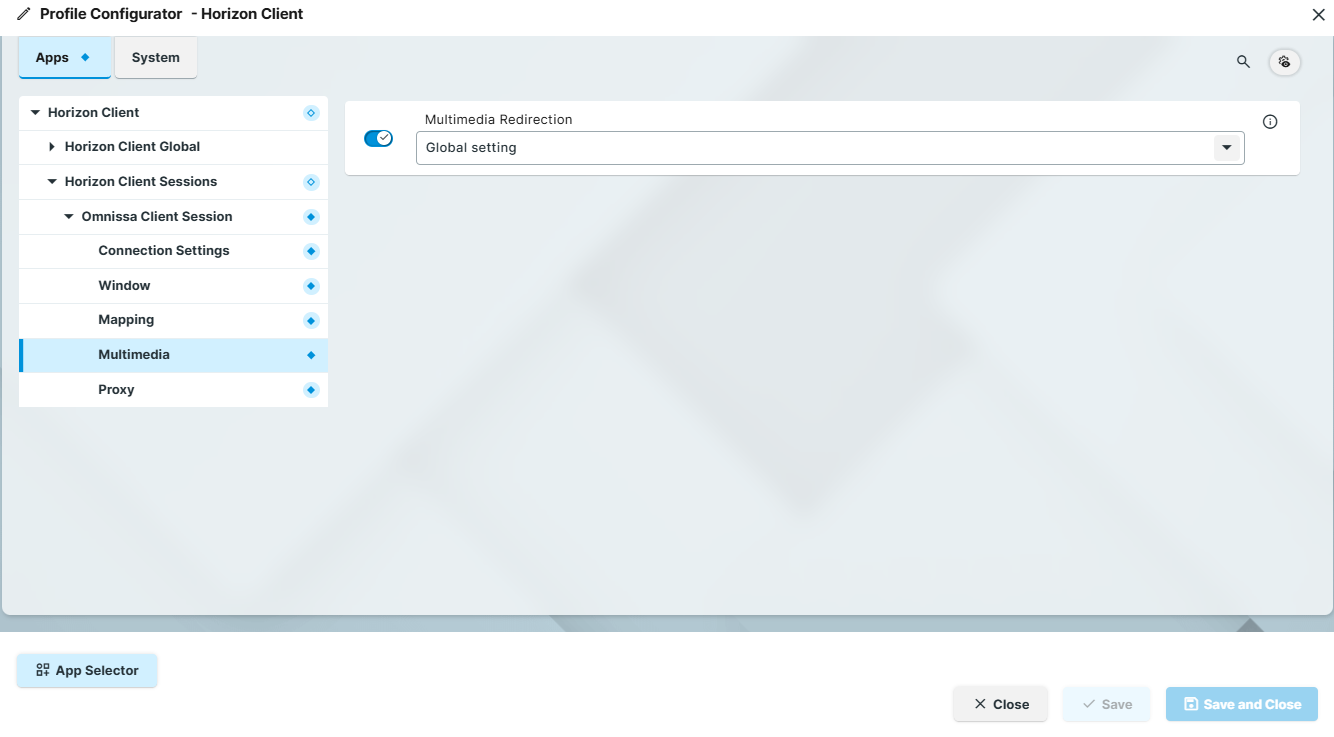
In the Profile Configurator, go to Apps > Horizon Client > Horizon Client Sessions > [session name] > Multimedia.
-
Edit the settings according to your needs. The parameters are described in the following.
Multimedia Redirection
If the global setting Apps > Horizon Client > Horizon Client Global > Multimedia > Omnissa Multimedia Redirection is disabled, multimedia redirection cannot be enabled on a session-specific basis.
Possible options:
-
Global setting: The setting Apps > Horizon Client > Horizon Client Global > Multimedia > Omnissa Multimedia Redirection will be used.
-
off
Configuring Proxy Settings (Session Specific)
You can configure the use of a proxy for the connection between the client and server.
-
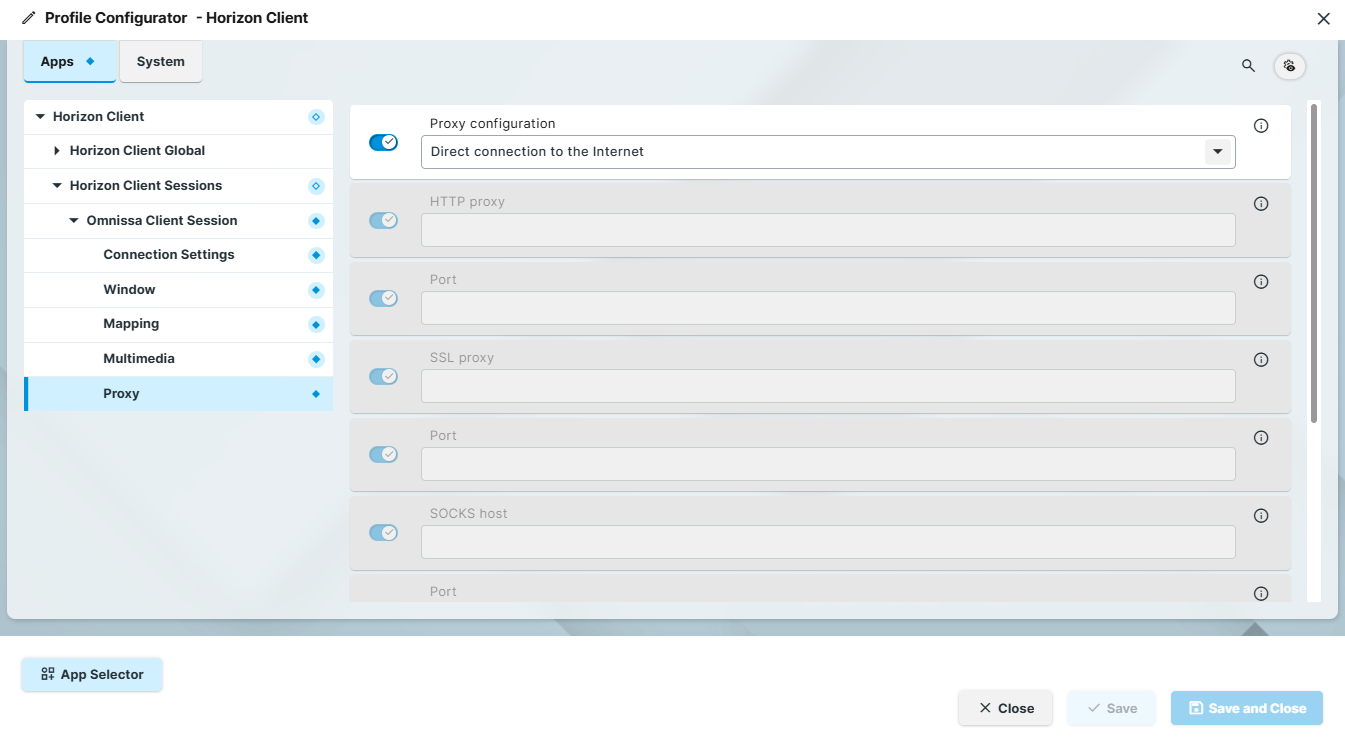
In the Profile Configurator, go to Apps > Horizon Client > Horizon Client Sessions > [session name] > Proxy.
-
Edit the settings according to your needs. The parameters are described in the following.
Proxy configuration
Possible options:
-
Direct connection to the Internet: No proxy will be used. (Default)
-
Manual proxy configuration: The proxy is configured with the following settings.
-
System-wide proxy configuration: The proxy configured under Network > Proxy is configured. See Proxy Configuration in IGEL OS 12.
HTTP proxy
URL of the proxy for HTTP
Port
Port of the proxy for HTTP
SSL proxy
URL of the proxy for SSL
Port
Port of the proxy for SSL
SOCKS host
URL of the proxy for SOCKS
Port
Port of the proxy for SOCKS
SOCKS protocol version
Version of the SOCKS protocol used
Possible options:
-
SOCKS v4
-
SOCKS v5 (Default)
No proxy for
List of URLs for which no proxy is to be used (separated by commas)